How To Stop Ac Vent Condensation

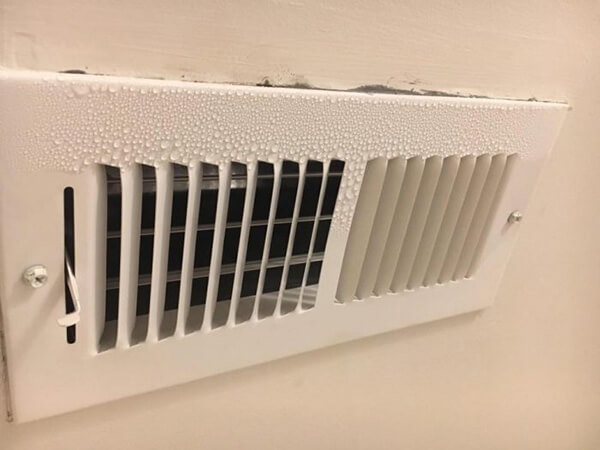
Finding water droplets forming on your air conditioning vents can be a frustrating problem. It's not just an unsightly nuisance; persistent condensation can lead to mold growth, damage to your ceilings and walls, and even health issues. This guide will walk you through the steps to diagnose and address the issue, empowering you to tackle some fixes yourself while helping you identify when it’s time to call in a professional.
Understanding AC Vent Condensation
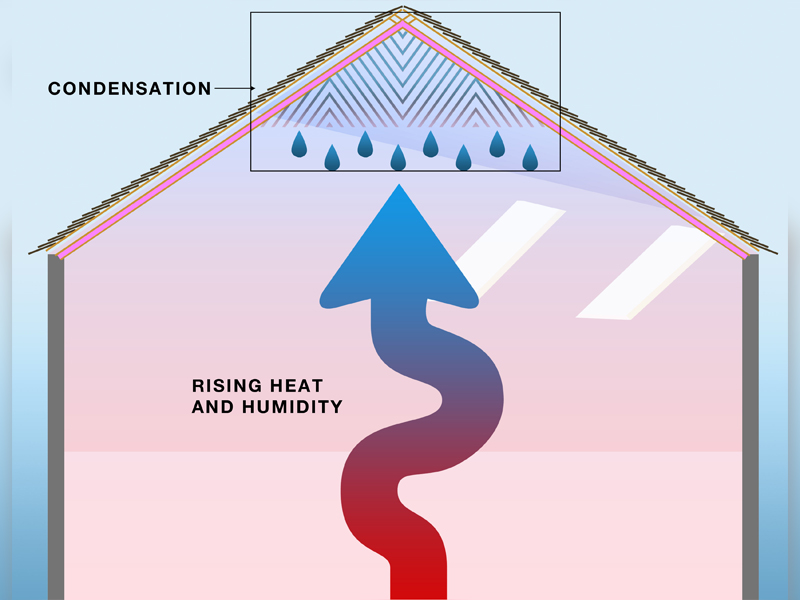
The condensation you see on your AC vents is similar to what happens on a cold glass of iced tea on a warm day. When warm, humid air comes into contact with a cold surface (in this case, your vent), the moisture in the air condenses into liquid water. The key factors at play are:
- Temperature Difference: The greater the temperature difference between the vent and the surrounding air, the more likely condensation is to occur.
- Humidity Levels: High humidity provides more moisture for condensation.
- Airflow: Poor airflow can exacerbate the problem by trapping humid air around the vent.
Before you start, remember to always turn off your AC unit at the breaker before performing any maintenance or inspection to avoid electrical hazards. Your safety is paramount!
Step 1: Initial Inspection and Diagnosis
Begin with a thorough visual inspection. Note the following:
- Where is the condensation occurring? Is it on all vents, or only specific ones? Is it just a few drops, or a steady stream?
- When does it happen? Does it occur only when the AC is running at full blast, or all the time?
- What is the general condition of the vents? Are they clean, or covered in dust? Are they properly attached to the ceiling/wall?
- Check for obvious air leaks around the vent. Feel around the edges for drafts.
This initial assessment will help you narrow down the potential causes. If the condensation is localized to only a few vents, the problem might be specific to those locations. Widespread condensation, on the other hand, could indicate a more systemic issue.
Tools You Might Need
- Screwdriver (Phillips and flathead)
- Ladder (for reaching ceiling vents)
- Clean cloths or paper towels
- Vacuum cleaner with hose attachment
- Insulating tape (specifically for HVAC systems)
- Caulk gun and caulk (if needed)
- Humidity meter (optional, but helpful)
Step 2: Address High Humidity Levels
Excessive humidity is a primary driver of condensation. Here's how to tackle it:
- Check Your AC System’s Drainage: A clogged condensate drain line is a common culprit. The drain line removes the moisture pulled from the air by your AC. If it's blocked, humidity builds up. Locate the drain line (usually a PVC pipe near your outdoor unit or indoor air handler). Look for any signs of blockage or leaks.
- Clear the Condensate Drain Line: You can try clearing it yourself. One method is to use a wet/dry vacuum to suck out any debris from the drain opening. Another is to pour a cup of white vinegar down the drain line every month to prevent algae and mold growth. *Never use harsh chemicals like bleach, as they can damage your system.*
- Use Dehumidifiers: In particularly humid climates, or during especially humid periods, a dehumidifier can significantly reduce indoor humidity levels. Place dehumidifiers in areas prone to dampness, like basements and bathrooms.
- Improve Ventilation: Ensure adequate ventilation in your home, especially in bathrooms and kitchens. Use exhaust fans when showering or cooking to remove excess moisture from the air.
- Check for Leaks: Repair any plumbing leaks promptly, as these contribute to indoor humidity.
Pro Tip: A humidity meter (hygrometer) can help you monitor your home's humidity levels. Aim for a humidity level between 30% and 50%.
Step 3: Improve Airflow Around the Vents
Stagnant, humid air around the vents increases the likelihood of condensation. Here’s how to boost airflow:
- Clean Your Vents: Dust and debris on the vents restrict airflow and can trap moisture. Use a vacuum cleaner with a hose attachment to thoroughly clean the vents, both inside and out. A damp cloth can be used to wipe away any remaining grime.
- Ensure Proper Vent Placement: Make sure that furniture or other objects aren't blocking the airflow from the vents.
- Check Your Air Filters: A dirty air filter restricts airflow throughout your entire AC system, potentially leading to increased humidity and condensation. Replace your air filter regularly (usually every 1-3 months, depending on the type and usage).
- Run Ceiling Fans: Ceiling fans help circulate air and prevent pockets of stagnant, humid air from forming.
Important: When cleaning, pay close attention to the vent fins, as they can easily accumulate dust and restrict airflow.
Step 4: Insulate the Vents (If Applicable)
In some cases, particularly in unconditioned spaces like attics or crawl spaces, the ductwork leading to the vents may not be properly insulated. This can cause the ducts themselves to become cold, leading to condensation both on the ducts and around the vents.
- Inspect Ductwork: If you have access to your ductwork, check for any sections that are uninsulated or poorly insulated.
- Insulate Exposed Ductwork: Use insulating tape specifically designed for HVAC systems to wrap any exposed or poorly insulated ductwork. Ensure a tight seal to prevent air leaks. You can also use foil-backed fiberglass insulation for better thermal performance.
- Seal Air Leaks: Seal any visible air leaks in the ductwork with foil tape. Even small leaks can contribute to energy loss and condensation problems.
Safety First: When working in attics or crawl spaces, wear appropriate protective gear, including a dust mask and gloves.
Step 5: Seal Air Leaks Around the Vents
Air leaks around the vent itself can allow warm, humid air to enter the space between the vent and the ceiling/wall, leading to condensation. Carefully inspect the perimeter of the vent for any gaps or cracks.
- Caulk Gaps: Use caulk to seal any gaps between the vent and the ceiling/wall. Ensure that the caulk is paintable if you plan to paint over it.
- Use Foam Backer Rod (If Necessary): For larger gaps, use foam backer rod to fill the space before applying caulk. This will help to create a better seal and prevent the caulk from cracking.
- Ensure Proper Vent Installation: If the vent is loose or not properly attached, re-secure it to the ceiling/wall. You may need to use longer screws or add shims to ensure a tight fit.
Note: Choose a caulk that is specifically designed for use in bathrooms and kitchens, as these are often mildew-resistant.
When to Call a Professional
While many condensation issues can be resolved with DIY solutions, there are times when it's best to call a qualified HVAC technician. Here are some indicators that professional help is needed:
- Persistent Condensation Despite Your Efforts: If you've tried all the DIY solutions and the condensation problem persists, there may be a more complex underlying issue.
- Suspected Refrigerant Leak: A refrigerant leak can cause your AC system to overcool, leading to excessive condensation. Signs of a refrigerant leak include hissing noises, reduced cooling performance, and ice buildup on the evaporator coil. *Refrigerant handling requires specialized equipment and training.*
- Mold Growth: If you notice mold growing around the vents or on the ceiling/walls, it's important to address the mold problem and the underlying cause of the condensation. *Mold remediation can be a complex and potentially hazardous process.*
- Ductwork Damage: If your ductwork is damaged, leaking, or improperly installed, it may need to be repaired or replaced. *Ductwork repairs often require specialized knowledge and tools.*
- HVAC System Issues: Problems with your AC system's compressor, evaporator coil, or other components can lead to condensation issues.
- You're Uncomfortable Working With Electricity or Heights: Safety should always be your top priority. If you're uncomfortable working with electrical components or climbing ladders, it's best to leave the work to a professional.
Warning: Do not attempt to repair or modify your AC system's refrigerant lines or electrical components unless you are a qualified HVAC technician. Improper handling of refrigerant can be harmful to the environment and illegal. Electrical work can be dangerous and should only be performed by a licensed electrician.
Preventive Measures
Once you've addressed the condensation problem, take steps to prevent it from recurring:
- Regular AC Maintenance: Schedule regular maintenance for your AC system to ensure that it's running efficiently and to catch potential problems early.
- Monitor Humidity Levels: Keep an eye on your home's humidity levels and take steps to reduce them if they become too high.
- Change Air Filters Regularly: Replace your air filters every 1-3 months to maintain proper airflow.
- Clean Vents Regularly: Dust and clean your vents regularly to prevent the buildup of debris.
- Inspect Ductwork Periodically: Check your ductwork periodically for leaks or damage.
By following these steps, you can effectively troubleshoot and address AC vent condensation, keeping your home comfortable, healthy, and free from water damage. Remember, when in doubt, don't hesitate to call a professional!