How To Tell If A Thermocouple Is Bad
Is Your Thermocouple Failing? A Guide to Troubleshooting and Saving Energy
A faulty thermocouple can silently sabotage your heating system's efficiency, leading to wasted energy and higher utility bills. Whether you're a homeowner looking to optimize your energy consumption, a business aiming for greener operations, or an HVAC professional seeking diagnostic tips, understanding how to identify a bad thermocouple is crucial. This comprehensive guide provides a step-by-step approach to thermocouple troubleshooting, focusing on cost-effectiveness, energy savings, and integration with modern smart home technologies.
What is a Thermocouple and Why Does it Matter for Energy Efficiency?
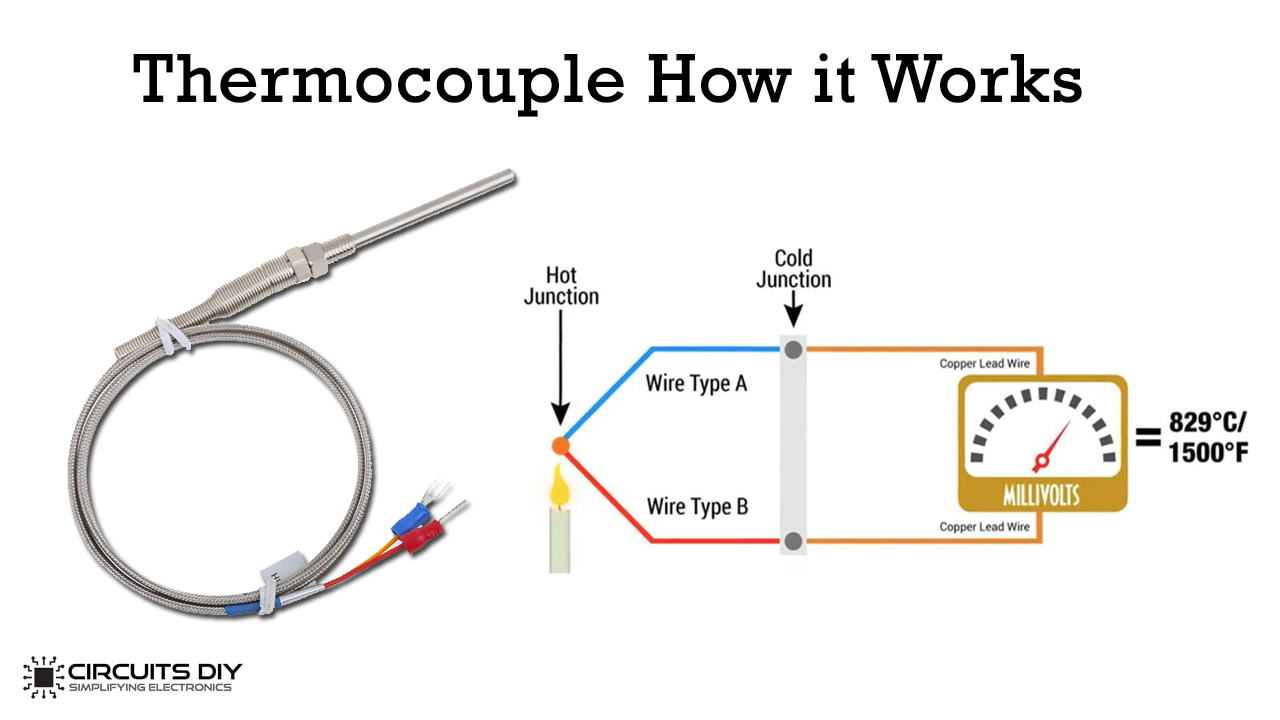
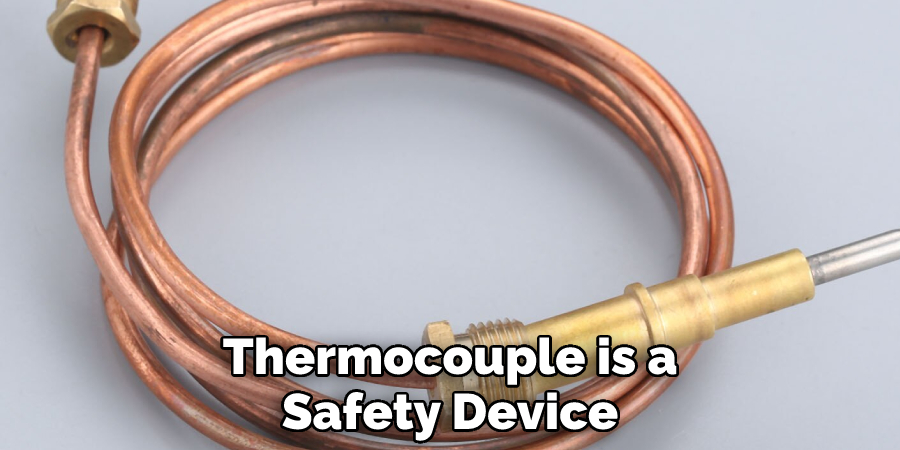
The thermocouple is a small but mighty component in gas-powered appliances like furnaces, water heaters, and fireplaces. It's a safety device that detects the presence of a pilot light or burner flame. When the flame is present, the thermocouple generates a tiny electrical current, which keeps the gas valve open, allowing the appliance to function. If the flame goes out, the thermocouple cools down, the current stops, and the gas valve shuts off, preventing a dangerous gas leak.
A malfunctioning thermocouple can lead to:
- Pilot light constantly going out: This results in repeated relighting, wasting gas and your time.
- Inconsistent heating: An unreliable thermocouple can cause the appliance to shut off prematurely, leading to uneven temperatures and discomfort.
- Increased energy bills: Repeated cycling of the appliance due to a failing thermocouple translates to higher energy consumption.
- Potential safety hazards: Although designed as a safety device, a severely degraded thermocouple might not respond reliably, increasing the risk of a gas leak if not properly addressed.
Addressing thermocouple issues promptly ensures the safe and efficient operation of your gas appliances, contributing to significant energy savings and a reduced carbon footprint. Many new high-efficiency furnaces, as highlighted by Energy Star, incorporate more robust flame sensors, further minimizing the risk of thermocouple-related problems. Investing in such systems can yield a substantial ROI over their lifespan.
Symptoms of a Failing Thermocouple
Identifying a bad thermocouple early can save you from costly repairs and prevent energy waste. Here are the key symptoms to watch out for:
- The pilot light won't stay lit: This is the most common sign. You light the pilot, but it extinguishes as soon as you release the gas control knob.
- The appliance shuts off unexpectedly: The furnace or water heater might run for a short period and then suddenly turn off, even though the thermostat is calling for heat.
- Yellow or orange flame: While not always a thermocouple issue, an abnormal flame color can indicate incomplete combustion, potentially putting stress on the thermocouple and other components. A healthy flame should be mostly blue.
- Visible damage: Inspect the thermocouple for any signs of corrosion, cracks, or kinks. Physical damage can impair its ability to generate electricity.
Testing a Thermocouple: Step-by-Step Guide
Before calling an HVAC technician, you can perform some basic tests to determine if the thermocouple is the culprit. Always ensure the gas supply is shut off before working on any gas appliance. If you're not comfortable working with gas, contact a qualified professional.
Tools You'll Need:
- Multimeter with millivolt (mV) setting
- Wrench or pliers (for disconnecting the thermocouple)
- Sandpaper or wire brush (for cleaning the thermocouple)
Testing Procedures:
- Visual Inspection: Begin by visually inspecting the thermocouple for any signs of damage, such as corrosion, cracks, or kinks. Clean the thermocouple with sandpaper or a wire brush to remove any deposits that might be interfering with its performance.
- Millivolt Output Test (In-Place):
- Locate the thermocouple and the gas valve.
- Set your multimeter to the millivolt (mV) setting.
- Attach the multimeter leads to the terminals of the thermocouple where it connects to the gas valve.
- Light the pilot light following the appliance's instructions.
- Observe the multimeter reading. A healthy thermocouple should generate between 25-30 mV initially, and maintain at least 10-15 mV to hold the valve open. A reading significantly lower than this indicates a weak thermocouple.
- Open Circuit Test (Out-of-Place):
- Carefully disconnect the thermocouple from the gas valve.
- Use a lighter to heat the tip of the thermocouple.
- Simultaneously, measure the mV output with the multimeter. Again, look for a reading in the range of 25-30 mV. If the thermocouple fails to produce this voltage, it's likely defective.
- Flame Rectification Test (For Newer Furnaces): Some newer, high-efficiency furnaces use flame rectification instead of a traditional thermocouple. This involves a flame sensor and a control board. A multimeter set to microamps (µA) is used to measure the current flow through the flame. Consult the furnace's service manual for specific testing procedures and acceptable current ranges.
Important Note: Low millivolt readings don't always indicate a bad thermocouple. A dirty pilot orifice, a weak pilot flame, or a corroded connection can also cause low readings. Before replacing the thermocouple, ensure these other components are in good condition.
Replacing a Thermocouple: A DIY Project or Call a Professional?
Replacing a thermocouple is a relatively straightforward task for experienced DIYers. However, working with gas appliances always carries inherent risks. If you're not completely comfortable with the process, it's best to call a qualified HVAC technician.
DIY Replacement Steps:
- Turn off the gas supply to the appliance.
- Locate the thermocouple and disconnect it from the gas valve.
- Remove the old thermocouple from its mounting bracket.
- Install the new thermocouple, ensuring it's properly seated in the bracket.
- Reconnect the thermocouple to the gas valve, tightening the connections securely.
- Turn the gas supply back on and test the appliance to ensure it's functioning correctly.
When replacing a thermocouple, use only a replacement part that is specifically designed for your appliance. Using the wrong thermocouple can be dangerous.
Consider upgrading to a newer, more efficient furnace. New Energy Star certified furnaces often use more durable flame sensors and offer significant energy savings compared to older models. Some utility companies offer rebates for upgrading to high-efficiency equipment, further reducing the overall cost.
Smart Home Integration and Enhanced Energy Efficiency
Modern smart thermostats and HVAC systems offer advanced features that can help you monitor and optimize your energy consumption. Many smart thermostats can provide detailed reports on your heating and cooling usage, allowing you to identify potential problems early. Some systems even integrate with sensors that can detect pilot light outages or other issues, alerting you to potential problems before they escalate.
Integrating a smart thermostat with your HVAC system can lead to significant energy savings. According to the U.S. Department of Energy, programmable thermostats can save homeowners up to 10% on their heating and cooling bills. Smart thermostats take this a step further by learning your habits and automatically adjusting the temperature to optimize energy efficiency.
Furthermore, connecting your smart thermostat to other smart home devices, such as occupancy sensors and window/door sensors, can further enhance energy savings. For example, if the system detects that no one is home, it can automatically lower the temperature to conserve energy. If a window is left open, the system can temporarily disable the heating or cooling to prevent energy waste.
Cost Savings and ROI
While a faulty thermocouple might seem like a minor issue, addressing it promptly can lead to significant cost savings. A consistently malfunctioning thermocouple can waste a considerable amount of gas over time, driving up your energy bills. Replacing the thermocouple, which typically costs between $20 and $50 (plus labor if you hire a professional), can quickly pay for itself in reduced energy consumption.
Upgrading to a more energy-efficient furnace or water heater can provide even greater savings. New Energy Star certified appliances can reduce energy consumption by 10-20% or more. While the initial investment might be higher, the long-term savings can be substantial. Factor in available rebates and tax credits, and the ROI becomes even more attractive.
For businesses, implementing a comprehensive energy management system, including smart thermostats, efficient HVAC equipment, and regular maintenance, can result in significant cost reductions and a reduced carbon footprint. Many utility companies offer incentives and programs to encourage businesses to adopt energy-efficient practices.
Conclusion
Understanding how to identify and address thermocouple issues is a crucial step in maintaining the efficiency and safety of your gas appliances. By following the troubleshooting steps outlined in this guide, you can potentially save money on energy bills and prevent costly repairs. Whether you choose to tackle the repair yourself or hire a professional, addressing thermocouple problems promptly will contribute to a more comfortable and energy-efficient home or business. Embrace smart home technology and explore available rebates and incentives to maximize your energy savings and create a more sustainable future.