How To Test A 3 Phase Contactor Coil

A 3-phase contactor is a vital component in many HVAC systems, controlling the flow of electrical power to motors like those in your air conditioner, heat pump, or ventilation system. Understanding how to test a contactor coil is essential for maintaining efficient operation and preventing costly breakdowns. This knowledge empowers you to troubleshoot common issues, potentially saving you money on expensive service calls and ensuring your system operates at peak energy efficiency. Regular testing is particularly relevant for homeowners focused on energy savings, businesses upgrading to eco-friendly HVAC, and smart home enthusiasts integrating their systems.
Understanding 3-Phase Contactors
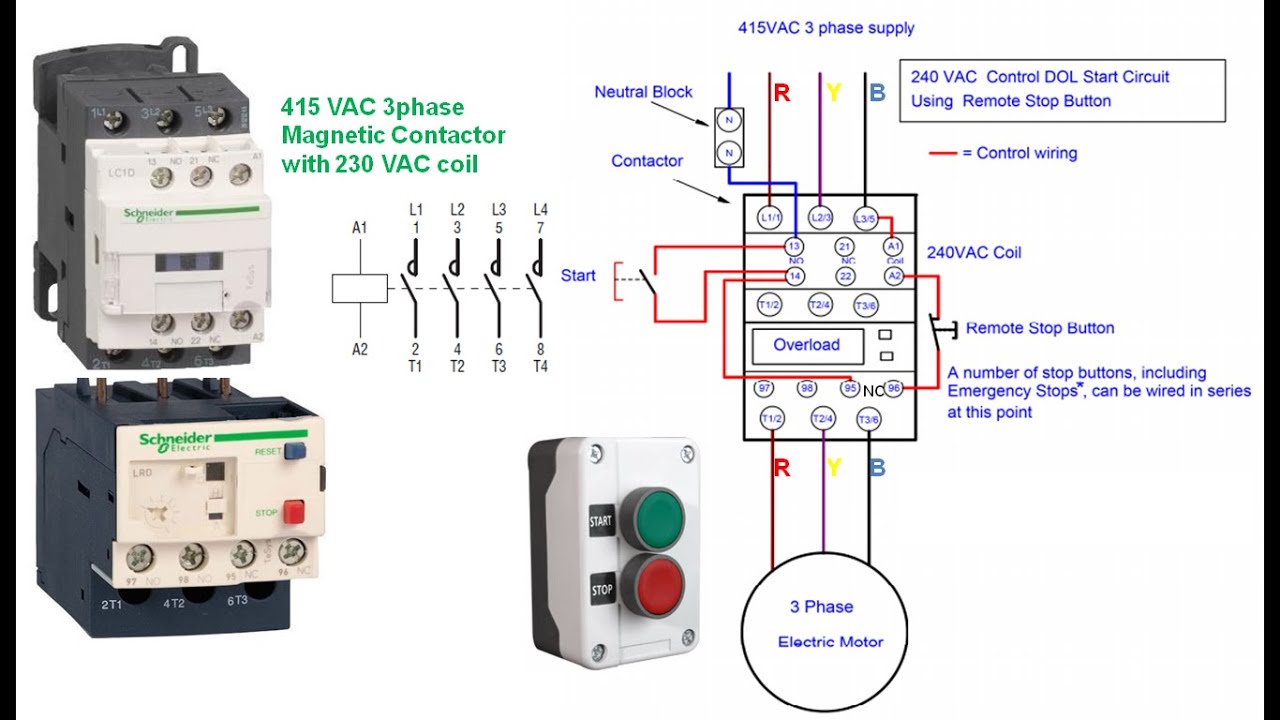
Before diving into the testing process, let's establish what a 3-phase contactor is and its function within your HVAC system. Think of it as an electrically controlled switch. When the coil is energized, the switch closes, allowing power to flow to the connected motor. When the coil is de-energized, the switch opens, stopping the power flow. This makes contactors indispensable for remotely controlling high-voltage motors. Many older, inefficient systems feature failing contactors, impacting overall energy efficiency. Upgrading to a newer, more robust contactor and ensuring its proper function is often a worthwhile investment, with potential rebates available in some regions. Consult the Energy Star website for details on qualifying upgrades and incentives.
For businesses, a failing contactor can lead to downtime and lost productivity, making regular inspections and testing crucial. Integrating a smart thermostat with energy monitoring capabilities can further enhance preventative maintenance, alerting you to potential issues before they escalate into major problems.
Safety First
Working with electrical components can be dangerous. Always disconnect the power supply to the HVAC system at the main breaker before performing any tests. Double-check with a voltage tester to ensure the system is de-energized. If you are not comfortable working with electricity, consult a qualified HVAC technician. Your safety is paramount.
Tools and Equipment Needed
To test a 3-phase contactor coil, you'll need the following:
- Multimeter: A digital multimeter (DMM) is essential for measuring voltage and resistance. Ensure it's set to the appropriate range before taking any measurements.
- Screwdrivers: You'll need screwdrivers to access the contactor and disconnect wires.
- Voltage Tester: Use this to verify the system is de-energized before starting any work.
- Safety Glasses: Protect your eyes from any potential hazards.
- Gloves: Electrical-rated gloves offer an extra layer of protection.
Testing the Contactor Coil
There are two primary methods for testing a contactor coil: a visual inspection and an electrical test using a multimeter.
1. Visual Inspection
Begin with a thorough visual inspection. Look for the following:
- Burn Marks: Check the contactor for any signs of burning or discoloration, which indicate overheating and potential damage.
- Cracks or Breaks: Inspect the contactor housing for any cracks or breaks.
- Loose Connections: Ensure all wiring connections are secure. Loose connections can cause arcing and lead to premature failure.
- Corrosion: Look for signs of corrosion on the terminals and wiring. Corrosion can increase resistance and reduce the effectiveness of the contactor.
- Debris: Clean any dust, dirt, or debris from the contactor.
If you observe any of these issues, the contactor may need to be replaced. Ignoring these warning signs can lead to reduced energy efficiency, increased operational costs, and potential system failure. According to a study by the U.S. Department of Energy, regularly maintaining HVAC components can reduce energy consumption by up to 15%.
2. Electrical Test with a Multimeter
The electrical test involves measuring the coil's resistance to determine if it's within the manufacturer's specified range. This test is crucial for identifying a shorted or open coil.
- Disconnect Power: Ensure the power to the HVAC system is completely disconnected at the main breaker and verified with a voltage tester.
- Isolate the Contactor: Disconnect the wires connected to the contactor coil terminals. This is crucial to prevent false readings from other components in the circuit.
- Set the Multimeter: Set your multimeter to the ohms (Ω) setting. This setting measures resistance. If your multimeter has different ranges for resistance, start with the highest range and gradually decrease it until you get a stable reading.
- Measure Resistance: Place the multimeter probes on the two terminals of the contactor coil. Note the resistance reading.
- Compare to Specification: The resistance reading should fall within the manufacturer's specified range for the contactor coil. This information is typically found on the contactor itself or in the manufacturer's documentation. If the resistance is significantly higher than the specified range, the coil is likely open. If the resistance is significantly lower than the specified range (close to zero), the coil is likely shorted.
Interpreting the Results:
- Open Coil (Very High Resistance): If the multimeter reads "OL" (overload) or an extremely high resistance value, the coil is likely open. This means the wire inside the coil is broken, preventing current from flowing. An open coil will prevent the contactor from closing, and the motor will not start.
- Shorted Coil (Very Low Resistance): If the multimeter reads a very low resistance value (close to zero), the coil is likely shorted. This means the insulation around the coil wire has deteriorated, causing the wires to touch each other. A shorted coil can cause excessive current flow, potentially damaging the contactor and other components.
- Within Range (Normal Resistance): If the resistance reading falls within the manufacturer's specified range, the coil is likely good. However, this doesn't guarantee that the contactor is functioning perfectly. There may be other mechanical issues that are not detectable with a simple resistance test.
Troubleshooting and Solutions
Based on the test results, here are some common issues and solutions:
- Contactor Not Pulling In: If the contactor is not pulling in (closing) when power is applied to the coil, it could be due to an open coil, low voltage to the coil, or a mechanical issue preventing the contactor from moving freely. Check the voltage to the coil with a multimeter. If the voltage is correct, the coil may be faulty and need to be replaced. If the voltage is low, troubleshoot the control circuit to identify the cause of the voltage drop.
- Contactor Buzzing: A buzzing contactor indicates that the coil is vibrating. This can be caused by low voltage, loose mounting, or a worn-out contactor. Check the voltage and tighten the mounting screws. If the buzzing persists, replace the contactor. A buzzing contactor is an inefficient component.
- Contactor Overheating: An overheating contactor can be caused by a shorted coil, excessive current flow, or poor ventilation. Check the coil resistance and the current draw of the motor. Ensure the contactor has adequate ventilation. If the overheating continues, replace the contactor.
Smart HVAC Integration
Integrating smart thermostats and sensors can provide valuable data and insights into your HVAC system's performance, helping you identify potential issues early on. Smart thermostats can monitor the runtime of your HVAC system and alert you to unusual patterns, such as excessive cycling or prolonged run times, which could indicate a failing contactor or other problems. Some smart home energy management systems even offer integration with local utility companies, potentially qualifying you for rebates on energy-efficient upgrades.
Replacing the Contactor
If the contactor is found to be faulty, replacing it is usually the best course of action. Choose a replacement contactor that is rated for the same voltage and current as the original. When replacing the contactor, follow these steps:
- Disconnect Power: Ensure the power to the HVAC system is completely disconnected at the main breaker.
- Label Wires: Carefully label each wire connected to the old contactor before disconnecting them. This will make it easier to reconnect the wires to the new contactor correctly. Use a permanent marker and labeling tape.
- Disconnect Wires: Disconnect the wires from the old contactor.
- Remove Old Contactor: Remove the old contactor from its mounting location.
- Install New Contactor: Install the new contactor in the same mounting location.
- Reconnect Wires: Reconnect the wires to the new contactor, making sure to match the labels to the correct terminals.
- Verify Connections: Double-check all wiring connections to ensure they are secure.
- Restore Power: Restore power to the HVAC system at the main breaker.
- Test Operation: Test the operation of the HVAC system to ensure the new contactor is functioning correctly.
Long-Term Energy Savings
By regularly testing and maintaining your HVAC system's contactor, you can ensure efficient operation, reduce energy consumption, and prevent costly breakdowns. This proactive approach not only saves you money on energy bills but also extends the lifespan of your HVAC equipment. Combining preventative maintenance with smart home integration empowers you to take control of your energy usage and create a more comfortable and sustainable living environment. Explore available rebates and incentives for energy-efficient upgrades to maximize your return on investment.
Remember to consult a qualified HVAC technician if you are uncomfortable performing any of these tests or repairs. A professional can provide expert diagnosis and ensure your HVAC system is operating safely and efficiently. Focusing on energy efficiency is good for the environment, and your wallet.