How To Test A 45 5 Capacitor

Understanding HVAC Capacitors: A Homeowner's Guide to Testing a 45/5 Capacitor
When your air conditioner sputters, hums without starting, or simply refuses to turn on, a faulty capacitor is often the culprit. The capacitor is a critical component in your HVAC system, responsible for providing the electrical jolt needed to start the motors for both the fan and the compressor. Understanding how to test a capacitor, specifically a 45/5 capacitor (a common type in residential units), can save you money on unnecessary service calls and potentially extend the life of your HVAC system. This guide walks you through the process, safety precautions, and what to look for.
What is a 45/5 Capacitor?
A 45/5 capacitor is a dual-run capacitor, meaning it contains two separate capacitors within a single housing. The "45" represents the capacitance in microfarads (µF) for the compressor motor, and the "5" represents the capacitance in µF for the fan motor. These values are crucial; using a capacitor with incorrect values can damage your HVAC system.
Safety First: Important Precautions
Working with electricity can be dangerous. Before attempting to test a capacitor, take these precautions:
- Turn off the power: Locate the breaker for your outdoor unit and switch it off. Double-check that the power is off by using a non-contact voltage tester.
- Discharge the capacitor: Even with the power off, capacitors can store a dangerous electrical charge. Use a resistor (approximately 20,000 ohms, 2 watts) with insulated leads to carefully discharge the capacitor by connecting the leads across each terminal for several seconds. Alternatively, you can use an insulated screwdriver, being extremely cautious to avoid touching any metal parts. Expect a spark when discharging.
- Wear safety glasses and gloves: Protect your eyes and hands from potential hazards.
Never touch the terminals of a capacitor with your bare hands. Even after discharging, residual voltage can remain.
Tools You'll Need
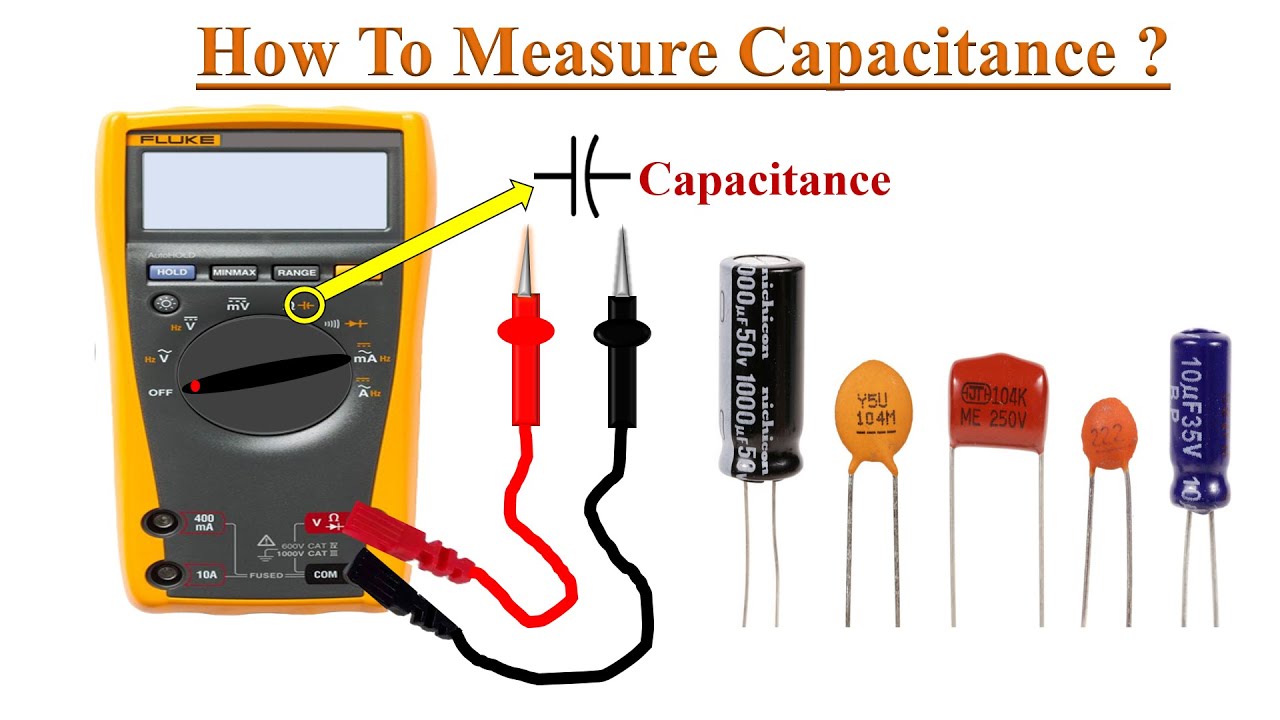
* Multimeter with Capacitance Setting: A multimeter capable of measuring capacitance is essential. Ensure it's functioning correctly and calibrated if possible. * Resistor (20,000 ohms, 2 watts): For discharging the capacitor. * Insulated Screwdriver: As an alternative discharging tool (use with extreme caution). * Safety Glasses: Protect your eyes. * Gloves: Insulated gloves are recommended. * Non-Contact Voltage Tester: To verify power is off. * Camera or Phone: To take pictures of wiring before disconnection.Step-by-Step Guide to Testing a 45/5 Capacitor
- Disconnect the Power: As described in the Safety First section.
- Access the Capacitor: Locate the capacitor inside the outdoor unit. It's usually housed in a control panel. Remove the access panel using a screwdriver.
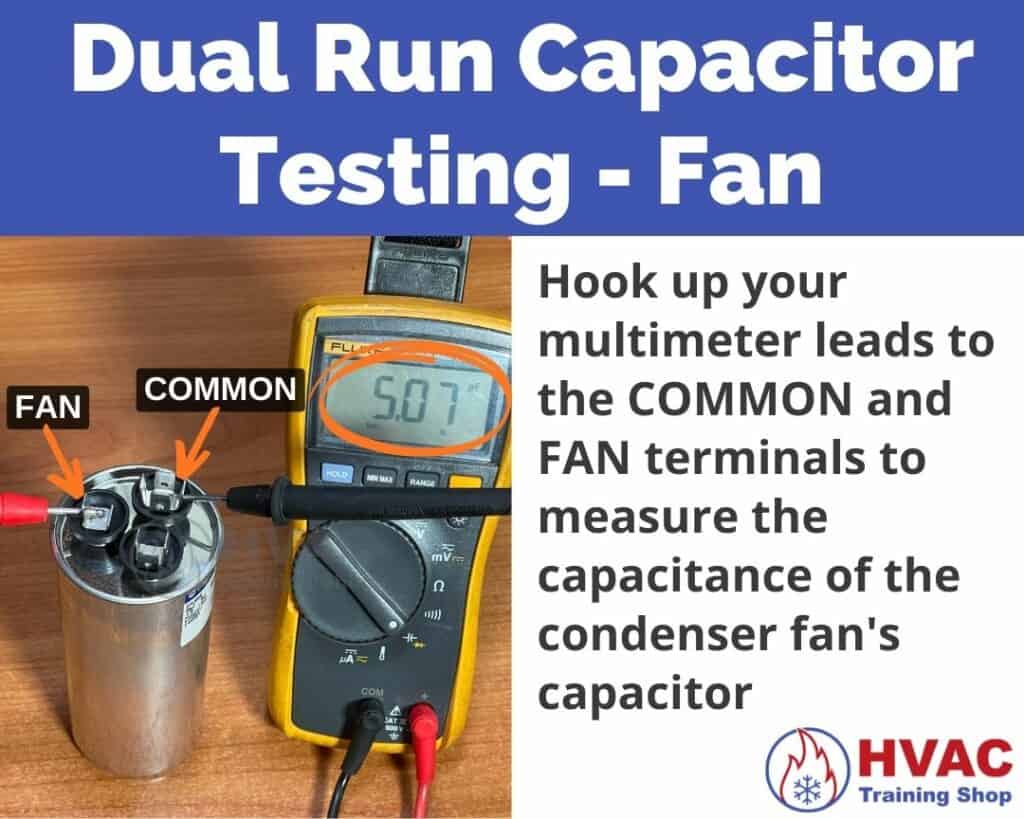
- Document Wiring: Before disconnecting any wires, take a picture or draw a diagram of the wiring configuration. This is critical for reassembly. The capacitor will have three terminals labeled:
- C (Common): Usually the center terminal.
- HERM (Hermetic): Connected to the compressor.
- FAN: Connected to the fan motor.
- Disconnect the Wires: Carefully disconnect the wires from the capacitor terminals. Use pliers with insulated handles if necessary.
- Discharge the Capacitor: Using the resistor, carefully discharge the capacitor as described in the Safety First section.
- Inspect the Capacitor: Visually inspect the capacitor for any signs of damage, such as:
- Bulging or Swelling: A bulging capacitor is a clear sign of failure.
- Leaking Fluid: Any signs of leaking oil indicate a damaged capacitor.
- Rust or Corrosion: Corrosion can affect the capacitor's performance.
- Test with a Multimeter:
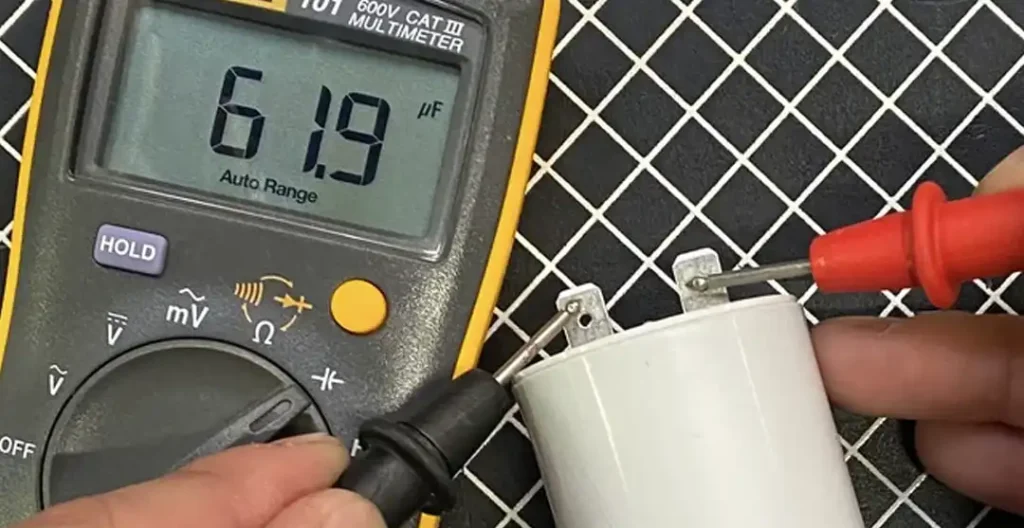
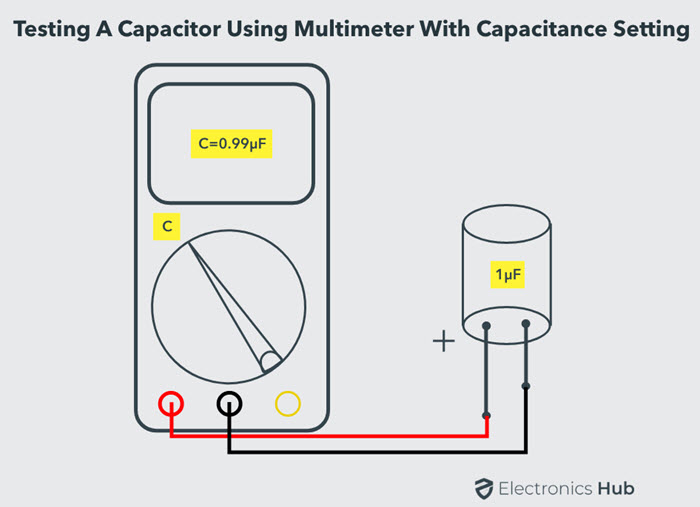
- Set your multimeter to the capacitance setting (µF).
- Connect the multimeter probes to the "C" (Common) and "HERM" (Hermetic) terminals. Record the reading. It should be close to the specified value of 45 µF (within a tolerance of +/- 5% or 10%, depending on the capacitor's specifications).
- Connect the multimeter probes to the "C" (Common) and "FAN" terminals. Record the reading. It should be close to the specified value of 5 µF (within a tolerance of +/- 5% or 10%).
- Evaluate the Readings:
- Within Tolerance: If both readings are within the specified tolerance range, the capacitor is likely functioning correctly.
- Outside Tolerance: If either reading is significantly outside the tolerance range (e.g., more than 10% lower or higher than the specified value), the capacitor is faulty and needs replacement. A reading of zero indicates a completely failed capacitor.
- Reassemble: If the capacitor tests good, carefully reconnect the wires to the correct terminals, referring to your diagram or photo. Replace the access panel.
- Restore Power: Turn the breaker back on.
- Test the System: Turn on your air conditioner and observe its performance. If the capacitor was the problem, the system should now start and run smoothly.
Interpreting the Results
As mentioned, a reading significantly outside the specified tolerance range indicates a failing capacitor. However, even if the readings are within tolerance, a capacitor can still be weak and nearing the end of its life. This can manifest as slow starting, increased energy consumption, or intermittent problems. In such cases, replacing the capacitor proactively can prevent future breakdowns.
Replacing a 45/5 Capacitor
If the capacitor is faulty, you'll need to replace it with an identical one. Ensure the new capacitor has the same capacitance values (45/5 µF) and voltage rating as the original. Local HVAC supply stores or online retailers are good sources for replacement capacitors.
Installation should be performed by a qualified HVAC technician if you are not comfortable working with electricity. Incorrect installation can damage your HVAC system or create a safety hazard.
Common HVAC Capacitor Problems
- Hard Starting: The compressor struggles to start, often accompanied by a humming sound.
- Fan Motor Problems: The fan doesn't spin or spins slowly.
- HVAC System Shutting Down: The system may run for a short period and then shut down.
- Increased Energy Bills: A failing capacitor can cause the system to work harder, increasing energy consumption.
Preventative Maintenance
Regular HVAC maintenance can help prevent capacitor failures. This includes:
- Cleaning the Outdoor Unit: Keep the condenser coils clean to ensure proper airflow.
- Regular Inspections: Have a qualified HVAC technician inspect your system annually, including the capacitor.
- Monitoring Performance: Pay attention to any changes in your system's performance, such as slow starting or unusual noises.
Brands and Models: Choosing a Reliable HVAC System
While this guide focuses on capacitor testing, selecting a reliable HVAC system can minimize potential problems down the road. Consider brands known for their quality and durability, such as Trane, Carrier, American Standard, and Lennox. When comparing models, pay attention to the AFUE (Annual Fuel Utilization Efficiency) rating for furnaces and the SEER (Seasonal Energy Efficiency Ratio) and HSPF (Heating Seasonal Performance Factor) ratings for air conditioners and heat pumps. Higher ratings indicate greater energy efficiency.
Warranty information is also crucial. Look for systems with comprehensive warranties that cover parts and labor. A longer warranty period typically indicates greater confidence in the product's reliability.
Professional Help
While this guide provides information on testing a 45/5 capacitor, it's important to recognize your limitations. If you're uncomfortable working with electricity or are unsure about any step in the process, it's best to consult a qualified HVAC technician. A professional can accurately diagnose the problem and perform the necessary repairs safely and efficiently.
Regular maintenance, prompt repairs, and a well-chosen HVAC system can contribute to a comfortable and energy-efficient home. Understanding the role of the capacitor and knowing how to test it is a valuable skill for any homeowner.