How To Test A Ac Pressure Switch

How to Test an AC Pressure Switch: A Homeowner's Guide
Your air conditioner's pressure switch is a vital safety component. It monitors the refrigerant pressure within the system and shuts down the compressor if the pressure is too high or too low, preventing damage. Knowing how to test it can save you money and time, but proceed with caution, especially if you're not comfortable working with electrical components.
Safety First!
Before starting any work on your AC unit, always disconnect the power at the breaker. This is crucial to prevent electric shock. Wear safety glasses and work gloves. Be mindful of sharp edges and hot surfaces inside the unit. If you smell refrigerant, evacuate the area immediately and call a professional. Refrigerant can be harmful.
Tools You'll Need
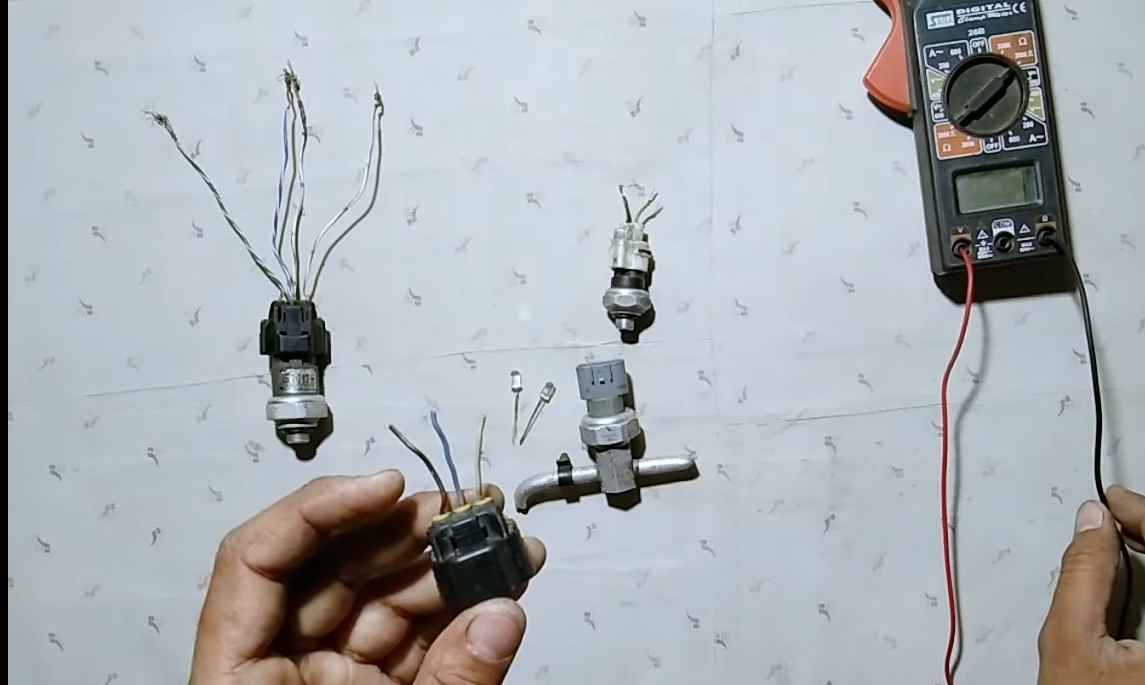
- Multimeter (digital is preferred)
- Screwdrivers (various sizes, including Phillips and flathead)
- Socket set or wrenches
- Jumper wire (with insulated alligator clips)
- Safety glasses
- Work gloves
- Manufacturer's service manual (if available)
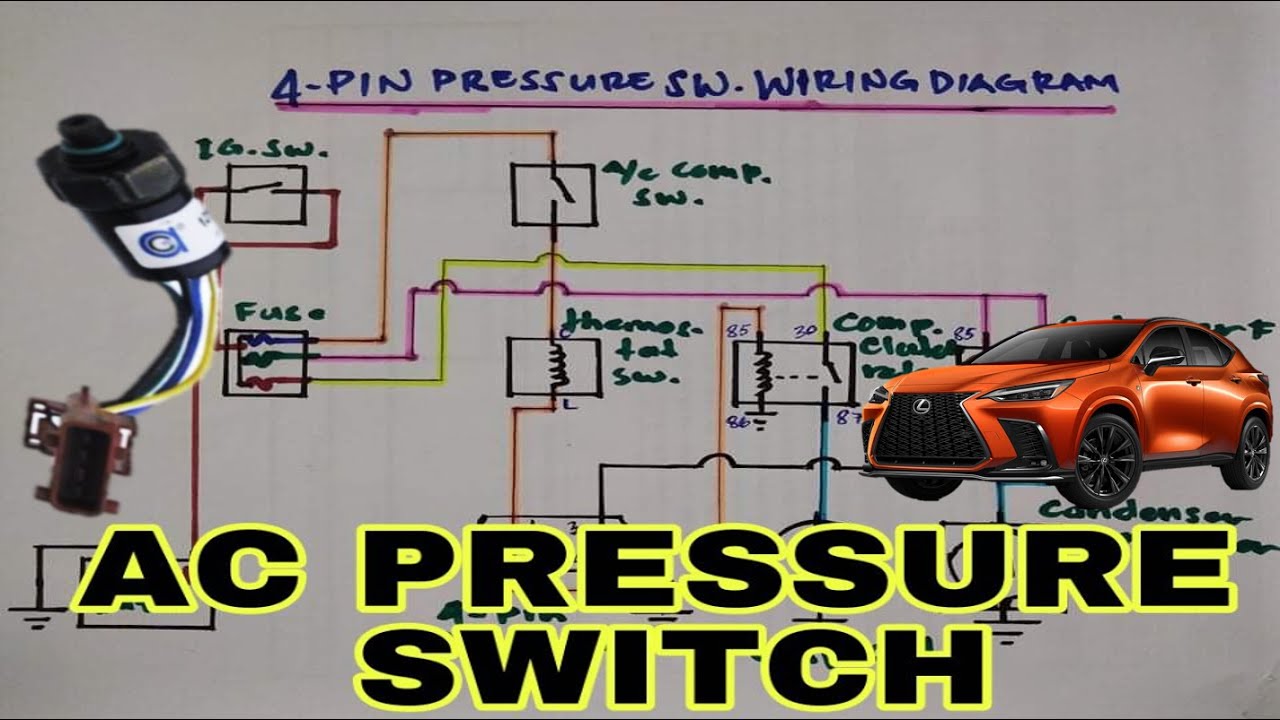
Understanding AC Pressure Switches
AC units usually have two main types of pressure switches:
- High-Pressure Switch: Shuts down the system if the refrigerant pressure is too high, which can damage the compressor.
- Low-Pressure Switch: Shuts down the system if the refrigerant pressure is too low, which can indicate a refrigerant leak or other problems.
These switches are typically wired in series with the compressor control circuit. When the pressure is within the acceptable range, the switch is closed (conducting electricity). When the pressure falls outside the range, the switch opens (breaking the circuit).
Testing the Pressure Switch: A Step-by-Step Guide
Step 1: Locate the Pressure Switch
The pressure switch is usually found on or near the refrigerant lines, often close to the compressor or liquid line drier. It's a small, cylindrical component with wires connected to it. You might need to remove an access panel to see it. Refer to your AC unit's schematic diagram if you're unsure of the location.
Step 2: Visual Inspection
Before testing with a multimeter, visually inspect the switch for any obvious signs of damage, such as:
- Corrosion on the terminals
- Cracked or broken housing
- Loose or damaged wires
If you see any of these, replace the switch immediately.
Step 3: Disconnect the Wires
Carefully disconnect the wires from the pressure switch terminals. Note their original positions so you can reconnect them correctly later. If the wires are connected with quick-disconnect terminals, simply pull them off. If they're screwed on, use a screwdriver to loosen the screws.
Step 4: Set Up Your Multimeter
Set your multimeter to the continuity setting. This setting checks for a complete electrical circuit. It often has a symbol that looks like a sound wave or a diode. You should hear a beep or see a visual indication when the multimeter probes are touched together, confirming the setting is working.
Step 5: Test for Continuity (Switch Open)
With the wires disconnected and the AC unit off, touch one multimeter probe to each of the switch terminals. The multimeter should *not* show continuity (no beep, no visual indication). This is because the switch is designed to open under abnormal pressure conditions. If you do get a continuity reading, it means the switch is stuck closed and needs replacing.
Step 6: Bypassing the Switch (For Testing Purposes Only)
Warning: This step is for troubleshooting purposes only and should be done with extreme caution.
To bypass the pressure switch, use a jumper wire with insulated alligator clips to connect the two wires that were originally connected to the switch. This completes the circuit as if the switch were closed. Only do this briefly to see if your AC unit starts. If the unit starts with the switch bypassed, it strongly suggests the switch is faulty.
Important Considerations:
- Never run the AC unit for an extended period with the pressure switch bypassed. This disables a critical safety feature and could damage the compressor.
- Monitor the system carefully while bypassed, and immediately disconnect the jumper wire if you hear any unusual noises or smell anything burning.
Step 7: Reconnecting the Wires
After testing, immediately disconnect the jumper wire (if you used one). Reconnect the wires to the pressure switch terminals exactly as they were before. Ensure the connections are secure.
Step 8: Restoring Power and Observing
Restore power to the AC unit at the breaker. Turn on the AC unit and observe its operation. If the unit still doesn't start, or if it shuts down shortly after starting, the problem may lie elsewhere in the system, such as the compressor, capacitor, or control board.
Troubleshooting Common Issues
AC Won't Start
If your AC won't start, and you suspect a faulty pressure switch, here's what to check:
- Check the breaker: Make sure the breaker for the AC unit hasn't tripped.
- Check the thermostat: Ensure the thermostat is set to "cool" and the temperature is set lower than the current room temperature.
- Test the capacitor: A faulty capacitor can prevent the compressor from starting.
- Refrigerant Leak: If the low-pressure switch is constantly tripping, it may indicate a refrigerant leak. This requires professional attention.
AC Starts and Stops Repeatedly (Short Cycling)
Short cycling can be caused by:
- Dirty air filter: A clogged air filter restricts airflow and can cause the system to overheat, triggering the high-pressure switch.
- Dirty condenser coils: Dirty condenser coils reduce the system's ability to dissipate heat, leading to high pressure.
- Refrigerant overcharge: Too much refrigerant can also cause high pressure.
Cost to Replace an AC Pressure Switch
The cost to replace an AC pressure switch can vary depending on the type of switch, the location, and the labor rates in your area. Generally, you can expect to pay between $75 and $250, including parts and labor. If the switch replacement reveals a more significant issue, like a refrigerant leak, the repair costs will be higher.
When to Call a Professional
While testing an AC pressure switch is a task some homeowners can handle, there are situations where calling a professional HVAC technician is essential:
- If you're uncomfortable working with electrical components.
- If you suspect a refrigerant leak. Refrigerant handling requires specialized equipment and training.
- If you've replaced the pressure switch, and the problem persists. This indicates a more complex issue that requires professional diagnosis.
- If you're unsure of any step in the testing process. It's better to be safe than sorry.
Signs You Need Professional Help
If you notice any of the following, contact an HVAC professional immediately:
- A strong chemical smell near the AC unit.
- Frost or ice buildup on the refrigerant lines.
- Unusual noises coming from the AC unit.
- The compressor is not running, even after replacing the pressure switch.
Final Thoughts
Testing an AC pressure switch can be a valuable troubleshooting step, potentially saving you a service call. However, remember to prioritize safety and know your limitations. When in doubt, always consult a qualified HVAC technician. Regular maintenance, such as cleaning the air filter and condenser coils, can help prevent pressure switch failures and keep your AC unit running efficiently.