How To Test A Compressor With A Multimeter

The compressor is the heart of any air conditioning or heat pump system. It circulates refrigerant, enabling the cooling or heating process. A malfunctioning compressor leads to system inefficiency or complete failure. Using a multimeter to test a compressor helps diagnose potential problems early.
Understanding the Compressor and its Role
In simple terms, the compressor increases the pressure and temperature of the refrigerant. This high-pressure, high-temperature refrigerant then travels through the system, releasing heat (in cooling mode) or absorbing heat (in heating mode). This phase change is essential for efficient operation.
Types of Compressors:
- Reciprocating Compressors: Use a piston and cylinder to compress the refrigerant. These are common in residential units.
- Rotary Compressors: Employ a rotating mechanism to compress the refrigerant. They're known for efficiency and are frequently found in newer systems.
- Scroll Compressors: Utilize two scroll-shaped components, one fixed and one orbiting, to compress the refrigerant. They offer smooth, quiet operation and high efficiency.
- Screw Compressors: Use two meshing screws to compress the refrigerant. Found in large commercial and industrial applications.
Each type has unique characteristics, but the principle of refrigerant compression remains the same.
Essential Tools and Safety Precautions
Before testing, ensure you have the right tools:
- Multimeter: A digital multimeter capable of measuring resistance (ohms) and voltage (VAC and VDC).
- Screwdrivers: For accessing the compressor terminals.
- Wire Strippers/Crimpers: If you need to disconnect or reconnect wiring.
- Safety Glasses: To protect your eyes.
- Gloves: To protect against electrical shock.
Safety First:
Always disconnect power to the HVAC system at the breaker box before working on any electrical components. Verify the power is off with your multimeter. Refrigerant can cause frostbite; avoid direct contact. If you are unsure about any step, consult a qualified HVAC technician.
Step-by-Step Guide to Testing a Compressor with a Multimeter
Testing a compressor involves checking for electrical continuity, shorts to ground, and voltage supply. Here's a breakdown:
1. Visual Inspection
Before electrical testing, visually inspect the compressor. Look for:
- Physical Damage: Dents, cracks, or leaks.
- Burn Marks: Indicate overheating or electrical arcing.
- Loose Wiring: Check for secure connections.
- Corrosion: Can impair electrical conductivity.
A visual inspection often reveals obvious problems.
2. Disconnecting Power and Accessing the Compressor Terminals
Turn off the power to the HVAC unit at the breaker. Locate the compressor, typically inside the outdoor unit. Remove the access panel to expose the compressor terminals. These terminals are usually labeled C (Common), S (Start), and R (Run).
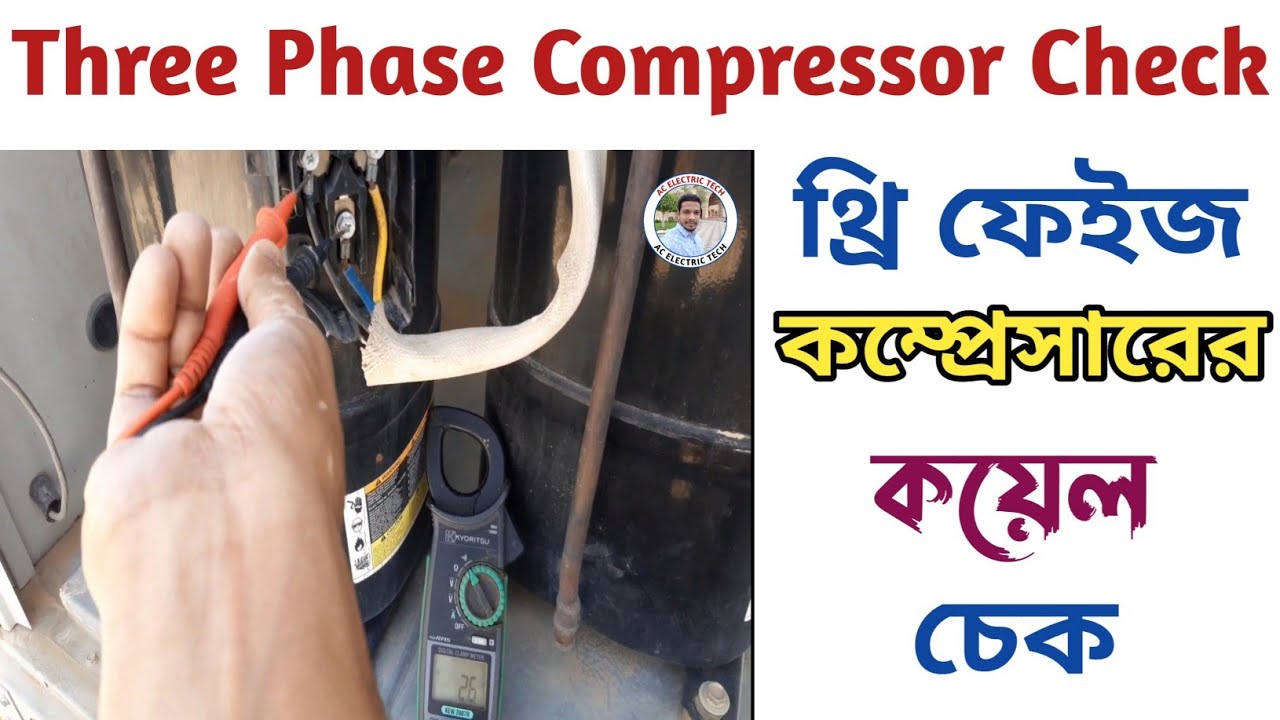
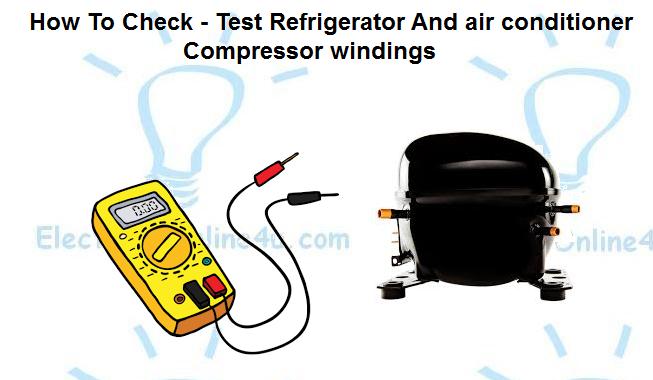
3. Testing for Continuity
Continuity testing checks the integrity of the compressor windings. Set your multimeter to the ohms (Ω) setting. Disconnect the wires from the compressor terminals. Then, measure the resistance between each pair of terminals:
- Common (C) to Run (R): Record the reading.
- Common (C) to Start (S): Record the reading.
- Run (R) to Start (S): Record the reading.
Compare these readings to the compressor manufacturer's specifications (if available). A healthy compressor typically has low resistance values (e.g., 2-10 ohms), but specific values vary. Significantly high resistance or an open circuit (OL on the multimeter) indicates a broken winding.
Example: If C-R reads 3 ohms, C-S reads 5 ohms, and R-S reads 8 ohms, the windings are likely good. A reading of "OL" on any of these indicates a problem.
4. Testing for Shorts to Ground
This test checks if the compressor windings are shorted to the compressor casing. Set your multimeter to the highest ohms setting. Place one probe on any compressor terminal (C, S, or R) and the other probe on the bare metal of the compressor casing. A good compressor will show very high resistance (ideally, OL). A low resistance reading indicates a short to ground, meaning the windings are touching the casing. A compressor with a short to ground needs replacement immediately.
5. Testing the Capacitor (if applicable)
Many compressors use a capacitor to aid starting. A faulty capacitor can prevent the compressor from starting. To test, disconnect the capacitor and use a capacitance meter (some multimeters have this function). Compare the reading to the capacitor's rated capacitance (marked on the capacitor). A reading significantly below the rated value indicates a bad capacitor. If your multimeter doesn't test capacitance, a dedicated capacitor tester is needed. Capacitors store energy, so discharge it before testing. A resistor can be used to slowly discharge the capacitor.
6. Checking Voltage Supply
After confirming the compressor windings are good, check if the compressor is receiving the correct voltage when the system is calling for cooling or heating. Set your multimeter to the appropriate VAC range (typically 240VAC for residential units). Carefully reconnect the power to the HVAC system. With the system running, measure the voltage at the compressor terminals. Ensure the voltage matches the compressor's rated voltage (found on the compressor's nameplate). Low voltage can cause the compressor to fail to start.
Warning: Live voltage testing is dangerous. Exercise extreme caution and wear appropriate safety gear. If you're uncomfortable, call a professional.
Interpreting Results and Troubleshooting
The multimeter tests provide clues about the compressor's condition. Here's how to interpret the findings:
- Open Circuit (OL) on Continuity Test: Indicates a broken winding; the compressor needs replacement.
- Low Resistance on Short to Ground Test: Indicates a shorted winding; the compressor needs replacement.
- Incorrect Voltage Supply: Indicates a problem with the wiring, contactor, or other electrical components; troubleshoot the electrical circuit.
- Faulty Capacitor: Replace the capacitor.
Example: Imagine your AC isn't cooling. You test the compressor and find an open circuit between the Common and Run terminals. This means the compressor windings are broken, and you'll need to replace the compressor.
Compressor Replacement vs. System Replacement
Replacing a compressor is a significant repair. Consider these factors:
- Age of the System: If your HVAC system is over 10-15 years old, replacing the entire system might be more cost-effective. Newer systems are more efficient.
- Refrigerant Type: Older systems might use R-22 refrigerant, which is being phased out. Replacing the compressor in an R-22 system might not be the best long-term investment.
- Cost: Compare the cost of compressor replacement (parts and labor) to the cost of a new system.
- Efficiency Ratings: New systems have higher SEER (Seasonal Energy Efficiency Ratio) and HSPF (Heating Seasonal Performance Factor) ratings, which translates to lower energy bills.
A complete system replacement offers improved efficiency, a new warranty, and compatibility with modern refrigerants. System replacement cost can range from $4,000 to $12,000, while compressor replacement could be $1,500 to $4,000.
Preventative Maintenance for Compressor Longevity
Regular maintenance can extend the life of your compressor:
- Clean Coils: Dirty coils restrict airflow and cause the compressor to work harder. Clean them annually.
- Change Air Filters: Clogged air filters reduce airflow. Replace them every 1-3 months.
- Regular Inspections: Schedule annual maintenance with a qualified HVAC technician to identify potential problems early.
- Proper Refrigerant Charge: Low refrigerant charge causes the compressor to overheat. A technician can check and adjust the refrigerant level.
By following these tips, you can help ensure your compressor operates efficiently and reliably for years to come.
The Role of an HVAC Technician
While this guide provides information on testing a compressor, HVAC systems are complex. Diagnosing and repairing a compressor often requires specialized knowledge and equipment. A qualified HVAC technician can:
- Accurately diagnose the root cause of the problem.
- Safely handle refrigerant.
- Properly install a new compressor or system.
- Ensure the system operates efficiently and safely.
If you are uncomfortable with any of these steps or lack the necessary expertise, consult a professional.