How To Test A Flame Sensor With Multimeter
Many homeowners experience the frustration of a furnace that starts, runs briefly, and then shuts down. Often, this is accompanied by a flashing error code on the furnace control board. One of the most common culprits behind this intermittent heating issue is a malfunctioning flame sensor. The flame sensor is a small, but critical, component that ensures your furnace is safely and efficiently burning fuel. Fortunately, with a multimeter and a little know-how, you can often diagnose a faulty flame sensor yourself.
Understanding the Flame Sensor
The flame sensor is essentially a safety device. It uses a principle called flame rectification. When the burner ignites, the flame acts as a conductor, allowing a small DC current to flow from the igniter (or sometimes another electrode) to the flame sensor. The furnace control board monitors this current. If the flame sensor doesn't detect the presence of a flame, the control board will shut down the gas supply to prevent a dangerous buildup of unburned fuel. This results in the furnace shutting off shortly after ignition.
Common Symptoms of a Faulty Flame Sensor
Here are some telltale signs that your flame sensor might be the problem:
* Furnace starts, runs for a few seconds (typically 1-5), then shuts off. This is the classic symptom. * Error code on the furnace control board indicating a flame sensing issue. Consult your furnace's manual to identify the specific code. * Furnace cycles on and off frequently (short cycling). * Furnace fails to ignite at all (less common, but possible).Safety First! Before You Begin
Safety is paramount when working with any electrical or gas appliance. Before attempting any troubleshooting, take these essential precautions:
* Turn off the furnace power. Locate the circuit breaker that controls the furnace and switch it to the OFF position. Double-check to ensure the furnace is completely powered down. * Turn off the gas supply. Locate the gas shut-off valve near the furnace and turn it to the OFF position. This prevents any accidental gas leaks during your inspection. * Allow the furnace to cool down. If the furnace has been running, give it ample time to cool before touching any components. * Work in a well-ventilated area. * If you are uncomfortable with any of these steps, call a qualified HVAC technician.Step-by-Step Guide: Testing the Flame Sensor with a Multimeter
This guide will walk you through the process of testing your flame sensor using a multimeter. Follow each step carefully.
Step 1: Locate the Flame Sensor
The flame sensor is usually a thin, metallic rod located near the burner assembly, often directly in the path of the flame. It typically has a single wire connected to it. Refer to your furnace's manual for the exact location if you're unsure. They are often white or gray ceramic rod with a metal sensor.
Step 2: Visual Inspection
Before getting your multimeter involved, carefully visually inspect the flame sensor. Look for:
* Cracks or damage to the ceramic insulator. * Corrosion or buildup on the metal rod. This is the most common issue. Carbon deposits can insulate the sensor, preventing it from detecting the flame properly. * Loose or damaged wiring.If you see any obvious damage, it might be worth replacing the flame sensor outright before even testing it. A replacement sensor is relatively inexpensive.
Step 3: Cleaning the Flame Sensor
Even if the sensor doesn't appear damaged, it's a good idea to clean it before testing. This simple step often resolves the issue. Use the following procedure:
* Disconnect the wire connected to the flame sensor. * Use a piece of emery cloth or fine-grit sandpaper to gently clean the metal rod. Remove any carbon buildup or corrosion. Be careful not to damage the sensor. * Wipe the sensor clean with a clean cloth. * Reconnect the wire to the flame sensor.Step 4: Testing for Continuity (Ohms Test)
This test checks the integrity of the flame sensor itself. It's not the primary test for flame sensing ability, but it can reveal a broken sensor.
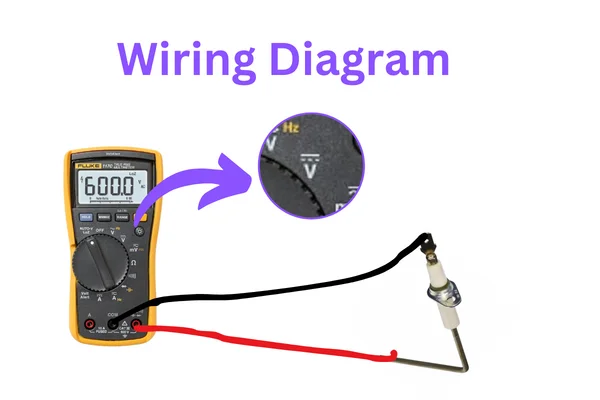
* Set your multimeter to the Ohms (Ω) setting. Usually, the lowest range is sufficient. * Disconnect the wire from the flame sensor. Important: Ensure the power to the furnace is still OFF. * Place one multimeter probe on the metal rod of the flame sensor and the other probe on the metal connector where the wire attaches. * Observe the reading on the multimeter. You should see a very low resistance reading (close to 0 ohms). A reading of infinite resistance (OL or 1 on the left) indicates that the sensor is open (broken) and needs to be replaced.Step 5: Testing the Flame Sensor Current (Microamps DC Test)
This is the most important test. It measures the DC current that the flame sensor produces when the furnace is running. This test requires the furnace to be running, so be extremely cautious.
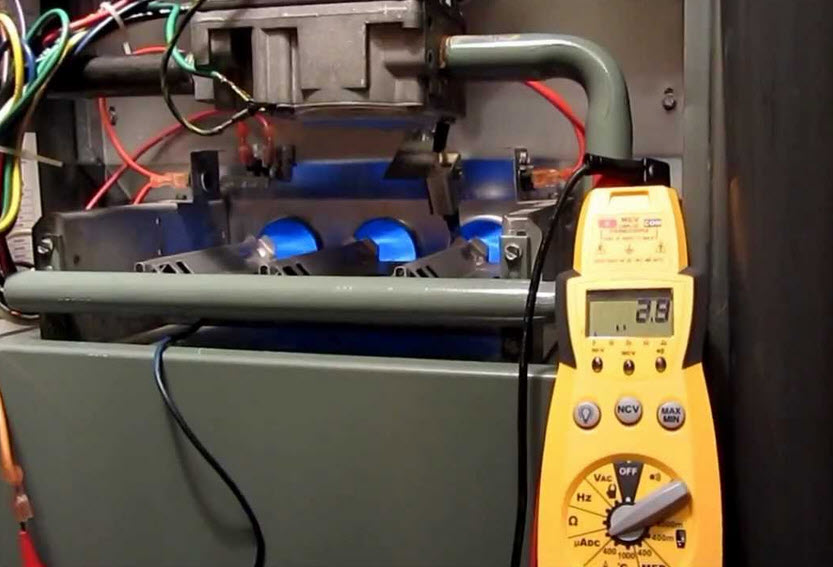
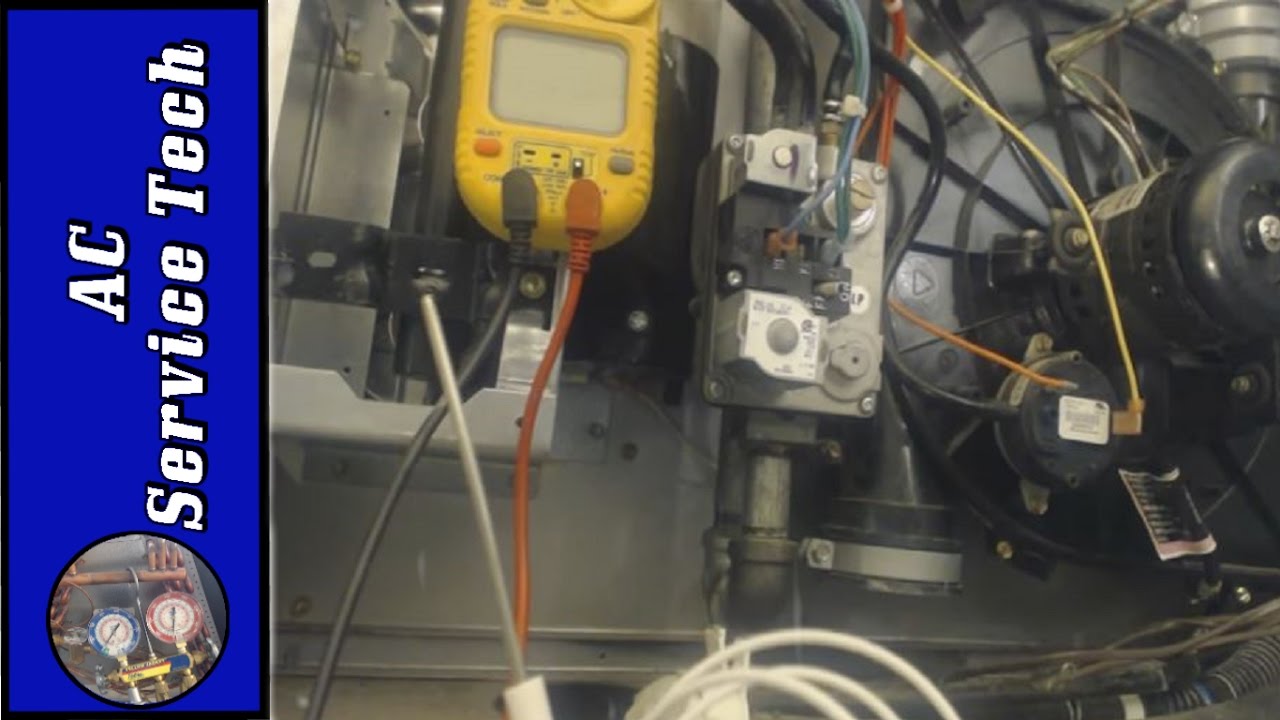
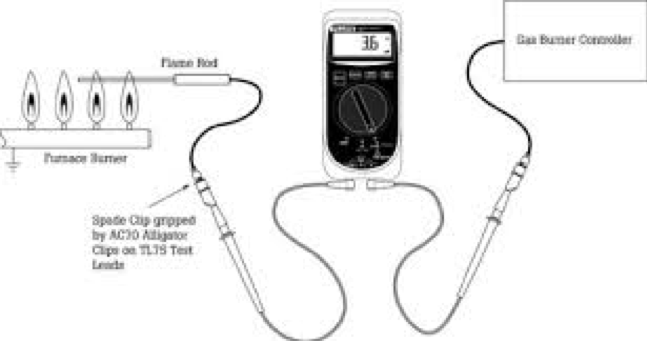
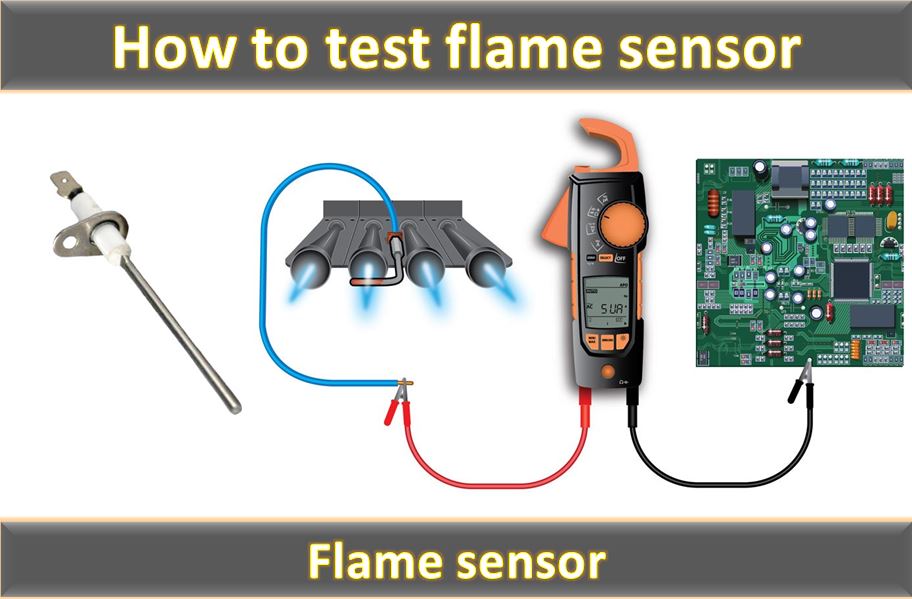
* Set your multimeter to the microamps DC (µA DC) setting. This is a very sensitive setting, so make sure you select the correct range. Some multimeters might require you to select a milliamps DC (mA DC) range instead. If so, you'll need to convert the reading to microamps (1 mA = 1000 µA). * Reconnect the wire to the flame sensor. * Turn the furnace power and gas supply back ON. * Start the furnace. * Carefully disconnect the wire from the flame sensor while the furnace is running. This requires dexterity and caution. Use insulated pliers if necessary. * Connect the multimeter in series with the flame sensor wire. This means you'll connect one probe of the multimeter to the wire you disconnected from the flame sensor, and the other probe to the flame sensor terminal. The current will now flow through the multimeter. * Observe the reading on the multimeter. A healthy flame sensor should produce a DC current of typically 1-10 microamps (µA), but refer to your furnace's manual or the manufacturer's specifications for the correct range for your specific model. * If the reading is significantly lower than the specified range (e.g., less than 0.5 µA), even after cleaning, the flame sensor is likely faulty and needs to be replaced. A reading of 0 µA indicates that the flame sensor is not detecting the flame. * Turn the furnace OFF. * Reconnect the wire to the flame sensor. * Turn the furnace power and gas supply back OFF.Important Notes for Microamp Testing:
* Be extremely careful when working with a live furnace. Avoid touching any metal parts of the furnace while it's running. * Some multimeters are more accurate than others at measuring microamps. If you're unsure about the accuracy of your multimeter, consider using a known good multimeter or consulting with an HVAC professional. * The microamp reading can fluctuate slightly. A stable reading within the specified range is what you're looking for. * If you have difficulty connecting the multimeter in series while the furnace is running, consider using alligator clips or test leads with small probes.Step 6: Reassemble and Test
After testing, reconnect all wires, turn the gas and power back on, and observe the furnace's operation. If the furnace now operates correctly, the problem was likely a dirty or faulty flame sensor. If the problem persists, proceed to the next troubleshooting steps or contact a professional.
Simple DIY Fixes
Based on your testing, you might be able to resolve the issue with these simple fixes:
* Replace the Flame Sensor: If the continuity test failed or the microamp reading was significantly low, replacing the flame sensor is usually the best course of action. Flame sensors are relatively inexpensive and easy to replace. Make sure to get the correct replacement for your furnace model. * Clean the Burners: A dirty burner can prevent the flame from reaching the flame sensor effectively. Clean the burners with a wire brush or vacuum them out. * Check the Igniter: If the igniter is weak or failing, it might not be producing a strong enough flame for the flame sensor to detect. Inspect the igniter for cracks or damage. * Check the Gas Pressure: Insufficient gas pressure can also cause flame sensing problems. This is a more complex issue that usually requires professional diagnosis and repair. * Check the Wiring: Ensure that all wires connected to the flame sensor and the control board are secure and in good condition.When to Call a Professional
While you can often diagnose and fix a faulty flame sensor yourself, there are certain situations where you should always call a qualified HVAC technician:
* You are uncomfortable working with electricity or gas. * You suspect a gas leak. If you smell gas, immediately turn off the gas supply and evacuate the premises. * The problem persists after replacing the flame sensor. This indicates a more complex issue that requires professional diagnosis. * You are unsure about the correct microamp range for your furnace model. * You suspect a problem with the control board or other internal components. * You live in an area that requires a licensed professional to perform furnace repairs.Remember: Attempting repairs beyond your skill level can be dangerous and could potentially damage your furnace or create a safety hazard. When in doubt, call a professional.
Conclusion
Troubleshooting a flame sensor with a multimeter is a manageable task for many homeowners. By following the steps outlined in this guide and prioritizing safety, you can often identify and resolve common flame sensor issues, saving yourself time and money. However, always remember your limits and don't hesitate to call a qualified HVAC technician when needed. A properly functioning flame sensor is crucial for the safe and efficient operation of your furnace, ensuring your home stays warm and comfortable during the colder months.