How To Test A Grounded Compressor

A grounded compressor is a common issue in HVAC systems, signaling a potentially serious problem with the electrical components. This article provides a comprehensive guide on how to test a grounded compressor, aimed at homeowners, HVAC technicians, and facility managers. Understanding the process and potential dangers is crucial for ensuring safety and preventing further damage to your system.
Understanding a Grounded Compressor
Before diving into the testing procedure, let's define what it means for a compressor to be grounded. In simple terms, a grounded compressor means that the electrical windings inside the compressor housing have lost their insulation and are making direct contact with the metal casing. This creates an unintended electrical path to ground, which can lead to short circuits, blown fuses or breakers, and even electrocution hazards.
Think of it like this: the electricity is supposed to flow in a closed loop through the compressor's motor windings. However, if the insulation around those windings wears down or gets damaged, the electricity can "leak" out and flow through the compressor's metal body, which is grounded. This leakage is what we mean by a "grounded compressor."
Symptoms of a Grounded Compressor
Recognizing the symptoms of a grounded compressor can help you identify the problem early on. Here are some common signs:
- Tripped Circuit Breaker: This is often the most obvious sign. If the circuit breaker dedicated to your HVAC system trips frequently, especially when the compressor is running, it could indicate a ground fault.
- Burning Smell: A burning smell coming from the outdoor unit (the condenser) can be a sign of overheating and insulation breakdown within the compressor.
- Compressor Not Starting: The compressor may hum or make a clicking sound, but fail to start. This can be due to the safety mechanisms shutting down the system to prevent further damage.
- Higher Than Normal Electric Bills: While not always indicative of a grounded compressor alone, a sudden spike in your electricity bill, especially during peak cooling or heating season, could suggest a problem with the compressor's efficiency, which can be related to grounding issues.
Important Safety Note: Always disconnect the power to the HVAC system at the main breaker panel before attempting any testing or repairs. Working with electricity can be dangerous, and safety should always be your top priority.
Tools Required for Testing
To properly test a compressor for grounding, you'll need the following tools:
- Multimeter: A digital multimeter is essential for measuring voltage, resistance (ohms), and continuity. Ensure your multimeter is properly calibrated and capable of measuring high resistance values (Megaohms). A quality multimeter from brands like Fluke or Klein is a good investment.
- Screwdrivers: You'll need a variety of screwdrivers (Phillips head and flathead) to access the compressor terminals.
- Wire Strippers/Crimpers: These are helpful for disconnecting and reconnecting wires.
- Personal Protective Equipment (PPE): Always wear safety glasses and insulated gloves when working with electrical components.
Testing Procedure: Step-by-Step Guide
This procedure involves using a multimeter to check for continuity between the compressor terminals and the compressor housing. Remember to disconnect the power to the unit at the breaker before starting.
Step 1: Disconnect the Power
Locate the circuit breaker that supplies power to your HVAC system and switch it to the "OFF" position. For added safety, you can also remove the fuse. Use a voltage tester to confirm that the power is indeed off at the disconnect switch near the outdoor unit (condenser).
Step 2: Access the Compressor Terminals
Remove the access panel on the outdoor unit to expose the compressor. You'll typically find a wiring diagram attached to the inside of the panel. Carefully disconnect the wires from the compressor terminals. Note the position of each wire for easy reconnection later. It's helpful to take a picture with your phone before disconnecting anything.
Step 3: Prepare the Multimeter
Set your multimeter to the resistance (ohms) setting. Most digital multimeters have a range setting; choose the highest range (e.g., Megaohms or MΩ). Some multimeters have an auto-ranging function, which will automatically select the appropriate range.
Step 4: Test for Ground Fault
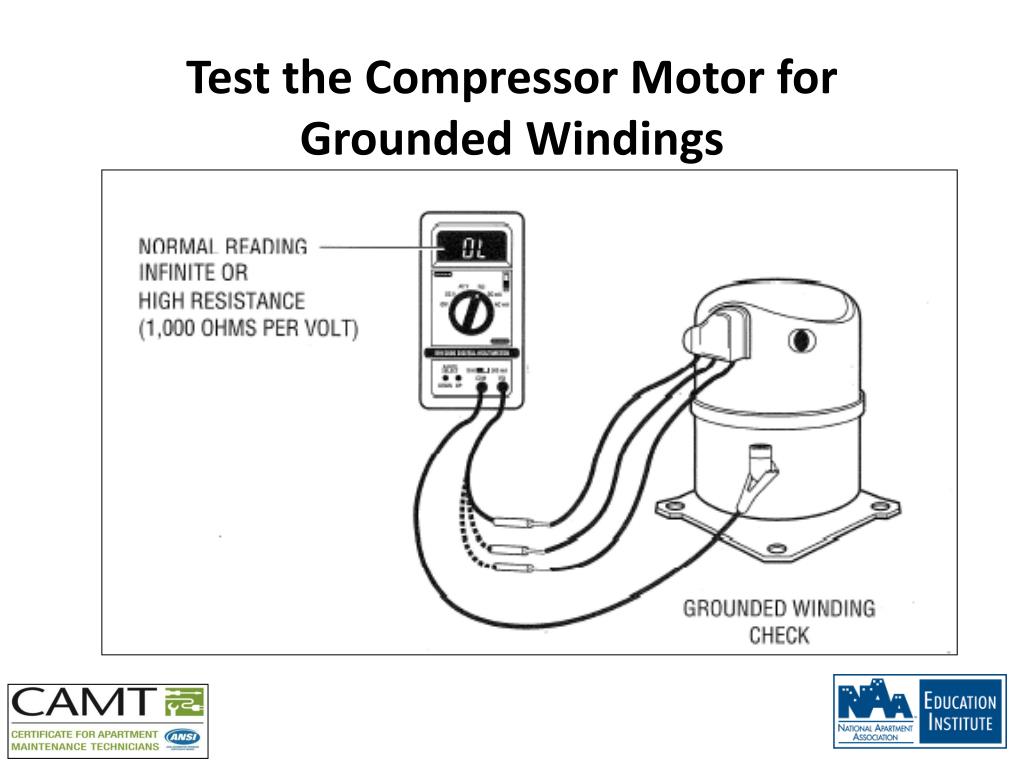
This is the crucial step. Place one probe of the multimeter on a clean, unpainted metal part of the compressor housing (the body of the compressor). Place the other probe on each of the compressor terminals (Common, Start, and Run) one at a time.
- Reading of "OL" or Infinity: This indicates a good compressor with no ground fault. "OL" means "Over Limit" and suggests infinite resistance between the terminal and the housing.
- Reading of 0 or a Low Resistance Value: This indicates a grounded compressor. A reading close to zero ohms or a low resistance value (e.g., less than 100,000 ohms) signifies that there's a direct electrical path between the compressor windings and the housing. This confirms a ground fault.
Step 5: Repeat for All Terminals
Repeat the testing procedure for each of the three compressor terminals (Common, Start, and Run) to ensure a thorough evaluation.
Step 6: Reconnect and Power On (If No Ground Fault Found)
If the multimeter shows "OL" or infinity for all three terminals, it means there's no ground fault detected. In this case, carefully reconnect the wires to the compressor terminals, ensuring they are securely attached. Replace the access panel and restore power to the unit by switching the circuit breaker back to the "ON" position.
Important: If you found a ground fault (low resistance reading), do NOT attempt to power on the unit. This could be extremely dangerous and could cause further damage.
What to Do if You Find a Grounded Compressor
If your testing confirms that the compressor is grounded, the next step is typically replacement. Repairing a grounded compressor is usually not feasible or cost-effective. The insulation inside the compressor has likely deteriorated significantly, and any attempt to repair it would be a temporary fix at best.
Compressor Replacement Considerations
Replacing a compressor is a significant undertaking that requires specialized knowledge and tools. It's strongly recommended to hire a qualified HVAC technician for this job. Here are some factors to consider:
- Matching the Compressor: The replacement compressor must be compatible with your existing HVAC system in terms of size, voltage, refrigerant type, and capacity (BTUs).
- Refrigerant Handling: Refrigerant must be properly recovered and disposed of according to EPA regulations. HVAC technicians are certified to handle refrigerants safely.
- System Evacuation and Charging: After replacing the compressor, the system needs to be evacuated (removing air and moisture) and recharged with the correct amount of refrigerant.
- Cost: Compressor replacement can be a costly repair. Expect to pay anywhere from $1,500 to $4,000 or more, depending on the size and complexity of the system.
System Replacement vs. Compressor Replacement
In some cases, it might be more economical to replace the entire HVAC system rather than just the compressor. This is especially true if the system is old (over 10-15 years) or if other components are showing signs of wear and tear. A new system will offer improved energy efficiency and may come with a warranty, providing peace of mind.
For example, if your old system has a SEER (Seasonal Energy Efficiency Ratio) rating of 10, upgrading to a new system with a SEER rating of 16 or higher can significantly reduce your energy consumption and save you money on your electricity bills over the long term. While the upfront cost is higher, the long-term savings and improved performance can make it a worthwhile investment. Look for Energy Star certified models to maximize energy efficiency.
HVAC replacement cost for a full system ranges from $5,000 to $12,000 depending on size, complexity, and brand.
Preventing Compressor Failure
While compressor failure can sometimes be unavoidable, there are steps you can take to prolong the life of your compressor and prevent grounding issues:
- Regular Maintenance: Schedule annual maintenance with a qualified HVAC technician. They can inspect the system, clean the coils, check refrigerant levels, and identify potential problems early on.
- Clean Air Filters: Replace your air filters regularly (every 1-3 months). Dirty air filters restrict airflow, causing the compressor to work harder and overheat.
- Clear Debris from Outdoor Unit: Keep the area around the outdoor unit free of debris such as leaves, grass clippings, and snow. This allows for proper airflow and prevents the compressor from overheating.
- Voltage Protection: Consider installing a surge protector to protect your HVAC system from power surges, which can damage the compressor windings.
Conclusion
Testing a compressor for grounding is a crucial step in diagnosing HVAC system problems. By following the steps outlined in this article, you can determine whether your compressor is grounded and take appropriate action. Remember that working with electricity can be dangerous, so always prioritize safety and consult with a qualified HVAC technician when in doubt. Understanding the potential causes of compressor failure and implementing preventive measures can help prolong the life of your HVAC system and save you money on costly repairs.