How To Use A Belt Tensioner Gauge
Maintaining the proper belt tension in your HVAC system is crucial for optimal performance, energy efficiency, and longevity. A belt that is too loose will slip, causing inefficient operation and potential damage to components. Conversely, a belt that is too tight can overload bearings and lead to premature failure. Using a belt tensioner gauge is the most accurate way to ensure your belts are correctly tensioned. This article provides a comprehensive guide on how to use a belt tensioner gauge, applicable to homeowners, HVAC technicians, and facility managers alike.
Understanding Belt Systems in HVAC
Before diving into the specifics of using a belt tensioner gauge, let’s briefly review where belts are typically found in HVAC systems and why their tension matters.
Belts are commonly used in the following HVAC applications:
- Air Handlers: Belts drive the blower motor that circulates air throughout your home or building. A slipping belt here will reduce airflow, impacting heating and cooling effectiveness and potentially leading to frozen evaporator coils in air conditioning systems.
- Condensing Units: In some older or larger systems, belts may drive the compressor. Improper tension can significantly impact the compressor's efficiency and lifespan, the heart of your cooling system.
- Exhaust Fans: In commercial or industrial settings, belts may power exhaust fans responsible for ventilation.
A properly tensioned belt will:
- Maximize Energy Efficiency: A slipping belt wastes energy, forcing the motor to work harder to achieve the desired airflow or compression.
- Extend Component Lifespan: Correct tension reduces stress on bearings and other components, prolonging their life.
- Reduce Noise: Squealing or screeching noises are often signs of a loose or misaligned belt.
- Improve System Performance: Proper tension ensures that the connected components operate as designed, delivering optimal heating and cooling.
Types of Belt Tensioner Gauges
Several types of belt tensioner gauges are available, each with its own advantages and disadvantages. The most common types include:
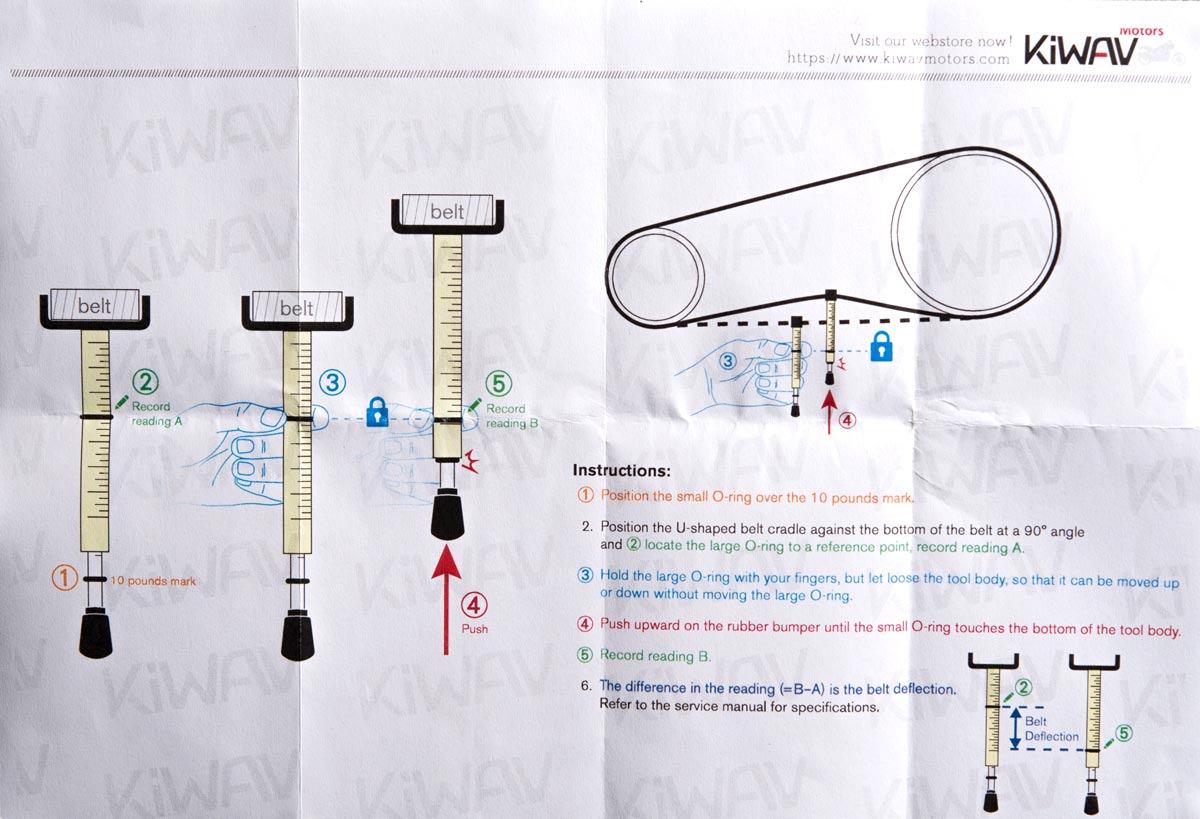
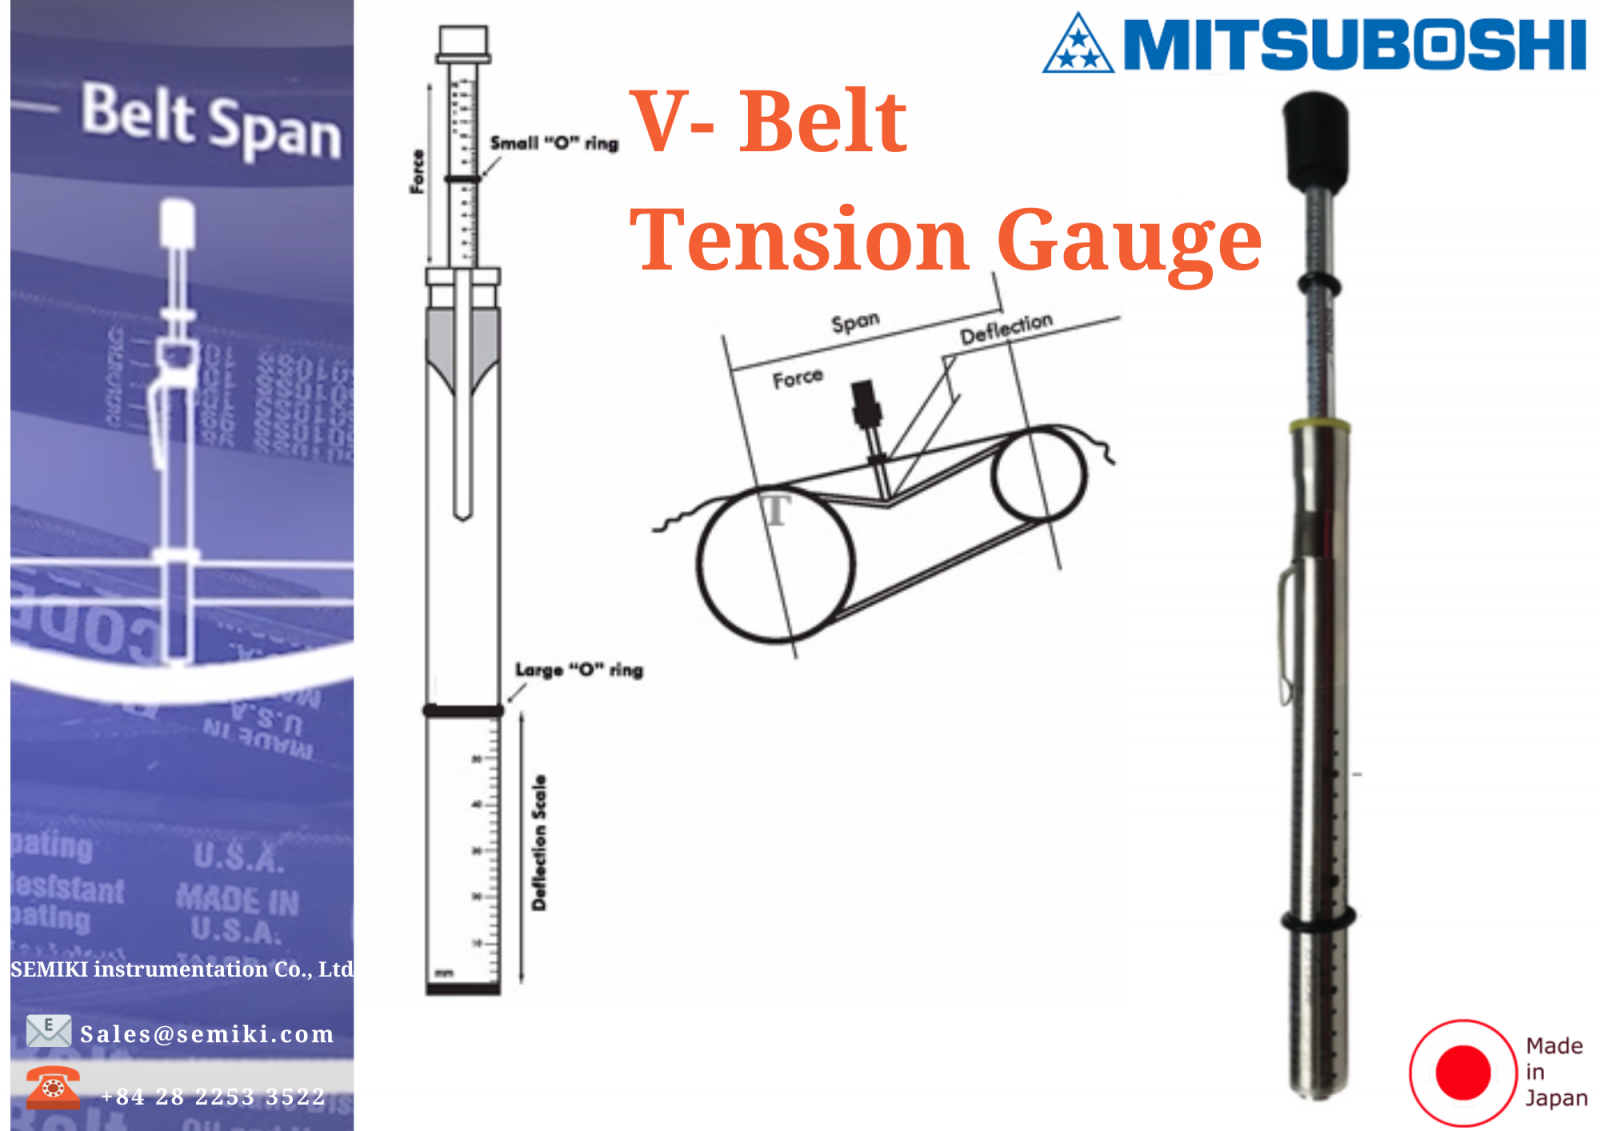
- Deflection Gauges: These gauges measure the amount of deflection (sag) in the belt when a specific force is applied. They are relatively simple to use and are often preferred for V-belts.
- Frequency Gauges (Sonic Tension Meters): These gauges measure the natural frequency of the belt vibration when plucked. The frequency correlates to the belt tension. These are often more precise and suitable for a wider range of belt types, including synchronous belts and V-belts.
- Force Gauges: These gauges directly measure the force required to deflect the belt a certain amount. They are often used in industrial applications where high accuracy is required.
For most HVAC applications, a deflection gauge or a frequency gauge will suffice. Deflection gauges are generally less expensive and easier to use, making them a good choice for homeowners and technicians working on smaller systems. Frequency gauges offer greater precision and are often preferred for larger or more critical systems.
Step-by-Step Guide: Using a Deflection Gauge
This section provides a detailed guide on how to use a deflection gauge to measure belt tension.
Step 1: Gather Necessary Tools and Information
Before you begin, gather the following:
- Belt tensioner gauge (deflection type)
- Wrench (to adjust the belt tension, if needed)
- Belt tension specification chart (provided by the equipment manufacturer)
- Safety glasses
- Gloves
- Flashlight (if working in a dimly lit area)
The belt tension specification chart is critical. This chart will provide the recommended deflection amount for your specific belt type and span length. You can usually find this information in the equipment's service manual or on a sticker near the belt drive. If you cannot find the chart, contact the equipment manufacturer or consult with a qualified HVAC technician.
Step 2: Ensure System is Off and Safe
Safety First! Before working on any HVAC equipment, ensure the system is completely powered off at the breaker. Lock out/tag out procedures should be followed in commercial settings. This will prevent accidental start-up and potential injury. Double-check that all moving parts have come to a complete stop.
Step 3: Identify the Belt Span
The belt span is the distance between the two pulleys that the belt connects. This measurement is crucial for determining the correct deflection value. Use a measuring tape to accurately determine the span length.
Step 4: Calculate the Correct Deflection
The belt tension specification chart will provide a deflection value, often expressed as a deflection per inch of span. For example, the chart might specify a deflection of 1/64 inch per inch of span. If your span is 20 inches, the correct deflection would be 20/64 inch, or 5/16 inch.
Step 5: Position the Deflection Gauge
Place the deflection gauge on the belt midway between the two pulleys (at the center of the span). Make sure the gauge is perpendicular to the belt.
Step 6: Apply Force and Measure Deflection
Apply a steady, perpendicular force to the belt using the plunger of the deflection gauge. Press down until the gauge reaches the specified force. The gauge will then indicate the amount of deflection. Compare the measured deflection to the calculated value from Step 4.
Step 7: Adjust Belt Tension (If Necessary)
If the measured deflection is not within the specified range, you will need to adjust the belt tension.
- Too Loose: Loosen the motor mounting bolts and slide the motor away from the driven component (e.g., blower fan). This will tighten the belt.
- Too Tight: Loosen the motor mounting bolts and slide the motor towards the driven component. This will loosen the belt.
After each adjustment, re-measure the deflection using the gauge. Repeat the process until the deflection is within the specified range. Once the correct tension is achieved, securely tighten the motor mounting bolts.
Step 8: Double-Check and Test
After adjusting the belt tension, double-check the alignment of the pulleys. Misaligned pulleys can cause premature belt wear and noise. Use a straightedge or laser alignment tool to ensure that the pulleys are properly aligned. Finally, turn the system back on and observe the belt operation for any signs of slippage or excessive vibration. Listen for any unusual noises.
Using a Frequency Gauge (Sonic Tension Meter)
Frequency gauges offer a more precise method of measuring belt tension. Here’s how to use one:
Step 1: Gather Information
Similar to using a deflection gauge, you'll need the manufacturer's recommended tension frequency for the specific belt type and span length. This information is often available in a chart or table specific to the system. You'll also need the belt weight per unit length, often found in the belt manufacturer's specifications.
Step 2: Input Parameters into the Gauge
Most frequency gauges require you to input the belt span length and the belt weight per unit length. Consult the gauge's manual for specific instructions on how to enter these parameters.
Step 3: Position and Pluck the Belt
Position the gauge near the belt, midway between the pulleys. Some gauges require contact with the belt, while others work non-contact using a microphone. Pluck the belt firmly with your finger. The gauge will measure the natural frequency of the vibration.
Step 4: Compare and Adjust
Compare the measured frequency to the manufacturer's recommended value. Adjust the belt tension as described in the deflection gauge section until the measured frequency matches the specification.
Step 5: Verify
After adjustment, re-measure the frequency to ensure it's within the specified range. Also, check the pulley alignment and observe the belt operation after starting the system.
Maintenance and Best Practices
Here are some additional tips for maintaining your HVAC belt systems:
- Regular Inspections: Inspect belts regularly for signs of wear, cracks, or glazing. Replace belts as needed, even if they appear to be in good condition.
- Proper Alignment: Ensure pulleys are properly aligned to prevent premature belt wear.
- Cleanliness: Keep belts and pulleys clean and free from debris.
- Use the Right Belts: Use belts that are specifically designed for HVAC applications.
- Professional Assistance: If you are unsure about any aspect of belt tensioning, consult with a qualified HVAC technician. Ignoring belt tension can lead to costly repairs or system downtime.
Cost Considerations
While the cost of a belt tensioner gauge itself is relatively low (typically ranging from $20 to $200, depending on the type and features), the benefits of proper belt tension far outweigh the investment. Neglecting belt tension can lead to:
- Increased Energy Bills: A slipping belt reduces system efficiency, leading to higher energy consumption.
- Premature Component Failure: Over- or under-tensioned belts can damage bearings, motors, and other components, resulting in expensive repairs.
- System Downtime: Belt failure can cause your HVAC system to shut down completely, leading to discomfort and potential business disruption.
By investing in a belt tensioner gauge and following proper maintenance procedures, you can significantly reduce these risks and ensure the long-term performance and efficiency of your HVAC system. Remember that preventative maintenance is always more cost-effective than reactive repairs.