How To Vent A Pellet Stove

The Comprehensive Guide to Venting Your Pellet Stove: A Step-by-Step Approach
Pellet stoves are an efficient and environmentally friendly way to heat your home, offering a convenient alternative to traditional wood-burning stoves. However, proper venting is crucial for safe and effective operation. This guide provides a detailed walkthrough of how to vent a pellet stove, covering essential considerations, venting options, and best practices to ensure optimal performance and safety.
Understanding the Importance of Proper Venting
Unlike wood stoves that rely on natural draft, pellet stoves use a forced-air system to exhaust combustion gases. This requires a specialized venting system designed to withstand the specific demands of pellet stove exhaust. Improper venting can lead to a number of problems, including:
- Carbon Monoxide (CO) Poisoning: Leaks in the venting system can allow dangerous levels of CO to enter your home.
- Reduced Efficiency: Improper venting can hinder the stove's ability to draw in air, leading to incomplete combustion and reduced heating efficiency.
- Equipment Damage: Condensation and backdrafts can damage the stove's internal components, shortening its lifespan.
- Fire Hazards: Improperly installed or maintained venting can create fire hazards due to creosote buildup or overheating.
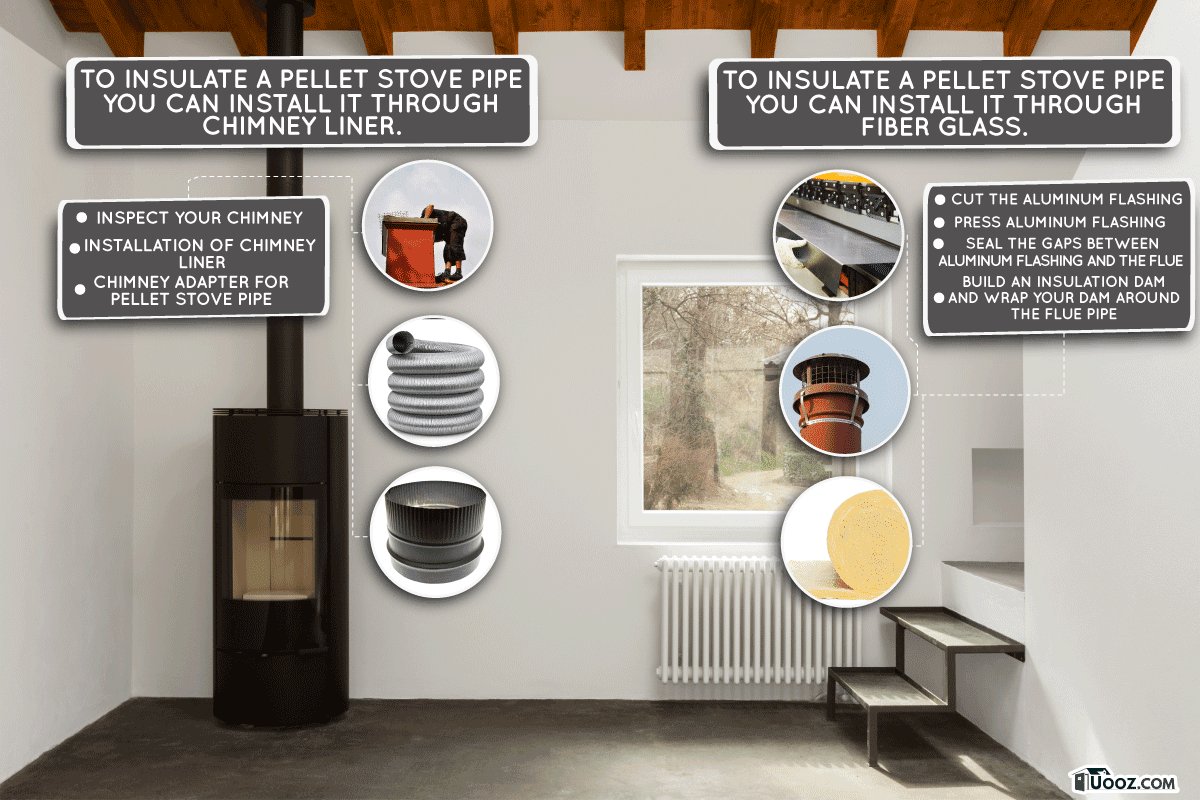
Choosing the Right Venting System
Pellet stove venting systems are typically constructed from stainless steel or galvanized steel. The type of venting required depends on the stove manufacturer's specifications and local building codes. Common venting options include:
- Direct Vent (DV): This system draws combustion air from outside the home and vents exhaust gases directly outside through a single pipe. DV systems are ideal for homes with airtight construction and offer superior efficiency.
- Through-the-Wall Vent (TWV): As the name suggests, this system vents directly through an exterior wall. TWV systems are often the easiest and most cost-effective option for existing homes.
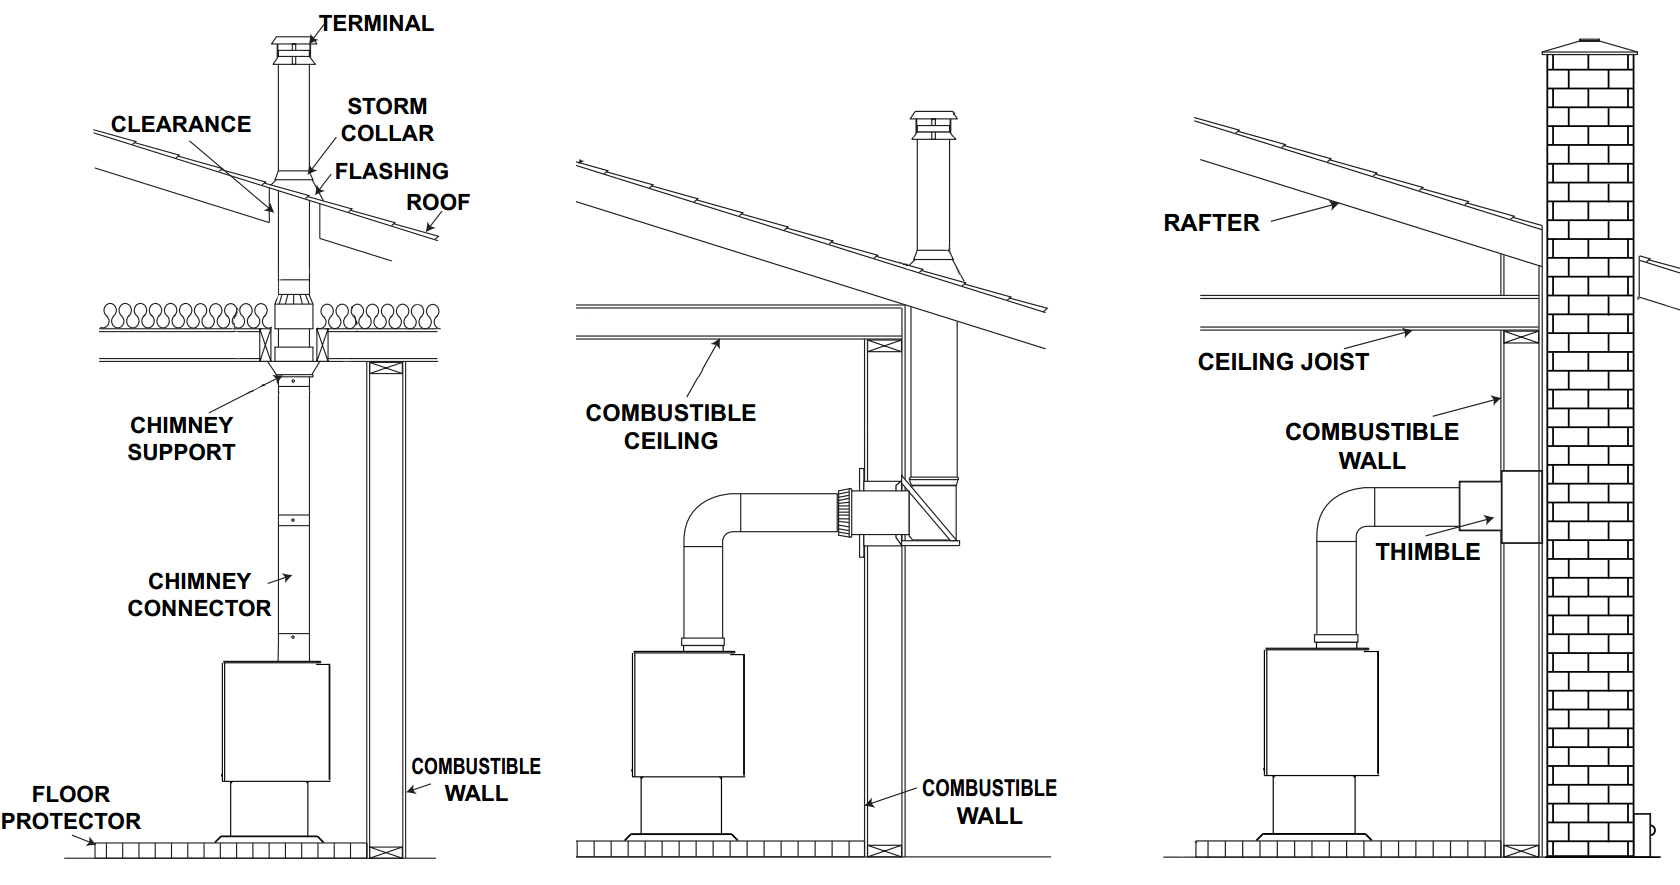
- Vertical Vent: This system vents exhaust gases vertically through the roof. Vertical venting is suitable for multi-story homes or when wall venting is not feasible.
Always consult your pellet stove's manual and local building codes to determine the appropriate venting system for your specific installation. You will need 3" or 4" diameter pellet vent pipe, depending on the stove model.
Step-by-Step Guide to Venting a Pellet Stove
Before you begin, always disconnect the stove from the power source and allow it to cool completely. This process assumes that the stove is placed at or near its final location and venting is planned.
- Planning and Preparation:
- Read the Manual: Thoroughly review your pellet stove's installation manual for specific venting requirements and recommendations. This is *crucial* for safe and efficient operation.
- Check Local Codes: Contact your local building department to determine if permits are required and to ensure compliance with all applicable codes.
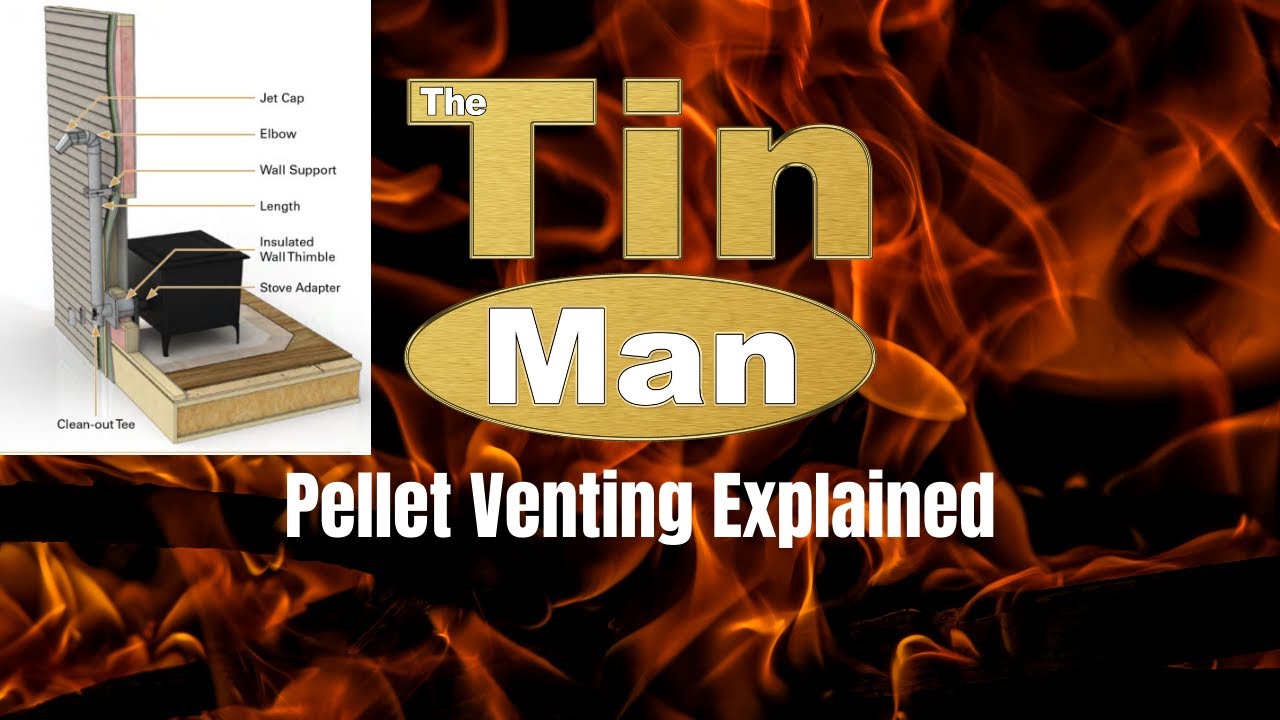
- Gather Materials: Assemble all necessary materials, including venting pipes, connectors, elbows, wall thimble (if applicable), roof flashing (if applicable), sealant, screws, and safety equipment (gloves, eye protection).
- Choose Venting Route: Carefully plan the venting route, considering factors such as proximity to windows and doors, clearance requirements, and aesthetic considerations.
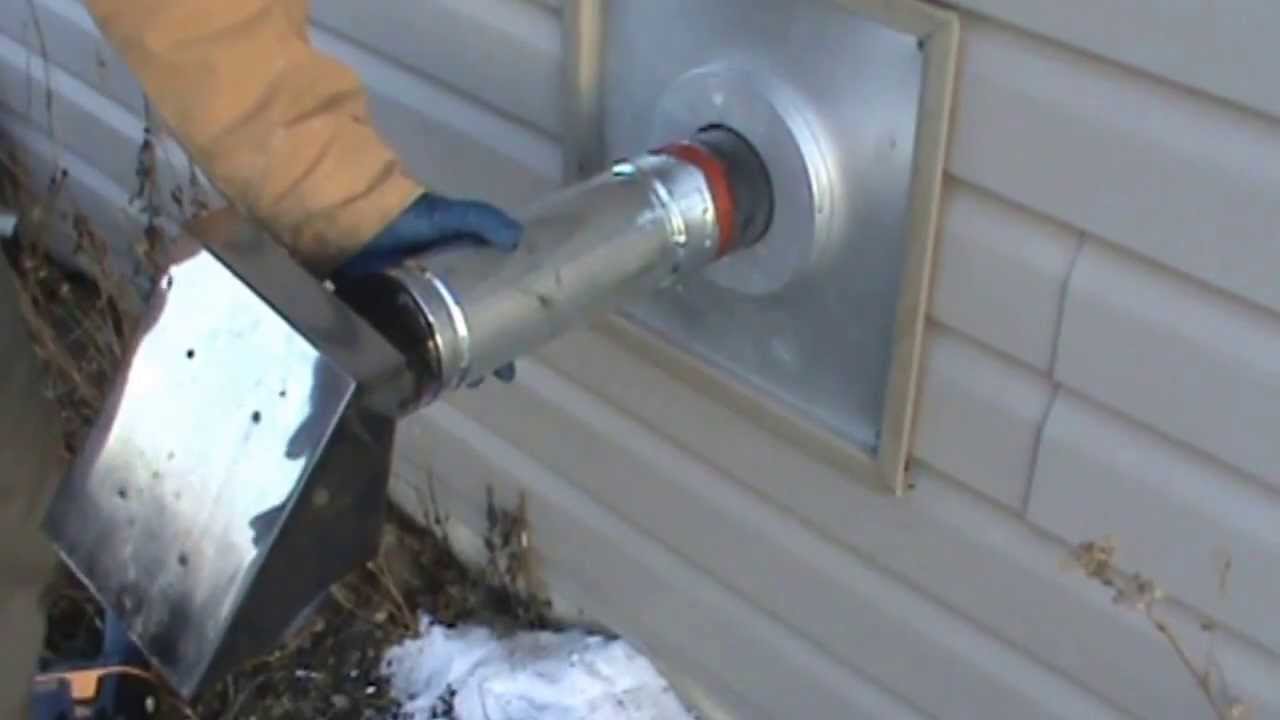
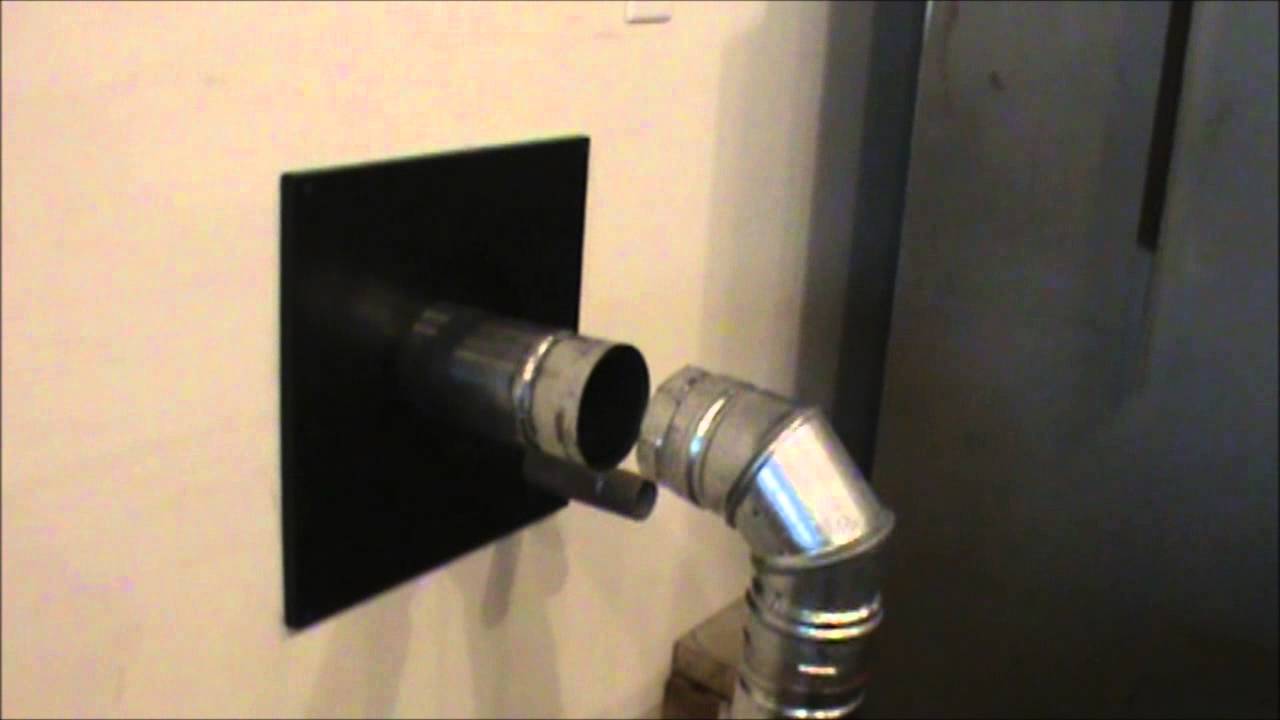
- Installing a Through-the-Wall Vent (TWV):
- Mark the Wall: Locate the stove's exhaust outlet and mark the corresponding location on the exterior wall. Ensure the vent will terminate at least one foot above any forced air inlet located within 10 feet.
- Cut the Hole: Using a hole saw of the appropriate diameter (typically 4" or 6"), carefully cut a hole through the wall.
- Install the Wall Thimble: Insert the wall thimble into the hole, ensuring it is properly sealed and secured to the wall studs. A wall thimble is *essential* for safety; it provides a fire-resistant barrier between the vent pipe and combustible wall materials.
- Connect the Vent Pipe: Connect the vent pipe to the stove's exhaust outlet, using appropriate connectors and sealant.
- Extend the Vent Pipe: Extend the vent pipe through the wall thimble and attach the appropriate termination cap. The termination cap prevents rain, snow, and debris from entering the venting system.
- Seal and Secure: Seal all connections with high-temperature sealant and secure them with screws or clamps.
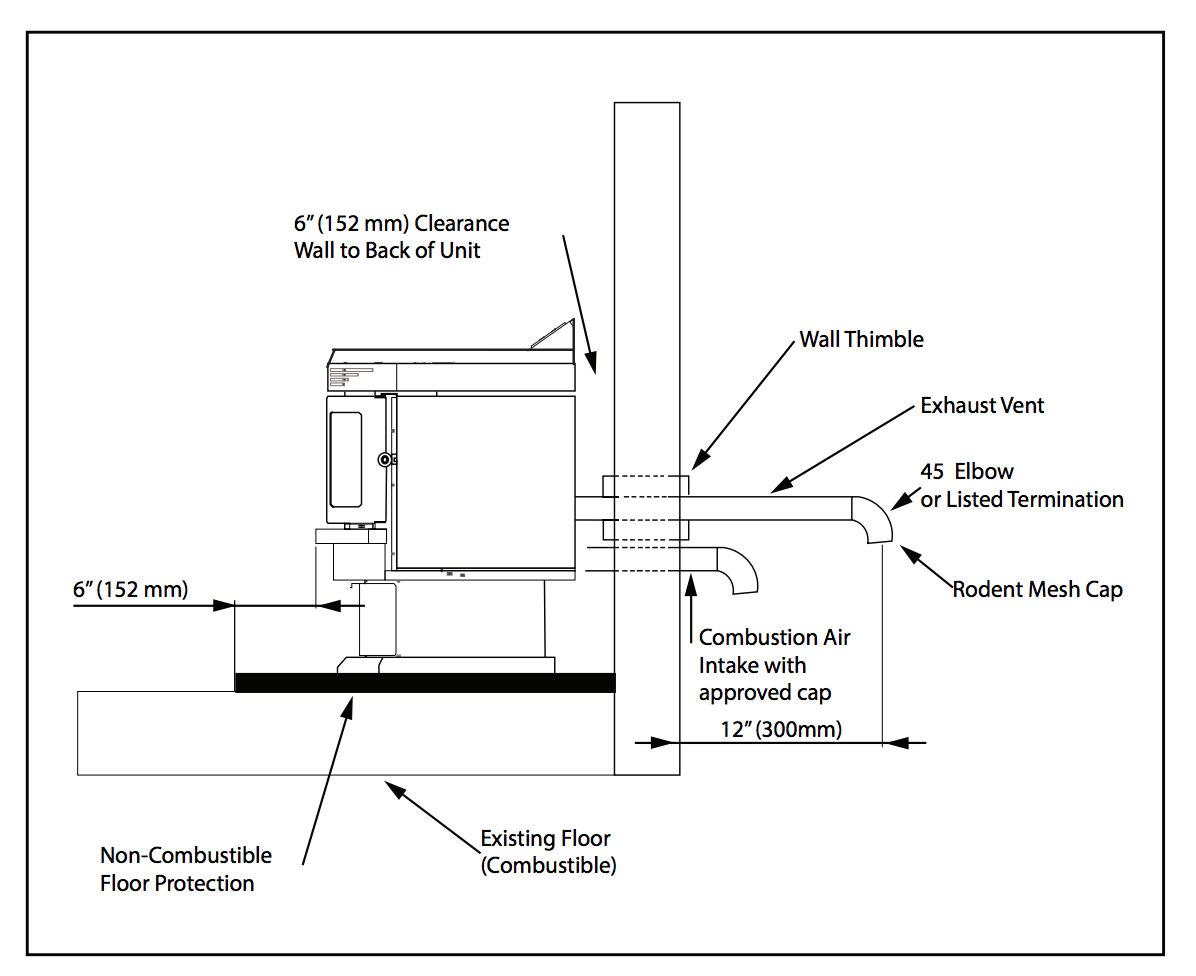
- Installing a Direct Vent (DV):
- Cut the Hole: Like the TWV, you'll need to cut a hole in the wall for the vent. Ensure the location meets the clearances specified in the stove's manual and local codes.
- Install the Vent Pipe: Connect the direct vent pipe to the stove's exhaust outlet. DV systems use a pipe-within-a-pipe design; the inner pipe vents exhaust, and the outer pipe draws in combustion air.
- Install the Termination Cap: Securely attach the direct vent termination cap to the end of the vent pipe. The cap is designed to prevent backdrafts and protect the venting system from the elements.
- Seal and Secure: Seal all connections with high-temperature sealant and secure them with screws or clamps.
- Installing a Vertical Vent:
- Plan the Route: Carefully plan the vertical venting route, ensuring adequate clearance from combustible materials and proper support for the vent pipe.
- Cut the Ceiling/Roof Openings: Cut openings in the ceiling and roof, following the manufacturer's instructions and local building codes.
- Install the Vent Pipe: Assemble the vent pipe sections, connecting them with appropriate connectors and sealant.
- Install the Roof Flashing: Install the roof flashing to create a watertight seal around the vent pipe.
- Install the Rain Cap: Attach a rain cap to the top of the vent pipe to prevent rain and snow from entering the venting system.
- Secure the Vent Pipe: Secure the vent pipe to the roof using appropriate supports and brackets.
- Final Inspection and Testing:
- Inspect all Connections: Carefully inspect all connections to ensure they are properly sealed and secured.
- Check Clearances: Verify that all clearances from combustible materials meet the manufacturer's specifications and local codes.
- Start the Stove: Start the pellet stove and observe the venting system for any signs of leaks or problems.
- Carbon Monoxide Detector: Install a carbon monoxide detector in the vicinity of the pellet stove to provide an extra layer of safety.
Common Mistakes to Avoid
Many problems can occur from improper installation. Here are a few mistakes to avoid:
- Using Incorrect Venting Pipe: Do not use standard plumbing or HVAC pipe for pellet stove venting. Use only venting specifically designed and listed for pellet stoves.
- Insufficient Clearance to Combustibles: Maintaining proper clearances from walls, ceilings, and other combustible materials is *critical* to prevent fire hazards.
- Improper Sealing: Leaks in the venting system can allow carbon monoxide to enter your home. Ensure all connections are properly sealed with high-temperature sealant.
- Inadequate Support: Vent pipes must be adequately supported to prevent sagging or damage.
- Ignoring Local Codes: Always comply with local building codes and regulations regarding pellet stove venting.
Maintenance and Troubleshooting
Regular maintenance is essential to ensure the safe and efficient operation of your pellet stove venting system.
- Regular Inspections: Inspect the venting system regularly for signs of damage, corrosion, or creosote buildup.
- Cleaning: Clean the venting system at least once a year, or more frequently if needed, to remove creosote and other debris.
- Professional Service: Schedule a professional inspection and cleaning every few years to ensure optimal performance and safety.
Cost Considerations
The cost of venting a pellet stove can vary depending on the type of venting system, the complexity of the installation, and local labor rates. Generally, expect to pay between $200 and $800 for materials and labor. DIY installation can save on labor costs, but it's crucial to have the skills and knowledge to perform the installation safely and correctly. For professional installation, be sure to get quotes from multiple contractors. The cost of not venting properly will be greater in the long run.
Professional Installation vs. DIY
While DIY installation is possible, professional installation is generally recommended, especially for those who are not experienced in home improvement projects. A qualified HVAC technician can ensure that the venting system is installed correctly and safely, complying with all applicable codes and regulations. A professional can also help you choose the right venting system for your specific needs and provide ongoing maintenance and support. Furthermore, a professional installation ensures compliance and that all warranties are valid.
By following this comprehensive guide, you can ensure that your pellet stove is properly vented, providing safe, efficient, and reliable heating for your home. Always prioritize safety and consult with qualified professionals when necessary to ensure a successful installation.