How To Vent Range Hood To Outside

Many homeowners face a frustrating situation: a range hood that seems to do little to clear the air. You might be cooking up a storm, yet the kitchen remains filled with smoke, odors, and grease. The culprit? Often, it’s a problem with the range hood’s venting system. This article will guide you through troubleshooting and fixing common venting issues, helping you reclaim a clean and fresh cooking space.
Diagnosing the Problem: Is Your Range Hood Actually Venting Outside?
Before diving into fixes, we need to confirm if your range hood is even attempting to vent outside. A seemingly functioning hood might just be recirculating air, which is ineffective for removing heavy smoke and grease.
Step 1: The Obvious Check – Fan Operation
First, turn on your range hood fan to the highest setting. Listen carefully. Do you hear the fan motor working, and can you feel air being drawn up into the hood? If not, the problem could be with the fan motor itself, a completely separate issue that likely requires professional attention.
Step 2: The Tissue Test
A simple yet effective test. Hold a sheet of tissue paper up to the range hood filter while the fan is running at its highest speed. If the venting system is working even marginally, the tissue should be held firmly against the filter by suction. If the tissue falls, there’s a significant problem with the airflow.
Step 3: The Outdoor Vent Check
This is crucial. Go outside and locate the exterior vent cap (usually on an outside wall or the roof). With the range hood fan running, can you feel air being exhausted from the vent? Be careful if the vent is high up. If you don't feel any airflow, or if it’s very weak, it indicates a blockage or a disconnection within the venting system.
Step 4: Visual Inspection (Power Off!)
Safety first! Turn off the power to your range hood at the circuit breaker before attempting any internal inspections. Remove the grease filters. Now, using a flashlight, look up into the ductwork. Can you see any obvious obstructions like nests, debris, or excessive grease buildup? Take note of the duct material (rigid or flexible) as this will influence the type of repair.
DIY Fixes: Common Venting Problems and Solutions
Once you've diagnosed the problem, you can attempt some simple DIY fixes. Remember to always prioritize safety and consult a professional if you're unsure about any step.
Problem 1: Clogged Grease Filters
The Solution: Dirty grease filters are a common culprit behind poor airflow. Remove the filters and wash them thoroughly with hot, soapy water. You can also soak them in a degreaser for stubborn buildup. Ensure the filters are completely dry before reinstalling them. For heavily soiled filters, consider replacing them altogether.
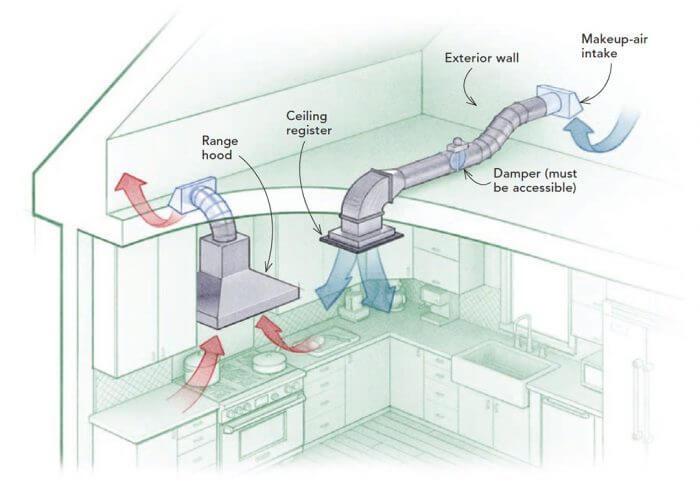
Problem 2: Blocked or Kinked Ductwork (Flexible Duct)
The Solution: Flexible ductwork is prone to kinking and sagging, which significantly restricts airflow. Inspect the entire length of the duct, paying close attention to bends. If you find kinks, try to straighten them out. If the duct is sagging, consider adding supports (like straps) to keep it straight. If the flexible duct is damaged or excessively greasy internally, replace it with a new section of the same size and type. Measure the existing duct length before purchasing a replacement.
To replace it, use metal tape to secure the new duct to the range hood adapter and to the exterior vent adapter. Do not use duct tape, as it will dry out and crack over time. Make sure the tape is applied smoothly and tightly to prevent leaks.
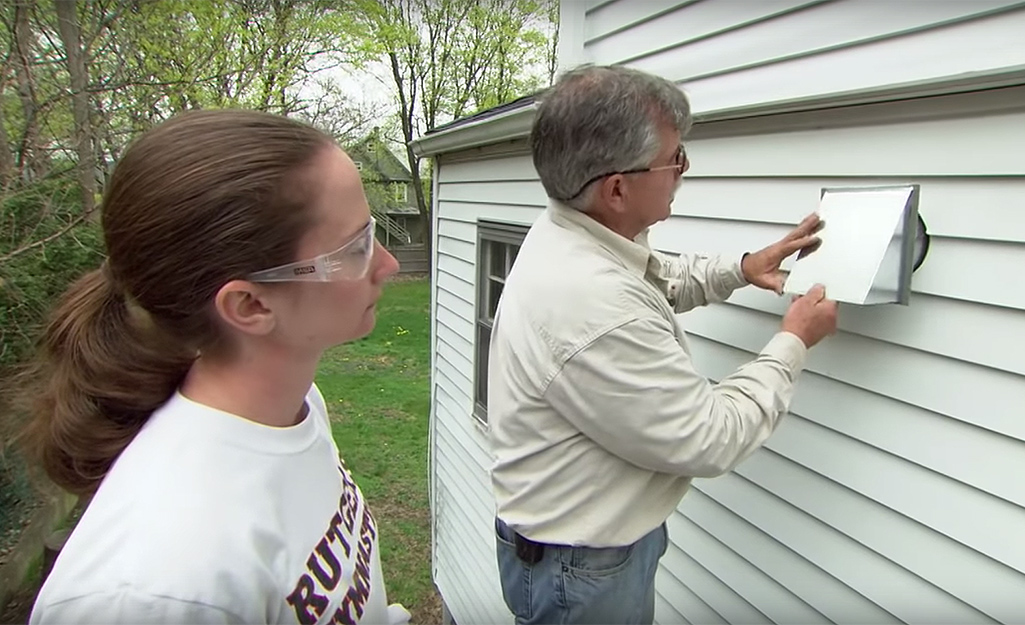
Problem 3: Blocked Exterior Vent Cap
The Solution: Insects, birds, and debris can build nests inside the exterior vent cap, blocking airflow. From the outside (using a ladder safely if necessary), inspect the vent cap. Remove any visible obstructions. Some vent caps have removable screens that can be cleaned. If the vent cap is heavily damaged or rusted, replace it with a new one of the same size and type.
Problem 4: Loose Duct Connections
The Solution: Over time, the connections between the ductwork and the range hood or exterior vent can loosen, creating air leaks. Inspect all connections and tighten any loose clamps or screws. If the connections are sealed with tape, check for cracks or peeling. Replace any damaged tape with new metal foil tape (not duct tape). Metal tape is heat-resistant and creates a much better seal.
Problem 5: Excessive Duct Length or Bends
The Solution: This is a more complex issue. Longer duct runs and numerous bends significantly reduce airflow. Ideally, your duct run should be as short and straight as possible. If your current duct run is excessively long or has multiple sharp bends, you may need to reroute the ductwork. This might involve moving the location of the exterior vent or reconfiguring the duct path. This type of change is better left to a professional.
When to Call a Professional
While many venting problems can be addressed with DIY fixes, there are situations where calling a professional is essential. Do not hesitate to seek expert help if:
- You are uncomfortable working with electricity or heights.
- You suspect a problem with the range hood's fan motor or internal wiring.
- The ductwork is inaccessible or requires significant modification.
- You are unsure about the proper size or type of ductwork to use.
- You suspect there is a fire hazard within the ductwork.
- Your range hood is not working after you have tried all the DIY solutions.
Specifically, issues with electrical wiring, gas line proximity, or structural modifications (like cutting through walls) absolutely require professional expertise. Attempting these repairs yourself could be dangerous and potentially violate building codes.
Preventative Maintenance: Keeping Your Range Hood Venting Properly
Preventative maintenance is key to ensuring your range hood vents effectively for years to come.
- Clean grease filters regularly (at least once a month, or more often if you cook frequently).
- Inspect the exterior vent cap periodically for obstructions.
- Periodically check duct connections for leaks or looseness.
- Consider having the ductwork professionally cleaned every few years to remove accumulated grease and debris.
Choosing the Right Ductwork
The type of ductwork you use significantly impacts the performance of your range hood. Rigid metal ductwork is generally preferred over flexible ductwork because it offers less resistance to airflow. Smooth, rigid ductwork allows air to move more freely, maximizing the hood's efficiency.
If you must use flexible ductwork, choose a high-quality, smooth-walled flexible duct to minimize airflow restriction. Avoid using cheap, corrugated flexible duct, as it creates significant turbulence and reduces venting efficiency.
The diameter of the ductwork is also crucial. Consult your range hood's specifications to determine the recommended duct diameter. Using a duct that is too small will restrict airflow and reduce the hood's effectiveness. Using the same diameter as the hood exhaust port is best. Increasing it can help a little, but decreasing it will severely impact the hood.
Understanding CFM (Cubic Feet per Minute)
CFM refers to the volume of air that the range hood fan can move per minute. A higher CFM rating indicates a more powerful fan and better ventilation. Choosing the right CFM for your cooking style and kitchen size is essential.
As a general guideline:
- For light cooking (occasional frying or boiling), a CFM of 300-400 may be sufficient.
- For moderate cooking (regular frying or stir-frying), a CFM of 400-600 is recommended.
- For heavy cooking (frequent frying, grilling, or wok cooking), a CFM of 600 or higher is ideal.
Consider the size of your kitchen when determining the appropriate CFM. A larger kitchen requires a higher CFM to effectively remove smoke and odors. Also, gas ranges generally require higher CFM range hoods than electric ranges.
Conclusion
By following these steps, you can diagnose and address many common range hood venting problems, restoring proper ventilation to your kitchen. Remember to prioritize safety and call a professional when needed. With regular maintenance and the right approach, you can ensure your range hood continues to keep your kitchen clean, fresh, and comfortable for years to come.