How To Wire A Hvac Thermostat
Imagine this: it's a sweltering summer day, or a frigid winter night, and your HVAC system suddenly stops working. Your first instinct might be to call an expensive repair technician, but before you do, let's explore a common culprit – the thermostat. Often, the issue isn't a major mechanical failure but a simple wiring or setting problem with your thermostat. This guide will walk you through basic thermostat troubleshooting, empowering you to potentially fix the issue yourself while emphasizing safety and when to call a professional.
Understanding Thermostat Basics
Before diving in, let's understand the core components involved. A thermostat is essentially a control panel for your heating and cooling system. It senses the room temperature and signals the HVAC unit to turn on or off to maintain the desired setting. Modern thermostats can be simple or complex, ranging from basic mechanical models to smart, programmable versions.
Key Components:
- Display: Shows the current temperature, set temperature, and system status.
- Buttons/Controls: Used to adjust temperature, fan settings, and program schedules.
- Wiring: Connects the thermostat to the HVAC unit, transmitting signals for heating, cooling, and fan operation.
- Power Source: Could be batteries, low-voltage AC power from the HVAC system, or both.
Safety First!
Before you start any troubleshooting:
- Turn off the power: Locate the circuit breaker that controls your HVAC system and switch it off. This is absolutely crucial to prevent electric shock.
- Use insulated tools: When working with wires, use tools designed for electrical work with insulated handles.
- Take pictures: Before disconnecting any wires, take clear pictures of the existing wiring configuration. This will be invaluable when reconnecting them.
- If unsure, call a pro: If at any point you feel uncomfortable or unsure about what you're doing, stop and call a qualified HVAC technician. It's better to be safe than sorry. Working with electricity and gas can be dangerous if not done correctly.
Troubleshooting Steps: A Step-by-Step Guide
1. Check the Obvious: Power and Basic Settings
Sometimes the simplest solutions are the answer.
- Check the Thermostat Display: Is the screen blank? If so, the first thing to check is the power source.
- Battery Check: If your thermostat uses batteries, replace them with fresh ones. Low batteries are a common cause of thermostat malfunctions.
- Breaker Check: Even if the thermostat has batteries, a tripped breaker can prevent the HVAC unit from responding. Double-check that the HVAC circuit breaker is switched on.
- Thermostat Mode: Make sure the thermostat is set to the correct mode (Heat, Cool, or Auto). Someone may have accidentally changed the setting.
- Temperature Setting: Ensure the set temperature is within a reasonable range. If it's set too high in cooling mode or too low in heating mode, the system won't activate.
- Fan Setting: Verify the fan setting is not set to "On" if you want the fan to run only when heating or cooling.
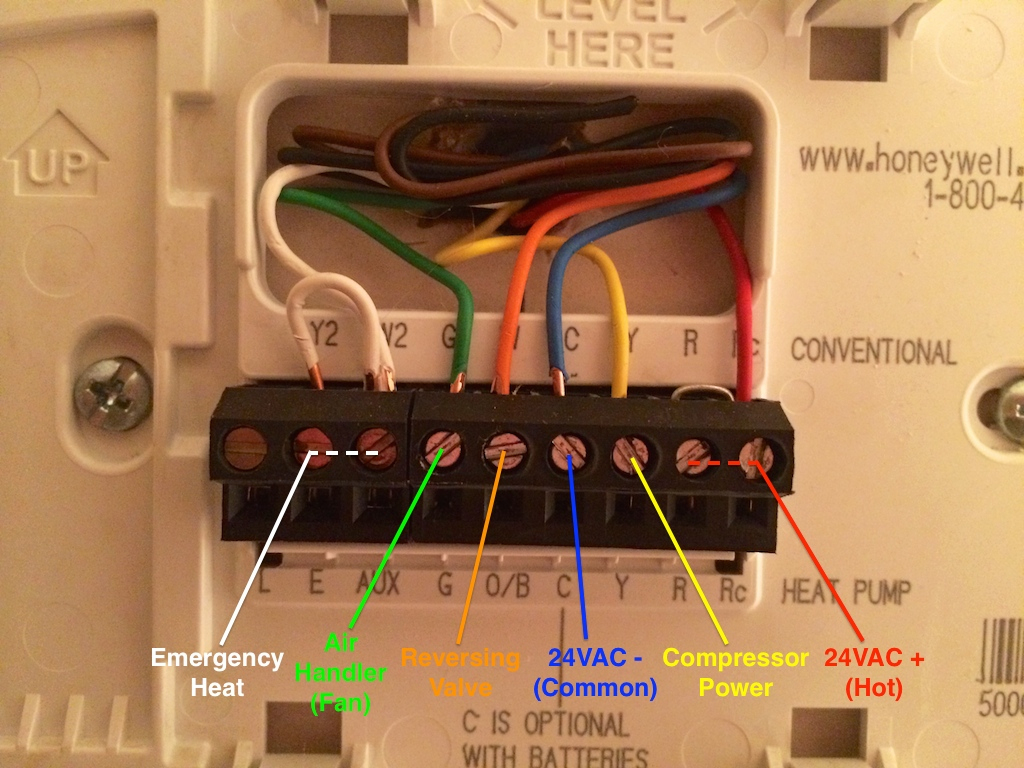
2. Inspect the Wiring Connections
This is where your photos from the safety steps become essential.
- Access the Wiring: Carefully remove the thermostat from its base plate, exposing the wiring terminals. Most thermostats either clip or screw onto the base.
- Visual Inspection: Look for any loose wires, corroded terminals, or frayed insulation. Gently tug on each wire to ensure it's securely connected to its terminal.
- Loose Wires: If you find a loose wire, carefully re-insert it into the correct terminal. Refer to your "before" pictures to ensure correct placement. If the wire is damaged, you may need to strip the end and re-attach it.
- Clean Corroded Terminals: If you see corrosion, use a small wire brush or contact cleaner to gently clean the terminals.
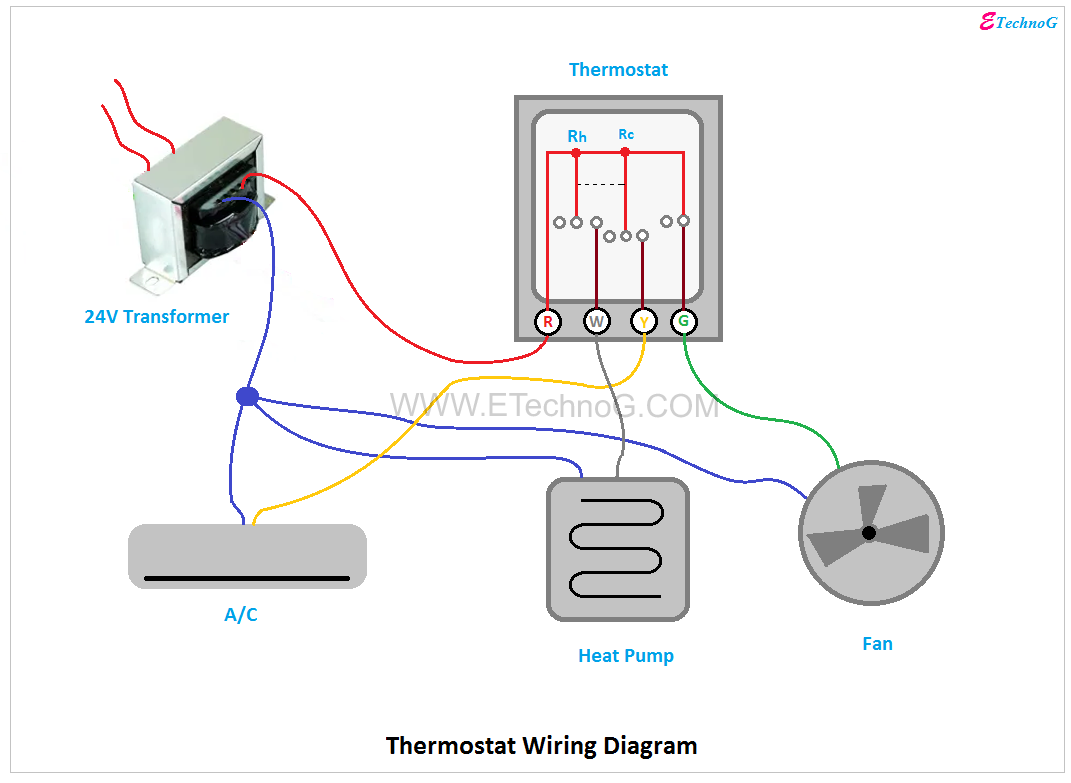
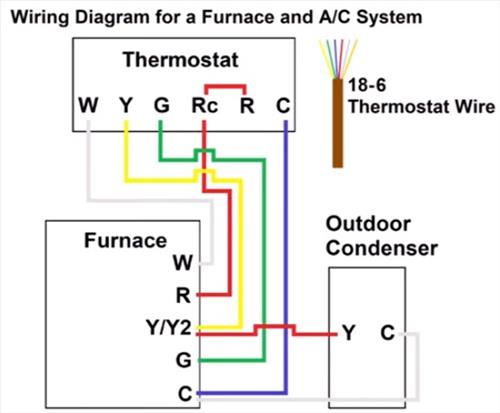
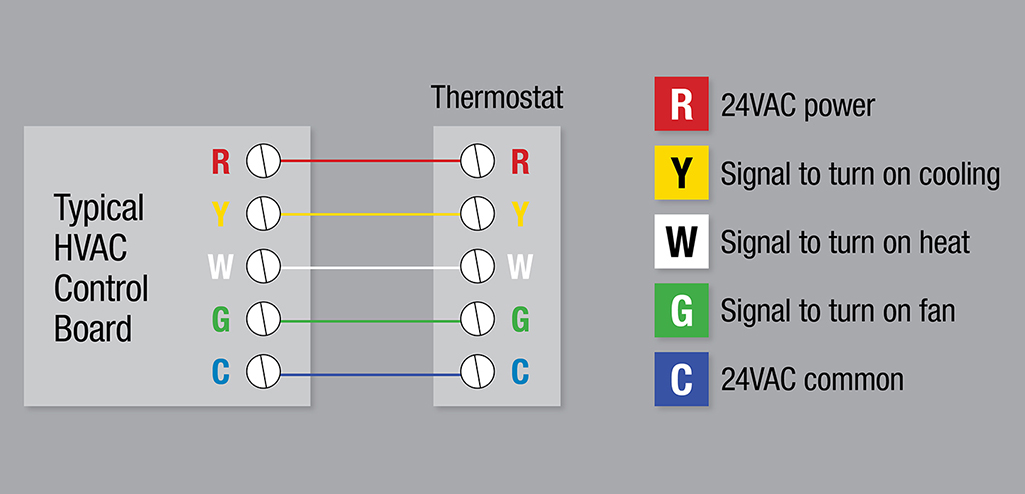
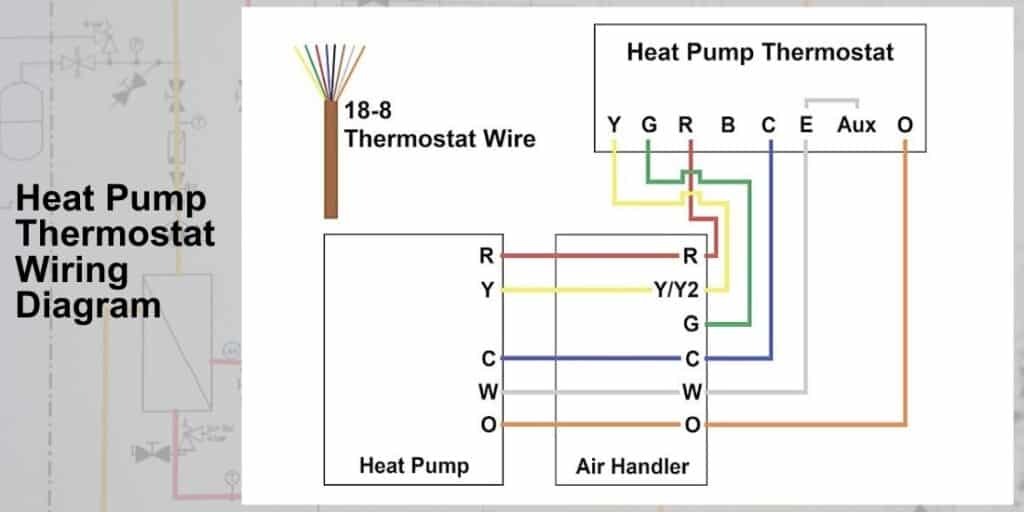
Common Thermostat Wire Labels:
- R: Power (usually Red)
- W: Heat (usually White)
- Y: Cool (usually Yellow)
- G: Fan (usually Green)
- C: Common (usually Blue or Black) - Note: Not all thermostats require a C wire
3. Checking for a Blown Fuse (Low-Voltage Systems)
Many HVAC systems use a low-voltage control circuit, often protected by a fuse located either in the HVAC unit itself or near the transformer that provides the low voltage.
- Locate the Fuse: Consult your HVAC system's manual to find the location of the low-voltage fuse. It's typically a small, automotive-style fuse.
- Inspect the Fuse: Remove the fuse and visually inspect it. If the filament inside the fuse is broken, the fuse is blown and needs to be replaced.
- Replace the Fuse: Replace the blown fuse with a new fuse of the exact same amperage rating. Using a fuse with a higher rating can damage your system.
If the fuse blows again shortly after replacement, there is likely a short circuit in the wiring. This requires professional diagnosis and repair.
4. Testing the Thermostat (Simple Continuity Test)
This test requires a multimeter and can help determine if the thermostat is properly completing the circuit when calling for heat or cooling.
- Set the Multimeter: Set your multimeter to the continuity setting (often indicated by a diode symbol or a sound wave symbol).
- Disconnect Wires: Disconnect the R (power) and W (heat) wires from the thermostat terminals.
- Test for Continuity: Touch one multimeter probe to the R wire and the other to the W wire.
- Adjust Thermostat: Set the thermostat to heating mode and raise the temperature above the current room temperature.
- Check the Multimeter: If the thermostat is working correctly, the multimeter should show continuity (a beep or a reading close to zero ohms) when the thermostat calls for heat. If there's no continuity, the thermostat might be faulty.
- Repeat for Cooling: Repeat steps 2-5 using the R and Y (cooling) wires, setting the thermostat to cooling mode and lowering the temperature below the current room temperature.
A lack of continuity when the thermostat is calling for heat or cooling suggests a faulty thermostat that may need replacing.
5. Replacing a Thermostat
If you've determined that your thermostat is faulty, replacing it can be a relatively straightforward DIY project. However, consider the complexity of your existing thermostat before proceeding.
- Purchase a Compatible Thermostat: Choose a replacement thermostat that is compatible with your HVAC system (e.g., gas furnace, electric furnace, heat pump). Note whether or not you have a C wire. Consider upgrading to a programmable or smart thermostat for improved energy efficiency.
- Follow the Manufacturer's Instructions: Carefully follow the wiring instructions provided with the new thermostat. Incorrect wiring can damage your HVAC system.
- Use Your "Before" Pictures: Refer to the pictures you took before disconnecting the old thermostat to ensure you connect the wires to the correct terminals on the new thermostat.
- Double-Check Connections: Once you've wired the new thermostat, double-check all connections to ensure they are secure.
- Test the System: After installing the new thermostat, turn the power back on and test the system in both heating and cooling modes.
When to Call a Professional HVAC Technician
While many thermostat issues can be resolved with simple DIY troubleshooting, some situations require the expertise of a qualified HVAC technician.
- Complex Wiring: If you have a complex wiring configuration or are unsure about how to connect the wires, it's best to call a professional.
- Gas Leaks: If you suspect a gas leak (e.g., you smell gas), immediately evacuate the premises and call your gas company or a qualified HVAC technician. Do not attempt to troubleshoot the system yourself.
- Refrigerant Leaks: If you suspect a refrigerant leak (e.g., ice buildup on the outdoor unit, poor cooling performance), call a professional. Refrigerant leaks require specialized equipment and training to repair.
- Compressor Issues: If your system is making unusual noises or the compressor is not running, call a professional. Compressor repairs are complex and require specialized knowledge.
- Electrical Problems: If you suspect an electrical problem (e.g., sparking wires, burning smells), turn off the power to the system and call a qualified electrician or HVAC technician.
- Repeated Problems: If you've tried troubleshooting the system yourself and the problem persists, it's time to call a professional. There may be an underlying issue that requires specialized diagnosis and repair.
- Older Systems: If you have an older HVAC system, it may be more susceptible to problems. A professional can assess the system and recommend the best course of action.
- You are Uncomfortable: Ultimately, if you feel uncomfortable working with electricity or gas, or if you're simply not sure what you're doing, it's always best to call a professional.
Preventative Maintenance
Regular maintenance can help prevent thermostat and HVAC system problems.
- Change Thermostat Batteries Regularly: If your thermostat uses batteries, replace them annually.
- Clean the Thermostat: Dust and debris can accumulate on the thermostat, affecting its accuracy. Clean the thermostat with a soft cloth.
- Schedule Annual HVAC System Tune-Ups: Have your HVAC system professionally inspected and tuned up annually. This can help identify and address potential problems before they become major issues.
- Change Air Filters Regularly: A dirty air filter can restrict airflow and cause your HVAC system to work harder, potentially leading to thermostat problems.
By following these troubleshooting steps and knowing when to call a professional, you can keep your HVAC system running smoothly and comfortably throughout the year.