How To Wire A Thermostat To A Ac Unit
Frequently Asked Questions: Wiring a Thermostat to an AC Unit
Understanding how to wire a thermostat to your AC unit can seem daunting, but it's a manageable task with the right information. This FAQ aims to answer common questions and guide you through the process. Remember to always prioritize safety and consult a qualified HVAC professional if you're unsure about any step.
1. Why would I need to wire a new thermostat to my AC unit?
There are several reasons why you might need to wire a new thermostat:
- Upgrading to a Smart Thermostat: Smart thermostats offer features like remote control, energy tracking, and learning capabilities. Installing one often requires rewiring.
- Replacing a Faulty Thermostat: If your old thermostat is malfunctioning (inaccurate temperature readings, unresponsive buttons, etc.), replacement and rewiring are necessary.
- Relocating a Thermostat: Sometimes, the thermostat's location is inefficient (e.g., near a heat source). Moving it requires rewiring.
- System Compatibility: Not all thermostats are compatible with all AC systems. Upgrading or replacing your AC system might necessitate a thermostat change.
- New AC Unit Installation: When installing a completely new AC unit, a new thermostat is almost always part of the package.
2. What safety precautions should I take before starting?
Safety is paramount when working with electrical components. Before you even think about touching wires, take these critical steps:
- Turn Off the Power: Completely shut off the power to both your AC unit and your furnace (or air handler). Locate the circuit breakers for both and flip them to the "off" position. Double-check with a voltage tester to ensure the power is completely disconnected at both the thermostat and the AC unit/furnace.
- Label the Wires: Before disconnecting any wires from your old thermostat, carefully label each wire with masking tape and a pen. Use the wire's terminal letter (e.g., "R", "W", "Y", "G", "C") as the label. Take a picture as a backup! This is crucial for connecting them correctly to the new thermostat.
- Read the Manuals: Consult the installation manuals for both your new thermostat and your AC unit (or furnace). They contain specific wiring diagrams and instructions relevant to your equipment.
- Wear Safety Glasses: Protect your eyes from dust and debris.
- Use Insulated Tools: Work with insulated screwdrivers and other tools designed for electrical work.
- If in Doubt, Call a Pro: If you're uncomfortable or unsure about any step, do not proceed. Contact a qualified HVAC technician or electrician. It's better to be safe than sorry.
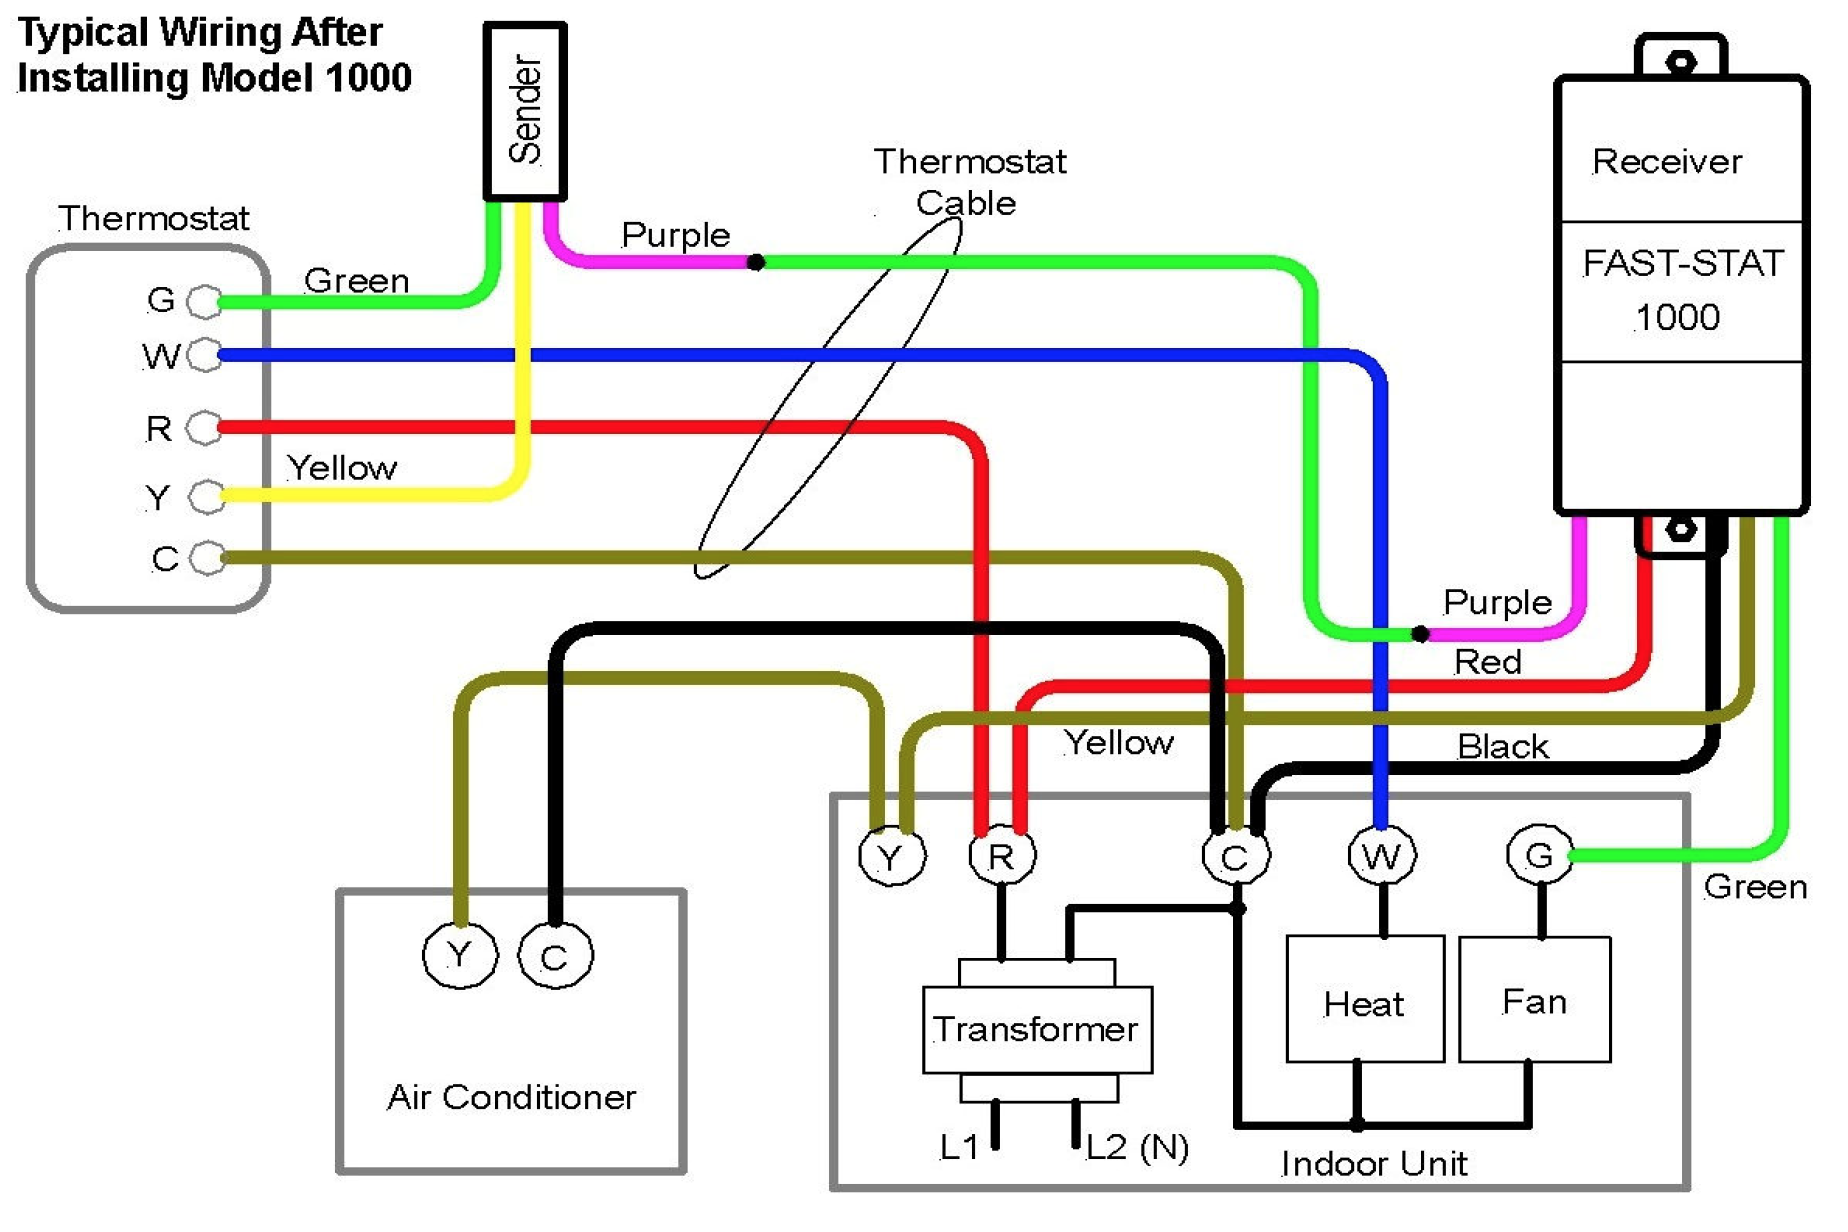
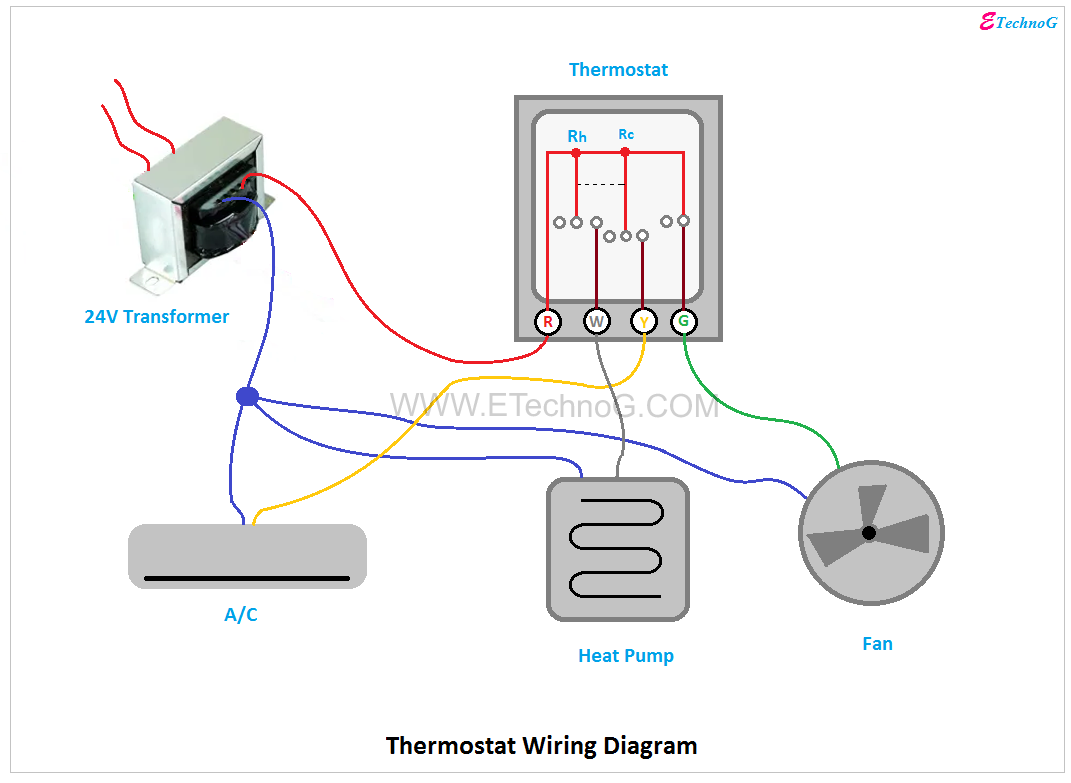
3. What are the common thermostat wire color codes and what do they mean?
While wire colors aren't standardized across the board, there are some common conventions. Understanding these can help with identification, but always rely on the terminal labels (R, W, Y, G, C) first and foremost. Here's a general guide:
- R (Red): Power (24V AC) - Often labeled as Rh (heat) or Rc (cool) depending on whether you have separate transformers for heating and cooling. If you have two R wires, the new thermostat may have separate Rh and Rc terminals; in that case, connect Rh to the R wire from your heating system and Rc to the R wire from your cooling system. If you only have one R terminal on the new thermostat, you may need to use a jumper wire (often included) to connect Rh and Rc. Consult your new thermostat's manual.
- W (White): Heat - Controls the heating system. May be labeled as W1 or AUX.
- Y (Yellow): Cooling - Controls the air conditioning system. May be labeled as Y1 or Compressor.
- G (Green): Fan - Controls the blower fan (for circulation).
- C (Blue or Black): Common - Provides a return path for the 24V AC power. This wire is essential for many newer thermostats to function correctly, especially smart thermostats. If you don't have a C wire, you may need to run a new wire from your furnace/air handler or use a "C-wire adapter" (see question #6).
- Other Wires: Some systems have additional wires for auxiliary heat (AUX), emergency heat (E), or other functions. Refer to your system's wiring diagram for these.
Important Note: These are just guidelines. Always refer to the wiring diagrams for your specific thermostat and HVAC system. Wire colors can vary, and relying solely on color coding can lead to incorrect wiring and potential damage.
4. What if I don't have a "C" wire, but my new thermostat requires it?
The "C" wire (common wire) is crucial for powering many modern thermostats, especially smart thermostats that require constant power for their displays, Wi-Fi connectivity, and other features. If you don't have a C wire already connected, you have a few options:
- Run a New Wire: This is the best and most reliable solution. If you have extra unused wires in the existing thermostat cable, you can connect one of them to the "C" terminal on both the thermostat and the furnace/air handler control board.
- Use a "C-Wire Adapter": These adapters allow you to "borrow" power from another wire (typically the fan wire, G) to create a C wire. They involve making connections at both the thermostat and the furnace/air handler. Follow the adapter's instructions carefully. These are a viable solution, but they may not work with all systems.
- Check for an Existing Unused Wire: Sometimes, there's an extra wire tucked behind the thermostat, not connected to anything. Check at both the thermostat and furnace/air handler. If you find one, you can use it as your new C wire.
Caution: Incorrectly installing a C-wire adapter can damage your thermostat or HVAC system. If you're not comfortable with electrical work, it's best to hire a professional.
5. How do I connect the wires to the new thermostat's terminals?
The process depends on the type of terminals your new thermostat has, but the general principles remain the same:
- Identify the Terminals: Locate the terminals on your new thermostat. They should be clearly labeled with letters (R, W, Y, G, C, etc.) that correspond to the wires.
- Match the Labels: Carefully match the labeled wires from your old thermostat to the corresponding terminals on the new thermostat. This is where your labeling in step 2 becomes critical!
- Secure the Wires: Most thermostats use one of these methods to secure the wires:
- Screw Terminals: Loosen the screw on the terminal, insert the bare end of the wire, and tighten the screw to secure it. Make sure the wire is firmly held in place.
- Push-In Terminals: Push the wire into the designated hole for the terminal. Some push-in terminals have a release mechanism (often a small button) to remove the wire.
- Clamp Terminals: These terminals use a clamp to hold the wire in place. Loosen the clamp, insert the wire, and tighten the clamp.
- Gently Tug: After connecting each wire, gently tug on it to ensure it's securely fastened.
- Neat Wiring: Keep the wires neat and organized behind the thermostat to prevent them from getting pinched or damaged.
6. What if the new thermostat doesn't seem to be working correctly after wiring it up?
If your new thermostat isn't working as expected, don't panic. Troubleshoot systematically:
- Double-Check the Wiring: The most common cause of problems is incorrect wiring. Carefully review your wire labels and compare them to the wiring diagram in your new thermostat's manual. Ensure that each wire is connected to the correct terminal. Also verify that the wires are securely connected.
- Check the Power: Make sure the circuit breakers for both your AC unit and your furnace/air handler are turned on. Verify that the thermostat is receiving power. Some thermostats have a battery backup; ensure the battery is fresh or properly installed.
- Thermostat Settings: Ensure the thermostat is set to the correct mode (heat, cool, auto, off) and temperature. Check for any programming conflicts or scheduling issues.
- System Switch: Confirm the system switch on the thermostat (if present) is set to the correct position (heat, cool, or auto).
- Fuse Check: Check the fuse inside your furnace/air handler. A blown fuse could prevent the system from operating.
- Manufacturer Reset: Consult the thermostat manual for instructions on how to perform a factory reset. This can sometimes resolve software glitches.
- Consult the Manual: Review the troubleshooting section of your new thermostat's manual.
- Professional Help: If you've checked everything and the thermostat still isn't working, it's time to call a qualified HVAC technician. There could be a more complex issue with your AC unit or furnace.
7. Are there any common mistakes to avoid when wiring a thermostat?
Yes! Avoiding these common pitfalls can save you time, frustration, and potential damage to your equipment:
- Not Turning Off the Power: This is the biggest mistake. Always disconnect the power before working with electrical wires.
- Not Labeling Wires: Proper labeling is crucial. Don't rely on memory or guesswork.
- Ignoring the Manuals: Read the installation manuals for both your thermostat and your HVAC system. They contain vital information specific to your equipment.
- Over-Tightening Screws: Over-tightening screw terminals can damage the wires or the thermostat.
- Forcing Wires: If a wire doesn't seem to fit properly, don't force it. Double-check the terminal labels and ensure you're using the correct wire.
- Ignoring the C Wire Requirement: Don't assume you can skip the C wire. Many modern thermostats require it for proper operation.
- Using Wire Nuts Inside Thermostat Housing: Do not use wire nuts or other bulky connectors inside the thermostat housing or at the furnace/air handler. These can prevent the thermostat from sitting flush or cause shorts.
- Connecting Wires to the Wrong Terminals: This is the most frequent cause of malfunctioning thermostats after installation.
- Assuming all systems are wired the same: Different manufacturers or even different models within the same manufacturer might have slight wiring differences.
Disclaimer: This FAQ provides general guidance. Always consult the installation manuals for your specific thermostat and HVAC system. Wiring diagrams should always be followed. If you are not comfortable performing electrical work, hire a qualified HVAC technician.