How To Wire Ac Unit To Thermostat

Wiring Your AC Unit to Your Thermostat: A Comprehensive Guide
Connecting your air conditioner to your thermostat might seem daunting, but understanding the basics can empower you to troubleshoot issues and potentially save on HVAC repair costs. This guide will walk you through the process, emphasizing safety and when to call in a professional. Always disconnect power to both the AC unit and the furnace/air handler before working on any wiring.
Safety First!
- Turn off the power: Locate the circuit breakers for both the indoor (furnace/air handler) and outdoor (AC unit) units and switch them off. Double-check with a non-contact voltage tester to confirm power is off.
- Use insulated tools: Protect yourself from electrical shock.
- Document everything: Take pictures of the existing wiring before disconnecting anything. This serves as a reference when reconnecting.
- Work in daylight: Ensure adequate lighting for clear visibility.
- If unsure, call a professional: Electricity can be dangerous. If you're uncomfortable or unsure about any step, consult a qualified HVAC technician.
Tools & Materials You'll Need
- Screwdrivers (Phillips and Flathead)
- Wire Strippers
- Wire Connectors (e.g., Wire Nuts)
- Non-Contact Voltage Tester
- Multimeter (Optional, but recommended for troubleshooting)
- Pliers
- Electrical Tape
- New Thermostat Wire (18/5 or 18/8 gauge, depending on your system. Check your existing wiring)
- Safety Glasses
- Work Gloves
- Flashlight or Headlamp
Understanding Thermostat Wiring Basics
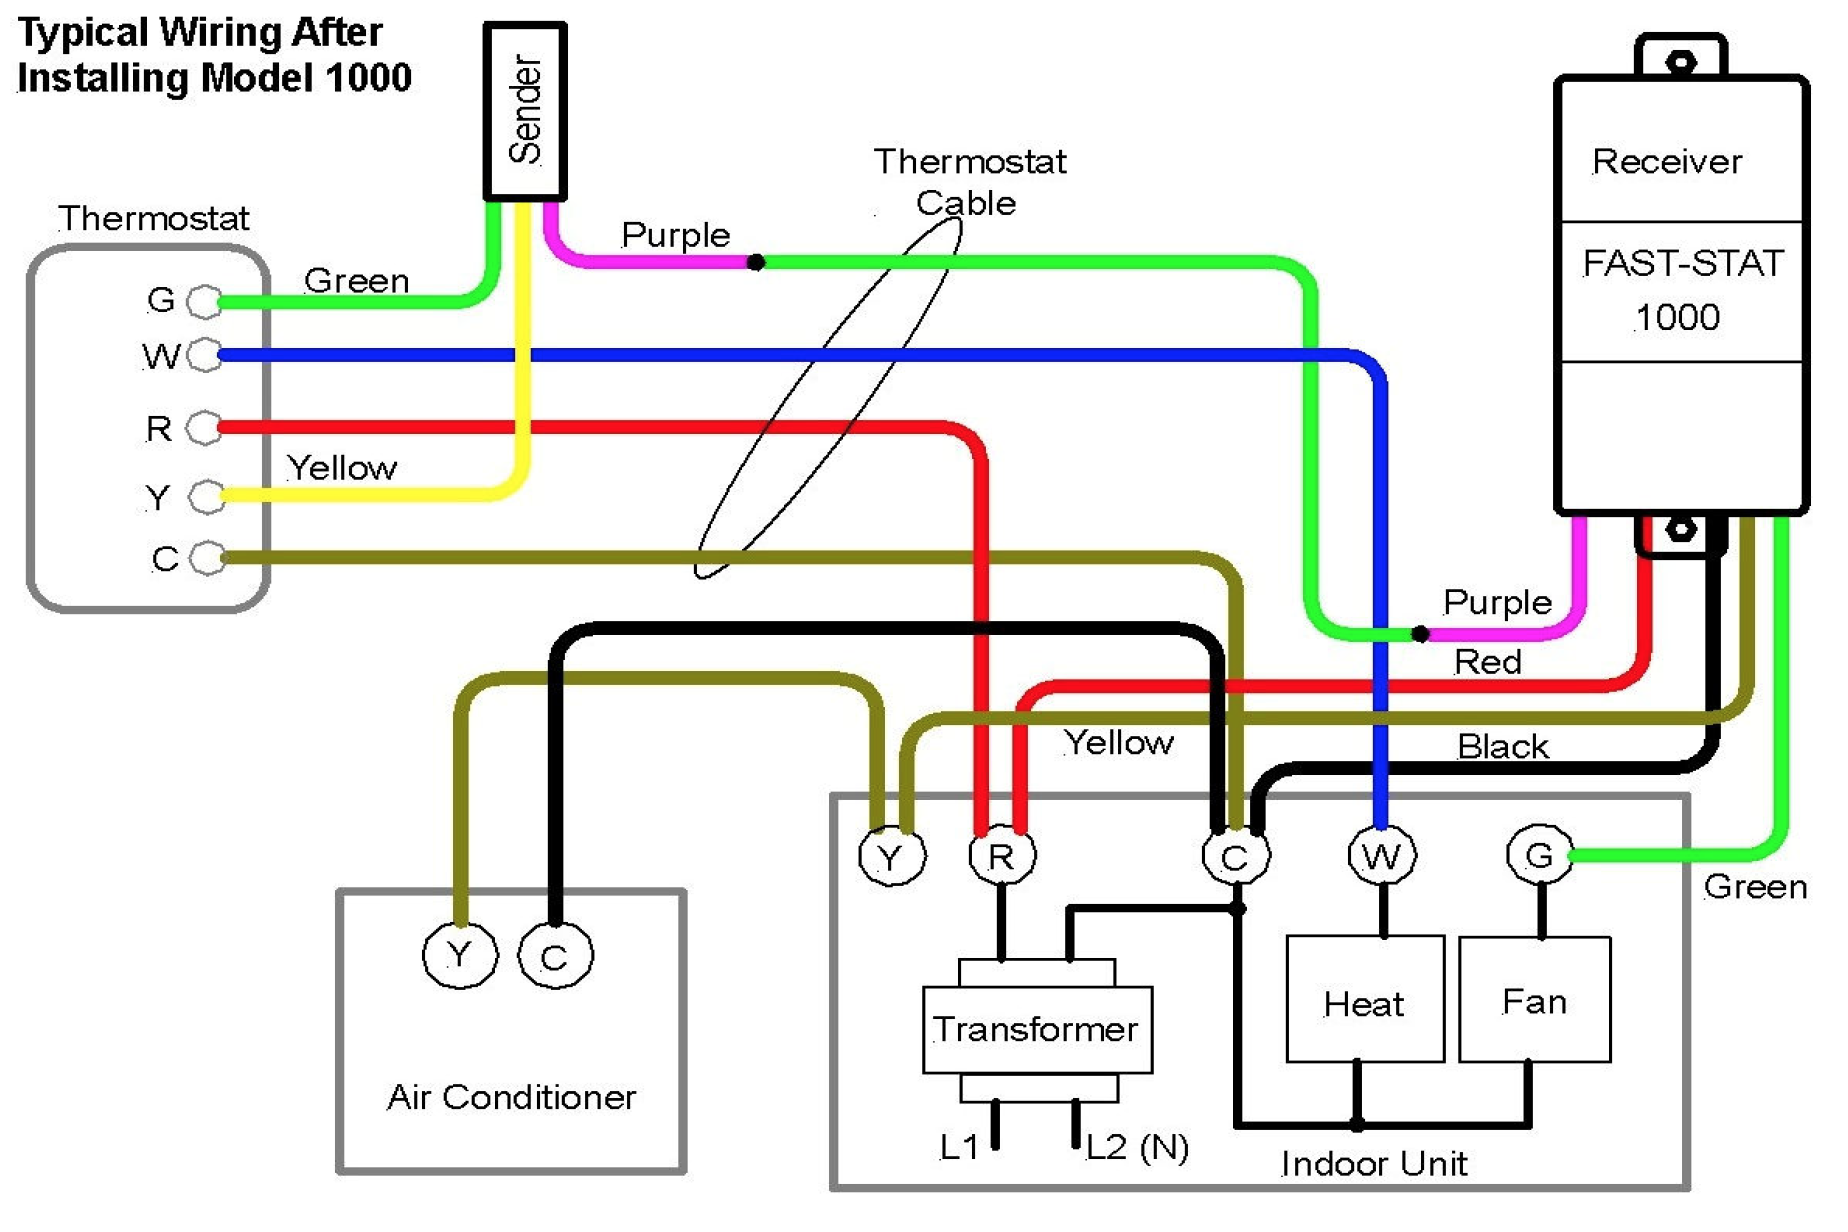
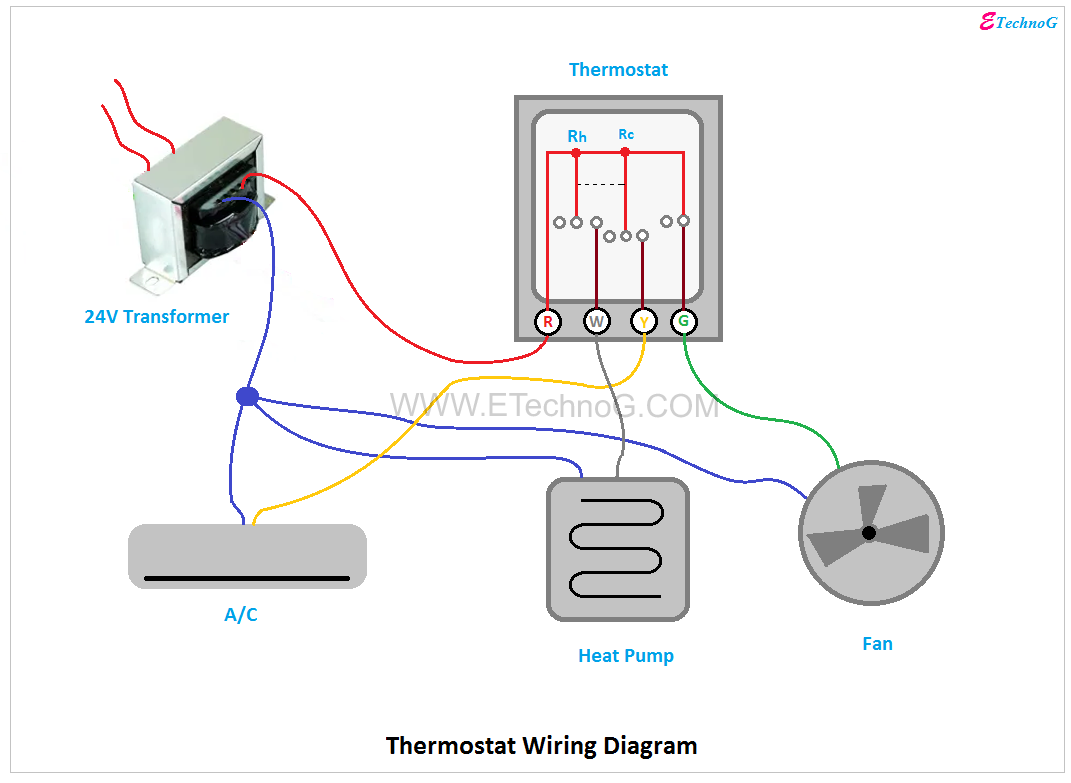
Thermostat wiring uses different colored wires to control various functions of your HVAC system. Common wires and their functions include:
- R (Red): 24V Power
- C (Common): 24V Common (Provides power to the thermostat)
- Y (Yellow): Compressor (Controls the AC unit)
- G (Green): Fan (Controls the blower fan in the air handler)
- W (White): Heat (Controls the heating system)
- O/B (Orange/Blue): Reversing Valve (Controls the heat pump's heating/cooling mode – O is usually for cooling, B for heating)
- Rh (Red - Heat): 24V Power for heating systems (often jumpered to R)
- Rc (Red - Cooling): 24V Power for cooling systems (often jumpered to R)
Note that the specific wire colors may vary depending on the thermostat and HVAC system. Always refer to the wiring diagrams for your specific equipment.
Step-by-Step Wiring Guide
1. Prepare the Workspace
Turn off the power to both the AC unit and the furnace/air handler at the circuit breaker. Remove the thermostat cover and the access panels on both the AC unit and the furnace/air handler. This will expose the wiring connections.
2. Document Existing Wiring
Before disconnecting anything, take clear pictures of the wiring at both the thermostat, the AC unit's control panel, and the furnace/air handler's control board. Label each wire with tape if necessary to avoid confusion during reconnection.
3. Disconnect the Old Wiring
Carefully disconnect the wires from the old thermostat and the AC unit/furnace/air handler. Use wire strippers to prepare the ends of the wires if necessary. Make sure the exposed copper wire is clean and free of corrosion.
4. Run the New Thermostat Wire (If Necessary)
If you're replacing the thermostat wire, carefully run the new wire from the thermostat location to the furnace/air handler. Secure the wire along its path to prevent it from being damaged or interfering with moving parts. You might need to drill small holes to run the wire through walls or floors. Use existing pathways wherever possible. You might also need to replace the wiring between the indoor unit and the outdoor unit.
5. Connect the Wires at the Thermostat
Connect the wires to the new thermostat according to the manufacturer's instructions. Match the wire colors to the corresponding terminals (e.g., R to R, Y to Y, G to G). If your new thermostat has different terminal designations, refer to its manual for guidance. If you have separate Rh and Rc terminals, and a single R wire, you might need to remove a jumper wire between them.
6. Connect the Wires at the Furnace/Air Handler
Connect the wires at the furnace/air handler, matching them to the corresponding terminals. Again, refer to the wiring diagram for your specific unit. Pay close attention to the C (Common) wire, as it's often required for modern thermostats to function correctly. Double check the voltage going to the thermostat.
7. Connect the Wires at the AC Unit
Locate the control panel inside the AC unit. You'll typically find a contactor and a terminal block. Connect the Y (Yellow) wire from the thermostat wire to the Y terminal on the contactor. The C (Common) wire from the thermostat typically connects to the other side of the 24V transformer inside the furnace/air handler, not directly to the AC unit. Some systems may have a low-voltage connection between the furnace/air handler and the AC unit for the C wire. Verify this with your system's wiring diagram. Do not connect high voltage wiring unless you are a licensed electrician.
8. Secure Connections and Test
Ensure all wire connections are secure. Use wire connectors to join any wires together and electrical tape to insulate exposed connections. Replace the access panels on the AC unit and the furnace/air handler. Restore power to both units at the circuit breaker. Test the thermostat to ensure it's controlling the AC unit and the furnace/air handler correctly. Set the thermostat to cool and verify that the AC unit starts and the blower fan turns on. Switch to heat and make sure that system starts. Turn off the system, wait 5 minutes, then turn it back on to ensure it is running as expected.
Common Wiring Problems and Troubleshooting
- Thermostat Not Turning On: Check the C (Common) wire connection. Many modern thermostats require a C wire for power. Verify that the thermostat is getting the correct voltage. Check the batteries if your thermostat uses them.
- AC Not Turning On: Check the Y (Yellow) wire connection at the thermostat, the furnace/air handler, and the AC unit. Ensure the contactor in the AC unit is being activated when the thermostat calls for cooling. Use a multimeter to check for voltage at the contactor.
- Fan Not Working: Check the G (Green) wire connection. Make sure the blower fan motor is functioning properly.
- Incorrect Wiring: Double-check all wire connections against the wiring diagrams for your equipment.
- Blown Fuse or Tripped Breaker: If a fuse blows or a breaker trips, it could indicate a short circuit. Inspect the wiring for damage or loose connections. Replace the fuse or reset the breaker after correcting the issue.
When to Call a Professional
While this guide provides a comprehensive overview of wiring your AC unit to your thermostat, certain situations require the expertise of a qualified HVAC technician:
- You're uncomfortable working with electricity.
- You can't identify the wiring connections or diagrams.
- You suspect a more complex problem beyond simple wiring issues.
- You're dealing with high-voltage wiring.
- You're experiencing frequent electrical problems or system failures.
- You are not comfortable with the equipment.
Estimated Repair Costs
The cost of hiring an HVAC technician to diagnose and repair thermostat wiring issues can vary depending on the complexity of the problem and your location. Here's a general estimate:
- Basic Wiring Repair: $75 - $200
- Thermostat Replacement: $150 - $500 (including the cost of the thermostat)
- Complete Rewiring: $200 - $600 (depending on the length and complexity of the wiring run)
These are just estimates, so it's always best to get a quote from a qualified HVAC technician in your area.
Preventative Maintenance
Regular HVAC maintenance can help prevent wiring problems and ensure your system operates efficiently. Consider the following:
- Annual HVAC Tune-Up: Schedule a professional tune-up each year to inspect and clean your system.
- Clean Air Filters: Replace your air filters regularly (every 1-3 months) to prevent dust and debris from clogging the system.
- Inspect Wiring: Periodically inspect the wiring connections for any signs of damage or corrosion.
By following these tips, you can maintain a comfortable and energy-efficient home while potentially saving on costly repairs.