How To Wire Hard Start Kit

A hard start kit can significantly improve the performance and lifespan of your air conditioner or heat pump, especially in older units or those operating in demanding conditions. Understanding how to wire a hard start kit is a valuable skill for homeowners, real estate investors looking to optimize property systems, and even contractors seeking to provide the best possible service. While this guide provides detailed instructions, remember that working with electricity can be dangerous. If you're not comfortable with electrical work, always consult a qualified HVAC technician.
Understanding Hard Start Kits
Before diving into the wiring process, let's clarify what a hard start kit is and why it's beneficial. A hard start kit provides an extra boost of power to the compressor motor during startup. This reduces the initial amperage draw, which can strain the motor and shorten its lifespan. By reducing this strain, a hard start kit can lead to:
- Extended Compressor Life: Less stress on the motor windings means fewer failures.
- Improved Cooling Performance: The compressor reaches its operating speed faster, resulting in quicker and more efficient cooling.
- Lower Energy Consumption: By reducing the initial surge of power, a hard start kit can slightly lower your energy bills.
- Reduced Voltage Drops: Especially helpful in areas with fluctuating power grids or older wiring.
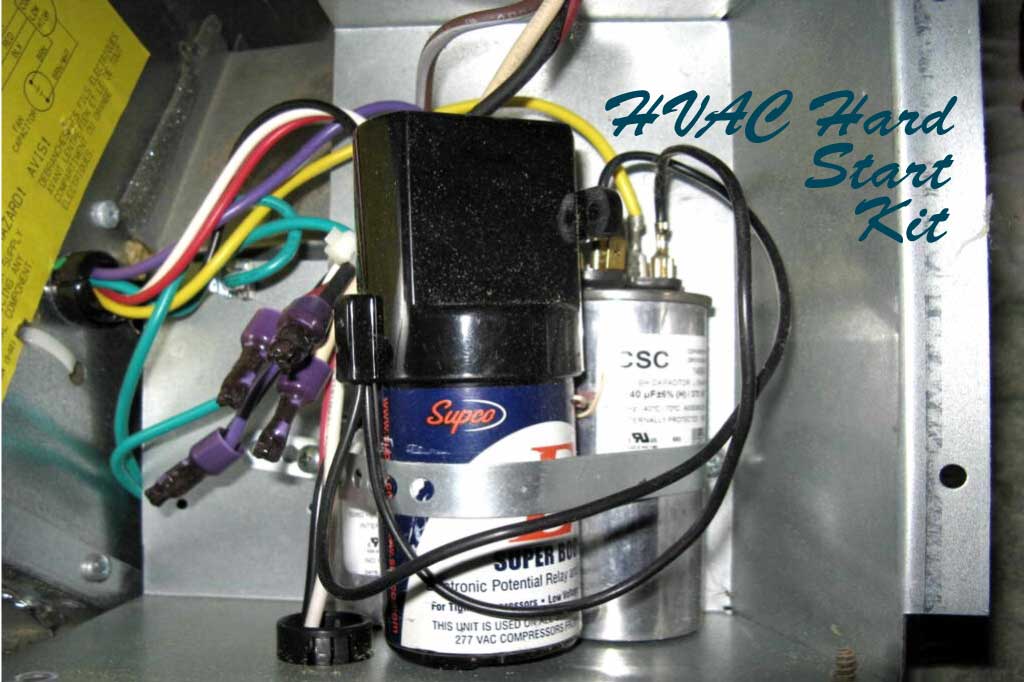
Hard start kits generally consist of a capacitor and a potential relay. The capacitor stores electrical energy and releases it during startup, while the potential relay disconnects the capacitor once the motor reaches a certain speed.
Safety First: Before You Begin
Safety is paramount when working with electrical components. Before you even think about touching any wires, follow these critical steps:
- Disconnect Power: Locate the disconnect switch for your outdoor AC unit (usually a pull-out or breaker). Turn it off completely. Double-check with a voltage tester to ensure no power is flowing to the unit.
- Wear Safety Gear: Use insulated gloves and safety glasses.
- Read the Instructions: Carefully read the instructions included with your specific hard start kit. Wiring configurations can vary slightly between models.
- Take Pictures: Before disconnecting any wires, take clear pictures of the existing wiring configuration. This will be invaluable if you need to refer back to it.
Tools and Materials You'll Need
* Hard Start Kit (appropriate for your AC unit) * Screwdrivers (various sizes, including a Phillips head) * Wire Strippers * Wire Connectors (crimp connectors or wire nuts) * Voltage Tester * Pliers * Electrical Tape * (Optional) MultimeterStep-by-Step Wiring Guide
Note: This is a general guide. Always refer to the specific wiring diagram included with your hard start kit. Improper wiring can damage your AC unit.
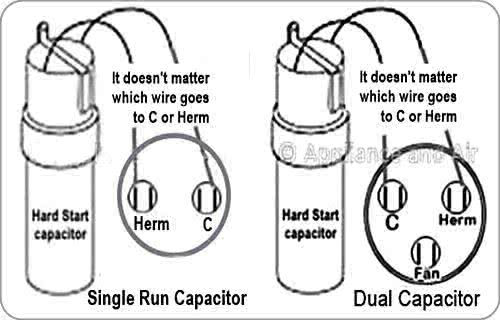
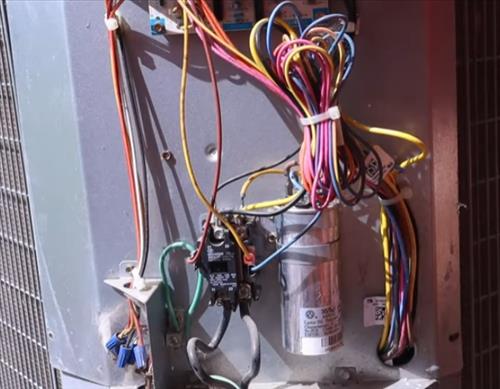
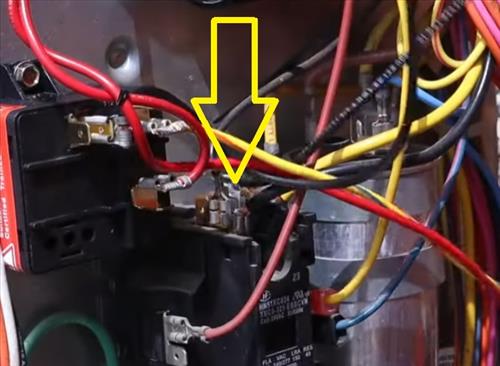
- Locate the Compressor Terminal: Open the access panel on the side of your AC unit. You'll find the compressor terminal, which usually has three terminals labeled "C" (common), "S" (start), and "R" (run).
- Identify Existing Components: Note the existing capacitor(s) connected to the compressor. There may be a run capacitor and potentially a start capacitor already in place.
- Disconnect Wires: Carefully disconnect the wires from the "C," "S," and "R" terminals. Label each wire as you disconnect it to avoid confusion. Your pictures from the "Safety First" section will be helpful here.
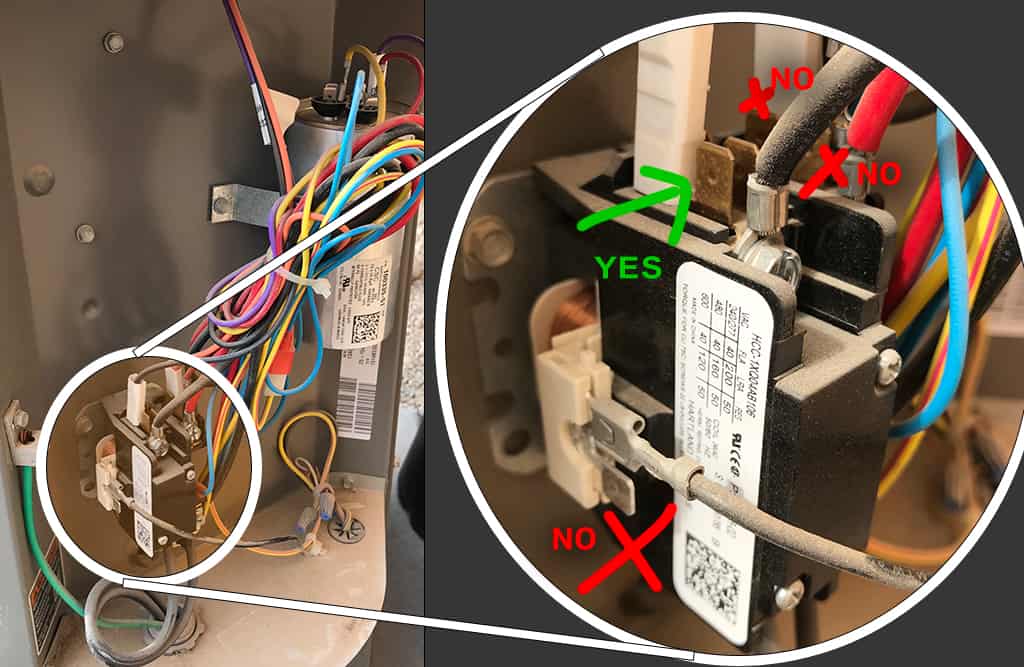
- Mount the Hard Start Kit: Find a suitable location inside the AC unit to mount the hard start kit. Make sure it's away from any moving parts or sharp edges. Some kits come with mounting brackets.
- Wiring the Potential Relay:
- Common (C) Terminal: Connect the wire that was originally connected to the "C" terminal of the compressor to one of the terminals on the potential relay. The specific terminal on the relay will be indicated in the kit's instructions. Typically, this wire goes to the "L1" side of the potential relay.
- Run (R) Terminal: Connect the wire that was originally connected to the "R" terminal of the compressor to the other terminal on the potential relay. Typically, this wire goes to the "L2" side of the potential relay.
- Wiring the Capacitor:
- Start (S) Terminal: Connect one lead of the hard start kit capacitor to the "S" terminal on the compressor.
- Relay Connection: Connect the other lead of the hard start kit capacitor to the appropriate terminal on the potential relay. This connection is often labeled as the "Start" or "Capacitor" terminal. Refer to the kit's wiring diagram.
- Double-Check Your Work: Before re-applying power, carefully double-check all wiring connections. Ensure all wires are securely connected and properly insulated. Compare your wiring to the kit's wiring diagram and the pictures you took earlier.
- Re-apply Power: Replace the access panel and turn the disconnect switch back on.
- Test the Unit: Turn on your AC unit and observe its operation. Listen for any unusual noises or vibrations. The compressor should start smoothly and quickly.
Troubleshooting
If your AC unit doesn't start after installing the hard start kit, or if you notice any unusual behavior, immediately turn off the power and re-check your wiring. Here are a few common issues:
- Loose Connections: Ensure all wires are securely connected.
- Incorrect Wiring: Double-check your wiring against the kit's wiring diagram.
- Faulty Hard Start Kit: If you suspect the hard start kit is faulty, test it with a multimeter (if you have one) or contact the manufacturer for support.
- Other AC Unit Problems: The hard start kit might not solve pre-existing issues with your AC unit, such as a refrigerant leak or a failing compressor. In these cases, consult a qualified HVAC technician.
Choosing the Right Hard Start Kit
Selecting the right hard start kit for your AC unit is crucial. Consider the following factors:
- Compressor Horsepower: Hard start kits are rated for specific horsepower ranges. Choose a kit that matches your compressor's horsepower rating.
- Voltage: Ensure the hard start kit is compatible with your AC unit's voltage (typically 208-230V).
- Brand Reputation: Opt for a reputable brand with a history of producing reliable hard start kits. Some popular brands include Supco, ICM Controls, and DiversiTech.
When to Call a Professional
While this guide provides detailed instructions, there are situations where it's best to call a qualified HVAC technician:
- You're Uncomfortable with Electrical Work: If you're not confident in your ability to safely perform electrical work, don't risk it.
- Your AC Unit is Under Warranty: Installing a hard start kit yourself may void the warranty on your AC unit.
- You Suspect Other Problems: If you suspect your AC unit has other underlying issues, such as a refrigerant leak, a technician can diagnose and repair them properly.
- You're Not Sure Which Kit to Choose: A technician can help you select the appropriate hard start kit for your AC unit.
Maintenance and Longevity
A hard start kit itself generally requires minimal maintenance. However, it's essential to maintain your AC unit properly to ensure its longevity and efficient operation. Regular maintenance includes:
- Cleaning the Condenser Coils: Dirty coils reduce airflow and can cause the compressor to overheat. Clean the coils at least once a year, or more often in dusty environments.
- Replacing the Air Filter: A clogged air filter restricts airflow and can strain the entire system. Replace the air filter every 1-3 months, depending on usage and air quality.
- Checking Refrigerant Levels: Low refrigerant levels can cause the compressor to work harder and eventually fail. Have a technician check the refrigerant levels periodically.
- Inspecting Wiring and Connections: Regularly inspect the wiring and connections in your AC unit for signs of damage or corrosion.
By following these guidelines and properly maintaining your AC unit, you can extend its lifespan and ensure efficient cooling performance. Remember, safety is always the top priority. If you have any doubts or concerns, consult a qualified HVAC technician.