Installing A Condensate Pump On A Mini Split

Mini-split air conditioners are a popular choice for cooling individual rooms or small spaces. They're efficient and relatively easy to install. However, one aspect that often gets overlooked is the management of condensate, the water that forms when warm, humid air passes over the cold evaporator coil inside the unit.
This guide will walk you through the process of installing a condensate pump on your mini-split system. We'll cover everything from understanding why you might need one, to choosing the right pump, and finally, the step-by-step installation process. By the end, you'll have the knowledge to confidently tackle this project, or at least, make an informed decision about whether to hire a professional.
Why Do Mini-Splits Produce Condensate?
Imagine taking a cold can of soda out of the refrigerator on a hot day. Almost immediately, water droplets form on the outside of the can. This is condensation. The same principle applies inside your mini-split.
Warm, humid air is drawn into the indoor unit. As this air passes over the cold coils, the air cools down. Cooler air can hold less moisture, so the excess water vapor in the air turns into liquid – condensate. This water needs to be drained away.
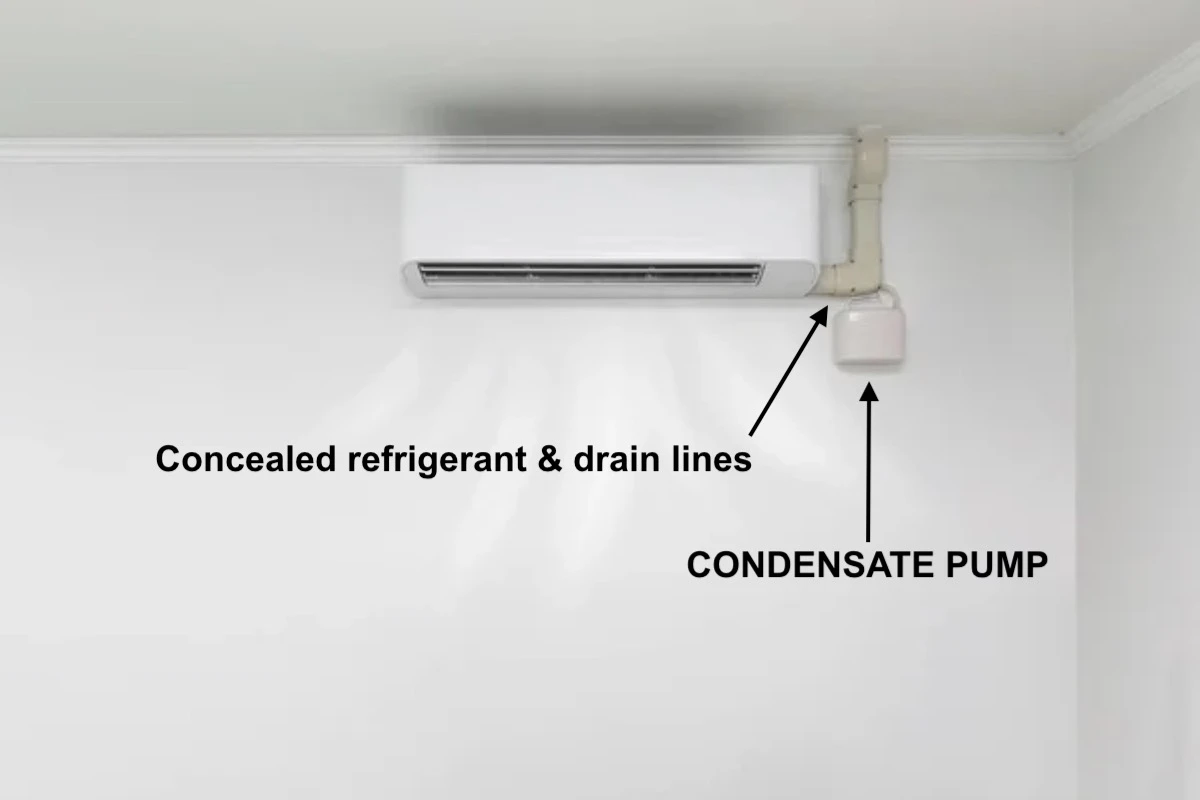
Most mini-splits are designed to drain condensate using gravity. A small pan underneath the evaporator coil collects the water, and a drain line carries it away to a suitable location, such as an outdoor drain, a sink, or a floor drain. However, gravity drainage isn't always feasible.
When Do You Need a Condensate Pump?
A condensate pump is required when gravity drainage is not possible or practical. Here are some common situations where a pump becomes necessary:
- No Convenient Drain Location: The most common reason. If your mini-split is installed in a location where the drain line would have to run uphill or too far to reach a suitable drain, a pump is essential.
- Basement Installations: Mini-splits installed in basements often require a pump because the drain line would need to be routed upwards to reach ground level.
- Aesthetic Concerns: Running a long, visible drain line across a room can be unsightly. A condensate pump allows you to route the drain line in a more discreet manner, even if it requires lifting the water.
- Avoiding Damage: If condensate water is allowed to drip freely, it can damage walls, floors, or other building materials. A pump ensures that the water is safely removed.
Choosing the Right Condensate Pump
Selecting the correct condensate pump is crucial for reliable and trouble-free operation. Here are some key factors to consider:
- Pumping Capacity: This is measured in gallons per hour (GPH). The higher the GPH, the more water the pump can handle. Consider the size and cooling capacity (BTU) of your mini-split. A larger unit will produce more condensate and require a pump with a higher GPH rating. A typical mini-split will need a pump rated for at least 1 GPH, but it's always best to err on the side of caution.
- Lift: The lift is the maximum vertical distance the pump can push the water. Determine the height you need to pump the condensate. If your pump needs to lift the water 5 feet, choose a pump with a lift rating of at least 5 feet. Add a safety margin of a foot or two to account for variations in installation.
- Noise Level: Condensate pumps can generate some noise when operating. Look for models that are designed to be quiet, especially if the mini-split is located in a bedroom or living area. Check customer reviews for comments on noise levels.
- Size and Dimensions: Condensate pumps come in various sizes. Choose a pump that will fit comfortably in the available space near your mini-split. Consider the pump's dimensions and the space required for connecting the drain lines.
- Safety Features: Some pumps come with built-in safety features, such as a high-level safety switch. This switch will shut off the mini-split if the water level in the pump reservoir becomes too high, preventing potential water damage. This is a highly recommended feature.
- Power Requirements: Ensure that the pump's voltage and amperage requirements match your electrical system. Most condensate pumps for mini-splits operate on standard 120V AC power.
Popular brands of condensate pumps for mini-splits include Little Giant, Rectorseal, DiversiTech, and Aspen Pumps. Research different models and compare their specifications and features to find the best pump for your needs.
Tools and Materials You'll Need
Before you begin the installation process, gather the necessary tools and materials:
- Condensate Pump: The appropriately sized pump for your mini-split.
- Tubing: Flexible PVC tubing or vinyl tubing, with the correct inner diameter to connect to the mini-split drain outlet and the pump inlet and outlet.
- Tubing Connectors/Fittings: Appropriate fittings to connect the tubing to the mini-split, pump, and drain line. Use fittings that are compatible with the tubing material you've chosen.
- Screwdrivers: A set of screwdrivers (Phillips and flathead) to remove and install screws.
- Pliers: For tightening clamps and making adjustments.
- Wire Strippers/Crimpers: If you need to wire the pump to a power source or connect the high-level safety switch.
- Electrical Tape: For insulating electrical connections.
- Level: To ensure the pump is installed level.
- Drill (Optional): If you need to drill holes for mounting the pump or running the drain line.
- Mounting Hardware: Screws, anchors, or other hardware to secure the pump to the wall or floor.
- Measuring Tape: For accurately measuring tubing lengths.
- PVC Cutter or Utility Knife: To cut the tubing to the correct length.
- Gloves and Safety Glasses: To protect your hands and eyes.
- Shop Vacuum or Towels: To clean up any spills.
Step-by-Step Installation Guide
Important Safety Note: Before starting any electrical work, turn off the power to the mini-split at the circuit breaker.
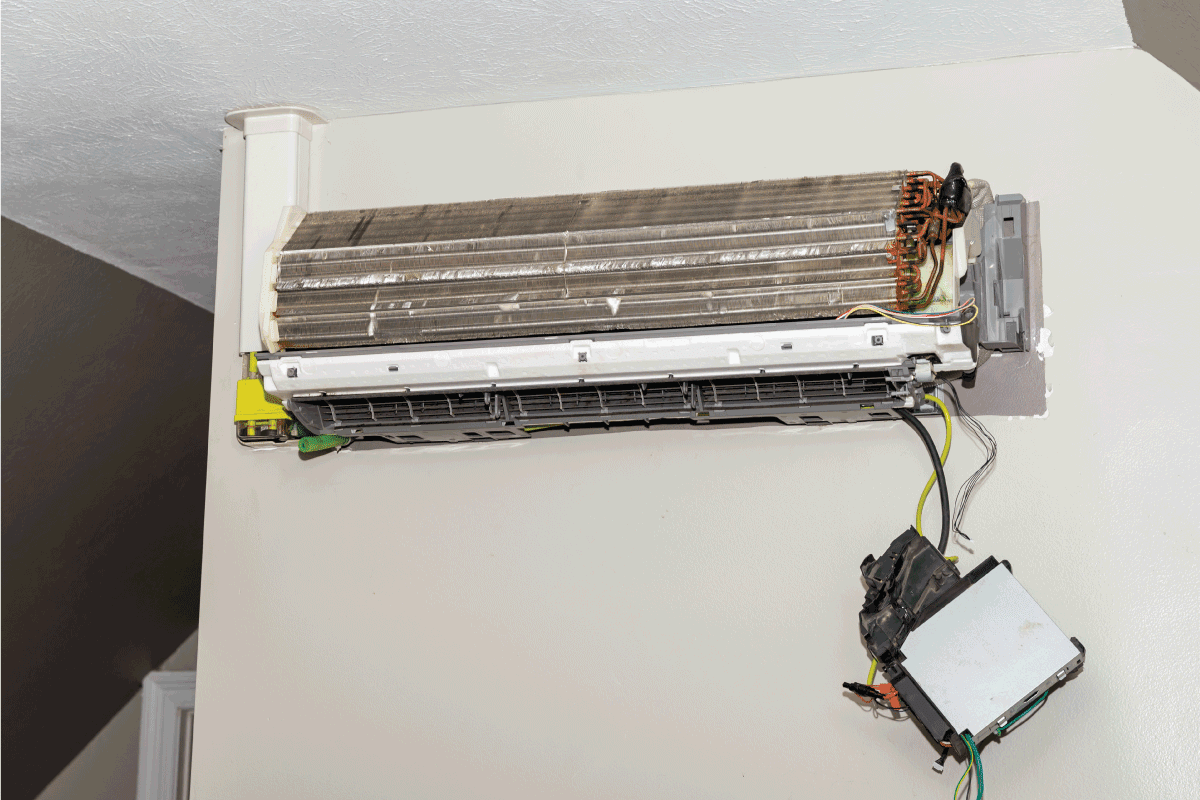
- Prepare the Mini-Split:
Carefully remove the access panel on the mini-split indoor unit to expose the drain pan and drain outlet. Consult your mini-split's installation manual for specific instructions on removing the panel.
- Locate the Drain Outlet:
Identify the drain outlet on the mini-split. This is where the condensate water exits the unit. It's usually a small, plastic pipe or fitting.
- Connect the Tubing to the Mini-Split:
Attach one end of the tubing to the drain outlet on the mini-split. Secure the connection with a clamp or fitting to prevent leaks. Ensure the tubing is properly seated and tightly connected.
- Position the Condensate Pump:
Choose a suitable location for the condensate pump. Ideally, it should be as close as possible to the mini-split and on a level surface. Consider the pump's dimensions and the routing of the drain lines. Use a level to ensure the pump is perfectly level. A tilted pump can cause it to malfunction or make excessive noise.
- Mount the Condensate Pump:
Secure the pump to the wall or floor using the appropriate mounting hardware. Follow the manufacturer's instructions for mounting the pump. Ensure the pump is firmly attached and cannot be easily moved.
- Connect the Tubing to the Pump Inlet:
Connect the other end of the tubing from the mini-split to the inlet of the condensate pump. Secure the connection with a clamp or fitting.
- Connect the Pump Outlet to the Drain Line:
Connect another length of tubing to the outlet of the condensate pump. This tubing will carry the condensate water to a suitable drain location. Secure the connection with a clamp or fitting.
- Route the Drain Line:
Carefully route the drain line to the chosen drain location. Ensure the drain line is properly supported to prevent sagging. Avoid sharp bends or kinks in the drain line, as these can restrict the flow of water. If you need to run the drain line through a wall, drill a hole slightly larger than the tubing diameter.
- Connect the Drain Line to the Drain:
Connect the end of the drain line to the drain. Make sure the connection is secure and allows for proper drainage. You may need to use a fitting to adapt the tubing to the drain pipe. Ensure that the drain line is not submerged in the drain water, as this can cause backflow and damage the pump.
- Wire the Pump (if necessary):
If the pump requires wiring to a power source, follow the manufacturer's instructions carefully. Connect the pump's power wires to a dedicated circuit or outlet. Use wire strippers and crimpers to make secure connections. Insulate all electrical connections with electrical tape.
- Connect the High-Level Safety Switch (if equipped):
If the pump has a high-level safety switch, connect it to the mini-split's control board according to the manufacturer's instructions. This switch will shut off the mini-split if the water level in the pump reservoir becomes too high.
- Test the Pump:
Pour a small amount of water into the mini-split's drain pan to test the pump. Observe the pump to ensure it starts and pumps the water out correctly. Check for any leaks at the connections. If the pump doesn't start, check the power connections and the pump's float switch.
- Reassemble the Mini-Split:
Carefully reattach the access panel to the mini-split indoor unit.
Troubleshooting Common Problems
Even with careful installation, problems can sometimes arise. Here are some common issues and how to address them:
- Pump Not Working:
- Check the power supply to the pump. Make sure the pump is plugged in or that the circuit breaker hasn't tripped.
- Check the float switch. Make sure it's moving freely and not stuck in the "off" position.
- Check for obstructions in the pump or tubing.
- Pump Running Constantly:
- Check for leaks in the drain pan or tubing.
- Make sure the pump is level.
- The float switch may be stuck in the "on" position.
- Pump Noisy:
- Ensure the pump is properly mounted and not vibrating against any surfaces.
- Check for obstructions in the pump.
- The pump may be nearing the end of its lifespan.
- Water Leaks:
- Check all tubing connections and fittings for leaks. Tighten any loose connections.
- Ensure the drain line is properly sloped and not blocked.
Maintenance
To ensure long-term reliability, perform regular maintenance on your condensate pump:
- Clean the Pump Reservoir: Periodically clean the pump reservoir to remove any debris or sediment that may have accumulated.
- Check the Tubing: Inspect the tubing for cracks, kinks, or blockages. Replace any damaged tubing.
- Test the Pump Regularly: Test the pump periodically to ensure it's working correctly.
When to Call a Professional
While this guide provides a comprehensive overview of installing a condensate pump, there are situations where it's best to call a qualified HVAC technician:
- You're not comfortable working with electricity.
- You're unsure about any aspect of the installation process.
- You encounter complex wiring issues.
- You suspect there may be a problem with the mini-split itself.
Installing a condensate pump on a mini-split can be a straightforward project if you follow the proper steps and take the necessary precautions. By carefully selecting the right pump, preparing the installation site, and following the instructions in this guide, you can ensure that your mini-split system operates efficiently and reliably for years to come. However, always prioritize safety and don't hesitate to seek professional assistance when needed.