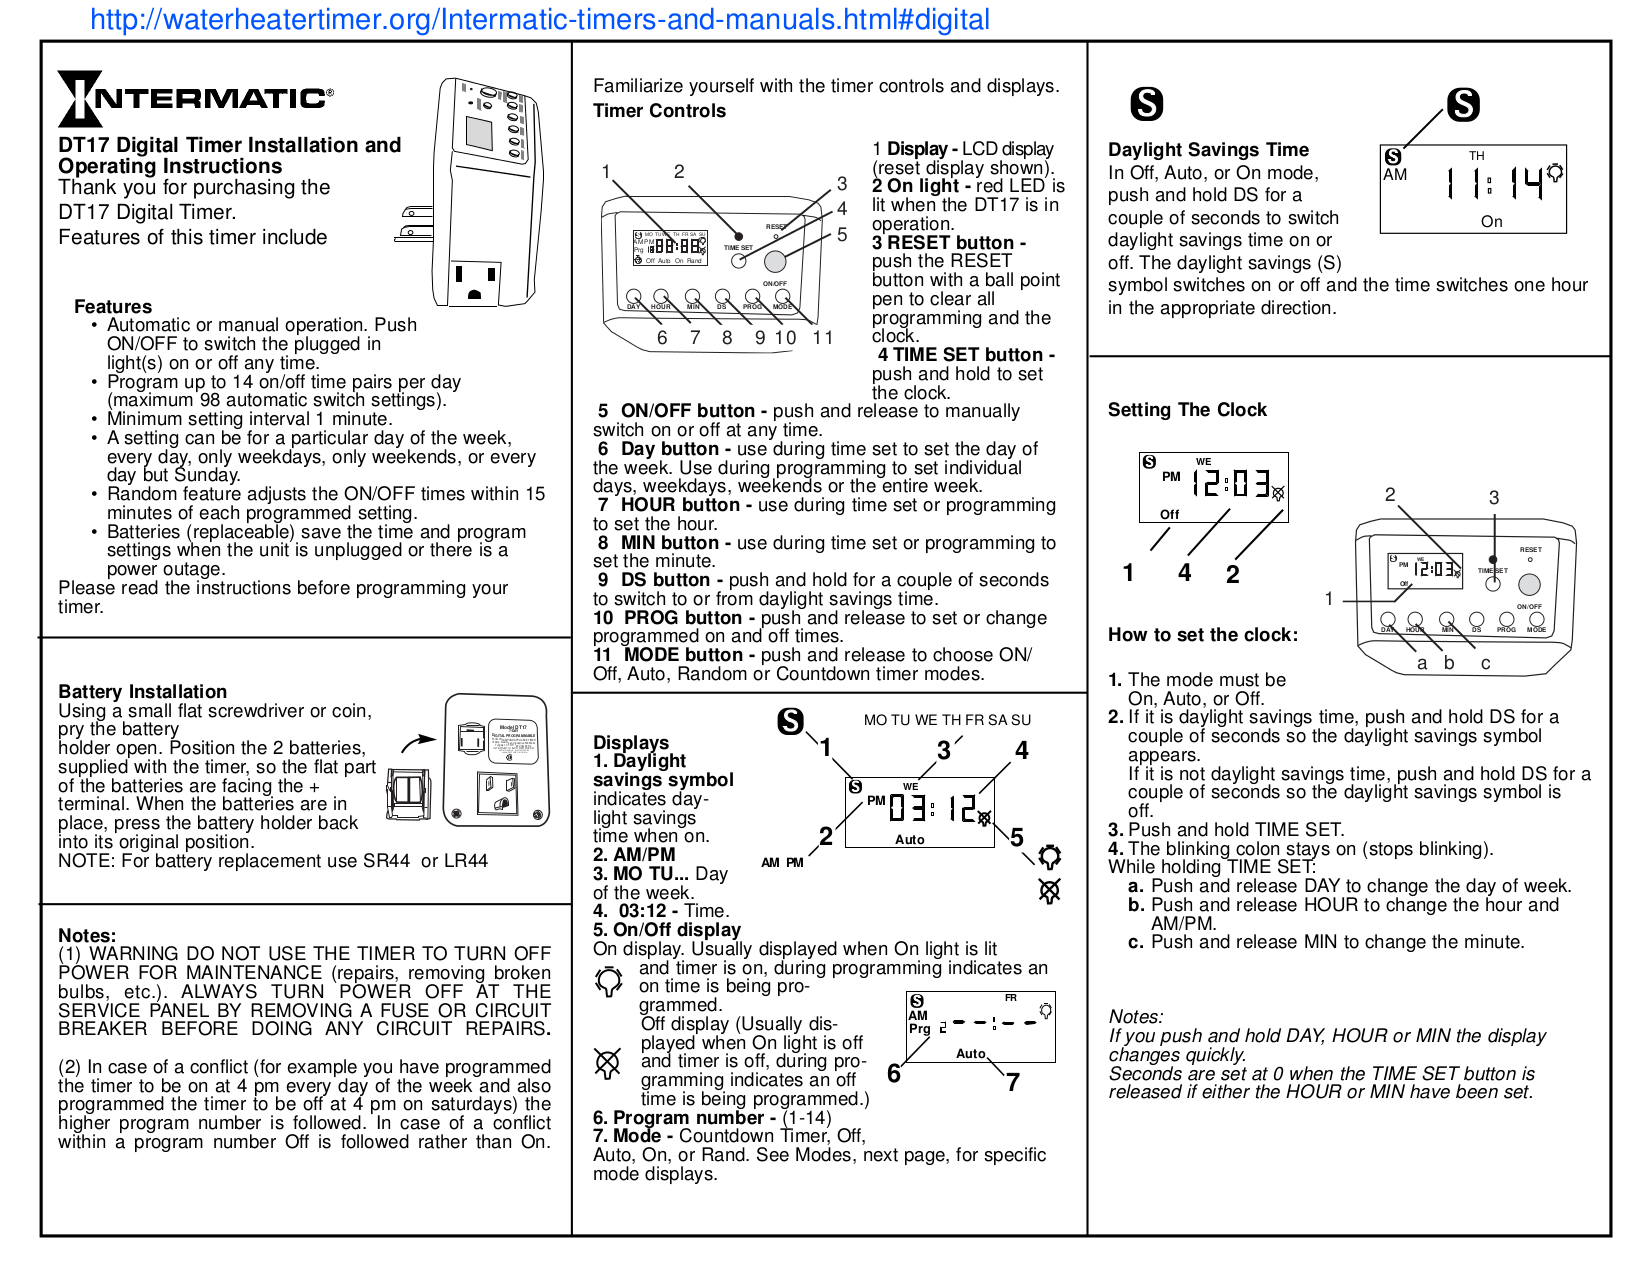
Intermatic Timer Light Switch Instructions
Intermatic timers are a popular and reliable way to automate lighting systems, both indoors and outdoors. Whether you're a homeowner looking to save energy, an HVAC technician installing lighting controls as part of a larger energy management system, or a facility manager responsible for scheduling building-wide lighting, understanding how to program and troubleshoot Intermatic timer light switches is essential. This article provides a comprehensive guide to Intermatic timer light switch instructions, catering to a range of users from DIY enthusiasts to seasoned professionals.
Understanding Intermatic Timer Models
Intermatic offers a diverse range of timer switches, each with its own set of features and programming methods. Before diving into specific instructions, it's crucial to identify the model you're working with. Common Intermatic timer types include:
- Mechanical Timers: These are the simplest type, featuring a dial with pins or trippers that you physically set to turn the lights on and off at specific times. They are known for their reliability and ease of use, even without needing a power source.
- Digital Timers: Digital timers offer greater flexibility and precision. They typically have a digital display and buttons for programming on/off times. Some advanced models may include features like automatic daylight saving time adjustment and battery backup.
- Astronomic Timers: These timers automatically adjust on/off times based on sunrise and sunset. You input your location (latitude and longitude), and the timer calculates the astronomical events, saving you the hassle of manual adjustments throughout the year. They are ideal for outdoor lighting control.
- Smart Timers: Integrating with smart home systems, these timers can be controlled remotely via a smartphone app. They often offer advanced features like energy usage monitoring and integration with other smart devices.
The model number is usually printed on the front of the timer or on a label located on the side or back. Refer to the Intermatic website or the product manual for specific details about your particular model.
General Safety Precautions
Safety first! Before working on any electrical wiring, always:
- Turn off the power to the circuit at the breaker panel. Use a non-contact voltage tester to confirm that the power is off before proceeding.
- Wear appropriate personal protective equipment (PPE), such as safety glasses and insulated gloves.
- Consult a qualified electrician if you are not comfortable working with electrical wiring. Improper wiring can result in electrical shock or fire.
Mechanical Timer Instructions
Installation
Mechanical timers are generally straightforward to install. Here's a general guide:
- Disconnect Power: As always, turn off the power at the breaker.
- Remove Existing Switch: Carefully remove the existing light switch from the wall box.
- Identify Wires: Identify the wires connected to the old switch (usually line, load, and possibly a neutral wire). Mark these wires for easy identification.
- Connect Wires: Connect the wires to the corresponding terminals on the Intermatic timer. Refer to the wiring diagram included with the timer for specific instructions. Typically, the line wire (power coming in) connects to one terminal, and the load wire (going to the light fixture) connects to another. If there is a neutral wire (usually white), it may need to be connected to a designated neutral terminal on the timer.
- Mount the Timer: Carefully push the timer back into the wall box and secure it with screws.
- Install Cover Plate: Attach the cover plate.
- Restore Power: Turn the power back on at the breaker.
Programming
Programming a mechanical timer involves setting the on/off times using pins or trippers:
- Set the Current Time: Rotate the dial until the current time aligns with the indicator mark.
- Set On/Off Times: Insert the pins or trippers at the desired on and off times. Each pin typically represents a 15-minute or 30-minute interval.
- Test: Test the timer by observing whether the lights turn on and off at the programmed times.
Digital Timer Instructions
Installation
The installation process for digital timers is similar to that of mechanical timers, but may involve additional wiring for neutral or ground connections.
Programming
Digital timers are programmed using buttons and a digital display. Here's a general guide:
- Power Up: Once installed, the timer will need to be powered up. Some models have a battery backup that needs to be charged.
- Set Current Time and Day: Use the "Set" or "Clock" button to enter the time and day setting mode. Use the up/down arrows to adjust the values and the "Enter" or "OK" button to confirm.
- Program On/Off Times: Press the "Program" or "Schedule" button to enter the programming mode. Follow the prompts to set the on and off times for each day of the week. You can typically program multiple on/off events per day.
- Review and Save: Review the programmed schedule to ensure accuracy. Save the settings by pressing the "Enter" or "OK" button.
- Override Function: Familiarize yourself with the override function, which allows you to manually turn the lights on or off without affecting the programmed schedule.
Astronomic Timer Instructions
Installation
Astronomic timers typically require a neutral connection and may have a separate antenna for receiving time signals.
Programming
Astronomic timers require you to input your location (latitude and longitude) so the timer can calculate sunrise and sunset times.
- Set Location: Use the "Set" button to enter the location setting mode. Enter your latitude and longitude using the up/down arrows. You can find your coordinates using online mapping tools.
- Set Time Zone: Set your time zone.
- Automatic Adjustments: The timer will automatically calculate sunrise and sunset times based on your location and the current date.
- Offset Adjustments: Some astronomic timers allow you to adjust the on/off times by a certain offset (e.g., turn on 30 minutes before sunset).
Smart Timer Instructions
Installation
Smart timers typically require a neutral connection and may need to be connected to your Wi-Fi network.
Programming
Smart timers are programmed using a smartphone app.
- Download the App: Download the Intermatic app from the App Store or Google Play.
- Create an Account: Create an account and log in.
- Add the Timer: Follow the instructions in the app to add the timer to your account. This usually involves scanning a QR code on the timer or entering the timer's serial number.
- Connect to Wi-Fi: Connect the timer to your Wi-Fi network.
- Program the Schedule: Use the app to program the on/off times. You can also set schedules based on sunrise and sunset.
- Remote Control: Control the timer remotely from your smartphone.
- Integration: Integrate the timer with other smart home devices.
Troubleshooting Common Issues
Even with careful installation and programming, issues can arise. Here are some common problems and troubleshooting steps:
- Lights Not Turning On/Off:
- Check the breaker: Ensure the breaker is not tripped.
- Verify wiring: Double-check the wiring connections to ensure they are secure and correct.
- Test the bulb: Make sure the light bulb is not burned out.
- Check programming: Review the programmed schedule to ensure the on/off times are set correctly.
- Override switch: Ensure the override switch is not in the wrong position.
- Timer Not Keeping Time:
- Battery backup: If the timer has a battery backup, check the battery. Replace it if necessary.
- Power interruptions: Frequent power interruptions can reset the timer.
- Astronomic Timer Not Adjusting Correctly:
- Location settings: Verify that the location settings (latitude and longitude) are correct.
- Time zone: Ensure the time zone is set correctly.
- Smart Timer Connectivity Issues:
- Wi-Fi connection: Check the Wi-Fi connection. Ensure the timer is within range of the router.
- App updates: Make sure the Intermatic app is up to date.
- Router compatibility: Some routers may not be compatible with smart timers.
Cost, Efficiency, and Lifespan Considerations
Intermatic timers offer a cost-effective way to save energy and improve convenience. The initial cost of a timer switch can range from around $15 for a basic mechanical timer to $100 or more for an advanced smart timer. Digital and astronomic timers, on average, may cost between $30 and $60. The savings from reduced energy consumption can quickly offset the initial investment. By automating lighting, you can ensure that lights are only on when needed, preventing unnecessary energy waste. For example, automating outdoor lights with an astronomic timer can save significant energy compared to leaving them on all night.
The lifespan of an Intermatic timer can vary depending on the model and usage. Mechanical timers are known for their durability and can last for many years. Digital and smart timers may have a shorter lifespan due to their electronic components. Proper installation and maintenance can help extend the life of the timer.
From an HVAC technician's perspective, understanding lighting controls, including Intermatic timers, is increasingly important. Many modern HVAC systems are integrated with building automation systems that include lighting control. Understanding how these systems interact can lead to more efficient and comfortable environments for building occupants.
Conclusion
Intermatic timer light switches provide a reliable and versatile solution for automating lighting systems. Whether you choose a simple mechanical timer, a precise digital timer, an intelligent astronomic timer, or a connected smart timer, understanding the installation and programming instructions is crucial for maximizing their benefits. By following the guidelines outlined in this article, homeowners, HVAC technicians, and facility managers can confidently install, program, and troubleshoot Intermatic timer light switches, leading to energy savings, enhanced convenience, and improved overall building performance.