Lennox Rtu Nomenclature
Imagine this: It's a sweltering summer afternoon, and suddenly, your air conditioner sputters and dies. Heat waves become unbearable quickly, but before you panic and call for costly professional repairs, let's walk through some basic troubleshooting steps you can safely perform yourself. We'll focus on understanding what might be wrong and what you can do about it, always prioritizing your safety and knowing when to call in the experts. This guide is focused on understanding the Lennox RTU (Rooftop Unit) nomenclature and applying that understanding to common problems and diagnostics.
Understanding Lennox RTU Nomenclature: Your Key to Troubleshooting
Lennox uses a specific nomenclature system to identify their RTUs. Understanding this system can unlock valuable information about your unit, including its capacity, efficiency, and features. This information is critical when ordering parts or communicating with a technician. Let's break it down:
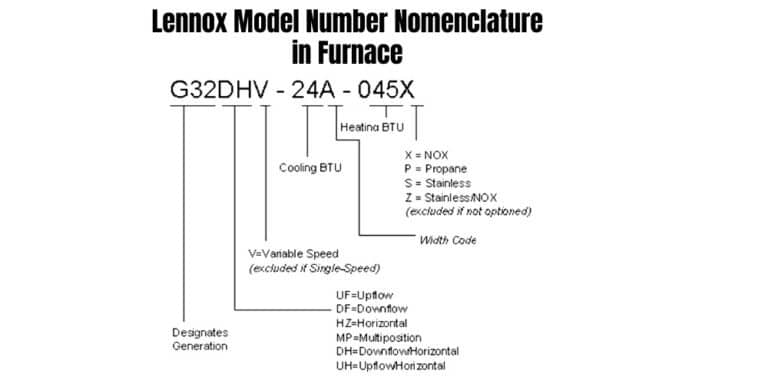
Typically, a Lennox RTU model number looks something like this: LGH150S4BD. Here's what each part means:
- First Three Letters (LGH, LGC, etc.): This denotes the series or type of unit. LGH often represents a high-efficiency gas/electric unit. LGC might be a standard-efficiency version. Other codes indicate heat pumps, electric-only units, etc. Consult Lennox documentation for a complete listing. Knowing the series helps you access specific service manuals and part lists.
- Numbers (150): This indicates the cooling capacity in thousands of BTU/h. So, 150 means 150,000 BTU/h, which translates to approximately 12.5 tons (since 1 ton = 12,000 BTU/h). This is vital for sizing replacement parts and ensuring compatibility.
- Letter (S): This usually indicates the voltage of the unit. S, for example, could mean 208-230V/3Ph/60Hz. Different letters correspond to different voltage configurations. Incorrect voltage can severely damage your unit.
- Number (4): This digit, often, but not always, refers to the efficiency of the unit. Higher numbers, generally, equate to higher efficiency ratings. This information is important when considering energy consumption and potential upgrades.
- Letters (BD): These characters typically signify design series or specific features or modifications. These vary greatly depending on the model and year. It’s crucial to consult the Lennox product documentation or a technician for a precise explanation of these letters. They can indicate specific options, such as economizers, powered exhaust, or other factory-installed accessories.
Why is this important for troubleshooting? Knowing your model number allows you to:
- Find the correct service manual: Service manuals contain wiring diagrams, troubleshooting flowcharts, and part lists specific to your unit.
- Order the right replacement parts: Using the wrong part can damage your unit or prevent it from functioning correctly.
- Understand your unit's capabilities: Knowing the capacity and efficiency helps you diagnose performance issues and determine if the unit is operating as expected.
Step-by-Step Troubleshooting: When the AC Stops Working
Let's move on to practical steps you can take when your AC isn't performing as it should. Always turn off the power to the unit at the breaker box before attempting any inspection or repair.
1. Power Check: The First and Most Important Step
Safety First! Before anything else, ensure the unit has power. Locate the disconnect switch near the RTU. This is usually a large, easily accessible switch. Make sure it is in the "ON" position. Then, check the breaker in your main electrical panel that controls the RTU. If the breaker has tripped, reset it. If it trips again immediately, do not keep resetting it. This indicates a more serious electrical fault that requires professional attention. Repeatedly tripping a breaker can be dangerous and damage the unit further.
2. Thermostat Settings: The Obvious Culprit
It sounds simple, but often the problem lies with the thermostat.
- Verify Mode: Ensure the thermostat is set to "Cool" or "Auto."
- Temperature Setting: Make sure the set temperature is lower than the current room temperature.
- Fan Setting: Set the fan to "Auto" for normal operation. "On" will run the fan continuously, even when the compressor isn't cooling.
- Battery Check: If your thermostat is battery-powered, replace the batteries. Low batteries can cause erratic behavior.
3. Air Filter Inspection: A Common Cause of Problems
A dirty air filter restricts airflow, causing the unit to work harder, overheat, and eventually shut down.
- Locate the Filter: The air filter is usually located in the return air duct or the blower compartment of the indoor unit (furnace).
- Inspect the Filter: If the filter is visibly dirty, replace it with a new one of the same size and type.
- Frequency: Replace air filters every 1-3 months, or more often if you have pets or allergies.
4. Condenser Unit Inspection: Visual Checks and Cleaning
The condenser unit is the outdoor portion of the AC system.
- Clear Obstructions: Make sure the unit is free of debris such as leaves, grass clippings, and branches. These can block airflow and cause the unit to overheat.
- Clean the Fins: Gently clean the condenser fins with a garden hose. Avoid using high pressure, as this can damage the fins. You can also use a fin comb to straighten bent fins.
- Listen for Unusual Noises: Pay attention to any unusual sounds, such as loud humming, grinding, or rattling. These could indicate a mechanical problem. If you hear anything concerning, turn off the unit and call a technician.
5. Condensate Drain Line: Clearing Blockages
The condensate drain line removes water that condenses during the cooling process. A clogged drain line can cause water to back up, potentially damaging your home and shutting down the AC system.
- Locate the Drain Line: The drain line is usually a PVC pipe that exits the indoor unit.
- Check for Clogs: Look for any signs of blockage, such as water dripping from the unit or a musty odor.
- Clear the Drain: You can try clearing the drain line with a wet/dry vacuum or a stiff wire. Pour a cup of white vinegar down the drain line to help dissolve any buildup.
6. Indoor Blower Fan: Ensuring Proper Airflow
The indoor blower fan circulates air throughout your home. If the blower fan isn't working, your AC won't cool properly.
- Check the Blower Motor: Access the blower compartment (refer to your furnace manual). Look for any visible signs of damage to the blower motor or fan blades.
- Listen for Unusual Noises: Listen for any unusual noises, such as squealing or grinding. These could indicate a problem with the blower motor.
- Capacitor (Professional): The blower motor relies on a capacitor to start and run. A failing capacitor is a common cause of blower motor problems. Replacing a capacitor involves working with electricity and should be done by a qualified technician.
When to Call a Professional: Safety and Complexity
While many basic troubleshooting steps are safe for homeowners, some repairs require specialized knowledge, tools, and training. Never attempt any repair that you are not comfortable with. Here are some situations where you should always call a professional:
- Refrigerant Leaks: Refrigerant is a hazardous substance. If you suspect a refrigerant leak, do not attempt to repair it yourself. Call a licensed HVAC technician.
- Electrical Repairs: Working with electricity can be dangerous. If you are not comfortable working with electrical wiring, do not attempt any electrical repairs. Always call a qualified electrician or HVAC technician.
- Gas Leaks: If you smell gas, immediately evacuate your home and call your gas company or 911. Do not attempt to locate or repair the leak yourself.
- Compressor Problems: The compressor is the heart of the AC system. If you suspect a compressor problem, call a qualified HVAC technician. Compressor repairs are complex and require specialized equipment.
- Complex Components: If you encounter problems with complex components like circuit boards, sensors, or the expansion valve, it's best to leave the repair to a professional.
- If your unit is still under warranty: Attempting repairs yourself may void the warranty.
- You have exhausted basic troubleshooting steps: If you've tried the steps outlined above and your AC is still not working, it's time to call a professional.
Preventative Maintenance: Avoiding Future Problems
The best way to avoid AC problems is to perform regular preventative maintenance. Here are some tips:
- Schedule annual maintenance: Have your AC system inspected and serviced by a qualified HVAC technician each year.
- Clean or replace air filters regularly: As mentioned earlier, clean or replace your air filters every 1-3 months.
- Keep the condenser unit clean: Clear debris from around the condenser unit and clean the fins regularly.
- Trim vegetation: Keep bushes and trees trimmed back from the condenser unit to ensure proper airflow.
- Monitor performance: Pay attention to how your AC system is performing. If you notice any changes in performance, such as reduced cooling or unusual noises, call a technician.
By following these troubleshooting steps and preventative maintenance tips, you can keep your AC system running smoothly and avoid costly repairs. Remember, when in doubt, always call a professional.
Final Thoughts
Troubleshooting your Lennox RTU doesn't have to be intimidating. Understanding the basics of how the unit operates, recognizing the nomenclature, and being comfortable with a few simple checks can save you time and money. Remember to always prioritize safety and know your limits. When in doubt, call a qualified professional. Armed with this knowledge, you can confidently address minor issues and communicate effectively with technicians when more complex repairs are needed.