Lennox Serial Number Lookup Age

One of the most common headaches homeowners face, especially when buying or selling a property, is determining the age of their HVAC system. Knowing the age of your Lennox furnace or air conditioner is crucial for several reasons: assessing its efficiency, planning for potential repairs or replacements, and understanding its value for resale purposes. Trying to decipher that age, however, can feel like cracking a complex code. Luckily, your Lennox equipment holds the key: its serial number.
This article guides you through the process of using your Lennox serial number to determine the age of your unit, offering a step-by-step approach. We'll cover how to locate the serial number, decipher its format, and know when it's time to call in a professional for assistance.
Step 1: Locating the Lennox Serial Number
Before you can determine the age of your Lennox unit, you need to find its serial number. This alphanumeric code is usually printed on a nameplate or sticker affixed to the unit. The location of the nameplate depends on the type of equipment you have:
For Furnaces:
Typically, you'll find the nameplate inside the furnace cabinet. Here's how to find it:
- Safety First! Turn off the power to the furnace at the breaker box. This is a crucial safety step before opening any access panels.
- Locate the Access Panel: The access panel is usually on the front or side of the furnace. It may be held in place by screws or clips.
- Remove the Access Panel: Carefully remove the panel and set it aside.
- Find the Nameplate: Look inside the furnace for a metal or plastic nameplate. It's often located on the inside wall of the cabinet. The plate will contain information like the model number, serial number, and other specifications.
- Record the Serial Number: Once you've found the nameplate, carefully note the complete serial number. Double-check that you've transcribed it accurately.
- Replace the Access Panel: Replace the access panel securely and restore power to the furnace at the breaker box.
For Air Conditioners (Outdoor Units):
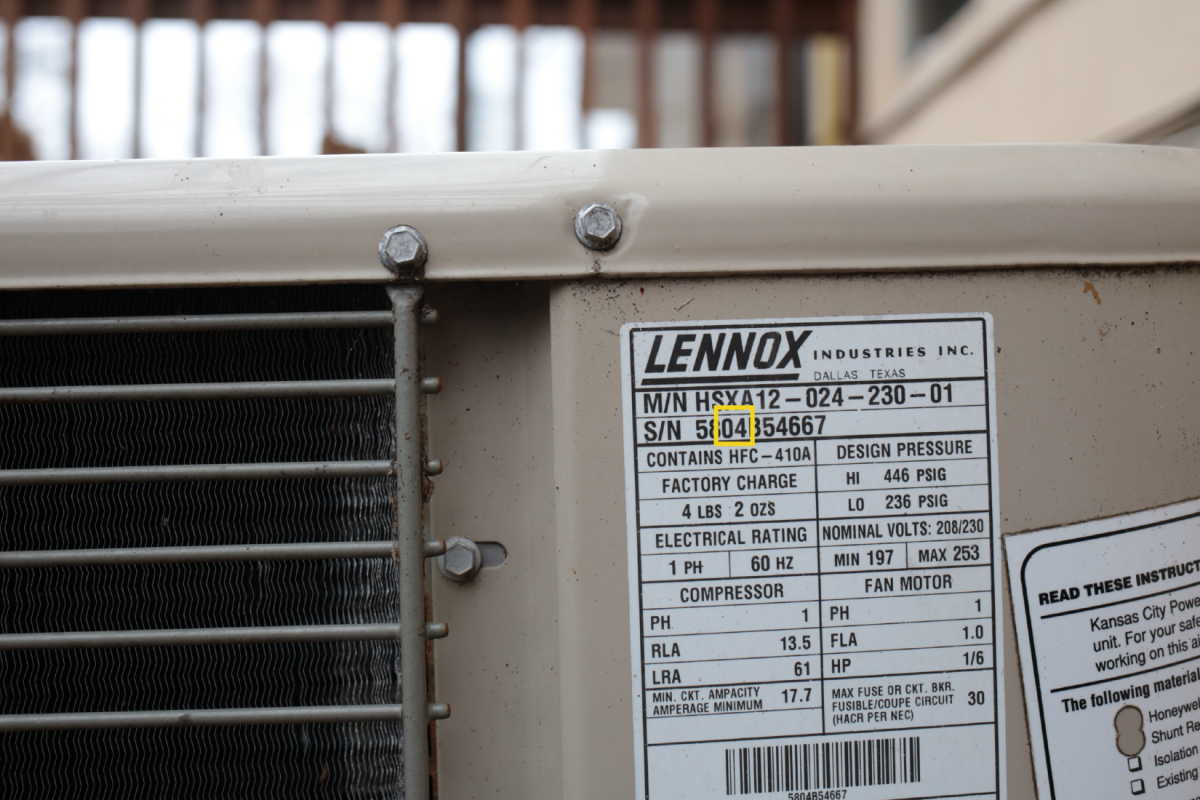
The nameplate on an outdoor air conditioning unit is usually located on the exterior of the unit, making it much easier to access.
- Inspect the Unit's Exterior: Walk around the air conditioner and look for a metal or plastic nameplate.
- Common Locations: Check the side of the unit, near the electrical disconnect, or sometimes on the back panel.
- Record the Serial Number: Once you find the nameplate, carefully note the complete serial number, ensuring accurate transcription.
For Air Handlers (Indoor Units):
Similar to furnaces, air handlers usually have their nameplates inside the unit's cabinet.
- Safety First! Turn off the power to the air handler at the breaker box.
- Locate the Access Panel: The access panel is typically on the front or side of the air handler.
- Remove the Access Panel: Carefully remove the panel and set it aside.
- Find the Nameplate: Look inside the unit for a metal or plastic nameplate. It's often located on the inside wall of the cabinet.
- Record the Serial Number: Once you've found the nameplate, carefully note the complete serial number.
- Replace the Access Panel: Replace the access panel securely and restore power to the air handler at the breaker box.
Step 2: Deciphering the Lennox Serial Number Format
Lennox uses various serial number formats, which can be a bit confusing. However, understanding the most common formats will allow you to determine the age of your unit. Here's a breakdown of the common formats and how to interpret them:
Common Lennox Serial Number Formats:
- Format 1: Six Numbers Followed by a Letter and Four Numbers (e.g., 123456A1234)
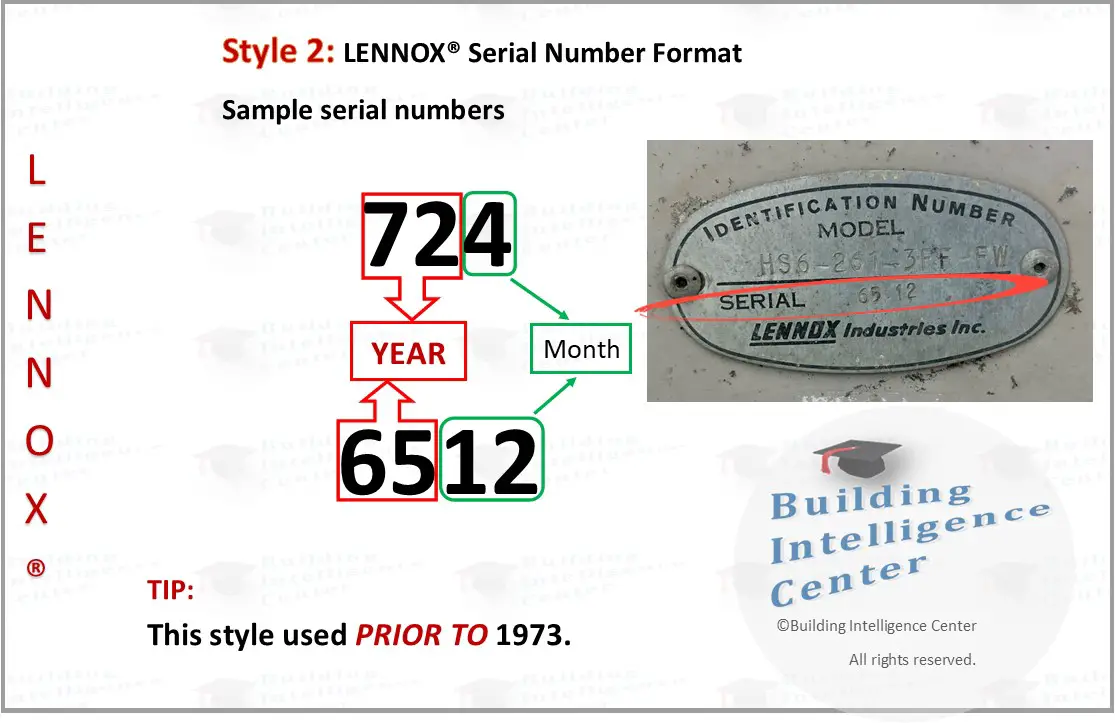
- Format 2: Four Numbers Followed by a Letter and Five Numbers (e.g., 4567B89012)
- Format 3: Letter Followed by Two Numbers and Six Numbers (e.g., C67123456)
- Format 4: Three Letters Followed by Eight Numbers (e.g., ABC12345678)
- Format 5: Multiple Letters, Numbers and Special Characters (Newer Units)
In this format, the first two numbers typically represent the year of manufacture. For example, "12" would indicate the year 2012. The letter and remaining numbers are specific to the unit and don't directly indicate the manufacture date.
Similar to the first format, the first two numbers usually represent the year of manufacture. In this case, "45" would signify the year 2045 (unlikely for older units, suggesting a potential misread or a newer format). The remaining characters are unit-specific.
In this format, the two numbers following the letter are often the year of manufacture. So, "C67" would indicate the year 1967 or 2067. Context is important – consider the likely age of the unit based on its appearance and features to determine the correct century.
This format is less common, but when present, the first four numbers after the letters may represent the month and year of manufacture. For example, "ABC1224" could indicate December of 2024 (12/24).
Newer Lennox units may have more complex serial number formats that do not follow the above patterns directly. These formats often incorporate a date code that is not immediately obvious. For these, it is recommended to use an online Lennox serial number lookup tool, or contact a Lennox dealer.
Important Notes:
- Leading Zeros: Some serial numbers may have leading zeros. These zeros are significant and should be included when recording and deciphering the serial number.
- Context Matters: Consider the overall condition of the unit and its features. If a serial number suggests the unit is from 1950, but it has modern components, there's likely an error in reading or interpreting the number.
- Variations Exist: Lennox has used different serial number formats over the years. If the formats above don't seem to fit, you might need to do further research online or contact a Lennox dealer for assistance.
Step 3: Using Online Lennox Serial Number Lookup Tools (If Available)
While Lennox doesn't offer a publicly available official serial number lookup tool on their main website, some third-party websites and HVAC forums may provide tools or databases that can help you determine the age of your unit based on its serial number. Exercise caution when using these tools, as their accuracy may vary.
How to Use Online Tools (If Available):
- Search for Lennox Serial Number Lookup Tools: Use a search engine to find websites that offer Lennox serial number lookup services.
- Enter the Serial Number: Carefully enter the serial number of your unit into the tool's designated field.
- Review the Results: The tool should provide information about the unit's manufacturing date (year and possibly month) and potentially other details.
- Verify the Information: Cross-reference the information provided by the tool with other sources, such as the unit's condition and features, to ensure accuracy.
Step 4: Contacting a Lennox Dealer for Assistance
If you're unable to decipher the serial number using the methods above, or if you want to confirm the accuracy of your findings, contacting a local Lennox dealer is the best option. Lennox dealers have access to internal databases and resources that allow them to quickly and accurately determine the age of your unit based on its serial number.
How to Contact a Lennox Dealer:
- Find a Local Dealer: Use the Lennox website's "Find a Dealer" tool or a search engine to locate a Lennox dealer in your area.
- Call or Email the Dealer: Contact the dealer by phone or email and provide them with the serial number of your unit.
- Ask for the Manufacturing Date: Ask the dealer to provide you with the manufacturing date (year and month) of your unit based on the serial number.
- Record the Information: Carefully record the information provided by the dealer for your records.
When to Call a Professional HVAC Technician
While determining the age of your Lennox unit using the serial number is a task you can often do yourself, there are situations where consulting a professional HVAC technician is necessary:
- Unreadable Serial Number: If the nameplate is damaged, faded, or missing, making the serial number unreadable, a technician may be able to use other identifying information to estimate the age of the unit.
- Suspected System Issues: If you're trying to determine the age of your unit because you suspect it's experiencing performance issues, such as reduced efficiency, frequent breakdowns, or unusual noises, a technician can diagnose the problem and recommend appropriate solutions.
- Complex Repairs: If your unit requires repairs that involve electrical components, refrigerant handling, or gas lines, it's crucial to hire a licensed HVAC technician to ensure the work is done safely and correctly. Never attempt to perform these types of repairs yourself!
- System Replacement: If your unit is nearing the end of its lifespan or requires extensive repairs, a technician can assess the situation and help you determine whether it's more cost-effective to repair or replace the system. They can also recommend energy-efficient replacement options that meet your needs and budget.
- You Are Uncomfortable: If at any point you are uncomfortable with opening your furnace or accessing any part of your HVAC equipment, it is always best to err on the side of caution and call a professional.
Remember: HVAC systems involve complex components and potentially hazardous materials. Improper handling can lead to personal injury or damage to your property. When in doubt, always consult a qualified professional.
DIY Fixes: What You Can and Can't Do
While you should always contact a professional for major HVAC issues, there are a few simple DIY tasks you can perform to maintain your Lennox system and potentially improve its efficiency:
DIY Tasks (Safe and Simple):
- Changing Air Filters: Regularly replacing dirty air filters is one of the most important things you can do to maintain your HVAC system. Dirty filters restrict airflow, reducing efficiency and potentially damaging the unit. Aim to change your air filter every 1-3 months, or more frequently if you have pets or allergies.
- Cleaning Outdoor Unit Fins: Over time, the fins on your outdoor air conditioning unit can become clogged with dirt, leaves, and debris. Use a garden hose with a gentle spray nozzle to clean the fins from the inside out. Be careful not to bend or damage the fins. Turn off the power to the unit before cleaning.
- Clearing Condensate Drain Lines: Clogged condensate drain lines can cause water damage. You can often clear minor clogs by using a wet/dry vacuum to suck out the blockage. Locate the drain line near the indoor unit and attach the vacuum hose to the end of the line. Turn off the unit before attempting this.
- Checking and Sealing Ductwork: Inspect your visible ductwork for leaks or gaps. Use duct tape or mastic sealant to seal any openings you find. This can help improve the efficiency of your system by preventing air loss.
Tasks Requiring Professional Assistance (Do Not Attempt Yourself):
- Refrigerant Handling: Refrigerant is a controlled substance that requires specialized equipment and training to handle safely. Never attempt to add or remove refrigerant yourself!
- Electrical Repairs: HVAC systems involve high-voltage electrical components. Only a licensed electrician or HVAC technician should perform electrical repairs.
- Gas Line Repairs: Gas furnaces require specialized knowledge and tools to repair safely. Never attempt to repair a gas line yourself!
- Compressor Repairs: The compressor is the heart of your air conditioning system. Repairs to the compressor are complex and require specialized training.
Conclusion: Empowerment Through Knowledge
Determining the age of your Lennox HVAC system is a valuable piece of information. By following these steps, you can decode the mystery of your unit's serial number. Remember to prioritize safety, use online resources cautiously, and don't hesitate to contact a Lennox dealer or qualified HVAC technician for assistance. With a little knowledge and effort, you can gain a better understanding of your HVAC system and make informed decisions about its maintenance and replacement.
Knowing the age of your Lennox system empowers you to be a responsible homeowner, allowing you to plan for the future and ensure your home remains comfortable and efficient for years to come.