Lennox Warranty Lookup
HVAC systems are significant investments, and understanding your Lennox warranty is crucial for protecting that investment. Whether you're a seasoned DIYer or a homeowner dealing with a sudden breakdown, knowing your warranty coverage can save you time, money, and unnecessary stress. This guide will walk you through the process of looking up your Lennox warranty, understanding what it covers, and troubleshooting common HVAC issues. Before you begin any troubleshooting or repair work, always disconnect the power to your HVAC unit at the breaker box for safety. If you're not comfortable working with electrical components or refrigerant lines, contact a qualified HVAC technician.
Finding Your Lennox Warranty Information
Several avenues exist for locating your Lennox warranty information. The most direct method is to check your paperwork.
Checking Your Original Paperwork
When your Lennox system was installed, you should have received a package containing warranty documents. This paperwork is the first place to look. Check for:
- Warranty Certificate: This document outlines the specific coverage, duration, and terms of your warranty.
- Installation Receipt: This provides proof of purchase and installation date, essential for validating your warranty.
- Homeowner's Manual: Often included, this may contain general warranty information and troubleshooting tips.
Keep these documents in a safe, accessible location. A digital copy is also recommended for added security.
Using the Lennox Website (Online Registration)
Many manufacturers, including Lennox, offer online warranty registration. If you registered your system when it was installed, you can easily access your warranty details on the Lennox website. Here's how:
- Visit the official Lennox website.
- Navigate to the "Support" or "Warranty" section. Look for options like "Warranty Lookup" or "Register Your Product."
- You will likely need to create an account or log in if you already have one.
- Enter the required information, such as your model number, serial number, and installation date. This information is typically found on a sticker located on your HVAC unit.
- Once submitted, the website should display your warranty details, including the coverage period and any specific conditions.
Contacting Your Lennox Dealer or Installer
Your Lennox dealer or the company that installed your system is another valuable resource for warranty information. They should have a record of your purchase and installation date and can help you access your warranty details. Have the model and serial numbers of your Lennox unit ready when you call.
Understanding Key Warranty Terms
Before you need to use your warranty, understanding its terms is essential. Here are some key aspects to consider:
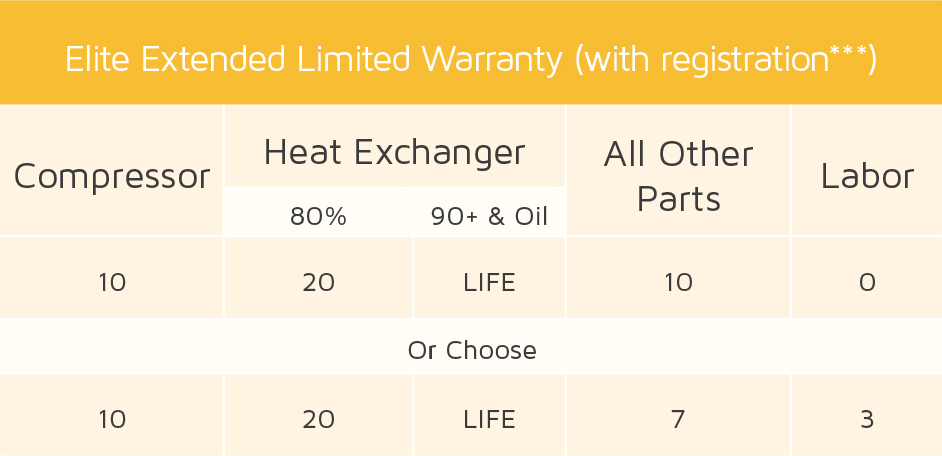
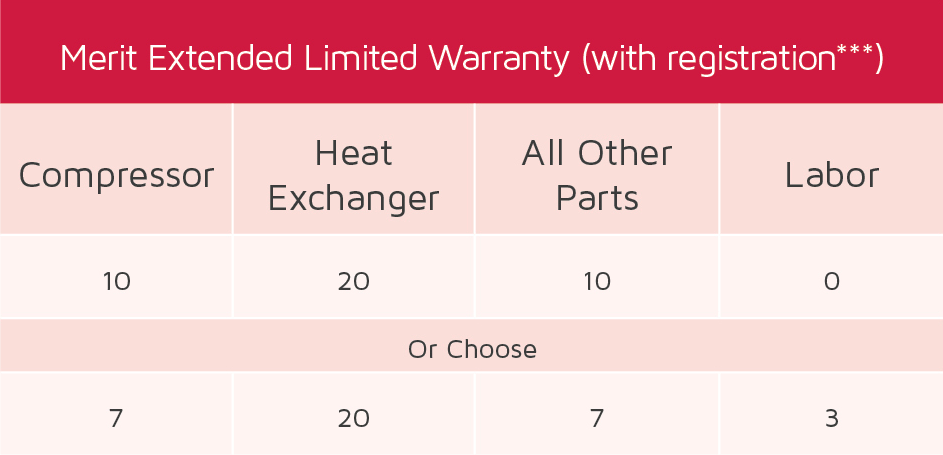
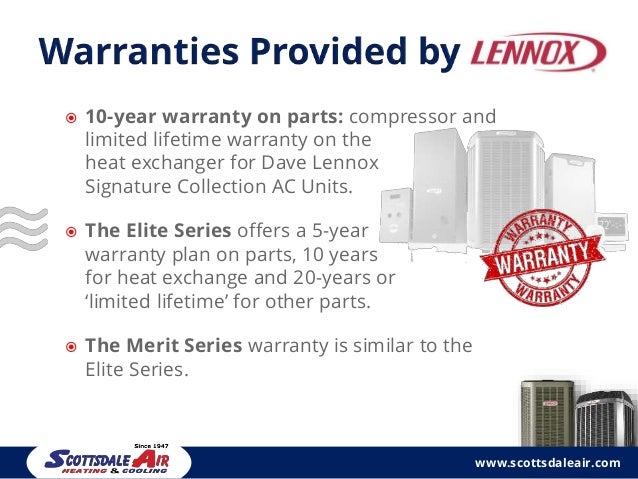
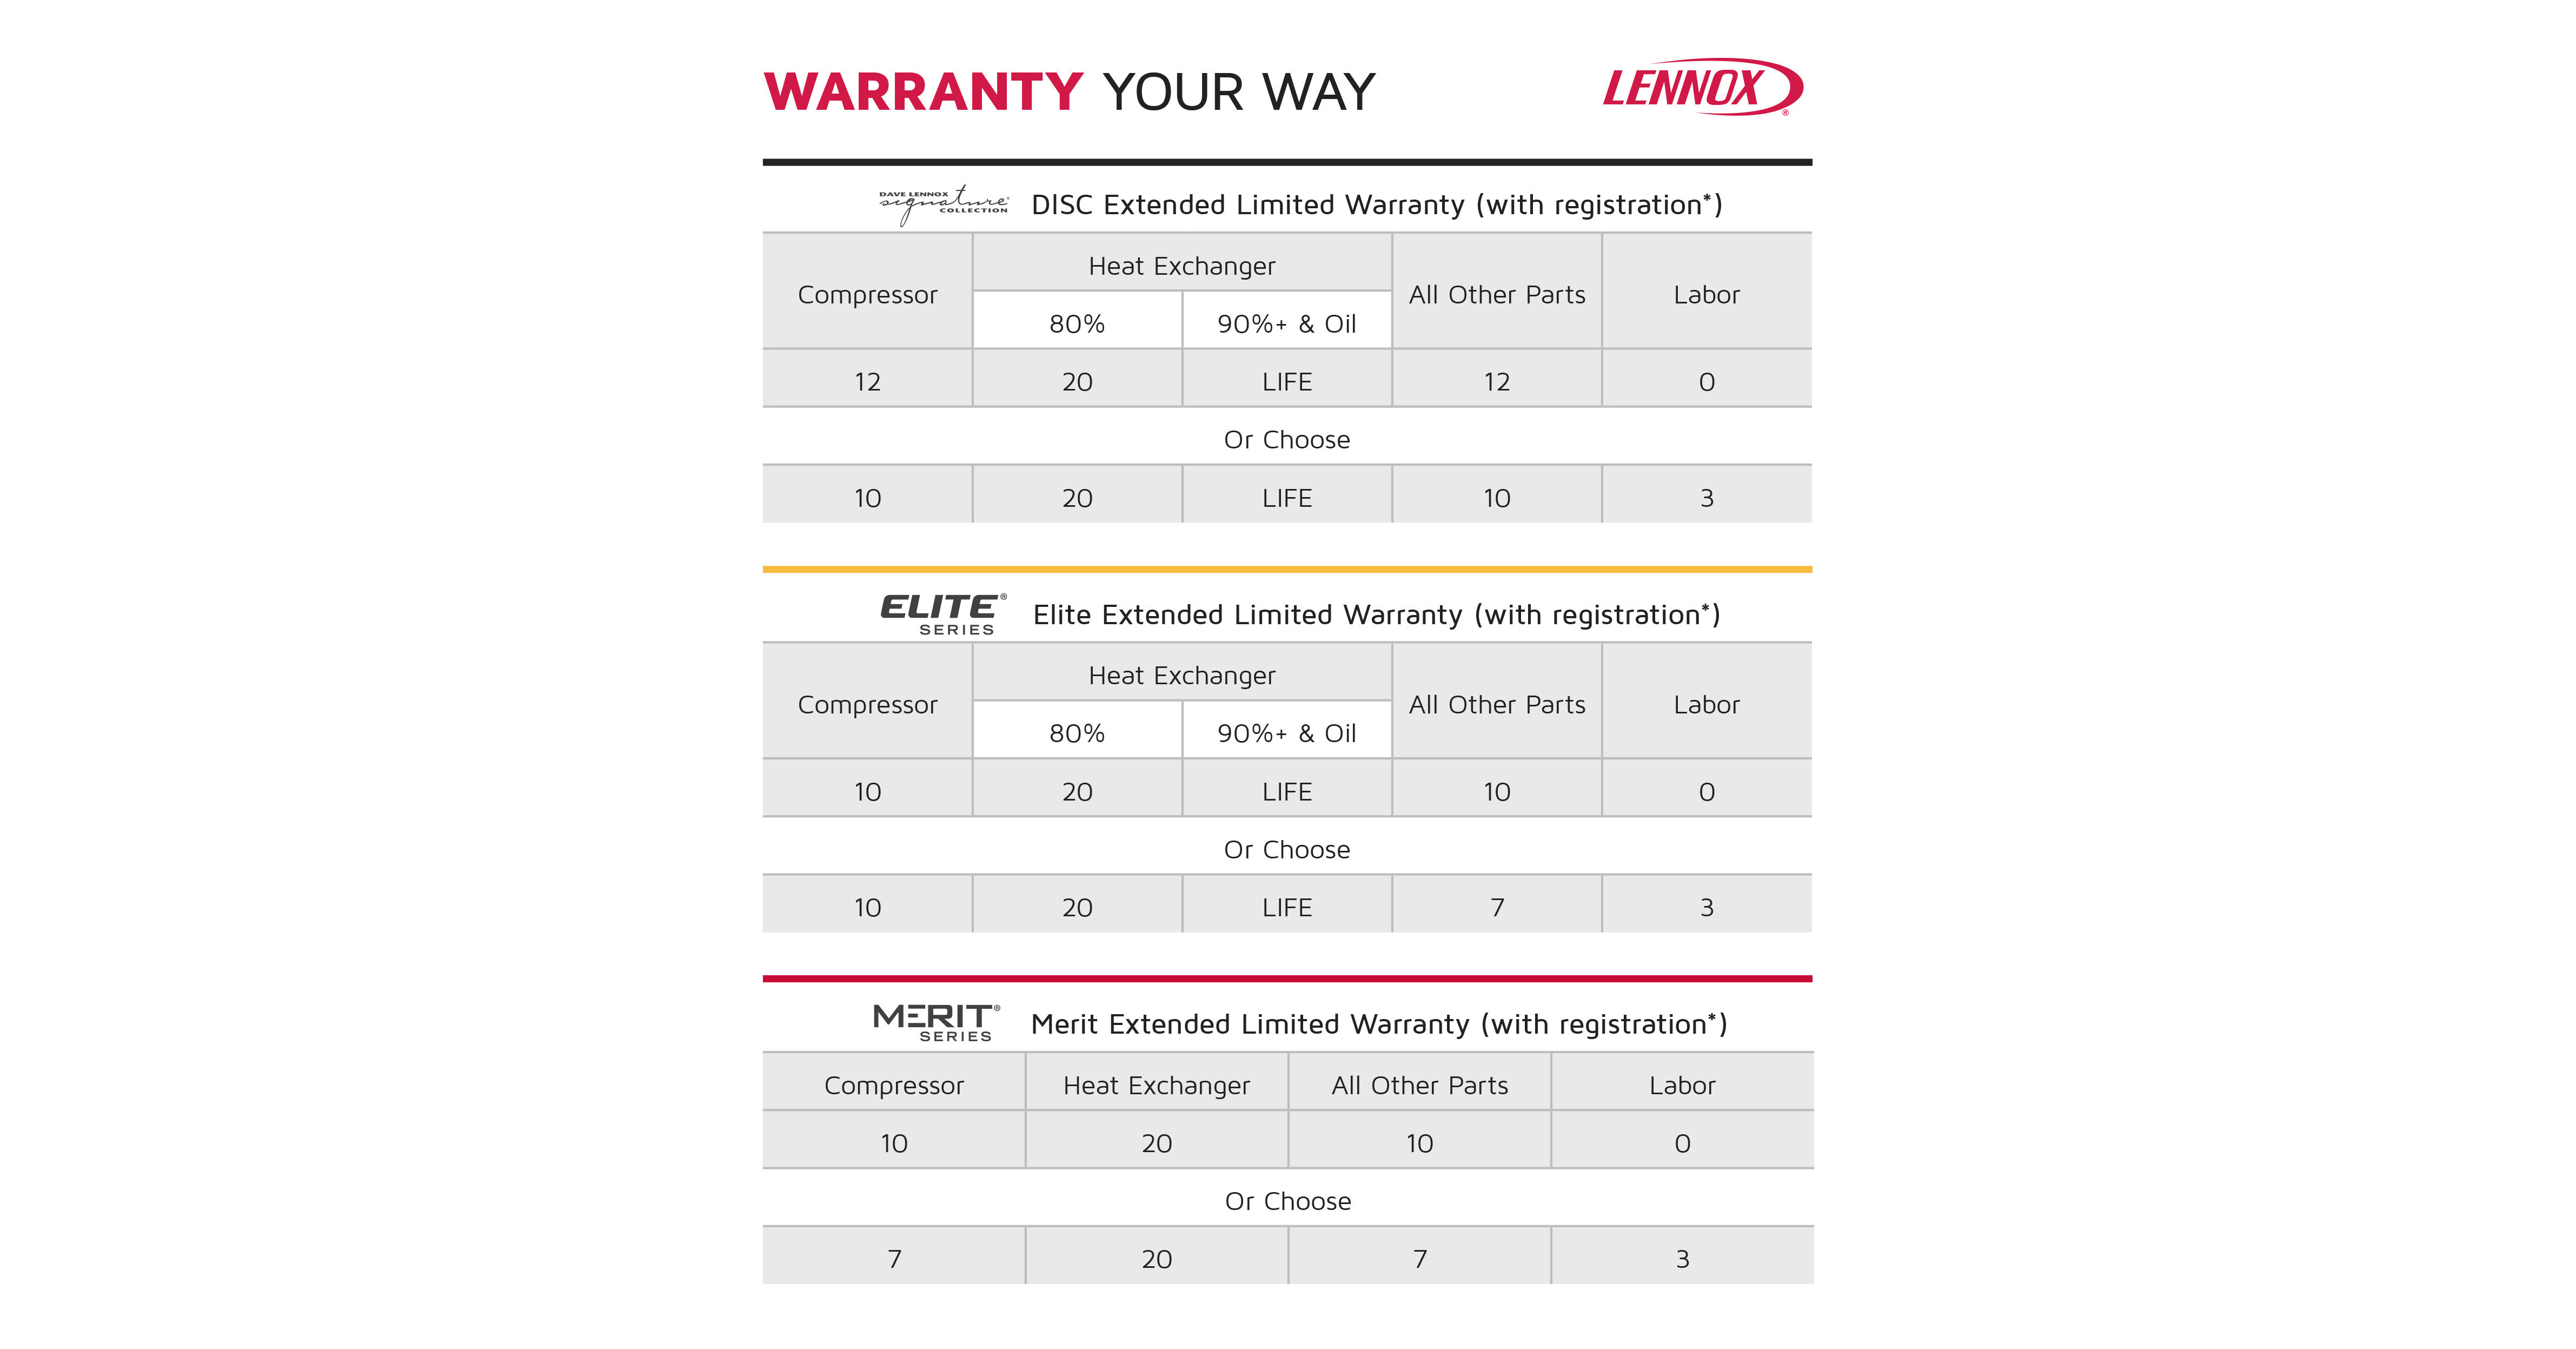
- Warranty Period: This is the length of time your warranty is valid. Standard warranties typically cover parts for a specific period (e.g., 5 years), while compressor warranties may extend longer (e.g., 10 years).
- Coverage: Understand which components are covered under the warranty. Typically, the warranty covers defects in materials or workmanship.
- Exclusions: Be aware of what's NOT covered. Common exclusions include damage caused by improper installation, lack of maintenance, acts of God (e.g., floods, lightning), and unauthorized repairs.
- Registration Requirements: Some warranties require registration within a specific timeframe after installation to be valid.
- Transferability: Check if the warranty is transferable to a new homeowner if you sell your property.
Common Lennox HVAC Issues and Troubleshooting
While a warranty protects you from manufacturing defects, proper maintenance and troubleshooting can prevent many common HVAC problems. Below are some frequent issues and basic DIY troubleshooting steps. Remember to always prioritize safety and disconnect power before working on your unit.
Lack of Cooling or Heating
This is one of the most common complaints. Here's what to check:
- Thermostat Setting: Ensure the thermostat is set to the correct mode (cooling or heating) and temperature.
- Air Filter: A dirty air filter restricts airflow and can cause the system to overheat or underperform. Replace it regularly (every 1-3 months).
- Circuit Breaker: Check if the circuit breaker for your HVAC system has tripped. Reset it if necessary.
- Outdoor Unit: Ensure the outdoor unit is free of debris, such as leaves, branches, and snow. Clear any obstructions around the unit to allow for proper airflow.
If these steps don't resolve the issue, there might be a more complex problem, such as a refrigerant leak or a faulty compressor, requiring professional attention.
No Airflow
If the system is running but no air is coming out of the vents, consider these possibilities:
- Blower Motor: A faulty blower motor can prevent air from circulating. This usually requires a professional diagnosis and repair.
- Ductwork Issues: Check for any visible leaks or disconnections in the ductwork. Seal any accessible leaks with duct tape (though professional sealing is recommended for long-term solutions).
- Damper Problems: Dampers control airflow to different zones. Ensure they are properly open and functioning.
Unusual Noises
Strange noises emanating from your HVAC system can indicate various problems. Here are some common culprits:
- Rattling: Loose panels or debris inside the unit. Secure any loose panels and remove any visible debris.
- Squealing: Worn-out belts in the blower motor. These belts may need to be replaced by a professional.
- Hissing: Potential refrigerant leak. Refrigerant leaks require immediate professional attention. Do not attempt to repair a refrigerant leak yourself.
- Banging: This could indicate a serious problem, such as a loose or damaged component within the compressor or blower motor. Contact a qualified HVAC technician immediately.
Water Leaks
Water leaks can cause significant damage if left unattended. Check these areas:
- Condensate Drain Line: This line removes condensation from the system. A clogged drain line is a common cause of leaks. You can try clearing the line with a wet/dry vacuum or a stiff wire.
- Condensate Pan: Inspect the condensate pan for cracks or damage. Replace the pan if necessary.
Tools and Parts for Basic Troubleshooting
Having a few essential tools and parts on hand can help with basic HVAC troubleshooting:
- Screwdrivers (various sizes)
- Wrenches
- Multimeter (for electrical testing – use with extreme caution and only if you are qualified)
- Duct Tape
- Air Filters (correct size for your system)
- Wet/Dry Vacuum
- Wire Brush
When to Call a Professional
While some HVAC issues can be addressed with DIY troubleshooting, certain situations require the expertise of a qualified HVAC technician. Here are some instances where calling a professional is crucial:
- Refrigerant Leaks: Handling refrigerant requires specialized equipment and training.
- Electrical Problems: Working with high-voltage electricity is dangerous. Unless you have extensive electrical experience, leave these repairs to a professional.
- Compressor Issues: Compressor repairs are complex and typically require specialized tools and knowledge.
- Gas Leaks: If you suspect a gas leak, evacuate the premises immediately and call your gas company and a qualified HVAC technician.
- If you are uncomfortable or unsure about any repair.
Estimating Repair Costs
Repair costs for HVAC systems can vary depending on the nature of the problem, the parts required, and the labor rates of the HVAC technician. Here are some general cost estimates for common repairs:
- Air Filter Replacement: $10 - $50 (DIY)
- Condensate Drain Line Cleaning: $75 - $200
- Blower Motor Replacement: $300 - $800
- Compressor Replacement: $1,000 - $3,000+
- Refrigerant Recharge: $200 - $500+
These are just estimates, and the actual cost may vary. Always get multiple quotes from qualified HVAC technicians before committing to a repair. Be sure to ask for a detailed breakdown of the costs, including parts, labor, and any additional fees.
Maintaining Your Lennox System to Prevent Problems
Regular maintenance is key to preventing HVAC problems and extending the life of your Lennox system. Here are some essential maintenance tasks:
- Regularly Change Air Filters: As mentioned earlier, clean air filters are crucial for efficient operation.
- Schedule Annual Tune-Ups: A professional tune-up should include cleaning the coils, checking refrigerant levels, inspecting electrical components, and lubricating moving parts.
- Keep the Outdoor Unit Clean: Remove debris from around the outdoor unit to ensure proper airflow.
- Monitor System Performance: Pay attention to any changes in system performance, such as reduced airflow, unusual noises, or inconsistent temperatures. Address any issues promptly to prevent them from escalating.
By understanding your Lennox warranty and following these troubleshooting and maintenance tips, you can keep your HVAC system running smoothly and efficiently for years to come.