Liquid Line And Suction Line
Your refrigerator is the unsung hero of your kitchen, tirelessly keeping your food fresh and your drinks cold. So, what happens when it suddenly decides to take a break? One common issue is a refrigerator that's not cooling properly. This could manifest as food spoiling faster than usual, a warmer-than-normal interior temperature, or ice cream that's softer than it should be. Before calling a repair technician, let's explore some DIY troubleshooting steps you can take to identify and possibly resolve the problem.
Safety First!
Before we begin, it's crucial to prioritize your safety. Always disconnect the refrigerator from its power source before performing any internal inspections or repairs. This prevents the risk of electric shock. If you're unsure about any step or uncomfortable working with electrical components, it's always best to consult a qualified appliance repair professional.
Step 1: Power Check and Basic Settings
Let's start with the simplest possibilities. Sometimes, the solution is easier than you think.
- Confirm the Power Supply: Ensure the refrigerator is properly plugged into a functioning outlet. Test the outlet with another appliance, like a lamp, to verify it's delivering power. A tripped circuit breaker is another common culprit. Check your home's electrical panel and reset any tripped breakers.
- Temperature Settings: Double-check the temperature settings on both the refrigerator and freezer compartments. Accidentally bumping the controls can cause them to be set too high (warmer) or too low (colder). Refer to your refrigerator's manual for the recommended temperature settings. A good starting point is typically around 37-40°F (3-4°C) for the refrigerator and 0°F (-18°C) for the freezer.
- Control Panel Lock: Some refrigerators have a control panel lock feature. Ensure this isn't activated, as it might prevent you from adjusting the temperature settings.
Step 2: Condenser Coils Inspection and Cleaning
The condenser coils are responsible for releasing heat from the refrigerant. When these coils are covered in dust and debris, they can't effectively dissipate heat, leading to reduced cooling performance. These coils are typically located at the back or underneath the refrigerator.
- Locate the Condenser Coils: Refer to your refrigerator's manual to find the exact location of the condenser coils.
- Disconnect Power: As always, disconnect the refrigerator from its power source before cleaning.
- Clean the Coils: Use a vacuum cleaner with a brush attachment to remove dust, pet hair, and other debris from the coils. A long-handled brush can also be helpful for reaching tight spots. Be gentle to avoid damaging the coils.
- Re-energize: Once the coils are clean, plug the refrigerator back in and allow it some time to cool down. It can take several hours for the temperature to stabilize.
Step 3: Evaporator Fan Motor Assessment
The evaporator fan motor circulates cold air throughout the refrigerator and freezer compartments. If this fan isn't working, the refrigerator won't cool effectively.
- Locate the Evaporator Fan: The evaporator fan is typically located inside the freezer compartment, often behind a panel.
- Inspect for Obstructions: Make sure nothing is blocking the fan blades, such as ice buildup or food items.
- Manually Test the Fan: (Exercise Caution - Electricity Involved) After disconnecting the power, carefully try to spin the fan blades by hand. If the blades are difficult to turn or don't spin freely, the motor might be faulty. In some cases, ice buildup can prevent the fan from spinning. If you suspect ice buildup, try defrosting the freezer completely and then retesting the fan. If the fan motor seems faulty or has excessive resistance, it's recommended to contact a qualified appliance repair technician for replacement. Replacing the fan motor involves electrical work and should be handled by a professional.
Step 4: Condenser Fan Motor Check
Similar to the evaporator fan, the condenser fan motor helps cool the compressor. A malfunctioning condenser fan can cause the compressor to overheat, reducing cooling efficiency.
- Locate the Condenser Fan: The condenser fan is usually located near the compressor at the back of the refrigerator.
- Inspect for Obstructions: Ensure nothing is blocking the fan blades.
- Listen for Operation: Plug the refrigerator back in and listen for the condenser fan to start running. If it's not running, carefully try to spin the fan blades by hand (after disconnecting the power again!). If they don't spin freely, the motor may be faulty.
- Professional Repair: Like the evaporator fan motor, replacing the condenser fan motor involves electrical work and is best left to a qualified technician.
Step 5: Door Seals Inspection
Damaged or worn door seals (gaskets) can allow warm air to enter the refrigerator, forcing it to work harder and reducing its cooling efficiency.
- Visual Inspection: Carefully examine the door seals for any signs of damage, such as cracks, tears, or gaps.
- Paper Test: Close the refrigerator door on a piece of paper. If you can easily pull the paper out without any resistance, the seal is likely compromised. Repeat this test at various points around the door.
- Cleaning the Seals: Clean the door seals with a mild detergent and warm water. This can remove any dirt or debris that might be preventing a good seal.
- Replacing the Seals: If the seals are damaged, they will need to be replaced. Replacement seals can usually be purchased online or from appliance parts stores. Follow the manufacturer's instructions for installation. The replacement process is typically straightforward, involving removing the old seal and pressing the new one into place.
Step 6: Defrost System Evaluation
If your refrigerator has an automatic defrost system, a malfunction in this system can lead to ice buildup on the evaporator coils, which will reduce cooling performance. The defrost system typically consists of a defrost heater, a defrost timer, and a defrost thermostat.
- Listen for Defrost Cycle: You should hear the refrigerator enter a defrost cycle periodically (usually every 8-12 hours). During this cycle, the defrost heater melts any ice buildup on the evaporator coils.
- Check for Excessive Ice Buildup: If you notice excessive ice buildup on the back wall of the freezer compartment, it could indicate a problem with the defrost system.
- Professional Diagnosis: Diagnosing and repairing problems with the defrost system requires specialized knowledge and tools. It's best to consult a qualified appliance repair technician for this type of repair. They can test the defrost heater, timer, and thermostat to identify the faulty component and replace it.
Step 7: Refrigerant Leaks (Professional Attention Required!)
Refrigerant is the lifeblood of your refrigerator's cooling system. If there's a refrigerant leak, the refrigerator won't be able to cool properly.
- Warning Signs: Common signs of a refrigerant leak include a gradual decrease in cooling performance, even after trying the steps above, and a hissing sound coming from the refrigerator.
- Do NOT Attempt DIY Repair: Refrigerant leaks require specialized equipment and knowledge to repair safely and effectively. Attempting to repair a refrigerant leak yourself is dangerous and can be illegal due to environmental regulations. Contact a qualified HVAC or appliance repair technician immediately if you suspect a refrigerant leak. They can locate and repair the leak, and recharge the refrigerant to the proper level.
Step 8: Compressor Problems (Leave to the Pros!)
The compressor is the heart of the refrigerator, responsible for circulating the refrigerant throughout the system. A faulty compressor can cause a complete loss of cooling.
- Listen for Compressor Operation: The compressor should run intermittently, cycling on and off as needed to maintain the desired temperature. If you don't hear the compressor running at all, it could be faulty.
- Overheating: If the compressor is running but feels excessively hot to the touch, it could indicate a problem.
- Professional Assessment: Diagnosing and repairing compressor problems requires specialized knowledge and equipment. Compressor replacement is a complex and expensive repair that should only be performed by a qualified appliance repair technician.
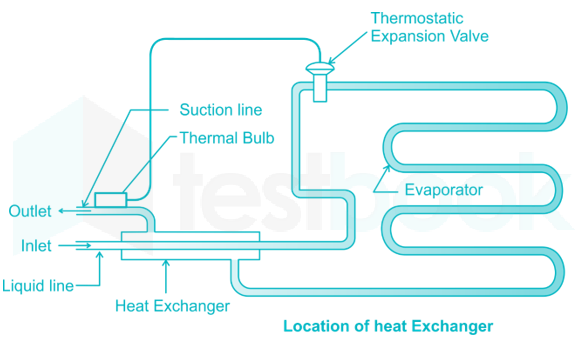
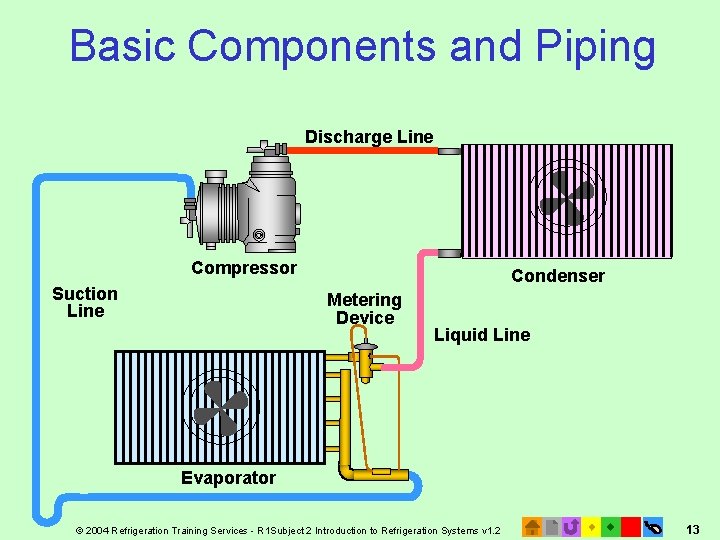
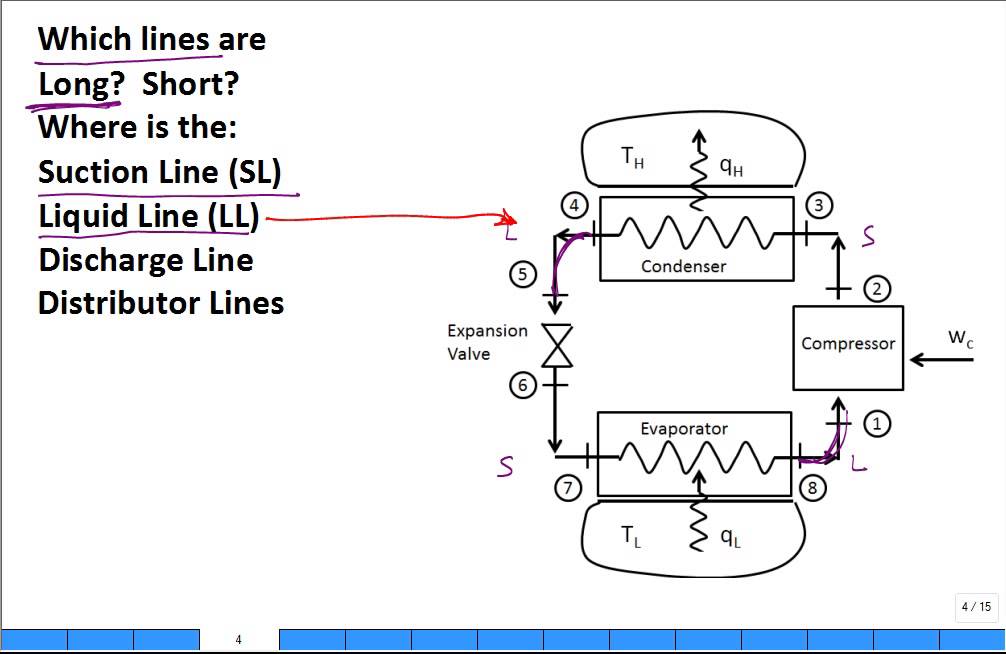
Understanding the Liquid and Suction Lines
While many repairs require professional assistance, understanding the basics of the liquid and suction lines can provide valuable insight into your refrigerator's operation.
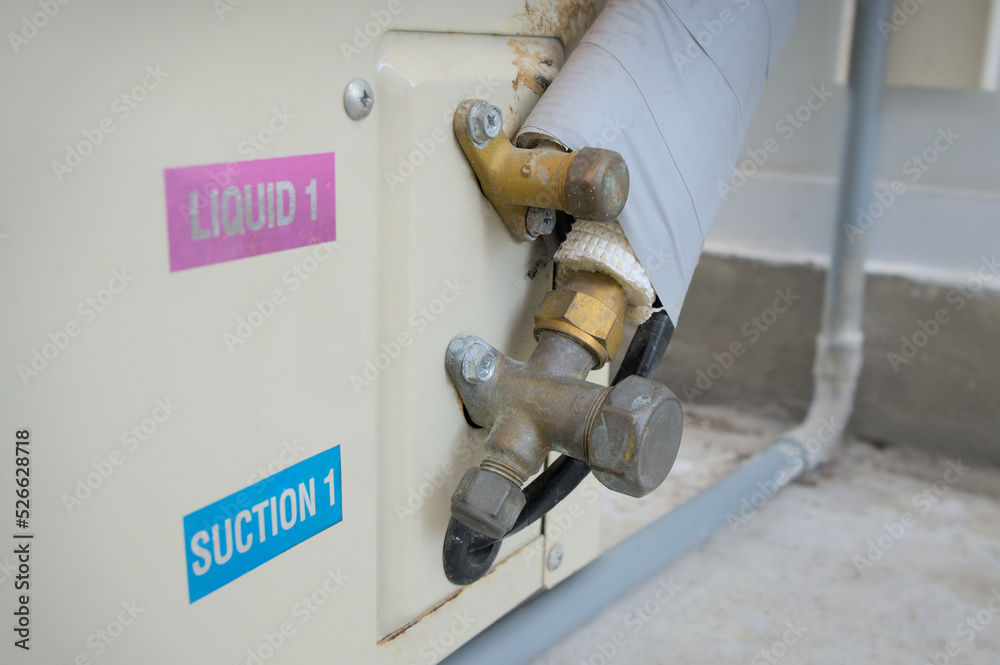
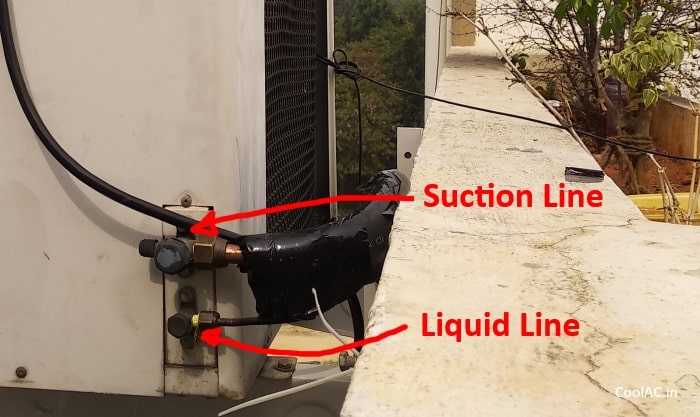
Liquid Line
The liquid line carries high-pressure, liquid refrigerant from the condenser to the expansion valve (also called a metering device). This is typically a smaller-diameter copper tube. A slightly warm liquid line indicates normal operation, as it's carrying heat away from the condenser.
Suction Line
The suction line carries low-pressure, gaseous refrigerant from the evaporator back to the compressor. This is usually a larger-diameter copper tube. Ideally, the suction line should be cool to the touch. If it's unusually warm or hot, it could indicate a problem with the refrigerant charge, the compressor, or the evaporator.
Important Note: Never attempt to cut, puncture, or modify the liquid or suction lines. These lines contain pressurized refrigerant, and any attempt to tamper with them can be dangerous.
When to Call a Professional
While many simple refrigerator problems can be resolved with DIY troubleshooting, certain situations require the expertise of a qualified appliance repair technician. Here are some signs it's time to call in the professionals:
- You suspect a refrigerant leak.
- The compressor is not running or is overheating.
- The defrost system is malfunctioning.
- You're uncomfortable working with electrical components.
- You've tried the troubleshooting steps above, and the refrigerator is still not cooling properly.
Final Thoughts
By following these troubleshooting steps, you can often identify and resolve common refrigerator problems. Remember to prioritize your safety and consult a professional when needed. A little preventative maintenance, like cleaning the condenser coils regularly, can also help keep your refrigerator running smoothly for years to come.