Long Sweep 90 Vs Short Sweep

One of the most frustrating plumbing problems a homeowner can face is a slow-draining or completely blocked drain. Often, the culprit isn't some mysterious, deep-seated issue, but a seemingly minor detail in the drainpipe configuration: the type of 90-degree bend used. Understanding the difference between a long sweep (also called a long radius) and a short sweep (or tight radius) fitting, and knowing which one is appropriate for which situation, can save you from headaches and expensive plumbing bills.
This article will guide you through diagnosing drain problems potentially caused by improper 90-degree bends, and provide some simple DIY fixes. However, it’s important to know when to call in a professional. Safety is paramount, and attempting repairs beyond your skill level can lead to further damage and potential injury.
Understanding Long Sweep vs. Short Sweep
Before diving into troubleshooting, let's clearly define these two fitting types:
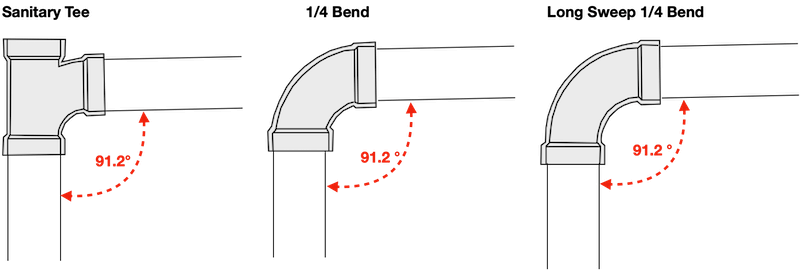
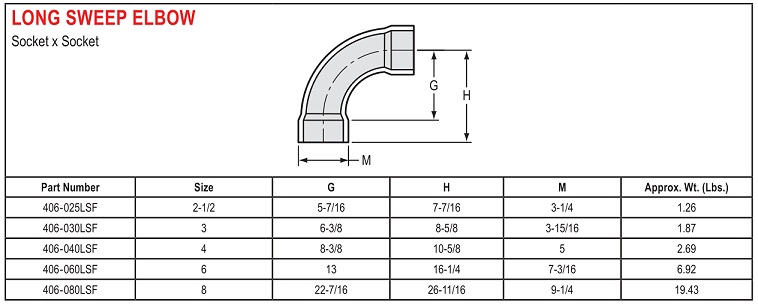
Long Sweep 90 (Long Radius)
A long sweep 90-degree fitting has a gradual curve. This gentler bend allows water and waste to flow more smoothly, reducing the likelihood of clogs. It’s the preferred choice for most drain applications, especially for horizontal runs.
Short Sweep 90 (Tight Radius)
A short sweep 90-degree fitting has a sharper, more abrupt bend. While it takes up less space, this tight turn restricts flow and significantly increases the chance of clogs. Short sweeps are generally only appropriate for specific situations, like venting (we'll touch on that later), and should never be used on horizontal drain lines carrying solid waste.
Diagnosing the Problem
Is your drain sluggish or completely stopped? Here’s how to determine if the culprit might be an incorrectly installed short sweep 90:
- Identify the Problem Area: Which drain is affected? Is it a sink, shower, toilet, or washing machine drain? Knowing the location helps narrow down the potential sources of the blockage.
- Check for Obvious Clogs: Before suspecting a fitting issue, rule out simple clogs. Use a plunger on sinks and toilets. For showers and tubs, remove the drain stopper and check for hair and debris. A plumbing snake (also called an auger) can be helpful for retrieving deeper clogs.
- Locate the Drainpipe: This usually involves looking under sinks, in basements, or crawl spaces. If the drain is concealed behind walls, you might need to rely on access panels or, as a last resort, cut a small inspection hole. Always proceed with caution when cutting into walls to avoid hitting electrical wires or plumbing.
- Visually Inspect the 90-Degree Bends: Once you locate the drainpipe, examine the 90-degree bends. Are they long sweeps (gradual curves) or short sweeps (tight angles)? Take a photo of the fitting if you're unsure, and compare it to images online. Pay close attention to horizontal drain lines, as this is where short sweeps cause the most problems.
- Listen to the Drain: When running water down the drain, listen carefully. Do you hear gurgling sounds? These sounds often indicate restricted airflow or a partial blockage, which can be exacerbated by a short sweep fitting.
- Consider the Drain's History: Has this drain always been slow, or is this a recent issue? If it's always been slow, a poorly designed drain system, including incorrect fittings, is likely the root cause. If it's a recent problem, a new clog formed within or around the problematic fitting is more probable.
DIY Fixes (With Caution!)
If you've identified a potential issue with a short sweep 90 in a *non-critical*, *easily accessible* drain line (like a sink drain that isn't backing up sewage into your house), and you feel comfortable with basic plumbing, you can attempt the following DIY fixes. Remember, safety first! Turn off the water supply to the fixture before attempting any repairs.
- Auger the Drain: Even if you've already tried a plunger, a plumbing snake can be more effective at clearing clogs around a short sweep fitting. Carefully insert the auger into the drainpipe and rotate it to break up or retrieve the blockage.
- Enzyme Drain Cleaner: Avoid harsh chemical drain cleaners, as they can damage pipes and are harmful to the environment. Instead, try an enzyme-based drain cleaner. These cleaners use enzymes to break down organic matter, which can help clear clogs caused by grease, hair, and food particles. Follow the manufacturer's instructions carefully.
- Replace a Short Sweep with a Long Sweep (If Accessible and Simple): *This is the most effective long-term solution, but requires plumbing experience.*
- Turn off the water supply.
- Disassemble the drainpipe at the connections upstream and downstream of the short sweep. Use appropriate tools (pipe wrenches or pliers) and be prepared for some water to spill out.
- Cut out the short sweep 90. Use a PVC pipe cutter or a hacksaw. Make sure to cut cleanly and squarely.
- Install the new long sweep 90. Use PVC primer and cement to properly join the new fitting to the existing pipes. Ensure the fitting is properly aligned and secured.
- Allow the cement to cure completely according to the manufacturer's instructions before turning the water back on.
- Test the drain for leaks and proper flow.
Important Considerations Before Replacing a Fitting Yourself:
- Pipe Material: Identify the type of pipe (PVC, ABS, copper, etc.) before attempting any repairs. Different materials require different joining methods and materials.
- Proper Tools: Ensure you have the correct tools for cutting, cleaning, and joining the pipes.
- Accessibility: If the drainpipe is difficult to access or tightly packed, it may be best to leave the repair to a professional.
- Local Codes: Be aware of local plumbing codes, which may dictate the type of fittings allowed in certain applications.
When to Call a Professional Plumber
While some minor drain issues can be resolved with DIY methods, certain situations require the expertise of a licensed plumber. Here's when to call for professional help:
- Main Drain Issues: If the problem affects multiple drains or the main drain line, do not attempt DIY repairs. These issues often involve more complex plumbing systems and can lead to sewage backups and serious health hazards.
- Hidden Plumbing: If the drainpipe is located behind walls or under floors and requires extensive demolition to access, a plumber is the best choice. They have the tools and experience to minimize damage and ensure the repair is done correctly.
- Persistent Clogs: If you've tried multiple DIY methods and the drain remains clogged, there may be a more serious underlying problem, such as a collapsed pipe or root intrusion.
- Suspect a Venting Issue: Improper venting can mimic the symptoms of a clogged drain. If you suspect a venting problem (e.g., drains are slow and gurgling), a plumber can diagnose and correct the issue. Sometimes short sweeps are used intentionally in venting systems, but improper vent design can still cause problems.
- You're Uncomfortable or Unsure: If you're not confident in your plumbing skills or are uncomfortable working with pipes and fittings, it's always best to err on the side of caution and call a professional.
- The Drain is for a Toilet: Replacing plumbing components connected to a toilet is a task best left to professionals. Improper installation could lead to leaks and costly repairs.
Preventing Future Problems
Once you've resolved the drain issue, take steps to prevent future problems:
- Use Drain Screens: Install drain screens in sinks, showers, and tubs to catch hair and debris before they enter the drainpipe.
- Avoid Pouring Grease Down the Drain: Grease solidifies as it cools, clogging drainpipes. Dispose of grease in a separate container.
- Flush Only Toilet Paper: Avoid flushing anything other than toilet paper down the toilet. Feminine hygiene products, wipes (even "flushable" ones), and paper towels can clog drainpipes.
- Regular Drain Maintenance: Periodically flush drains with hot water and a small amount of baking soda and vinegar to help prevent buildup.
- Consider Professional Drain Cleaning: Schedule professional drain cleaning every few years to remove accumulated debris and prevent clogs.
By understanding the difference between long and short sweep 90s, knowing how to diagnose potential problems, and implementing preventative measures, you can keep your drains flowing smoothly and avoid costly plumbing repairs.