Matching Ceiling Fans In Different Sizes

Creating Cohesion: Matching Ceiling Fans in Different Sizes for a Stylish and Efficient Home
Ceiling fans are more than just decorative elements; they're crucial for energy efficiency, circulating air in summer and pushing down warm air in winter, reducing the strain on your HVAC system. But what happens when you need different sizes in different rooms? How do you maintain a cohesive aesthetic while ensuring optimal performance? This guide will walk you through matching ceiling fans in various sizes, covering design considerations, installation tips, and when to call in a professional.
Why Different Sizes Matter
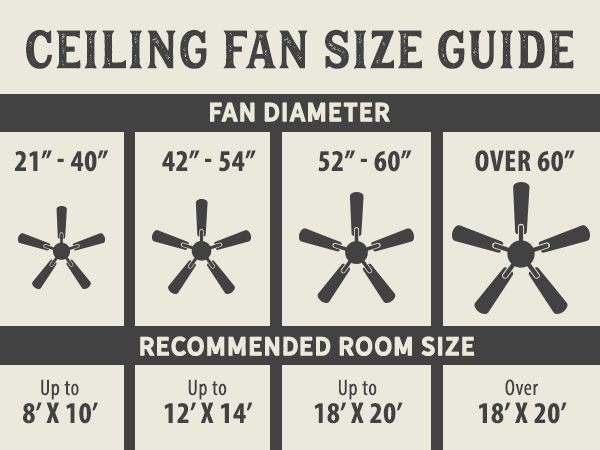
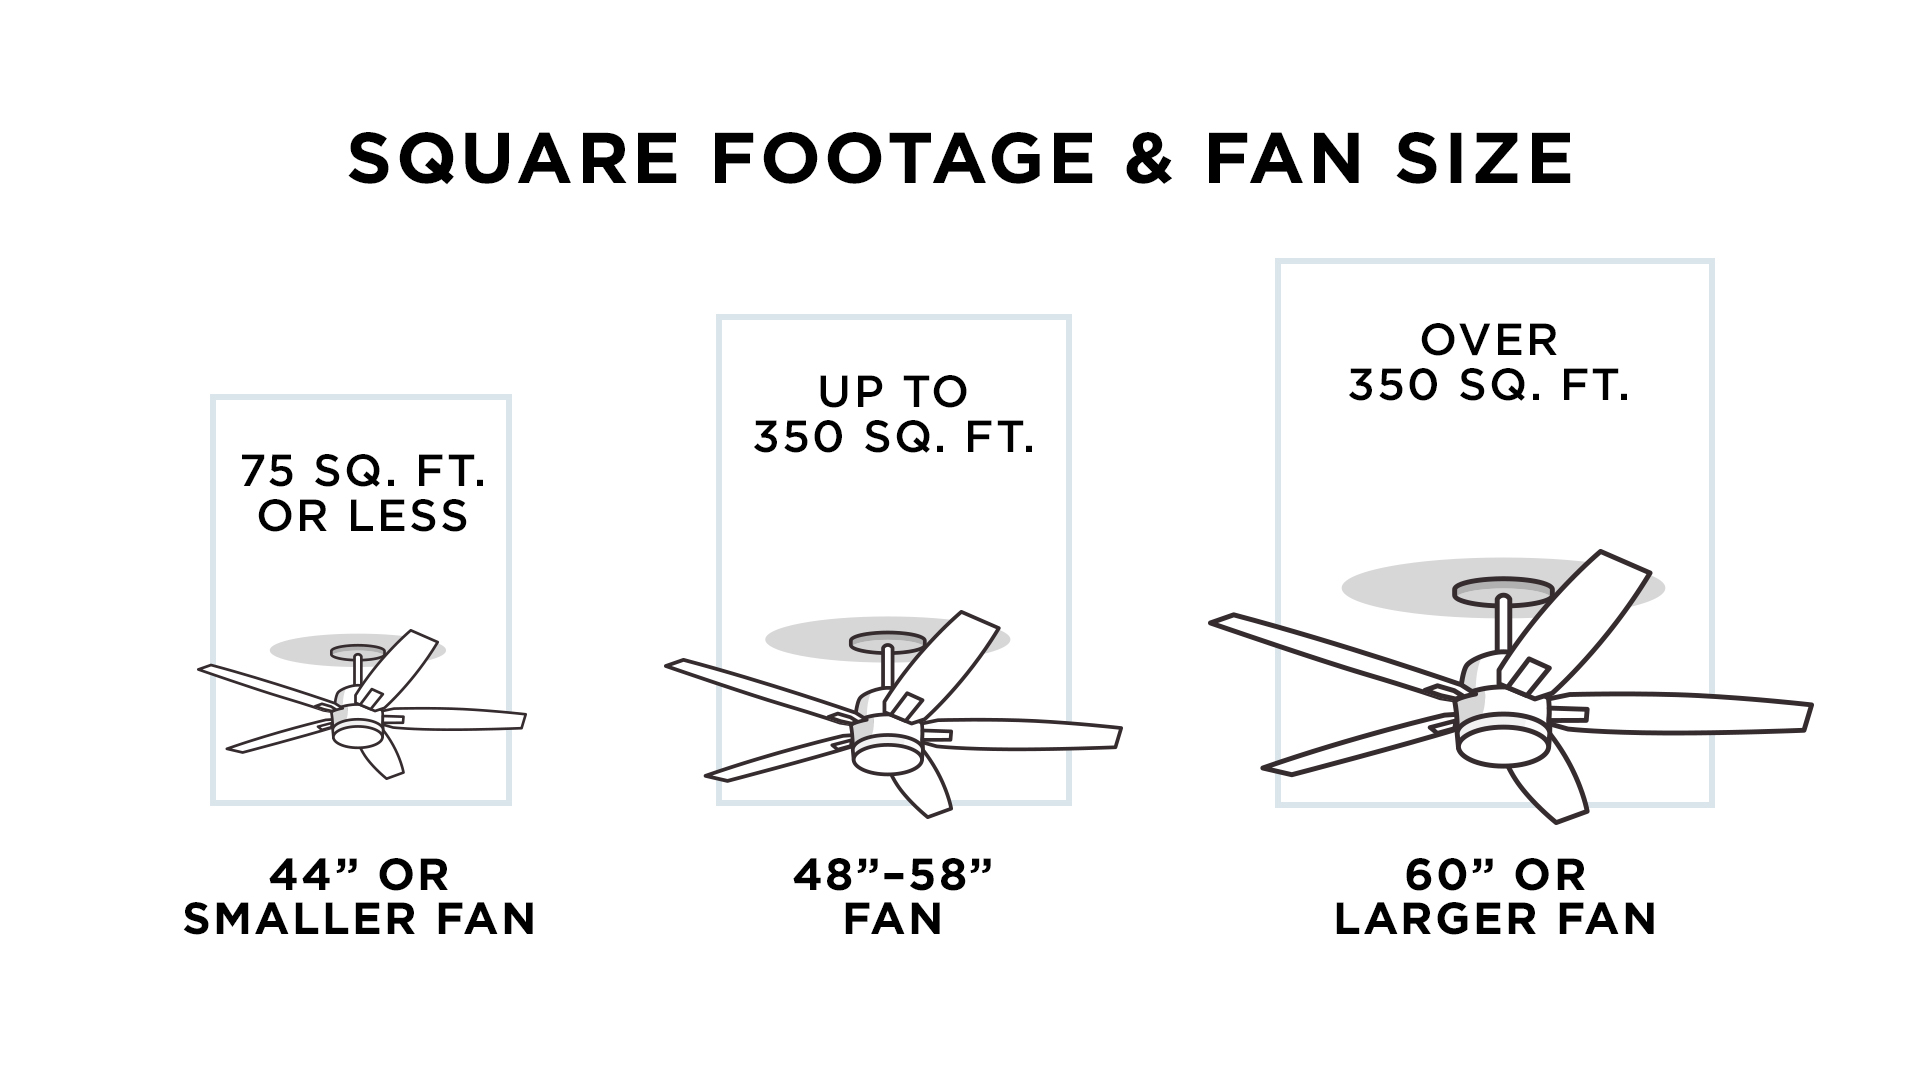
A small bathroom fan won’t effectively cool a large living room, and an oversized fan in a tiny bedroom can be overpowering. The key is to select the right fan size based on room dimensions. Generally:
- Rooms up to 75 square feet: 36-inch blade span
- Rooms up to 144 square feet: 42-inch blade span
- Rooms up to 225 square feet: 52-inch blade span
- Rooms up to 400 square feet: 56-inch blade span
- Rooms larger than 400 square feet: Consider multiple fans or a fan with a 60-inch or larger blade span.
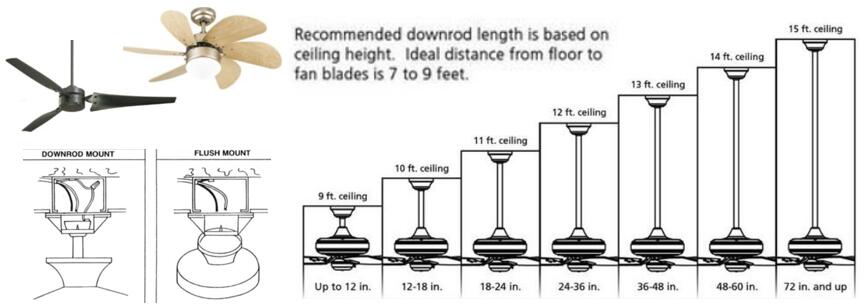
These are guidelines, and ceiling height also plays a role. For ceilings higher than 9 feet, consider using a downrod to lower the fan for optimal airflow.
Choosing a Consistent Style
The trick to matching fans in different sizes is maintaining a consistent design theme. Here’s how:
- Finish: Select the same finish for all fans. Brushed nickel, oil-rubbed bronze, matte black, and white are popular choices. Consistency in finish is one of the easiest ways to tie different-sized fans together.
- Blade Shape: Choose fans with similar blade shapes. Whether it's a classic paddle shape or a more contemporary curved design, keeping the blade profile consistent creates visual harmony.
- Motor Housing Design: Pay attention to the motor housing (the part that encases the motor). Look for fans with similar housing styles, even if the size varies. A sleek, modern housing will complement other fans with the same design.
- Details: Small details like the light fixture style (if applicable) or the pull chain design can make a big difference. Opt for similar details across all fans to reinforce the cohesive look.
Pro Tip: Many manufacturers offer ceiling fan collections that include fans in various sizes, all designed to coordinate perfectly. This simplifies the matching process.
Color Considerations
Color plays a significant role in how your fans blend (or contrast) with your room. Here's a breakdown:
- Matching the Décor: Choose fan colors that complement your existing furniture, walls, and flooring. If you have a room with a lot of natural wood tones, a fan with wooden blades might be a good choice.
- Neutral Colors: Neutral colors like white, gray, or black are always safe bets. They tend to blend well with most color schemes and won't clash with other elements in the room.
- Accent Colors: If you're feeling bold, you can choose a fan with an accent color that matches a particular piece of furniture or artwork in the room. Just be careful not to overdo it; too many accent colors can make a space feel cluttered.
Installation Tips and Tricks
Installing a ceiling fan can be a rewarding DIY project, but safety is paramount. Always turn off the power at the breaker before starting any electrical work.
Essential Tools and Materials
- Screwdrivers (Phillips and flathead)
- Wire strippers
- Wire connectors (wire nuts)
- Electrical tape
- Pliers
- Voltage tester
- Ladder
- Stud finder
- New ceiling fan mounting bracket (if needed)
- Safety glasses
- Gloves
Step-by-Step Installation Guide (General Outline)
- Turn off the power: Locate the circuit breaker for the room and turn it off. Double-check with a voltage tester to ensure the power is off at the wiring location.
- Remove the old fixture: Carefully disconnect the wiring from the old light fixture or fan. Note the wiring connections (black to black, white to white, ground to ground).
- Install the mounting bracket: Secure the new mounting bracket to the ceiling joist. If no joist is available, use a fan-rated brace. This is crucial for safety, as ceiling fans can be heavy.
- Wire the fan: Connect the fan wires to the house wiring according to the manufacturer's instructions. Use wire connectors to secure the connections and wrap them with electrical tape for added safety.
- Mount the fan: Carefully lift the fan motor housing and attach it to the mounting bracket. Follow the manufacturer's instructions for securing the fan.
- Attach the blades: Assemble and attach the fan blades. Make sure they are securely fastened.
- Install the light kit (if applicable): If your fan has a light kit, install it according to the manufacturer's instructions.
- Test the fan: Turn the power back on at the breaker. Test the fan's operation and the light kit (if applicable).
Safety First: If you are uncomfortable working with electricity, hire a qualified electrician. Incorrect wiring can be dangerous and could lead to a fire hazard.
Troubleshooting Common Issues
- Fan Wobbles: Ensure all blades are securely attached and balanced. Use a fan balancing kit if needed.
- Fan Doesn't Turn On: Check the circuit breaker, wiring connections, and the fan's pull chain or remote control.
- Light Doesn't Work: Check the light bulb, wiring connections, and the fan's pull chain or remote control.
- Humming Noise: Tighten all screws and connections. If the noise persists, the motor may be faulty.
When to Call a Professional
While installing or troubleshooting ceiling fans can be a DIY project, there are times when it's best to call in a professional electrician or HVAC technician:
- If you're uncomfortable working with electricity.
- If you're unsure about the wiring connections.
- If you encounter any unexpected problems during the installation process.
- If your home's electrical system is old or outdated.
- If you suspect a problem with the fan motor.
- If you live in an older home with potentially hazardous wiring (e.g., aluminum wiring).
Attempting complex electrical repairs without the proper training and experience can be dangerous. It's always better to err on the side of caution and hire a professional to ensure the job is done safely and correctly.
Estimated Repair Costs
Here's a general idea of what you might expect to pay for common ceiling fan repairs:
- Ceiling fan installation: $150 - $350 (depending on complexity and location)
- Ceiling fan repair (minor issues): $75 - $150
- Ceiling fan motor replacement: $200 - $400 (including parts and labor)
- Electrical wiring repair related to the fan: $100 - $300 (depending on the extent of the damage)
These are just estimates, and the actual cost may vary depending on your location, the complexity of the job, and the electrician's rates. Always get multiple quotes from qualified electricians before hiring someone.
Final Thoughts
Matching ceiling fans in different sizes is achievable with careful planning and attention to detail. By focusing on consistent finishes, blade shapes, motor housing designs, and colors, you can create a cohesive and stylish look throughout your home. Remember to prioritize safety during installation and don't hesitate to call a professional when needed. A well-chosen and properly installed ceiling fan not only enhances your home's aesthetic but also contributes to improved energy efficiency and overall comfort.


:max_bytes(150000):strip_icc()/peo-best-ceiling-fans-of-2023-tout-c04fd78408cc4fcca6d93595ca433104.jpg)