Metal Roof To Wall Flashing Detail

Understanding Metal Roof to Wall Flashing: A Comprehensive Guide for HVAC Professionals and Homeowners
The intersection of a metal roof and an adjacent wall presents a unique challenge in building construction. This critical area is prone to water infiltration if not properly sealed. The solution lies in effective metal roof to wall flashing, a vital component that protects your building from the elements. This article delves into the intricacies of this flashing detail, covering its purpose, types, installation methods, and maintenance, ensuring optimal performance and longevity for your building envelope.
Why is Metal Roof to Wall Flashing Important?
The primary function of flashing is to create a waterproof barrier, diverting water away from vulnerable areas where different building materials meet. At the junction of a metal roof and a wall, thermal expansion and contraction can create movement, leading to gaps and potential leaks. Improperly installed or inadequate flashing will inevitably lead to water damage, resulting in costly repairs, mold growth, and structural deterioration. From an HVAC perspective, water intrusion can damage ductwork, insulation, and even compromise the performance of equipment housed near the affected area. Efficient HVAC performance relies on a tightly sealed building envelope; water leaks negate energy efficiency and can lead to increased operational costs.
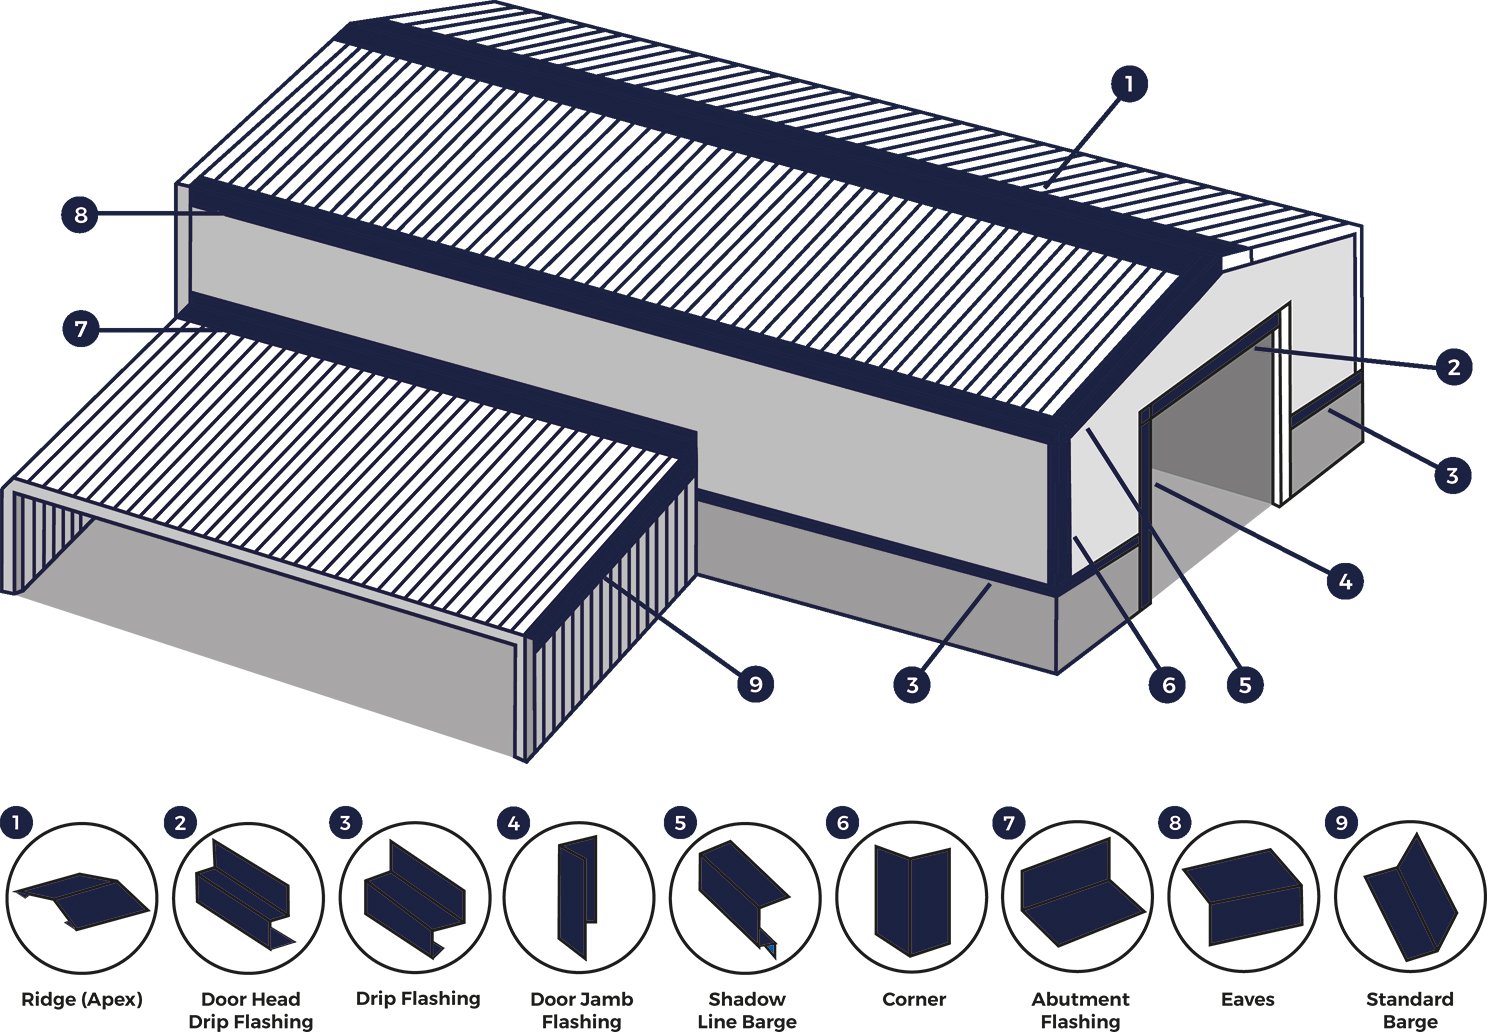
Types of Metal Roof to Wall Flashing
Several types of flashing are commonly used, each with its advantages and disadvantages. The best choice depends on the specific roof and wall configuration, climate, and budget. Here's a breakdown of some popular options:
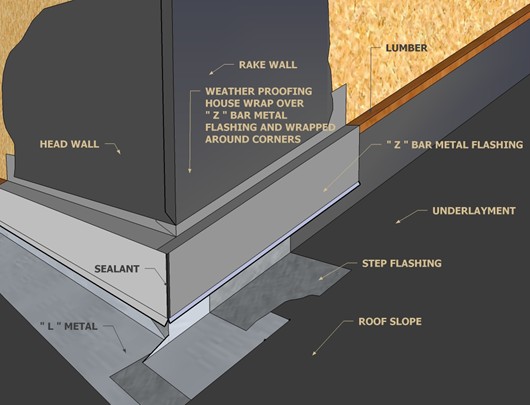
- Step Flashing: Often used with siding, step flashing consists of individual pieces of metal that are interwoven with the siding and the roofing material. Each piece is bent at a 90-degree angle and installed in overlapping courses. Step flashing is particularly effective for roofs with a steep slope.
- Continuous Flashing (or Apron Flashing): This involves a single, long piece of metal that extends from the roof up the wall. It's typically used for situations where the wall is relatively smooth and straight. Continuous flashing offers a clean aesthetic and can be quicker to install than step flashing.
- Counter Flashing: This is used in conjunction with base flashing. The base flashing is attached to the roof, and the counter flashing is embedded in the wall or siding and overlaps the base flashing. This creates a two-part system that allows for movement and prevents water from penetrating.
- Z-Flashing: Z-flashing is commonly used to protect horizontal joints in siding. While not exclusively for roof-to-wall transitions, it can be adapted for certain situations, particularly where the wall is clad with panels.
Materials Used for Metal Roof to Wall Flashing
The material used for flashing is just as crucial as the design. Common materials include:
- Aluminum: Lightweight, corrosion-resistant, and relatively inexpensive. A good choice for most climates but may not be suitable for environments with high salt content (coastal areas).
- Galvanized Steel: Steel coated with a layer of zinc to prevent rust. More durable than aluminum but can eventually corrode, especially if the zinc coating is damaged.
- Copper: Highly durable and aesthetically pleasing, copper flashing is an excellent choice for longevity. However, it is also the most expensive option.
- Stainless Steel: Offers superior corrosion resistance and strength, making it ideal for harsh environments. Stainless steel is a premium option with a higher initial cost.
Consider the compatibility of the flashing material with both the roofing and wall materials to prevent galvanic corrosion. For example, avoid direct contact between copper and aluminum.
Installation Best Practices
Proper installation is paramount to the effectiveness of metal roof to wall flashing. Here are some best practices to follow:
- Preparation: Ensure the roof and wall surfaces are clean, dry, and free of debris. Remove any old flashing and inspect for damage.
- Cutting and Bending: Precisely cut and bend the flashing material to fit the specific contours of the roof and wall. Use appropriate tools to avoid damaging the metal.
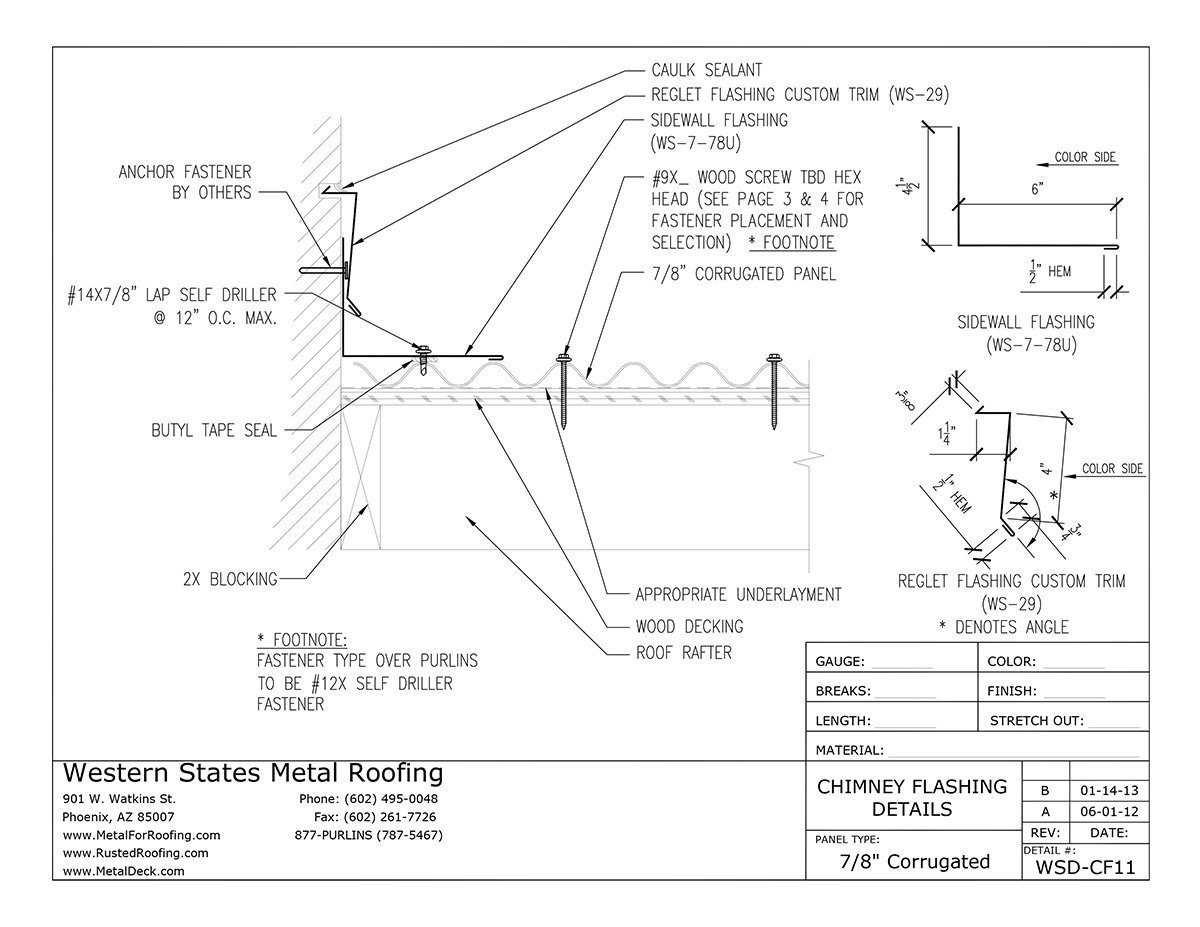
- Overlapping: Ensure adequate overlapping of flashing pieces to prevent water from seeping through joints. A minimum overlap of 2 inches is generally recommended.
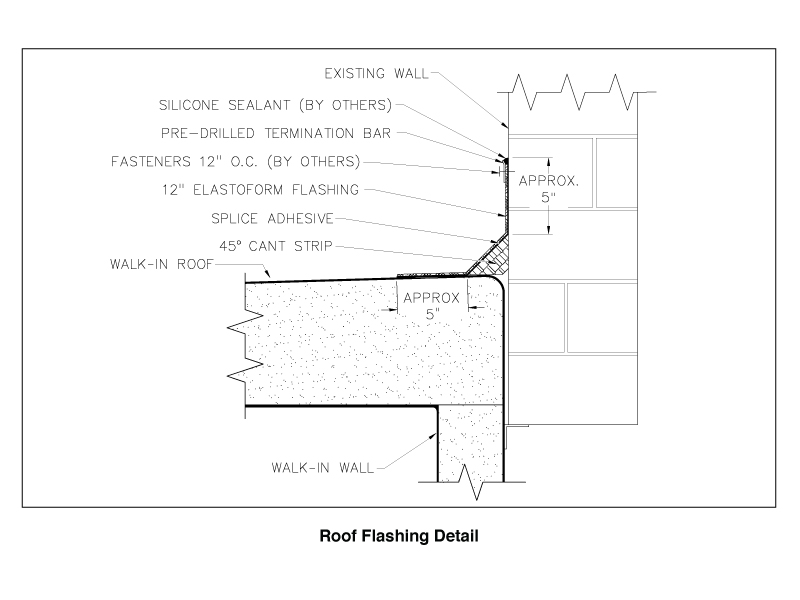
- Sealing: Use a high-quality sealant specifically designed for roofing applications to seal all edges and joints. Pay close attention to corners and areas where the flashing meets other building materials. Silicone-based sealants are often a good choice due to their flexibility and weather resistance.
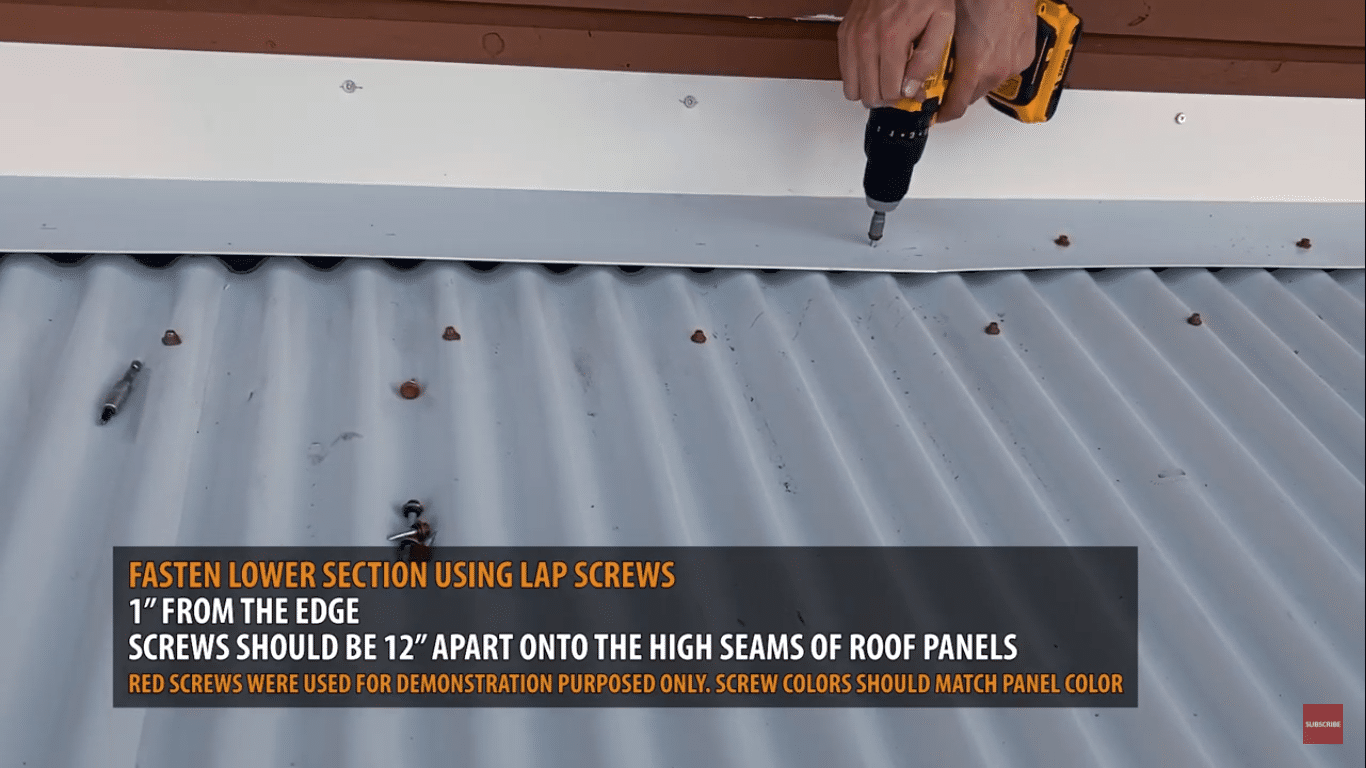
- Fastening: Secure the flashing to the roof and wall using appropriate fasteners, such as screws or nails. Ensure the fasteners are compatible with the flashing material to prevent corrosion.
- Counter Flashing Installation: If using counter flashing, properly embed it into the wall and overlap the base flashing by at least 4 inches. Create a secure and watertight seal.
Common Mistakes to Avoid
Even with the best materials and intentions, mistakes can happen during installation. Avoiding these common errors will ensure a longer-lasting and more effective flashing system:
- Insufficient Overlap: Failing to provide adequate overlap between flashing pieces is a common cause of leaks.
- Using the Wrong Sealant: Not all sealants are created equal. Using an incompatible or low-quality sealant can lead to premature failure and leaks.
- Improper Fastening: Using the wrong type of fasteners or spacing them too far apart can compromise the integrity of the flashing.
- Neglecting Surface Preparation: Installing flashing on a dirty or uneven surface can prevent a proper seal and lead to water infiltration.
- Mixing Incompatible Metals: Mixing dissimilar metals can cause galvanic corrosion, which can weaken the flashing and lead to leaks.
Maintenance and Inspection
Regular inspection and maintenance are essential for prolonging the life of your metal roof to wall flashing. Here's what to look for:
- Visual Inspection: Check for signs of damage, such as cracks, rust, or loose fasteners. Pay close attention to areas around chimneys, vents, and other penetrations.
- Sealant Condition: Inspect the sealant for cracks, peeling, or deterioration. Reapply sealant as needed.
- Debris Removal: Remove any debris, such as leaves or branches, that can accumulate around the flashing and trap moisture.
- Professional Inspection: Consider having a professional roofer or HVAC technician inspect your flashing annually to identify potential problems early. This is especially important after severe weather events.
Impact on HVAC System Performance
A properly installed and maintained metal roof to wall flashing system directly impacts the performance and longevity of your HVAC system. Water leaks caused by faulty flashing can lead to several problems:
- Ductwork Damage: Leaks can damage ductwork, leading to reduced airflow and energy inefficiency. Wet insulation loses its R-value, further exacerbating the problem.
- Equipment Damage: Water infiltration can damage HVAC equipment, such as furnaces, air conditioners, and heat pumps, leading to costly repairs or replacements.
- Mold Growth: Moisture creates a breeding ground for mold, which can negatively impact indoor air quality and pose health risks. This can also damage building materials, leading to further expense. Mold remediation can be a significant cost.
- Increased Energy Costs: Leaks and damaged ductwork increase the load on your HVAC system, leading to higher energy bills.
Cost Considerations
The cost of metal roof to wall flashing varies depending on the type of material, complexity of the installation, and labor rates in your area. Here's a general overview:
- Materials: Aluminum is generally the least expensive, followed by galvanized steel, copper, and stainless steel.
- Labor: Installation costs can vary depending on the complexity of the job and the experience of the installer.
- DIY vs. Professional: While DIY installation can save money on labor costs, it's essential to have the necessary skills and knowledge to ensure a proper installation. Improper installation can lead to costly repairs down the road.
It's always best to obtain multiple quotes from qualified contractors before making a decision. Be sure to ask about their experience, licensing, and insurance.
Conclusion
Metal roof to wall flashing is a critical component in protecting your building from water damage and ensuring the optimal performance of your HVAC system. By understanding the different types of flashing, materials, installation methods, and maintenance practices, you can make informed decisions and ensure a long-lasting and effective flashing system. Whether you are a homeowner, HVAC technician, or facility manager, investing in proper flashing is an investment in the longevity and value of your property. Regular inspections and prompt repairs are key to preventing costly problems and maintaining a comfortable and healthy indoor environment. By prioritizing this often-overlooked detail, you'll safeguard your building from the elements and optimize the efficiency of your HVAC system.