Metal Roof To Wall Flashing Details

Frequently Asked Questions: Metal Roof to Wall Flashing Details
Metal roofing offers exceptional durability and longevity, but proper installation of flashing is crucial to prevent leaks, especially where the roof meets a wall. Here are answers to some frequently asked questions about metal roof to wall flashing details:
1. What is metal roof to wall flashing, and why is it so important?
Metal roof to wall flashing is a material, typically metal, that's installed at the intersection where a metal roof meets a vertical wall. Its primary purpose is to create a watertight barrier that prevents rain and snowmelt from penetrating the building envelope.
Importance:
- Prevents Leaks: The most obvious benefit. Without proper flashing, water can seep behind the siding and into the building's structure.
- Protects Structural Integrity: Water intrusion can lead to wood rot, corrosion of metal components, and damage to insulation, compromising the building's structural integrity.
- Prevents Mold and Mildew: Moisture promotes mold and mildew growth, which can cause health problems and further damage the building.
- Extends Roof Lifespan: Proper flashing ensures the roof performs as intended for its full lifespan.
- Maintains Property Value: Water damage negatively impacts property value, while a well-maintained roof enhances it.
In short, flashing is the first line of defense against water damage at this vulnerable junction.
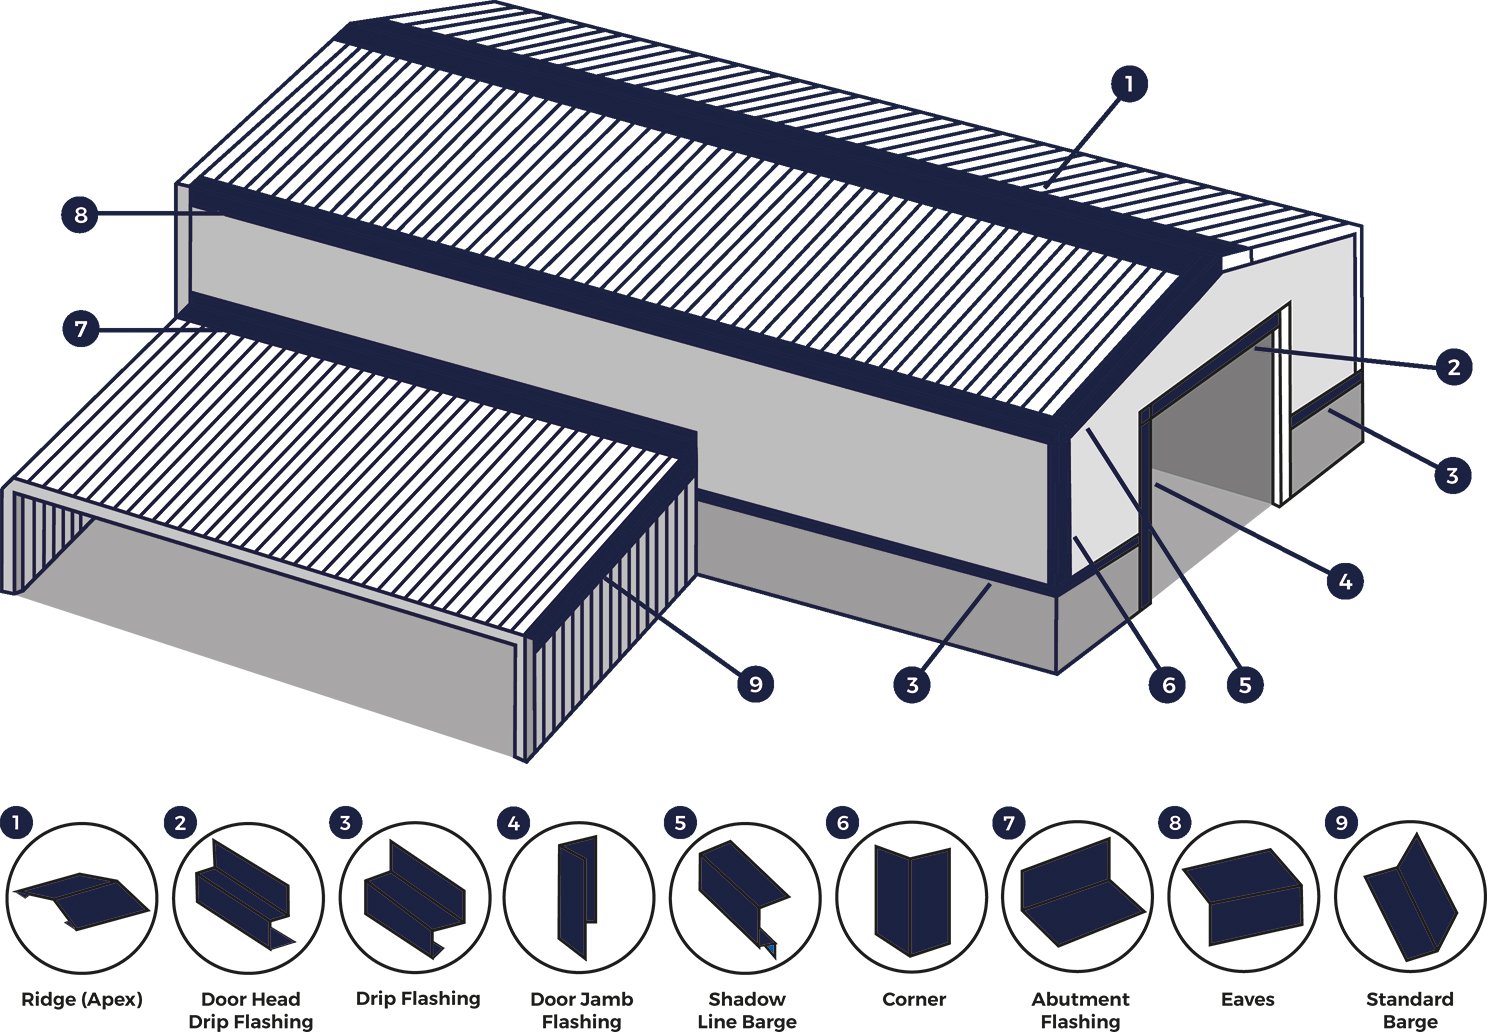
2. What are the different types of metal roof to wall flashing?
Several types of flashing are used, each suited to different roof pitches, wall materials, and aesthetic preferences. Here are some common types:
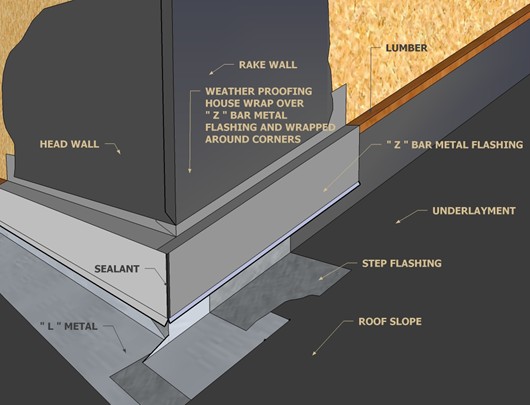
- Step Flashing: Used with siding materials like brick, stone, or wood. It consists of individual pieces of flashing that are "stepped" up the wall, interwoven with the siding. Very common and effective for many situations.
- Counter Flashing: Works in conjunction with base flashing (often step flashing). It's embedded in the wall (e.g., within mortar joints) and overlaps the base flashing to provide a double layer of protection. Essential for masonry walls.
- Continuous Flashing (Apron Flashing): A single, long piece of flashing that extends from the roof up the wall. Suitable for simpler wall-to-roof connections where siding is minimal or non-existent. It can also be used in conjunction with sealants for added protection. While simple, it may be less flexible than step flashing when dealing with complex wall details.
- "L" Flashing: A simple right-angle piece of metal used in various applications, including at the base of walls or as a component within more complex flashing systems. Can be useful for capping off the bottom of the siding where it meets the roof, and for directing water away from the wall.
- Z-Flashing: Shaped like a "Z," this flashing is designed to overlap siding and create a drip edge to direct water away from the wall. Useful when tying into existing siding, and it prevents water from running down the siding and behind the roof.
The best type for your specific situation depends on the materials involved and the local climate.
3. What materials are used for metal roof to wall flashing?
The best material for flashing is one that is compatible with both the metal roofing and the wall material. Common choices include:
- Aluminum: Lightweight, corrosion-resistant, and relatively inexpensive. A good choice for many metal roofing systems, especially aluminum roofs. However, it can react with dissimilar metals (e.g., copper).
- Galvanized Steel: Steel coated with zinc to prevent rust. More durable than aluminum but also heavier. A popular choice for steel roofs. Ensure the galvanization is high-quality.
- Copper: Very durable and aesthetically pleasing, but also the most expensive. Excellent corrosion resistance and a long lifespan. Works well with copper roofs and can add a premium look.
- Stainless Steel: Offers excellent corrosion resistance and strength. A good choice in harsh environments or where longevity is paramount. More expensive than galvanized steel.
- Lead: While traditionally used, lead flashing is now less common due to environmental and health concerns. Some older buildings may still have it.
Crucially, the flashing material should have a similar lifespan to the roofing material to avoid premature failure. Consider the thermal expansion properties of each material, too, as significant differences can lead to stress and eventual failure of the flashing.
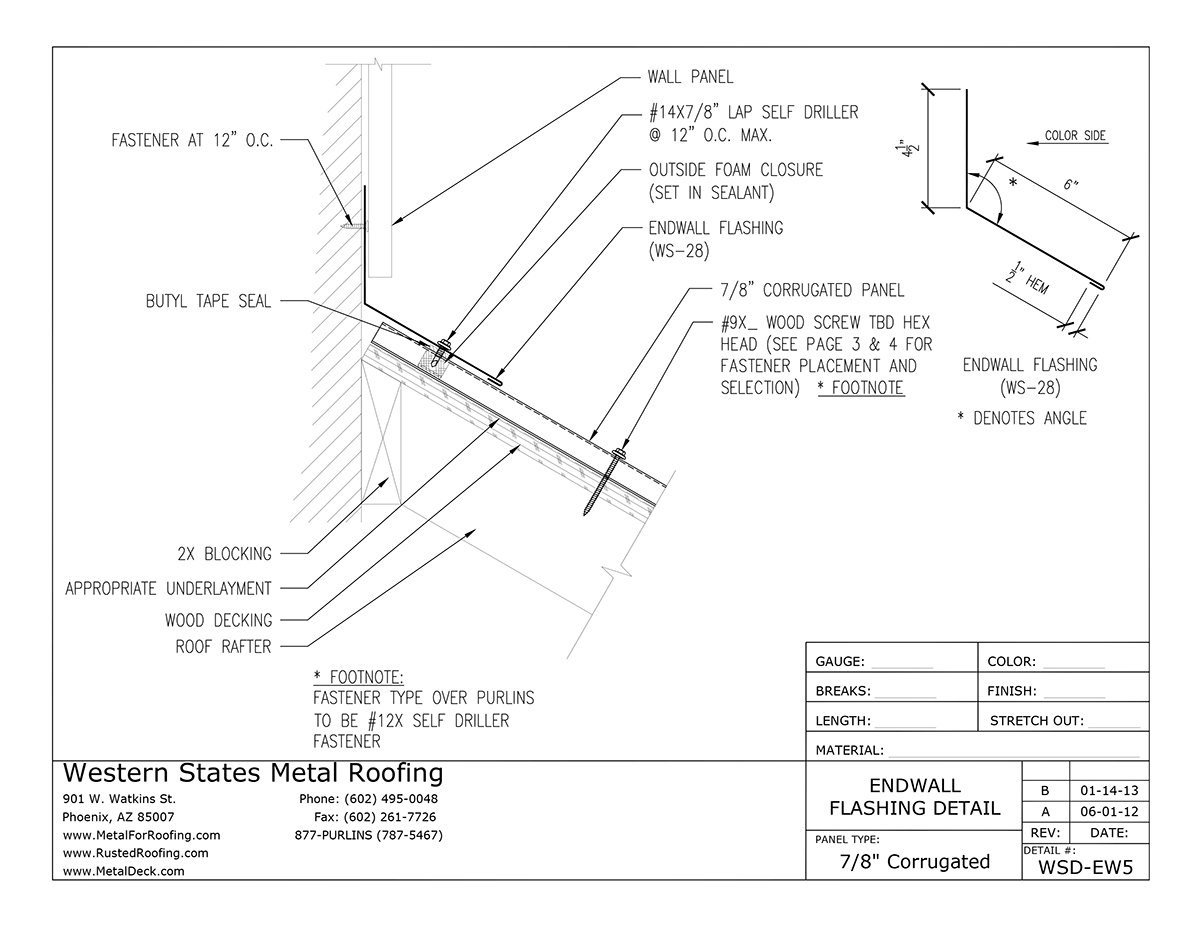
4. How is metal roof to wall flashing installed correctly?
Proper installation is paramount. Here's a general overview of the process, but always consult with a qualified professional:
General Steps:
- Preparation: Clean the roof and wall surfaces. Remove any debris or old flashing. Ensure the wall is properly prepared to accept the flashing (e.g., mortar joints raked out for counter flashing).
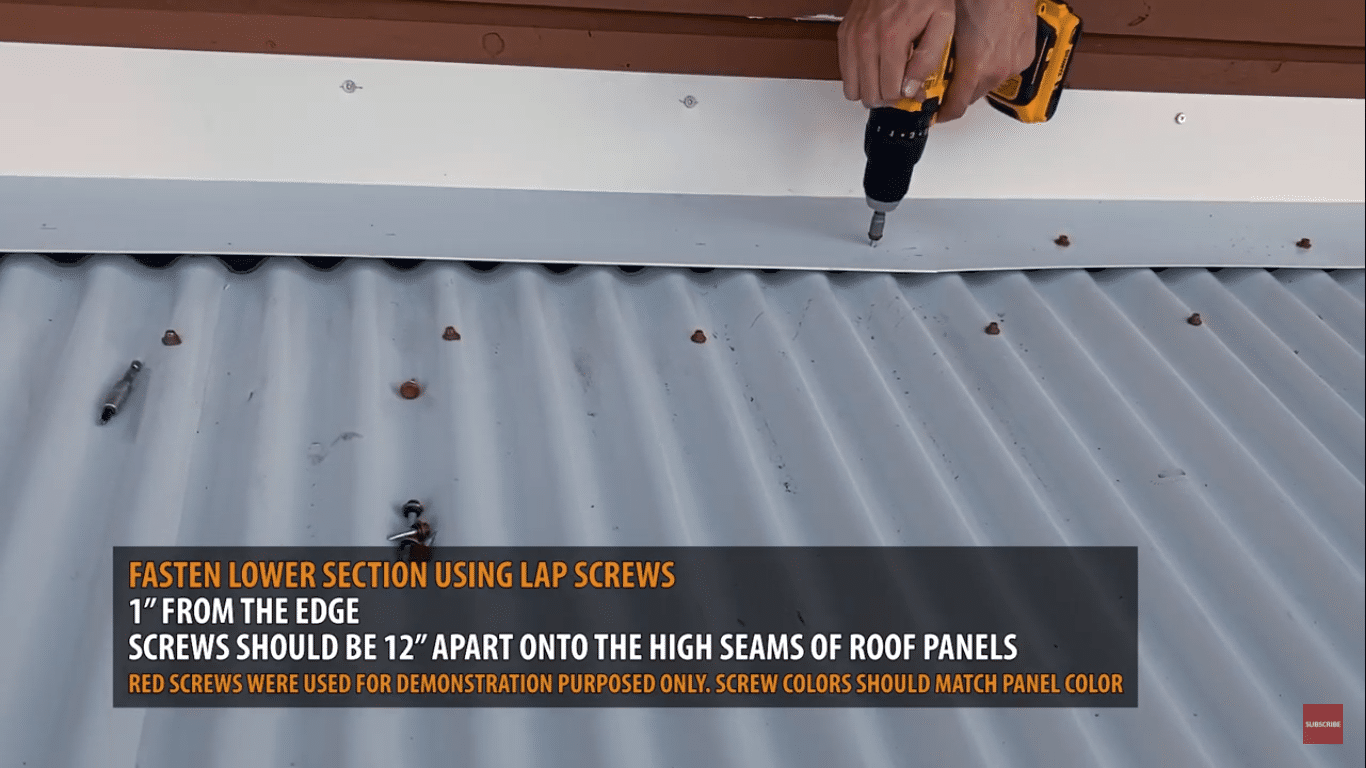
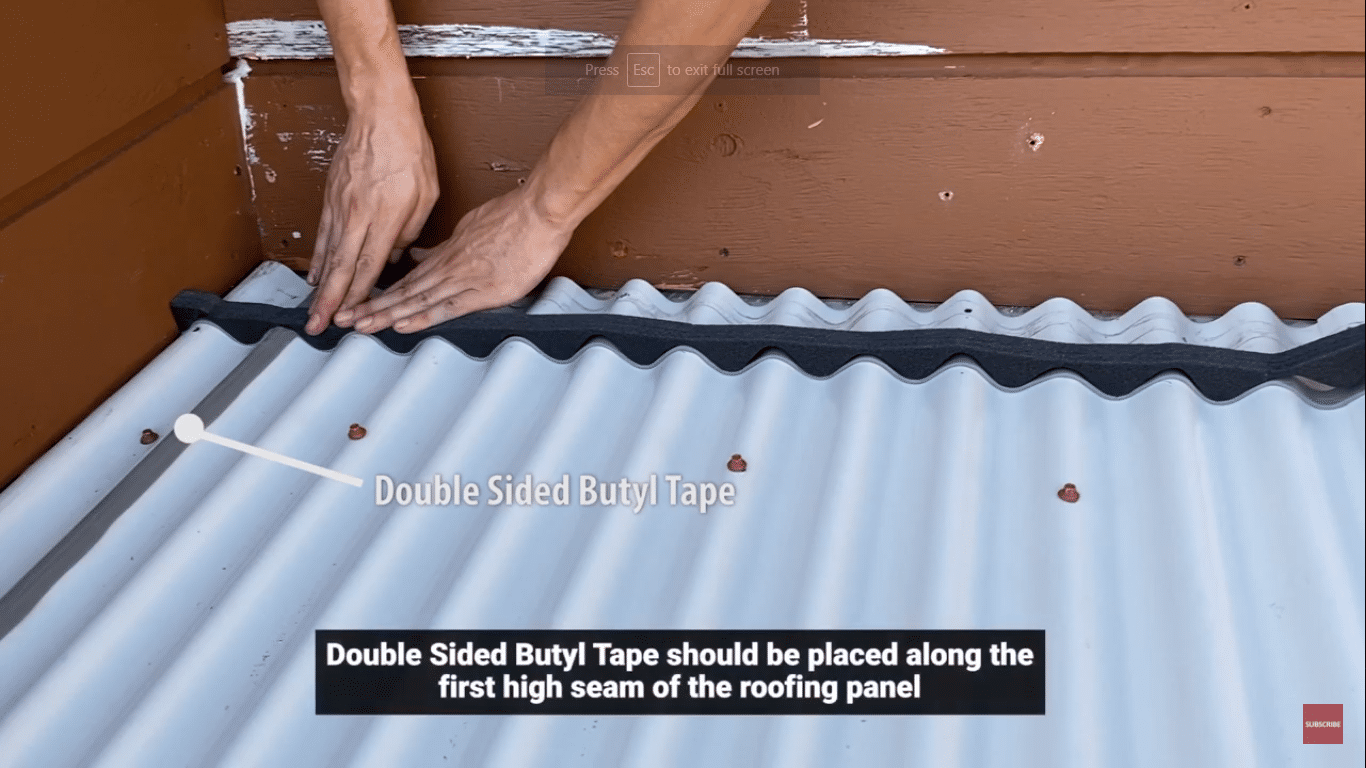
- Base Flashing Installation: Install the base flashing (e.g., step flashing) along the wall and roof intersection. Each piece of step flashing should overlap the previous one, and it should be properly integrated with the roofing panels.
- Securing the Base Flashing: Secure the base flashing to the roof using appropriate fasteners (screws or nails) and sealant. Ensure the fasteners are compatible with the flashing material to prevent corrosion. Avoid over-tightening the fasteners, as this can deform the flashing.
- Counter Flashing Installation (if applicable): Insert the counter flashing into the wall (e.g., mortar joints). Overlap the base flashing by at least 2 inches. Secure it in place using appropriate methods, such as mortar or sealant.
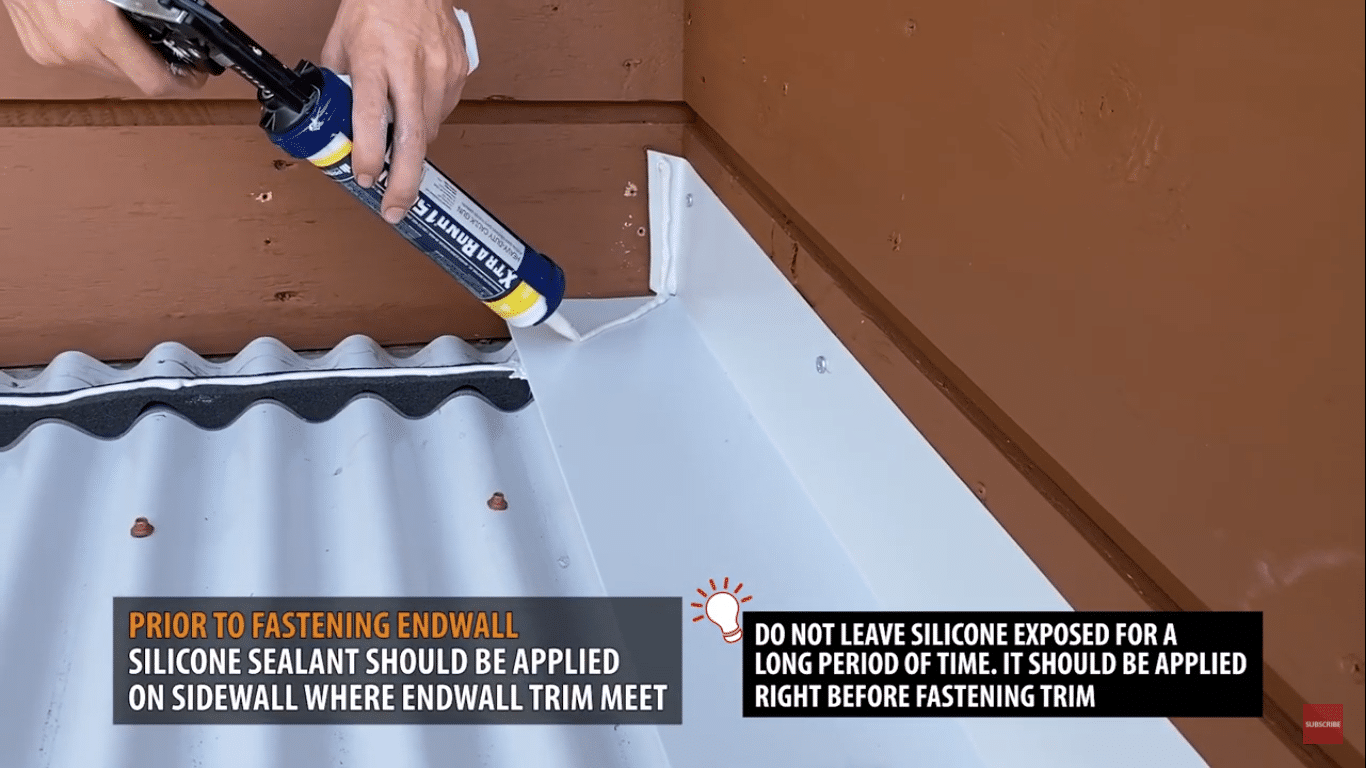
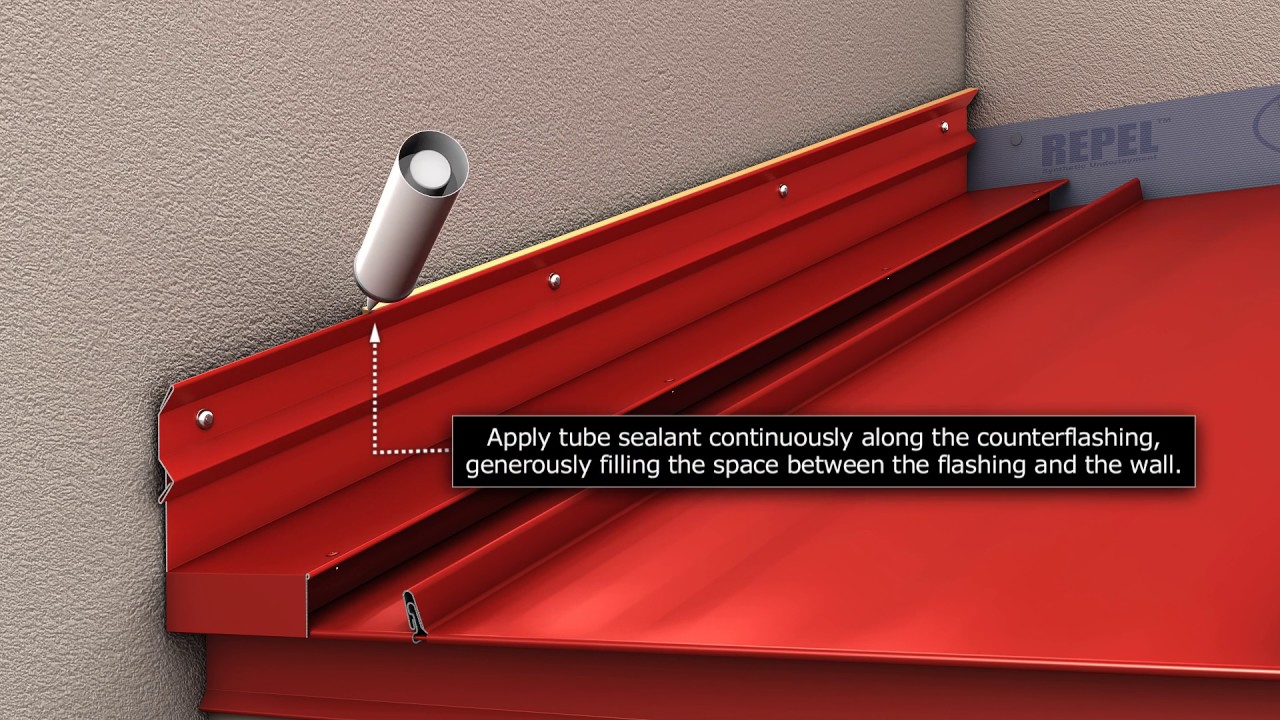
- Sealing: Apply sealant to all seams, joints, and fastener penetrations. Use a high-quality sealant that is compatible with the flashing and roofing materials.
- Siding Integration: Integrate the flashing with the siding material, ensuring a watertight seal. This may involve cutting and fitting the siding around the flashing.
- Inspection: Thoroughly inspect the completed installation to ensure there are no gaps or vulnerabilities. Test with a hose, if possible, to check for leaks.
Key Considerations:
- Overlap: Sufficient overlap between flashing pieces is essential to prevent water from seeping through.
- Sealant: Use a high-quality sealant designed for roofing applications. Reapply as needed over the lifespan of the roof.
- Fasteners: Use appropriate fasteners that are compatible with both the flashing and the roofing materials.
- Proper Bending: Accurately bend the flashing to conform to the roof and wall contours.
- Avoiding Punctures: Minimize punctures in the flashing, and seal any necessary penetrations thoroughly.
- Local Codes: Adhere to all local building codes and regulations regarding flashing installation.
A professional installer will have the knowledge and experience to ensure proper installation.
5. What are some common problems with metal roof to wall flashing, and how can they be avoided?
Several issues can arise if flashing is not installed correctly or maintained properly:
Common Problems:
- Improper Installation: The most common cause of flashing failures. Incorrect overlap, inadequate sealing, and using the wrong type of flashing are all potential issues. Prevention: Hire a qualified and experienced installer.
- Corrosion: Dissimilar metals in contact can cause galvanic corrosion. Prevention: Use compatible materials or install a barrier between them.
- Sealant Failure: Sealant can dry out, crack, or shrink over time, leading to leaks. Prevention: Use a high-quality sealant and inspect it regularly, reapplying as needed.
- Puncture Damage: Punctures from falling debris, hail, or other impacts can compromise the flashing. Prevention: Inspect the flashing regularly and repair any damage promptly.
- Thermal Expansion: Significant differences in thermal expansion between the flashing and surrounding materials can cause stress and cracking. Prevention: Choose materials with similar thermal expansion properties or allow for expansion and contraction during installation.
- Debris Accumulation: Leaves, twigs, and other debris can accumulate around the flashing, trapping moisture and accelerating corrosion. Prevention: Regularly clean the roof and gutters to prevent debris buildup.
- Incorrect Fasteners: Using the incorrect fasteners may result in corrosion on the flashing itself or at the point of contact. Prevention: Use only the manufacturer-recommended fasteners for your type of roof and flashing.
Regular inspection and maintenance are essential to catch problems early and prevent costly repairs.
6. How often should I inspect my metal roof to wall flashing?
Ideally, you should inspect your metal roof to wall flashing at least twice a year, typically in the spring and fall. After severe weather events, such as heavy storms or high winds, it's also a good idea to inspect the flashing for any damage.
What to Look For During Inspection:
- Cracks or Gaps: Look for any cracks or gaps in the sealant or flashing material.
- Corrosion: Check for signs of rust or corrosion on the flashing.
- Loose Flashing: Ensure the flashing is securely attached to the roof and wall.
- Debris Accumulation: Remove any leaves, twigs, or other debris that may be trapped around the flashing.
- Water Stains: Look for water stains on the wall or ceiling near the flashing, which could indicate a leak.
Address any issues promptly to prevent further damage. Small repairs can often be made by a homeowner, but for more significant problems, it's best to consult with a qualified roofing contractor.
7. Can I install metal roof to wall flashing myself, or should I hire a professional?
While some homeowners may be tempted to DIY metal roof to wall flashing installation, it's generally recommended to hire a professional. Proper flashing installation requires specialized knowledge, skills, and tools.
Reasons to Hire a Professional:
- Expertise: Professionals have the expertise to select the right type of flashing for your specific situation and install it correctly.
- Experience: They have experience working with different roofing and wall materials and can avoid common mistakes.
- Tools: They have the necessary tools and equipment for the job.
- Warranty: Many professional installers offer warranties on their work, providing peace of mind.
- Safety: Working on a roof can be dangerous. Professionals have the necessary safety equipment and training.
Improper flashing installation can lead to costly water damage and compromise the structural integrity of your building. While the upfront cost of hiring a professional may be higher, it can save you money in the long run by preventing these issues. If you are an experienced DIYer and familiar with roofing principles, a very simple installation *might* be feasible, but for anything complex, leave it to the pros.