Minimum Crawl Space Height

Imagine this: you’re doing laundry, and suddenly, your washing machine stops mid-cycle. The clothes are soaked, the machine is humming faintly, but nothing's happening. Before calling a repair technician, let's explore some simple troubleshooting steps you can try. Many issues are easily resolved with a little investigation and some basic checks.
Step 1: Safety First!
Before you touch anything, disconnect the washing machine from the power outlet. This is absolutely crucial to prevent electric shock. Don't skip this step, even if you think the problem is minor. If you're unsure how to disconnect it, locate the circuit breaker for the washing machine in your electrical panel and switch it off. Verify it's off by trying to turn on the machine again (it should be completely dead).
Step 2: The Obvious Checks
Often, the solution is simpler than you think. Start with these basic checks:
- Power Supply: Double-check that the washing machine is properly plugged into the electrical outlet. Sometimes the plug can loosen, especially if the machine vibrates a lot. If plugged in, test the outlet with another device (like a lamp) to ensure the outlet itself is working. If the outlet isn't working, check the circuit breaker in your electrical panel – it might have tripped. Reset the breaker if necessary.
- Water Supply: Make sure both the hot and cold water supply valves connected to the washing machine are fully open. They're usually located behind the machine. Sometimes these valves can get accidentally turned off or partially closed, restricting water flow.
- Water Hoses: Inspect the water hoses connecting to the machine. Look for any kinks, bends, or signs of damage. A kinked hose can significantly restrict water flow. Straighten any kinks you find. Also, check for leaks around the hose connections. If you see any leaks, tighten the connections. If the hose is damaged, it will need to be replaced by a professional.
- Lid/Door Switch: Many washing machines have a safety switch that prevents them from operating if the lid or door isn't properly closed. Ensure the lid or door is fully closed and latched. Try opening and closing it firmly. If the switch is faulty (which can happen over time), the machine won’t start even if the door is closed. This often requires a professional to diagnose and repair.
Step 3: Examining the Control Panel and Settings
Sometimes, the issue lies within the settings you've selected. Let's review those.
- Cycle Selection: Make sure you've selected the correct wash cycle and options. It sounds basic, but accidentally choosing the wrong cycle (like a "drain only" cycle) can cause unexpected behavior. Refer to your washing machine's user manual if you're unsure about the different cycle options.
- Pause/Stop Button: Ensure the machine isn't paused or stopped. Some machines have a sensitive pause button that can be easily activated accidentally. Press the start/pause button again to see if it resumes the cycle.
- Error Codes: Many modern washing machines display error codes on the control panel. These codes provide valuable clues about the problem. Consult your washing machine's user manual to decipher the meaning of the error code. The manual will often suggest troubleshooting steps specific to that code.
Step 4: Checking the Drain Hose and Pump
A common cause of washing machine problems is a clogged drain. This can prevent the machine from draining water properly, leading to it stopping mid-cycle. This can be a messy job, so prepare for potential spills.
- Drain Hose Inspection: Locate the drain hose (usually at the back of the machine) and check for any kinks, clogs, or obstructions. Disconnect the hose from the drainpipe (usually located in a utility sink or standpipe). Be prepared for some water to spill out. Flush the hose with water to dislodge any debris. You can use a garden hose or a utility sink faucet to do this.
- Drain Pump Filter: Many washing machines have a drain pump filter designed to catch lint, small objects, and other debris that could clog the pump. This filter is usually located at the front of the machine, near the bottom. Consult your user manual for the exact location. To access the filter, you'll often need to remove a small access panel. Before opening the filter, place a shallow pan or towels underneath to catch any spilled water. Carefully unscrew the filter cap and remove the filter. Clean the filter thoroughly, removing any lint, hair, coins, or other debris. Replace the filter and tighten the cap securely.
Step 5: Simple Part Replacements (DIY – with Caution!)
Some minor part replacements are relatively straightforward and can be done by a homeowner with basic DIY skills. However, always disconnect the power before working on any electrical components. If you are uncomfortable with any of these steps, call a professional.
- Inlet Valve Screens: The inlet valves (where the water hoses connect to the washing machine) often have small screens to filter out debris from the water supply. Over time, these screens can become clogged, restricting water flow. Turn off the water supply to the washing machine. Disconnect the water hoses from the machine. Carefully remove the screens from the inlet valves. Clean the screens thoroughly, removing any sediment or debris. Reinstall the screens and reconnect the water hoses.
When to Call a Professional
While many washing machine problems can be resolved with simple troubleshooting, some issues require the expertise of a qualified appliance repair technician. Here are some situations where it's best to call for professional help:
- Electrical Issues: If you suspect an electrical problem, such as a burning smell, sparking, or a complete lack of power, do not attempt to repair it yourself. Electrical repairs can be dangerous and should only be performed by a qualified electrician or appliance repair technician.
- Gas-Powered Washing Machines: If your washing machine is gas-powered (rare, but they exist), do not attempt to repair any gas-related components. Gas leaks can be extremely dangerous and should only be handled by a qualified gas technician.
- Complex Mechanical Problems: If you suspect a complex mechanical problem, such as a broken motor, transmission, or drum, it's best to call a professional. These repairs often require specialized tools and knowledge.
- Unfamiliar Error Codes: If you're unable to decipher the error code displayed on your washing machine, or if the troubleshooting steps suggested in the user manual don't resolve the issue, it's time to call a professional.
- Warranty Coverage: If your washing machine is still under warranty, do not attempt to repair it yourself. Doing so could void the warranty. Contact the manufacturer or retailer for warranty service.
- You're Uncomfortable: Ultimately, if you're uncomfortable with any of the troubleshooting steps or repairs, it's always best to err on the side of caution and call a professional. Appliance repair technicians have the training, experience, and tools to diagnose and repair washing machine problems safely and effectively.
Minimum Crawl Space Height: A Crucial Home Maintenance Factor
While we've focused on washing machine troubleshooting, another area of home maintenance often overlooked is the crawl space. Minimum crawl space height is a critical factor impacting your home's structural integrity, energy efficiency, and indoor air quality.
Why Crawl Space Height Matters
A crawl space that's too short presents several challenges:
- Accessibility for Maintenance: A primary reason for a crawl space is to provide access to plumbing, electrical wiring, and HVAC systems. If the space is too low, accessing these systems for repairs, inspections, or upgrades becomes incredibly difficult, potentially leading to neglected maintenance and costly problems down the line.
- Increased Moisture Problems: Low crawl spaces often have poor ventilation and limited sunlight, creating a damp environment that promotes mold growth, wood rot, and pest infestations. These issues can compromise the structural integrity of your home and negatively impact indoor air quality.
- Reduced Energy Efficiency: Inadequate insulation and air sealing in a low crawl space can lead to significant energy loss, increasing your heating and cooling bills. The lack of space makes it harder to properly insulate pipes and the subfloor.
- Difficulties with Encapsulation: Crawl space encapsulation (sealing the crawl space with a vapor barrier) is a common strategy for controlling moisture and improving air quality. However, a low crawl space makes encapsulation more challenging and expensive to implement effectively.
- Health Hazards: Mold, pests, and poor air quality in a crawl space can trigger allergies, asthma, and other respiratory problems. A low crawl space limits the ability to address these health hazards effectively.
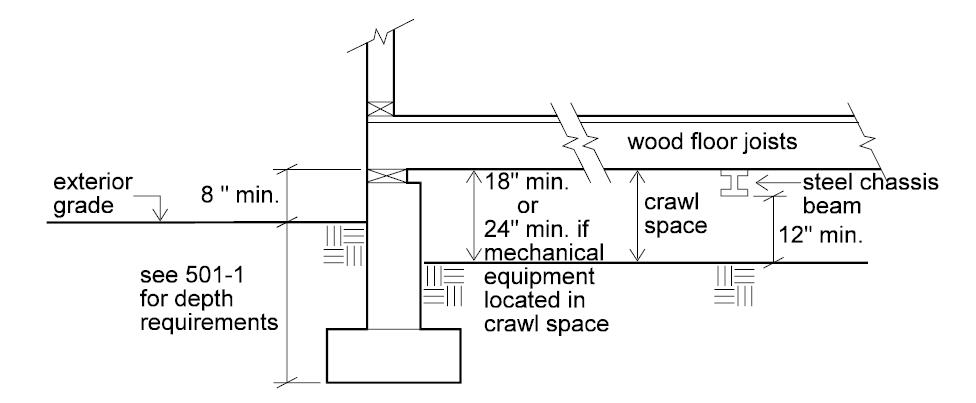
What is the Minimum Crawl Space Height?
Building codes vary by location, but generally, the minimum crawl space height recommended is at least 18 inches from the bottom of the floor joists to the ground. This provides enough space for basic access and ventilation. However, an ideal crawl space height is closer to 24 inches or more, allowing for easier maintenance and better access for encapsulation or other improvements. Remember to always check your local building codes for specific requirements in your area.
Troubleshooting a Crawl Space That's Too Short
If your crawl space is shorter than the recommended minimum, you have a few options, ranging from simple improvements to more extensive renovations:
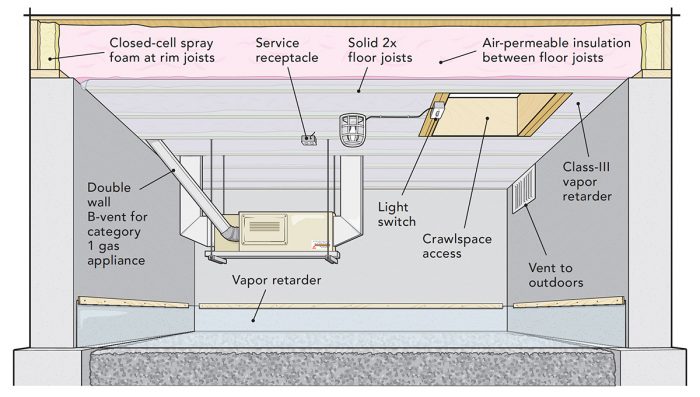
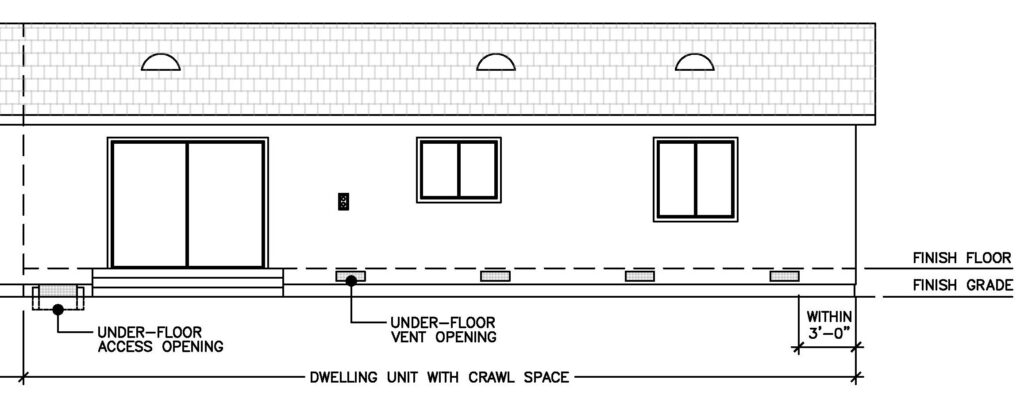
- Improve Ventilation: Even in a low crawl space, improving ventilation can help reduce moisture buildup. Install crawl space vents or a mechanical ventilation system to promote air circulation. Ensure the vents are properly screened to prevent pest entry.
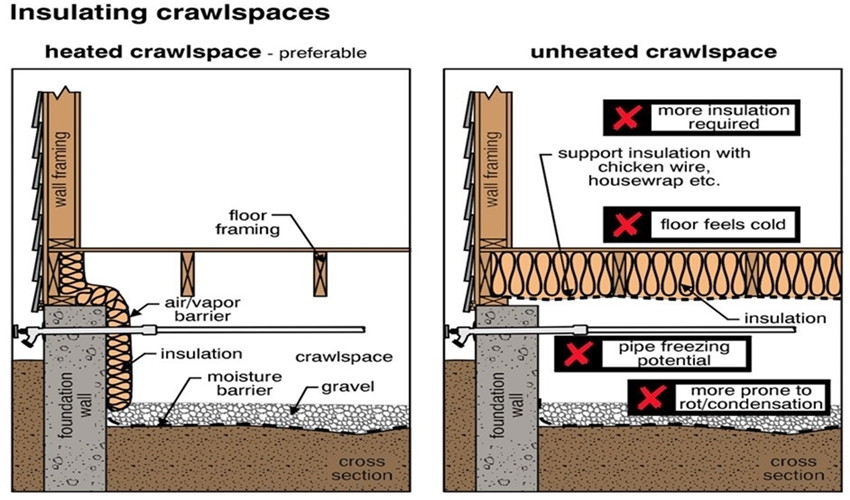
- Install a Vapor Barrier: A vapor barrier (usually a heavy-duty plastic sheet) can help prevent moisture from rising from the ground into the crawl space. Overlap the seams of the vapor barrier and seal them with tape. Extend the vapor barrier up the foundation walls a few inches.
- Address Drainage Issues: Make sure your gutters and downspouts are properly functioning and directing water away from the foundation. Consider installing French drains or other drainage systems to divert groundwater away from the crawl space.
- Encapsulation (Partial or Full): While full encapsulation may be difficult in a very low crawl space, a partial encapsulation might still be possible and beneficial. This involves sealing the crawl space vents and applying a vapor barrier to the walls and floor.
- Crawl Space Excavation (Professional Required): In some cases, the only solution is to excavate the crawl space to increase the height. This is a major undertaking that requires professional engineering and construction expertise. It can be expensive, but it may be necessary to address serious moisture or structural problems.
In conclusion, while a washing machine issue can be frustrating, many problems have straightforward solutions. Approaching the situation methodically and prioritizing safety will help you determine whether you can fix the issue yourself or need to call a professional. Likewise, understanding the importance of crawl space height and proactively addressing any issues can protect your home from costly damage and improve your family's health and well-being.