Minimum Distance Between Ac Outdoor Unit And Wall

Imagine this: It's a sweltering summer day, and your air conditioner suddenly stops cooling. The house starts heating up, and panic sets in. While many AC issues require professional help, sometimes the problem is surprisingly simple, like insufficient airflow due to improper outdoor unit placement. This article focuses on troubleshooting problems related to the minimum distance between your outdoor AC unit and the wall, and provides DIY steps you can take before calling a technician.
Understanding the Importance of Airflow
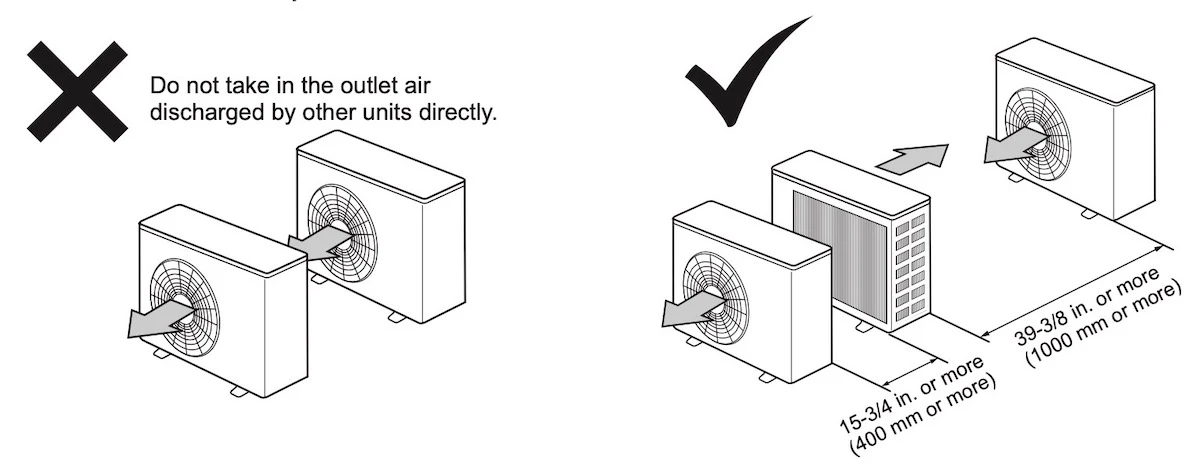
Your air conditioner's outdoor unit, also known as the condenser, needs unobstructed airflow to work efficiently. It releases heat extracted from inside your home. If the unit is too close to a wall, fence, or overgrown shrubbery, it can't effectively dissipate heat, leading to:
- Reduced Cooling Efficiency: The AC struggles to cool your home, leading to higher energy bills.
- Overheating: The compressor, the heart of your AC, can overheat and potentially fail.
- Increased Wear and Tear: The AC works harder, shortening its lifespan.
- Higher Energy Bills: Inefficient operation means more electricity consumed.
Determining the Minimum Distance Requirement
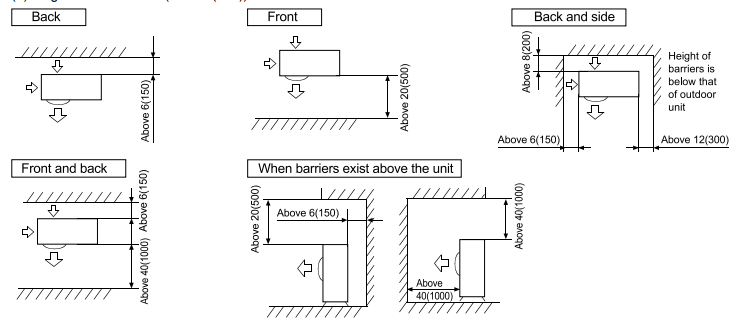
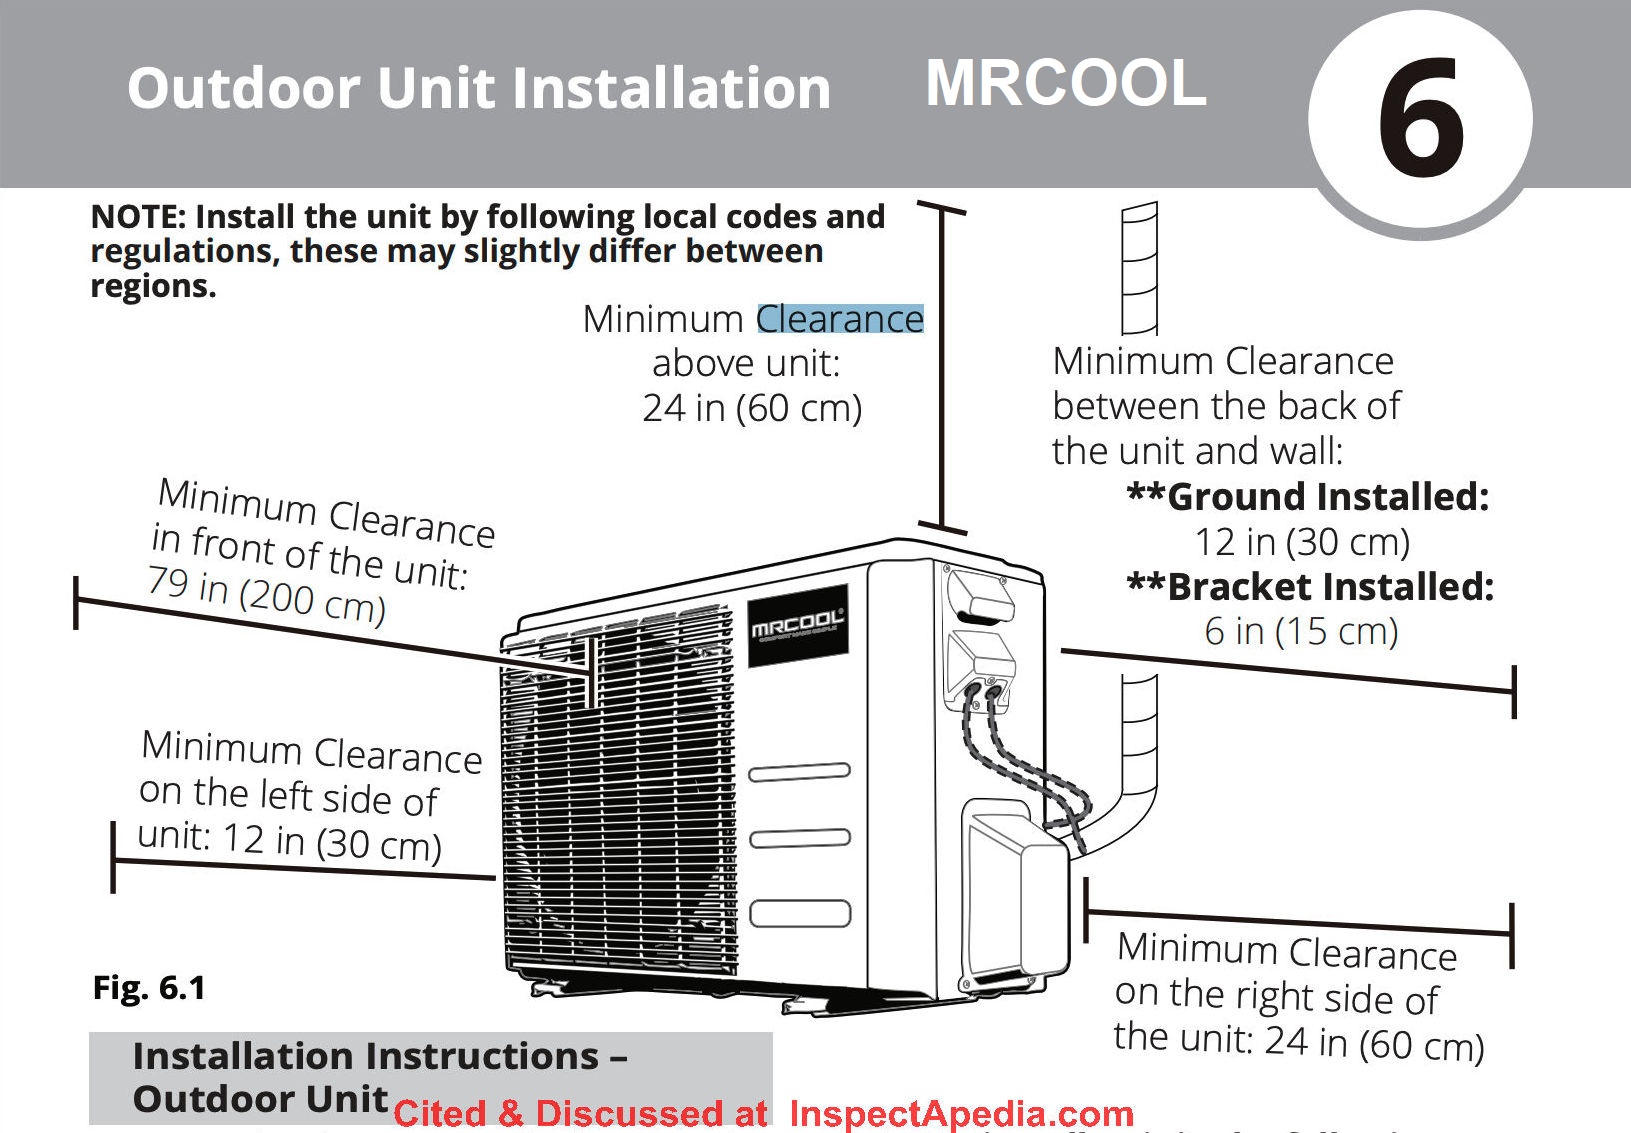
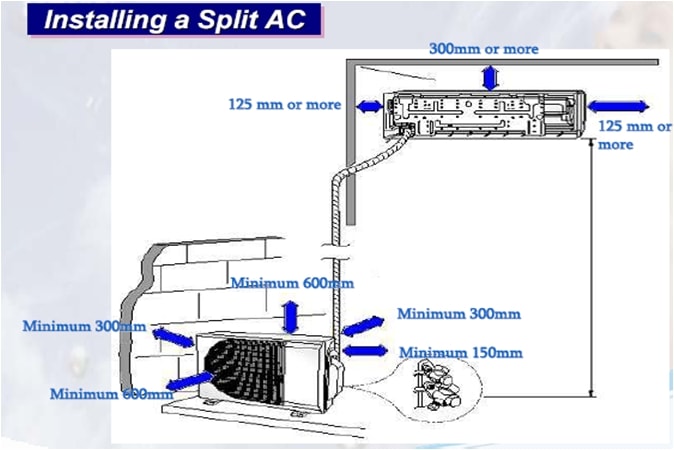
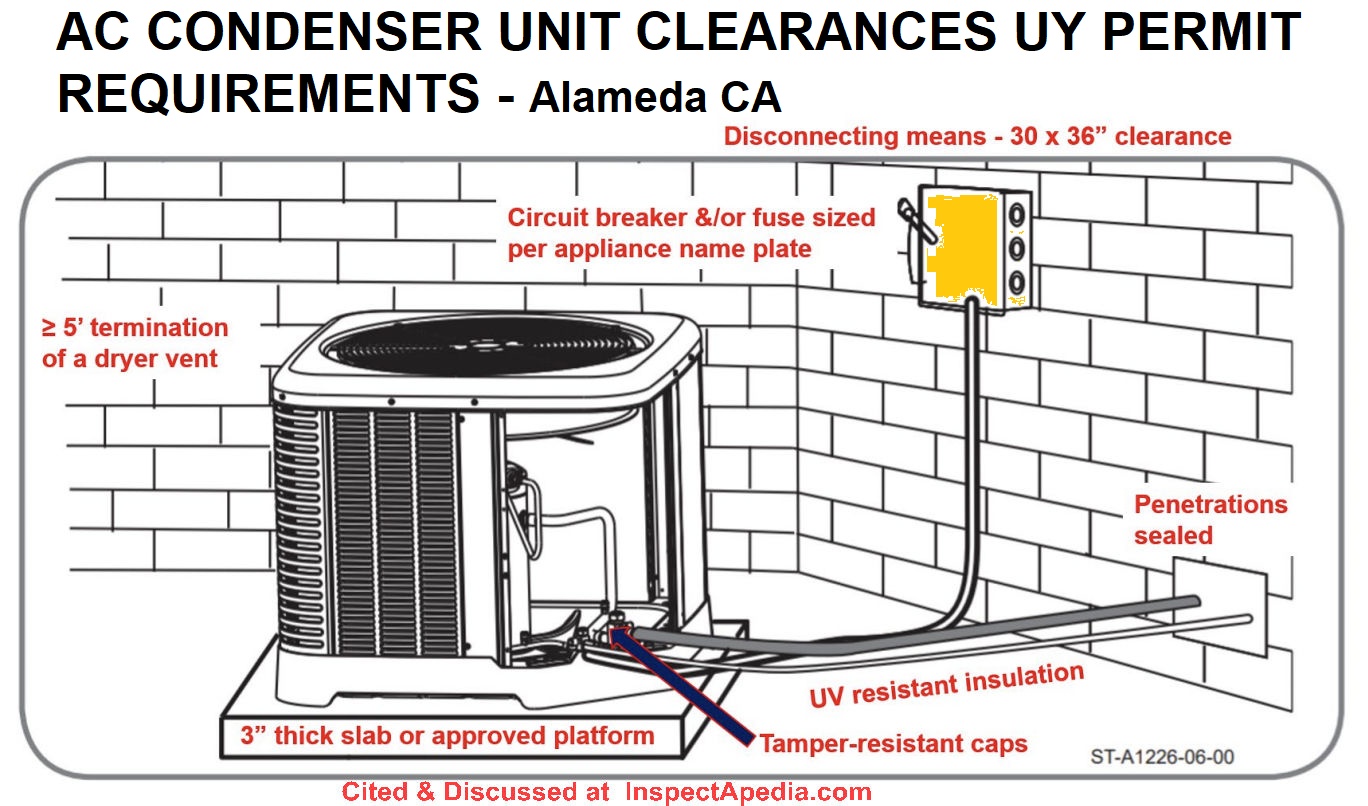
The recommended minimum distance between your outdoor AC unit and any obstruction (wall, fence, bushes) varies depending on the unit's size and model. Always consult your AC unit's manual for specific requirements. If you don't have the manual, you can often find it online by searching for the model number.
As a general guideline, consider these distances:
- Front (coil side): Most manufacturers recommend at least 36 inches (3 feet) of clearance in front of the unit's coil. This allows for optimal airflow.
- Sides: Aim for at least 12-18 inches of clearance on the sides. This is less critical than the front, but still important for ventilation.
- Top: Ensure there's adequate vertical clearance, especially if the unit is located under an overhang. Aim for at least 4-5 feet, but check your manual for specific requirements. Snowfall can also be a factor in some locations.
Troubleshooting Airflow Problems - A Step-by-Step Guide
Step 1: Safety First! - Disconnect the Power
Before you begin any troubleshooting, always disconnect the power to the outdoor AC unit at the main electrical panel. Locate the breaker labeled "AC" or "Condenser" and switch it to the "OFF" position. This is a crucial safety precaution to prevent electric shock.
Double-check that the power is off using a non-contact voltage tester before touching any wires or components.
Step 2: Visual Inspection - Check for Obstructions
Carefully inspect the area around the outdoor unit. Look for:
- Walls: Is the unit too close to a wall? Measure the distance to ensure it meets the minimum requirements.
- Fences: Similar to walls, check the proximity to fences.
- Shrubbery and Plants: Overgrown bushes, vines, or other plants can significantly restrict airflow.
- Debris: Leaves, twigs, grass clippings, and other debris can accumulate around the unit and block airflow.
- Snow and Ice: In winter, snow and ice buildup can completely obstruct the unit.
Step 3: Clearing Obstructions
This is often the simplest and most effective solution.
- Trim Shrubs and Plants: Use pruning shears to trim back any vegetation that's too close to the unit. Aim for the recommended clearances.
- Remove Debris: Clear away any leaves, twigs, or other debris from around the unit. You can use a broom, rake, or shop vacuum. Be gentle to avoid damaging the delicate fins on the coil.
- Clear Snow and Ice: Carefully remove snow and ice from around the unit. Do not use sharp objects that could damage the coil fins. Warm water can help melt ice, but be cautious not to create a slip hazard.
Step 4: Relocating the Unit (If Necessary) - When to Call a Pro
If the unit is too close to a wall or fence and you can't achieve the necessary clearance by trimming vegetation, you might need to consider relocating the unit. This is a more complex task that almost always requires a qualified HVAC technician. It involves:
- Disconnecting the refrigerant lines.
- Moving the unit to a new location.
- Reconnecting the refrigerant lines.
- Recharging the refrigerant.
- Reconnecting the electrical wiring.
Attempting to relocate the unit yourself can be extremely dangerous and can damage the unit and your home's HVAC system. Refrigerant is a hazardous substance, and improper handling can lead to environmental damage and health risks. Additionally, working with electrical wiring can be lethal if you are not properly trained.
Step 5: Checking the Coil Fins
The coil fins on the outdoor unit are delicate and can easily become bent or damaged. Bent fins restrict airflow.
- Inspect the Fins: Carefully examine the fins for any bends or damage.
- Straighten Bent Fins: You can use a fin comb (available at most hardware stores) to gently straighten bent fins. Be very careful not to apply too much pressure, as the fins are easily broken.
Step 6: Cleaning the Coil (If Accessible)
A dirty coil can also restrict airflow. If you can safely access the coil without disassembling the unit, you can try cleaning it.
- Turn off the power (again!).
- Use a garden hose with a gentle spray nozzle: Spray the coil from the inside out to flush out dirt and debris. Avoid using high pressure, as this can damage the fins.
- Use a commercially available coil cleaner: Follow the manufacturer's instructions carefully.
If you're not comfortable cleaning the coil yourself, or if it requires disassembling the unit, call a professional. Improper cleaning can damage the coil and void your warranty.
Step 7: Reconnecting the Power and Testing the System
After you've cleared any obstructions, straightened the fins, and cleaned the coil (if applicable), you can reconnect the power to the unit.
- Switch the breaker back to the "ON" position.
- Turn on your thermostat and set it to a cool temperature.
- Monitor the AC unit: Listen for the compressor to start and check for airflow coming from the vents inside your home.
When to Call a Professional HVAC Technician
While these DIY steps can address simple airflow problems, certain issues require the expertise of a qualified HVAC technician.
Call a professional if:
- The AC unit is still not cooling properly after clearing obstructions and cleaning the coil.
- You suspect a refrigerant leak. Signs include ice buildup on the refrigerant lines or a hissing sound.
- The compressor is not running.
- You hear unusual noises coming from the unit.
- You are uncomfortable working with electrical components or the AC unit's internal parts.
- You need to relocate the unit.
- The unit is under warranty, and DIY repairs could void the warranty.
Preventative Maintenance - Avoid Future Problems
Regular maintenance can help prevent airflow problems and ensure your AC unit operates efficiently for years to come.
- Regularly trim shrubs and plants around the unit.
- Keep the area around the unit clear of debris.
- Consider having your AC unit professionally serviced at least once a year. A technician can clean the coil, check the refrigerant levels, and inspect the other components for wear and tear.
Conclusion: Empowering You to Troubleshoot and Maintain Your AC
By understanding the importance of airflow and following these simple troubleshooting steps, you can often resolve minor AC problems related to the outdoor unit's proximity to walls or other obstructions. Remember to prioritize safety by disconnecting the power before starting any work. And, most importantly, don't hesitate to call a qualified HVAC technician when the problem is beyond your expertise or comfort level. With a little knowledge and proactive maintenance, you can keep your AC running smoothly and efficiently, ensuring a comfortable home all summer long.