Mitsubishi Mini Split Air Filter Replacement

Maintaining your Mitsubishi mini-split air conditioner is crucial for optimal performance, energy efficiency, and indoor air quality. A key part of this maintenance is regularly replacing the air filters. Dirty filters restrict airflow, forcing your system to work harder, which can lead to higher energy bills and potential breakdowns. This guide provides a step-by-step process for replacing your Mitsubishi mini-split air filters, along with helpful tips and considerations.
Why Air Filter Replacement Matters
Air filters play a vital role in keeping your mini-split system running smoothly and protecting your health. Understanding their importance is the first step in committing to regular maintenance.
Protecting Your System
Imagine your mini-split as a car engine. The air filter is like the engine's air filter, preventing dust, pollen, and other airborne particles from entering the system. When the filter becomes clogged, it restricts airflow. This forces the blower motor to work harder to pull air through, increasing energy consumption and potentially causing the motor to overheat and fail. Think of it like trying to breathe through a straw – you have to work much harder.
Furthermore, restricted airflow can cause the evaporator coil (the part of the unit that cools the air) to freeze up. A frozen coil reduces cooling efficiency and can damage the compressor, the heart of your air conditioning system. Replacing your filters regularly prevents these costly problems.
Improving Air Quality
Dirty air filters don't just harm your mini-split; they also degrade the air quality in your home. Filters trap dust, pollen, pet dander, mold spores, and other allergens. When a filter is clogged, these particles can bypass the filter and circulate throughout your home, potentially triggering allergies, asthma, and other respiratory problems. Clean filters ensure cleaner, healthier air for you and your family.
Enhancing Energy Efficiency
A clogged air filter forces your mini-split to work harder, consuming more energy to achieve the same level of cooling or heating. This increased energy consumption translates directly into higher electricity bills. Replacing your filters regularly ensures that your system operates at peak efficiency, saving you money on your energy costs.
Identifying Your Filter Type
Mitsubishi mini-split systems come with various filter types, and knowing yours is crucial for proper replacement. Refer to your owner's manual for specific information on your model. Here are some common types:
* Standard Filters: These are typically washable mesh filters that trap larger particles like dust and pet dander. They require regular cleaning but can last for several years with proper care. * Electrostatic Filters: These filters use an electrostatic charge to attract and trap smaller particles, such as pollen and mold spores. They may be washable or disposable, depending on the model. * Enzyme Filters: These filters contain enzymes that break down allergens and odors. They are typically disposable and need to be replaced periodically. * Activated Carbon Filters: These filters absorb odors and gases, such as smoke and volatile organic compounds (VOCs). They are typically disposable and need to be replaced regularly. * Hybrid Filters: Some systems combine multiple filter types for enhanced air purification.Always consult your owner's manual to determine the exact filter type and recommended replacement schedule for your Mitsubishi mini-split model.
Tools and Materials Needed
Before you begin, gather the necessary tools and materials:
* New Air Filters: Purchase the correct replacement filters for your specific Mitsubishi mini-split model. You can usually find these online or at your local HVAC supply store. Double-check the part number to ensure compatibility. * Screwdriver (if needed): Some models may require a screwdriver to remove the filter housing. * Vacuum Cleaner with Brush Attachment: Use this to clean the filter housing and surrounding area. * Soft Cloth or Damp Sponge: For cleaning washable filters. * Mild Soap (for washable filters): Use a mild soap and water solution to clean washable filters. * Owner's Manual: Refer to your owner's manual for specific instructions and safety precautions.Step-by-Step Filter Replacement Guide
Follow these steps to safely and effectively replace your Mitsubishi mini-split air filters:
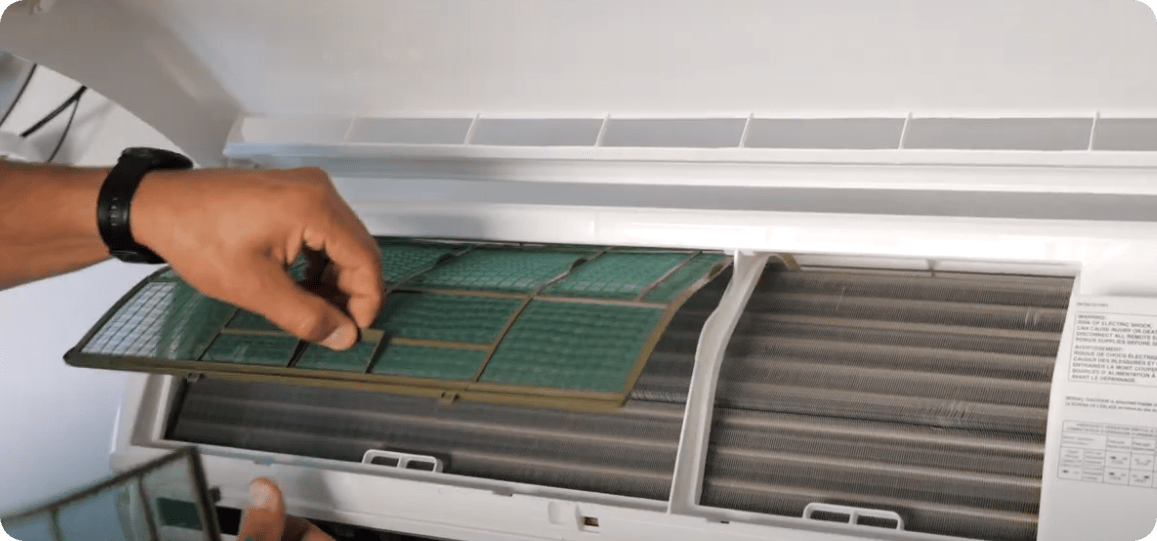
1. Turn Off the Unit: Always turn off the mini-split unit and disconnect it from the power source before starting any maintenance. This prevents electrical shock and potential damage to the system. 2. Locate the Air Filter: The air filter is typically located behind a removable grille on the front of the indoor unit. Refer to your owner's manual for the exact location. 3. Remove the Grille: Depending on the model, the grille may be held in place by clips, screws, or latches. Carefully detach the grille, following the instructions in your owner's manual. 4. Remove the Old Filter(s): Once the grille is removed, you should see the air filter(s). Gently slide the filter(s) out of the housing. Note the orientation of the filter before removing it, as you'll need to install the new filter in the same way. 5. Clean the Filter Housing: Use a vacuum cleaner with a brush attachment to remove any dust or debris from the filter housing and surrounding area. This helps to prevent contaminants from entering the system after the new filter is installed. 6. Clean or Replace the Filter: * For Washable Filters: Wash the filter with mild soap and water. Rinse thoroughly and allow it to air dry completely before reinstalling. Never put a wet filter back into the unit. * For Disposable Filters: Discard the old filter and replace it with a new one. 7. Install the New Filter(s): Insert the new filter(s) into the housing, ensuring they are oriented correctly. Match the orientation you noted when removing the old filter. The filter should fit snugly in the housing. 8. Reattach the Grille: Reattach the grille, making sure it is securely fastened in place. 9. Restore Power: Reconnect the mini-split unit to the power source and turn it on. 10. Reset Filter Reminder (if applicable): Some Mitsubishi mini-split models have a filter reminder light. Consult your owner's manual for instructions on how to reset the reminder after replacing the filter.Cleaning Washable Filters: A Detailed Guide
If your Mitsubishi mini-split uses washable filters, proper cleaning is essential to maintain their effectiveness. Here's a more detailed guide:
1. Prepare a Cleaning Solution: Mix a small amount of mild dish soap with warm water in a sink or tub. Avoid using harsh chemicals or abrasive cleaners, as these can damage the filter material. 2. Soak the Filter: Submerge the filter in the cleaning solution and let it soak for 15-20 minutes. This will help to loosen any accumulated dirt and debris. 3. Gently Clean the Filter: Use a soft brush or sponge to gently scrub the filter. Avoid using excessive force, as this can damage the filter material. Pay particular attention to areas with heavy dirt buildup. 4. Rinse Thoroughly: Rinse the filter thoroughly with clean water until all traces of soap are gone. 5. Dry Completely: Allow the filter to air dry completely before reinstalling it. This is crucial to prevent mold and mildew growth inside the unit. Do not use a hairdryer or other heat source to dry the filter, as this can damage the material. You can gently pat the filter with a clean towel to remove excess water, but avoid squeezing or wringing it out. 6. Inspect for Damage: Before reinstalling the filter, inspect it for any signs of damage, such as tears, holes, or excessive wear. If the filter is damaged, it should be replaced.Filter Replacement Frequency: When to Change
The recommended filter replacement frequency depends on several factors, including:
* Filter Type: Disposable filters typically need to be replaced more frequently than washable filters. * Usage: If you use your mini-split frequently, especially in dusty or polluted environments, you'll need to replace the filters more often. * Indoor Air Quality: If you have pets, allergies, or other factors that affect indoor air quality, you may need to replace the filters more often.As a general guideline:
* Washable Filters: Clean every 2-4 weeks. * Disposable Filters: Replace every 1-3 months.Always refer to your owner's manual for the specific recommended filter replacement schedule for your Mitsubishi mini-split model. It's also a good idea to visually inspect the filters regularly. If they appear dirty or clogged, it's time to clean or replace them, regardless of the recommended schedule.
Troubleshooting Common Issues
Here are some common issues you might encounter during filter replacement and how to address them:
* Difficulty Removing the Grille: Ensure you're following the instructions in your owner's manual. Some grilles require a specific technique or the use of a screwdriver. Don't force it, as you could damage the grille or the unit. * Incorrect Filter Size: Double-check the part number on the filter packaging to ensure it matches your mini-split model. If you're unsure, consult your owner's manual or contact a Mitsubishi dealer. * Filter Doesn't Fit Snugly: Make sure you're inserting the filter in the correct orientation. If the filter is still loose, it may be the wrong size or the filter housing may be damaged. * Filter Reminder Light Won't Reset: Refer to your owner's manual for specific instructions on how to reset the filter reminder light. Some models require a specific sequence of button presses. * Unit Doesn't Turn On After Filter Replacement: Double-check that you've reconnected the unit to the power source and that the circuit breaker hasn't tripped.Professional Assistance
While replacing air filters is a relatively simple task, you may prefer to have a professional handle it, especially if you're uncomfortable working with electrical appliances or if you have any concerns about damaging the unit. A qualified HVAC technician can also perform other maintenance tasks, such as cleaning the coils and inspecting the refrigerant levels, to ensure your mini-split system is running at peak performance. Consider professional assistance if you encounter any difficulties or if you're unsure about any aspect of the filter replacement process.
Conclusion
Regularly replacing your Mitsubishi mini-split air filters is an essential part of maintaining your system and ensuring optimal performance, energy efficiency, and indoor air quality. By following the steps outlined in this guide, you can easily replace your filters and keep your mini-split running smoothly for years to come. Remember to consult your owner's manual for specific instructions and recommendations for your model. Prioritize safety and never hesitate to seek professional assistance if needed.