Most Efficient Heating System For Cold Climates
Living in a cold climate presents unique challenges, and one of the most crucial is maintaining a consistently warm and comfortable home. A poorly functioning heating system can lead to skyrocketing energy bills, discomfort, and even potential health risks. Many homeowners grapple with the frustration of a heating system that simply can't keep up with the frigid temperatures outside. This article will guide you through diagnosing common heating system problems and provide DIY solutions, while also helping you understand when it's time to call in a professional.
Identifying the Core Issue: Is Your Heating System Really Struggling?
Before diving into specific components, it's important to establish a baseline. Are you certain your heating system isn't performing as it should? Consider these initial checks:
- Set the Thermostat Properly: This sounds obvious, but ensure your thermostat is set to a comfortable temperature, ideally between 68-72°F (20-22°C). Make sure it's not in "Auto" mode if you want constant heat.
- Check for Drafts: Drafty windows and doors can significantly impact your home's ability to retain heat. Seal any noticeable gaps with weather stripping or caulk.
- Insulation Assessment: Inadequate insulation is a major culprit in heat loss. Check your attic and walls to ensure they have sufficient insulation. If you're unsure, consult a professional for an insulation audit.
If, after addressing these basics, you're still experiencing insufficient heating, it's time to investigate your heating system itself.
Step-by-Step Troubleshooting Guide
1. Furnace Problems
If you have a furnace (gas, oil, or electric), start with these checks:
a. Check the Thermostat Settings
Diagnosis: Ensure the thermostat is set to "Heat" mode and the desired temperature is higher than the current room temperature. Low batteries can also cause thermostat malfunctions.
DIY Fix: Replace the thermostat batteries. Double-check all wiring connections at the thermostat and furnace control panel, ensuring everything is secure and corrosion-free.
When to Call a Pro: If replacing the batteries and checking the wiring doesn't resolve the issue, or if the thermostat display is blank or erratic, consult a qualified HVAC technician.
b. Inspect the Air Filter
Diagnosis: A dirty air filter restricts airflow, causing the furnace to work harder and less efficiently, leading to overheating and potential shutdowns. This is one of the most common causes of furnace problems.
DIY Fix: Locate the air filter (usually near the blower motor). Remove the old filter and replace it with a new one of the correct size and type. Aim to change your filter every 1-3 months, depending on usage and air quality.
When to Call a Pro: If changing the filter doesn't improve heating performance, or if you notice excessive dust and debris buildup despite regular filter changes, there may be underlying issues with your ductwork or furnace components.
c. Pilot Light or Ignition Issues (Gas Furnaces Only)
Diagnosis: If your gas furnace has a pilot light, check if it's lit. If it's not, the furnace won't ignite. For furnaces with electronic ignition, listen for the clicking sound of the igniter. No clicking usually indicates a faulty igniter.
DIY Fix (Pilot Light): Follow the manufacturer's instructions to relight the pilot light. Most furnaces have a diagram on the unit itself. If the pilot light repeatedly goes out, there might be a problem with the gas supply or thermocouple.
DIY Fix (Electronic Ignition): Check the gas valve is fully opened. Check the gas pipe for any damage. Sometimes a simple on/off reset can help.
When to Call a Pro: If you're uncomfortable working with gas, or if the pilot light won't stay lit after multiple attempts, or if you suspect a gas leak (smell of gas), immediately turn off the gas supply to the furnace and call your gas company and a qualified HVAC technician. Do not attempt to repair a faulty electronic igniter yourself.
d. Blower Motor Issues
Diagnosis: The blower motor circulates heated air throughout your home. If it's not working, you'll feel little to no airflow from the vents. Listen for unusual noises coming from the furnace – squealing, grinding, or rattling can indicate a blower motor problem.
DIY Fix: Turn off the furnace at the breaker. Inspect the blower motor for any obvious signs of damage or debris. Clean any visible dust or dirt from the blower fan blades. Check the blower motor capacitor (a cylindrical component attached to the motor) for signs of bulging or leaking – a faulty capacitor can prevent the motor from starting.
When to Call a Pro: Never attempt to repair a blower motor yourself if you are not experienced with electrical repairs. Replacing the blower motor or capacitor requires specialized knowledge and tools. If the motor is making loud noises or not running, contact an HVAC technician.
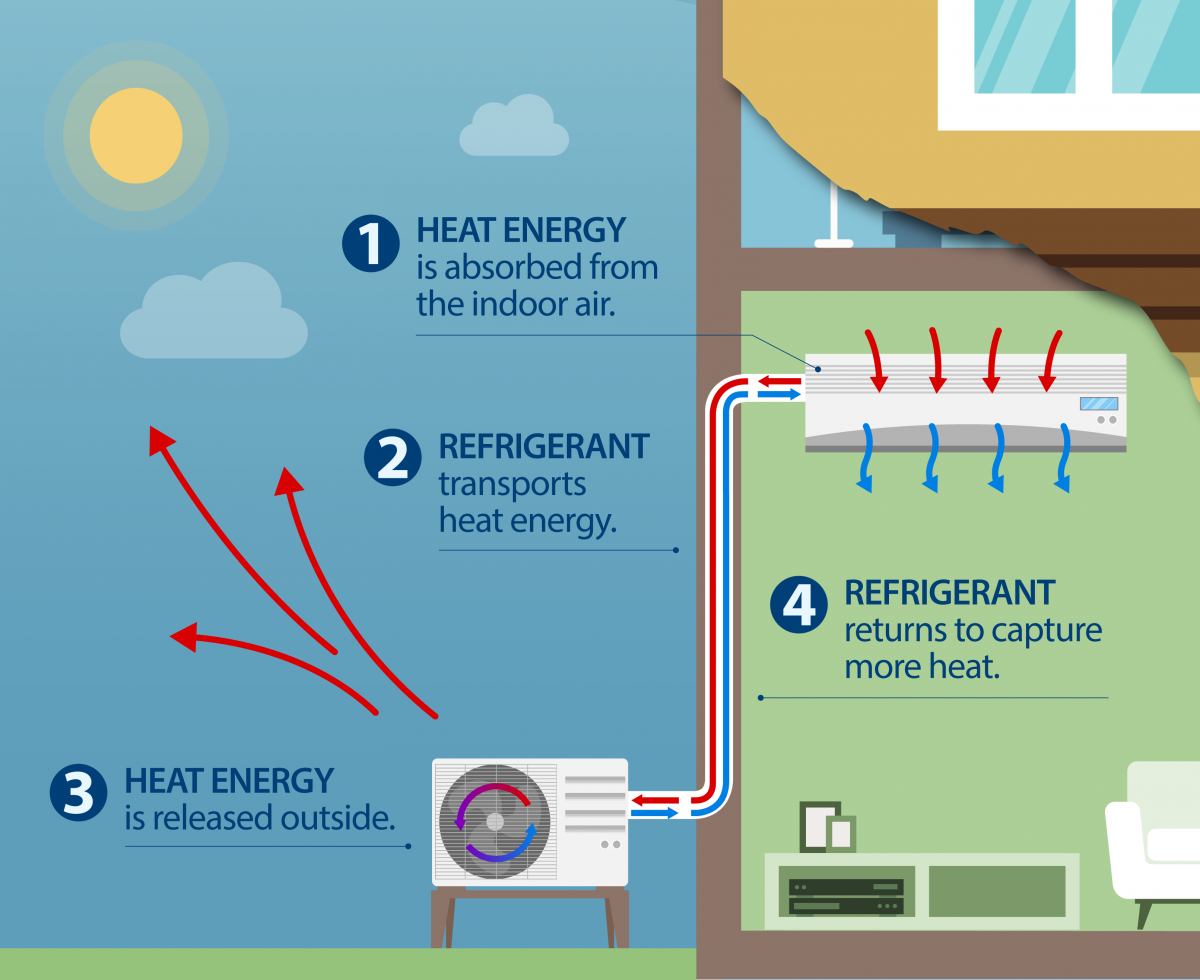
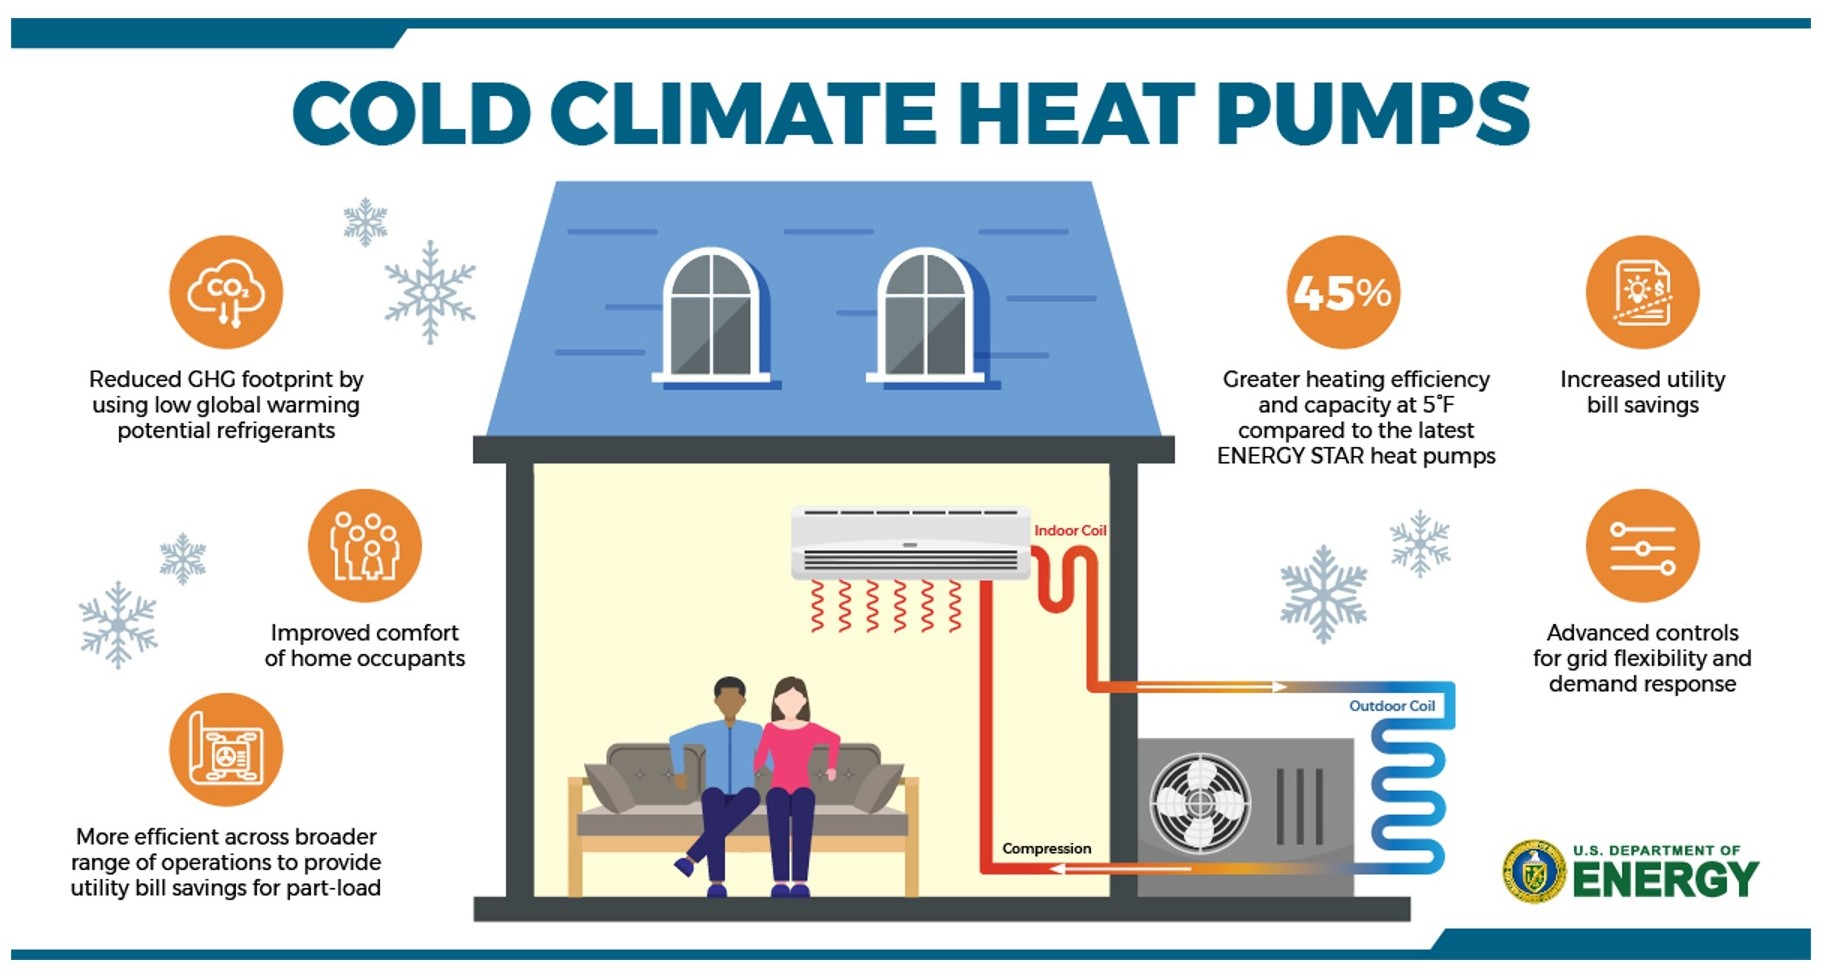
2. Heat Pump Problems
Heat pumps are popular in milder climates but are increasingly used in colder areas as well. They can be efficient, but specific issues arise in freezing temperatures.
a. Frozen Outdoor Unit
Diagnosis: In cold weather, heat pumps can accumulate frost on the outdoor unit. This is normal, and the system should automatically defrost itself. However, excessive ice buildup can indicate a problem.
DIY Fix: Check if the unit is in defrost mode (you may see steam coming from the unit). If it's not defrosting and there's a thick layer of ice, try manually defrosting it by gently spraying it with lukewarm water. Never use hot water or sharp objects to remove ice, as this can damage the unit.
When to Call a Pro: If the unit frequently freezes over, even during normal operating conditions, there could be a refrigerant leak, a faulty defrost cycle, or a problem with the reversing valve. Contact an HVAC technician to diagnose and repair the issue.
b. Reduced Heating Capacity in Extreme Cold
Diagnosis: Heat pumps become less efficient as temperatures drop significantly. At a certain point, they may not be able to provide adequate heating. This is often due to the low ambient temperature affecting the refrigerant's ability to extract heat from the outside air.
DIY Fix: Ensure your auxiliary heat (usually electric resistance heat) is functioning correctly. The auxiliary heat should automatically kick in when the heat pump can't keep up. Also, ensure the outdoor unit is clear of snow and debris, which can impede airflow.
When to Call a Pro: If the auxiliary heat isn't working, or if the heat pump consistently struggles to maintain a comfortable temperature even with auxiliary heat engaged, there may be a problem with the heat pump's refrigerant charge, compressor, or other internal components. A professional can evaluate the system and recommend the appropriate repairs.
c. Refrigerant Leaks
Diagnosis: Reduced heating performance, ice buildup on the coils, and a hissing sound near the outdoor unit can all indicate a refrigerant leak.
DIY Fix: There are NO DIY fixes for refrigerant leaks. Refrigerant handling requires specialized equipment and certification.
When to Call a Pro: If you suspect a refrigerant leak, immediately contact a qualified HVAC technician. Refrigerant leaks are harmful to the environment and can damage your heat pump.
3. Boiler Problems
Boilers heat water, which is then circulated through radiators or radiant floor systems.
a. Low Water Pressure
Diagnosis: Low water pressure can prevent the boiler from operating correctly, resulting in insufficient heating.
DIY Fix: Locate the pressure gauge on the boiler. The optimal pressure is typically between 12-15 PSI. If the pressure is too low, open the water feed valve to allow more water into the system until the pressure reaches the recommended level. Be careful not to overfill the system.
When to Call a Pro: If you frequently need to add water to maintain pressure, there may be a leak in the system. Contact a plumbing or HVAC technician to locate and repair the leak.
b. Air in the System
Diagnosis: Air trapped in the radiators can prevent them from heating evenly or at all. You may hear gurgling or hissing sounds from the radiators.
DIY Fix: Bleed the radiators to release trapped air. Locate the bleed valve on each radiator (usually on the top side). Use a radiator key or screwdriver to slowly open the valve. Allow air to escape until water starts to trickle out. Close the valve tightly. Repeat for all radiators in the system, starting with the ones closest to the boiler.
When to Call a Pro: If you're unable to bleed the radiators effectively, or if air keeps returning to the system, there may be a problem with the expansion tank or air separator. A professional can diagnose and repair the issue.
c. Leaks
Diagnosis: Look for water leaks around the boiler, pipes, or radiators. Even small leaks can cause significant damage over time.
DIY Fix: For small leaks at pipe connections, try tightening the fittings with a wrench. Use Teflon tape to reseal any threaded connections after tightening.
When to Call a Pro: For larger leaks, or if you're unable to stop the leak by tightening the fittings, immediately turn off the boiler and contact a plumbing or HVAC technician. Do not attempt to repair a leaking boiler yourself, as this can be dangerous.
Preventative Maintenance: The Key to Long-Term Efficiency
Regular maintenance is crucial for keeping your heating system running efficiently and preventing costly repairs. Consider these preventative measures:
- Annual Professional Inspection: Schedule an annual inspection and tune-up with a qualified HVAC technician. They can identify potential problems before they escalate and ensure your system is operating at peak performance.
- Regular Filter Changes: As mentioned earlier, replace your air filter regularly (every 1-3 months) to maintain good airflow and prevent strain on your furnace or heat pump.
- Clear Outdoor Units: Keep the area around your outdoor heat pump unit clear of snow, ice, and debris.
- Inspect Ductwork: Periodically inspect your ductwork for leaks or damage. Seal any noticeable leaks with duct tape or mastic sealant.
- Carbon Monoxide Detectors: Install carbon monoxide detectors on every level of your home, especially near sleeping areas. Test them regularly to ensure they're functioning properly.
Knowing When to Call a Professional: A Recap
While this guide provides helpful DIY troubleshooting tips, it's important to recognize when a professional's expertise is required. Call a qualified HVAC technician if:
- You suspect a gas leak (smell of gas).
- You are uncomfortable working with gas or electricity.
- You cannot diagnose the problem.
- You lack the necessary tools or experience to perform the repair safely.
- The problem involves refrigerant handling.
- The repair requires specialized knowledge or equipment.
- Your heating system is under warranty.
By following these troubleshooting steps and prioritizing preventative maintenance, you can keep your heating system running efficiently and comfortably throughout the cold winter months. Remember, your safety and the longevity of your heating system are paramount. When in doubt, always consult a qualified professional.