Multi Zone Mini Split Installation Diagram

Installing a multi-zone mini-split system can significantly improve your home's comfort and energy efficiency, allowing you to control the temperature in different rooms independently. While professional installation is always recommended, understanding the basic installation diagram and principles involved will empower you to make informed decisions and communicate effectively with your HVAC technician. This guide provides a comprehensive overview of multi-zone mini-split installation, explaining the key components and steps involved.
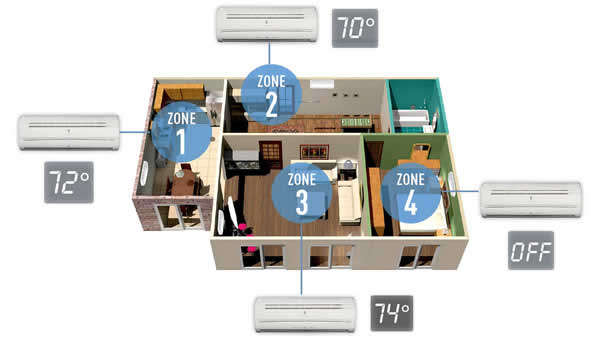
Understanding the Multi-Zone Mini-Split System
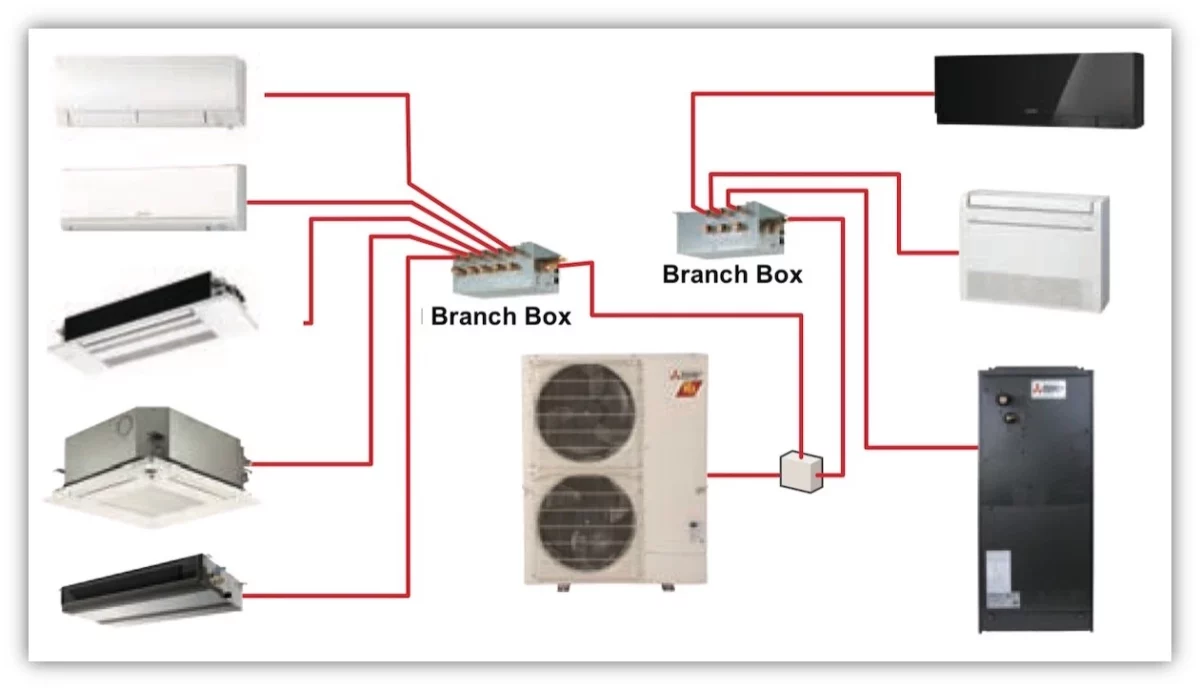
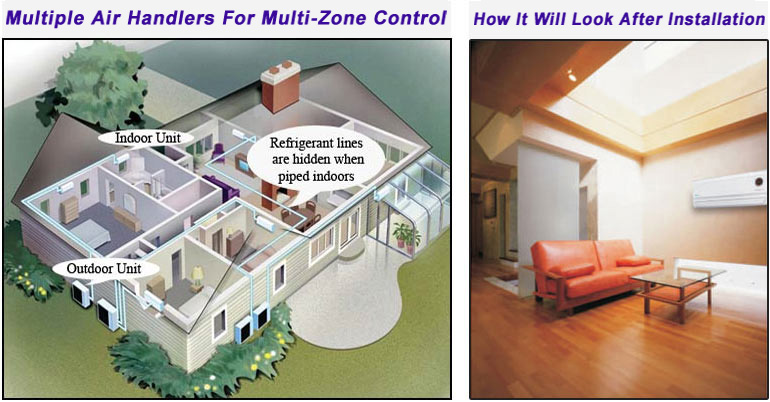
A multi-zone mini-split system consists of an outdoor unit (the condenser) and multiple indoor units (air handlers). Each indoor unit serves a separate zone or room. The outdoor unit houses the compressor and condenser coil, while the indoor units contain the evaporator coil and a fan to circulate air. Think of the outdoor unit as the 'heart' of the system, and the indoor units as the 'distribution points'.
Key Components:
- Outdoor Unit (Condenser): The powerhouse of the system, containing the compressor, condenser coil, and fan. It’s responsible for releasing heat to the outside.
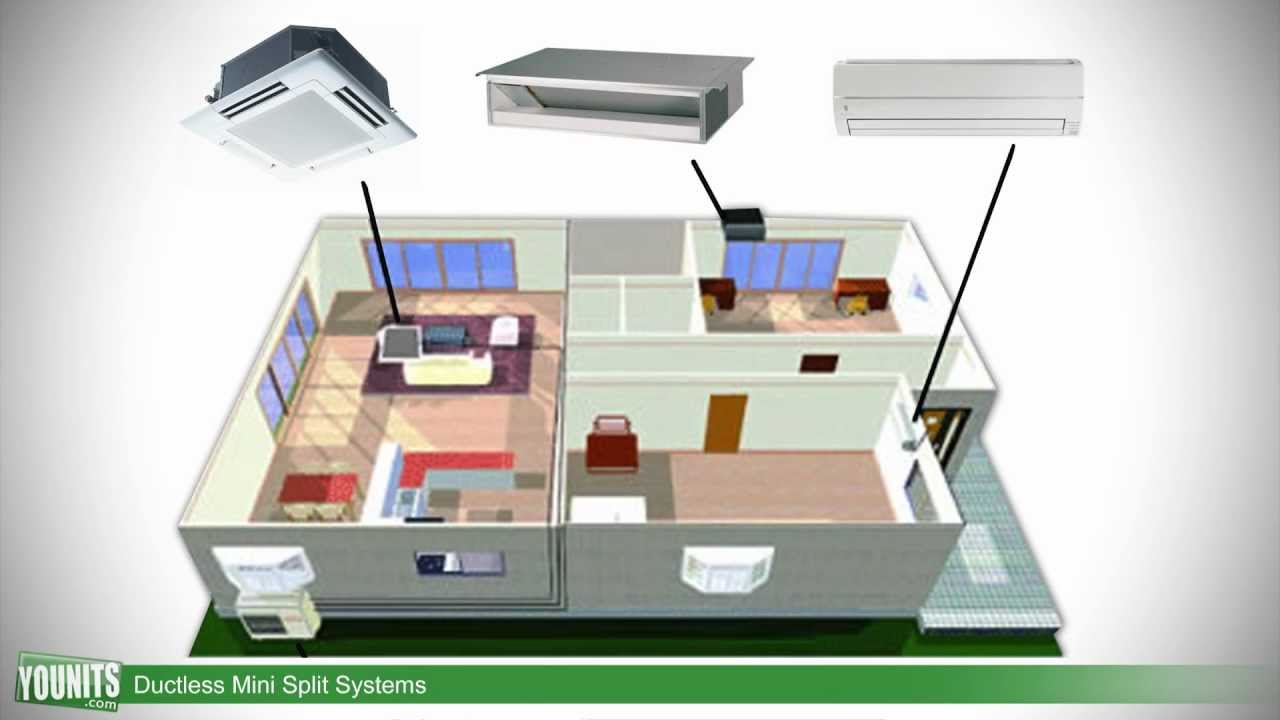
- Indoor Units (Air Handlers): Located inside each zone, these units cool or heat the air and distribute it throughout the room. They come in various styles, including wall-mounted, ceiling cassette, and floor-mounted.
- Refrigerant Lines: Copper pipes that carry the refrigerant between the outdoor and indoor units. Think of refrigerant as the 'blood' of your AC system, carrying heat from inside to outside.
- Control System: Usually a remote control for each indoor unit, allowing individual temperature settings and fan speeds. Some systems also offer centralized control options.
- Drain Lines: These lines remove condensation produced during the cooling process from the indoor units.
- Electrical Wiring: Provides power to both the outdoor and indoor units. This is a crucial aspect of the installation and requires proper electrical knowledge.
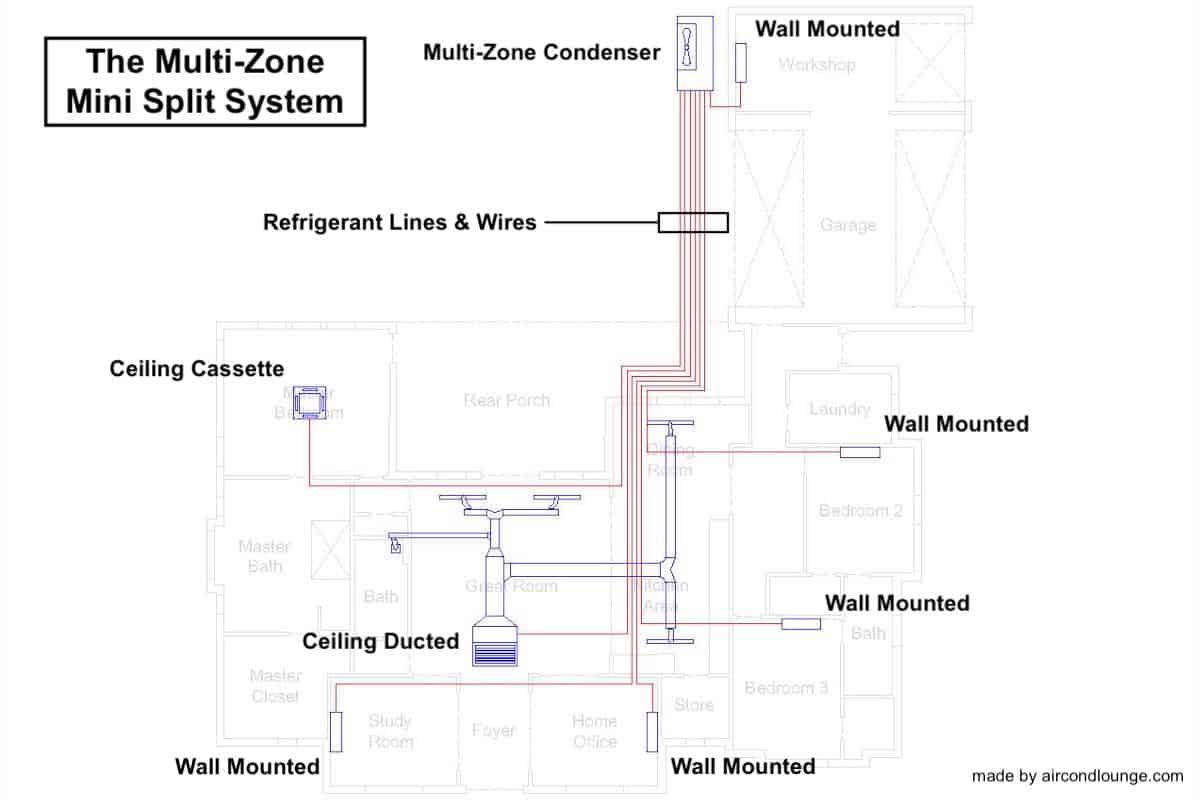
The Multi-Zone Mini-Split Installation Diagram: A Visual Guide
The installation diagram is a visual representation of how all the components of the system are connected. It’s like a roadmap for the installation process. While specific diagrams vary depending on the brand and model, they all share some common elements:
Outdoor Unit Placement
The outdoor unit should be placed on a level surface, typically a concrete pad or mounting brackets. Ensure there is ample clearance around the unit for proper airflow and maintenance. The location should also be chosen to minimize noise disturbance to neighbors.
Indoor Unit Placement
The indoor units should be mounted on a wall or ceiling in a location that allows for optimal airflow and temperature distribution. Avoid placing them behind furniture or in areas where airflow is obstructed. Each unit needs a clear path for air to circulate effectively.
Refrigerant Line Connections
This is a critical step. The refrigerant lines connect the outdoor unit to each indoor unit. The lines must be properly sized and insulated to prevent heat loss and condensation. Proper flaring and tightening of connections are essential to prevent refrigerant leaks. This step often requires specialized tools and expertise.
Drain Line Installation
Each indoor unit produces condensation, which needs to be drained away. Drain lines are typically made of PVC pipe and must be sloped downwards to allow for gravity drainage. Proper drainage is crucial to prevent water damage and mold growth. Consider using a condensate pump if gravity drainage is not possible.
Electrical Connections
The electrical wiring connects the outdoor unit and indoor units to the power supply. This step requires a qualified electrician to ensure that the wiring is properly sized and grounded, and that all electrical codes are followed. Incorrect wiring can be dangerous and damage the system.
Control System Wiring
Control wiring connects the indoor units to the outdoor unit for communication and control. This wiring is typically low-voltage and may involve connecting the units to a central control panel or remote control receivers.
Step-by-Step Installation Overview
While a detailed, step-by-step installation guide is beyond the scope of this article (and best left to professionals), here's a general overview of the installation process:
- Planning and Preparation: Determine the optimal locations for the outdoor and indoor units, considering factors such as airflow, aesthetics, and noise levels. Obtain the necessary permits and gather the required tools and materials.
- Mounting the Outdoor Unit: Secure the outdoor unit to a level surface using a concrete pad or mounting brackets. Ensure proper clearance for airflow.
- Mounting the Indoor Units: Install the mounting brackets for the indoor units on the walls or ceilings. Ensure the brackets are level and securely fastened.
- Drilling Holes for Refrigerant Lines and Drain Lines: Drill holes through the walls to run the refrigerant lines, drain lines, and electrical wiring between the outdoor and indoor units.
- Connecting Refrigerant Lines: Connect the refrigerant lines to the outdoor and indoor units, ensuring proper flaring and tightening of connections. Insulate the refrigerant lines to prevent heat loss.
- Installing Drain Lines: Connect the drain lines to the indoor units and run them to a suitable drainage point. Ensure proper slope for gravity drainage.
- Wiring Electrical Connections: Connect the electrical wiring to the outdoor and indoor units, following all electrical codes and safety precautions. This step MUST be done by a qualified electrician.
- Connecting Control Wiring: Connect the control wiring between the indoor and outdoor units, following the manufacturer's instructions.
- Vacuuming the Refrigerant Lines: This step is crucial! Use a vacuum pump to evacuate the refrigerant lines of air and moisture. This ensures optimal performance and prevents damage to the compressor.
- Releasing Refrigerant: Open the valves on the outdoor unit to release the refrigerant into the system.
- Testing and Calibration: Turn on the system and test its performance, checking for leaks and ensuring proper operation. Calibrate the system as needed to achieve optimal comfort and energy efficiency.
Important Considerations and Safety Precautions
Safety First! Working with electricity and refrigerant requires extreme caution. If you are not comfortable with any aspect of the installation process, it's best to hire a qualified HVAC technician.
- Refrigerant Handling: Refrigerant is a regulated substance and must be handled properly. Improper handling can be harmful to the environment and pose a health risk.
- Electrical Safety: Always disconnect the power supply before working on electrical components. Follow all electrical codes and safety precautions.
- Proper Tools: Use the correct tools for the job, including a vacuum pump, flaring tool, tube cutter, and torque wrench.
- Manufacturer's Instructions: Always follow the manufacturer's instructions for installation, operation, and maintenance.
- Permits and Codes: Check with your local building department to determine if any permits are required for mini-split installation. Ensure that the installation complies with all applicable building codes.
- Professional Help: Consider hiring a qualified HVAC technician for the installation, especially if you are not experienced in electrical wiring, refrigerant handling, or plumbing.
Benefits of Understanding the Installation Diagram
Even if you choose to hire a professional installer, understanding the multi-zone mini-split installation diagram provides several benefits:
- Informed Decision-Making: You'll be able to make more informed decisions about the placement of the units and the overall system design.
- Effective Communication: You can communicate more effectively with your HVAC technician, ensuring that your needs and preferences are met.
- Problem Solving: You'll be better equipped to troubleshoot potential problems and understand the causes of system malfunctions.
- Cost Savings: By understanding the installation process, you can potentially save money by performing some of the simpler tasks yourself (under professional guidance) or by avoiding costly mistakes. Remember safety must be the top priority.
Choosing the Right System and Installer
Selecting the right multi-zone mini-split system is crucial for achieving optimal comfort and energy efficiency. Consider factors such as the size of your home, the number of zones you need, and the climate in your area.
Choosing a qualified installer is equally important. Look for a licensed and insured HVAC contractor with experience in installing multi-zone mini-split systems. Check online reviews and ask for references to ensure that you are working with a reputable and reliable professional.
Ask potential installers about their experience with specific brands and models, and inquire about their installation process and warranty policies. A good installer will be able to answer your questions clearly and provide you with a detailed estimate of the installation costs.
Conclusion
Installing a multi-zone mini-split system can be a complex undertaking, but understanding the basic installation diagram and principles involved can empower you to make informed decisions and work effectively with your HVAC technician. Remember to prioritize safety, follow manufacturer's instructions, and consider hiring a qualified professional for the installation. By taking the time to understand the process, you can ensure that your multi-zone mini-split system provides years of reliable and efficient comfort for your home.
Investing in a properly installed multi-zone mini-split system is an investment in your home's comfort, energy efficiency, and overall value. With careful planning and execution, you can enjoy the benefits of customized climate control in every room of your home.