My Window Air Conditioner Is Not Cooling
It's a sweltering summer day, and you're relying on your window air conditioner to keep things cool and comfortable. But instead of a refreshing blast of cold air, you're met with… lukewarm disappointment. A window AC unit that's not cooling is a common homeowner frustration, but don't sweat it! Often, the fix is simple and something you can tackle yourself. This guide will walk you through a methodical troubleshooting process to diagnose the problem and, hopefully, get your AC back on track.
Step 1: Preliminary Checks – The Obvious (But Important) Stuff
Before diving into more complex troubleshooting, let's start with the easy stuff. These might seem obvious, but overlooking them is a common mistake.
1.1: Is it Plugged In... Really?
Yes, we know it sounds basic, but double-check that the AC unit is securely plugged into a functioning outlet. Sometimes, a plug can become partially dislodged, cutting off power. Try plugging it into a different outlet to rule out an issue with the original outlet. If you're using an extension cord, make sure it's rated for the AC's power requirements. Using an inadequate extension cord can be a fire hazard.
1.2: Check the Circuit Breaker
Locate your circuit breaker box (usually in the basement, garage, or a utility closet). Find the breaker that corresponds to the outlet powering your AC unit. Is it tripped (switched to the "off" position)? If so, flip it fully to the "off" position and then back to the "on" position. If it immediately trips again, do not keep resetting it. This indicates a more serious electrical problem that requires a qualified electrician.
1.3: Thermostat Setting and Mode
Ensure the thermostat is set to a temperature lower than the current room temperature. Sounds silly, but it happens! Also, make sure the AC is in the correct mode – typically "Cool" or "AC." Some units also have an "Auto" mode, which might not be actively cooling if the room is already close to the set temperature. Experiment with lowering the temperature several degrees to see if that kicks the unit into high gear.
1.4: Airflow Obstructions
Check that nothing is blocking the airflow into or out of the AC unit. Curtains, furniture, or even debris can significantly reduce its efficiency. Clear any obstructions to ensure proper ventilation.
Step 2: Cleaning the Air Filter – A Dirty Filter is the Enemy of Cool
A clogged air filter is one of the most common culprits behind a poorly performing window AC unit. A dirty filter restricts airflow, forcing the unit to work harder and reducing its cooling capacity. It can also lead to the evaporator coil freezing up (we'll get to that later).
2.1: Locate the Air Filter
The air filter is usually located behind a removable panel on the front of the unit. Consult your owner's manual for the exact location and removal instructions.
2.2: Remove and Inspect the Filter
Carefully remove the air filter. Inspect it closely. Is it visibly clogged with dust, dirt, and debris? If so, it's time for a cleaning.
2.3: Cleaning the Air Filter
Most window AC filters are washable. Here's how to clean them:
- Vacuum: Use a vacuum cleaner with a brush attachment to remove loose dust and debris from both sides of the filter.
- Wash: Rinse the filter with warm, soapy water. Use a mild detergent.
- Rinse Thoroughly: Ensure all soap residue is removed by rinsing the filter thoroughly under running water.
- Dry Completely: Allow the filter to air dry completely before reinstalling it. Never put a wet filter back into the AC unit. This can promote mold growth and damage the unit.
If your filter is heavily soiled or damaged, consider replacing it with a new one. Check your owner's manual for the correct filter type and size.
Step 3: Checking the Coils – Cleanliness is Next to Coolness
Window AC units have two sets of coils: the evaporator coil (inside) and the condenser coil (outside). Both need to be clean to function efficiently. Dirty coils impede heat transfer, reducing cooling performance.
3.1: Accessing the Coils
Unplug the AC unit before attempting to access or clean the coils. Safety first!
Gaining access to the coils often requires removing the outer casing of the AC unit. Consult your owner's manual for specific instructions. This process can vary depending on the model.
3.2: Inspecting the Coils
Once you have access to the coils, carefully inspect them for dirt, dust, and debris. Look for bent fins (the thin metal plates surrounding the coils). Bent fins restrict airflow and reduce efficiency.
3.3: Cleaning the Coils
- Vacuuming: Use a vacuum cleaner with a brush attachment to gently remove loose dirt and debris from the coils. Be careful not to damage the fins.
- Fin Comb: If you find bent fins, use a fin comb (available at most hardware stores) to gently straighten them. Be patient and avoid applying too much force.
- Coil Cleaner: For stubborn dirt and grime, you can use a commercially available coil cleaner specifically designed for air conditioners. Follow the instructions on the product label carefully. Ensure the area is well-ventilated when using coil cleaner.
3.4: Reassembling the Unit
After cleaning the coils, carefully reassemble the AC unit, ensuring all parts are securely in place.
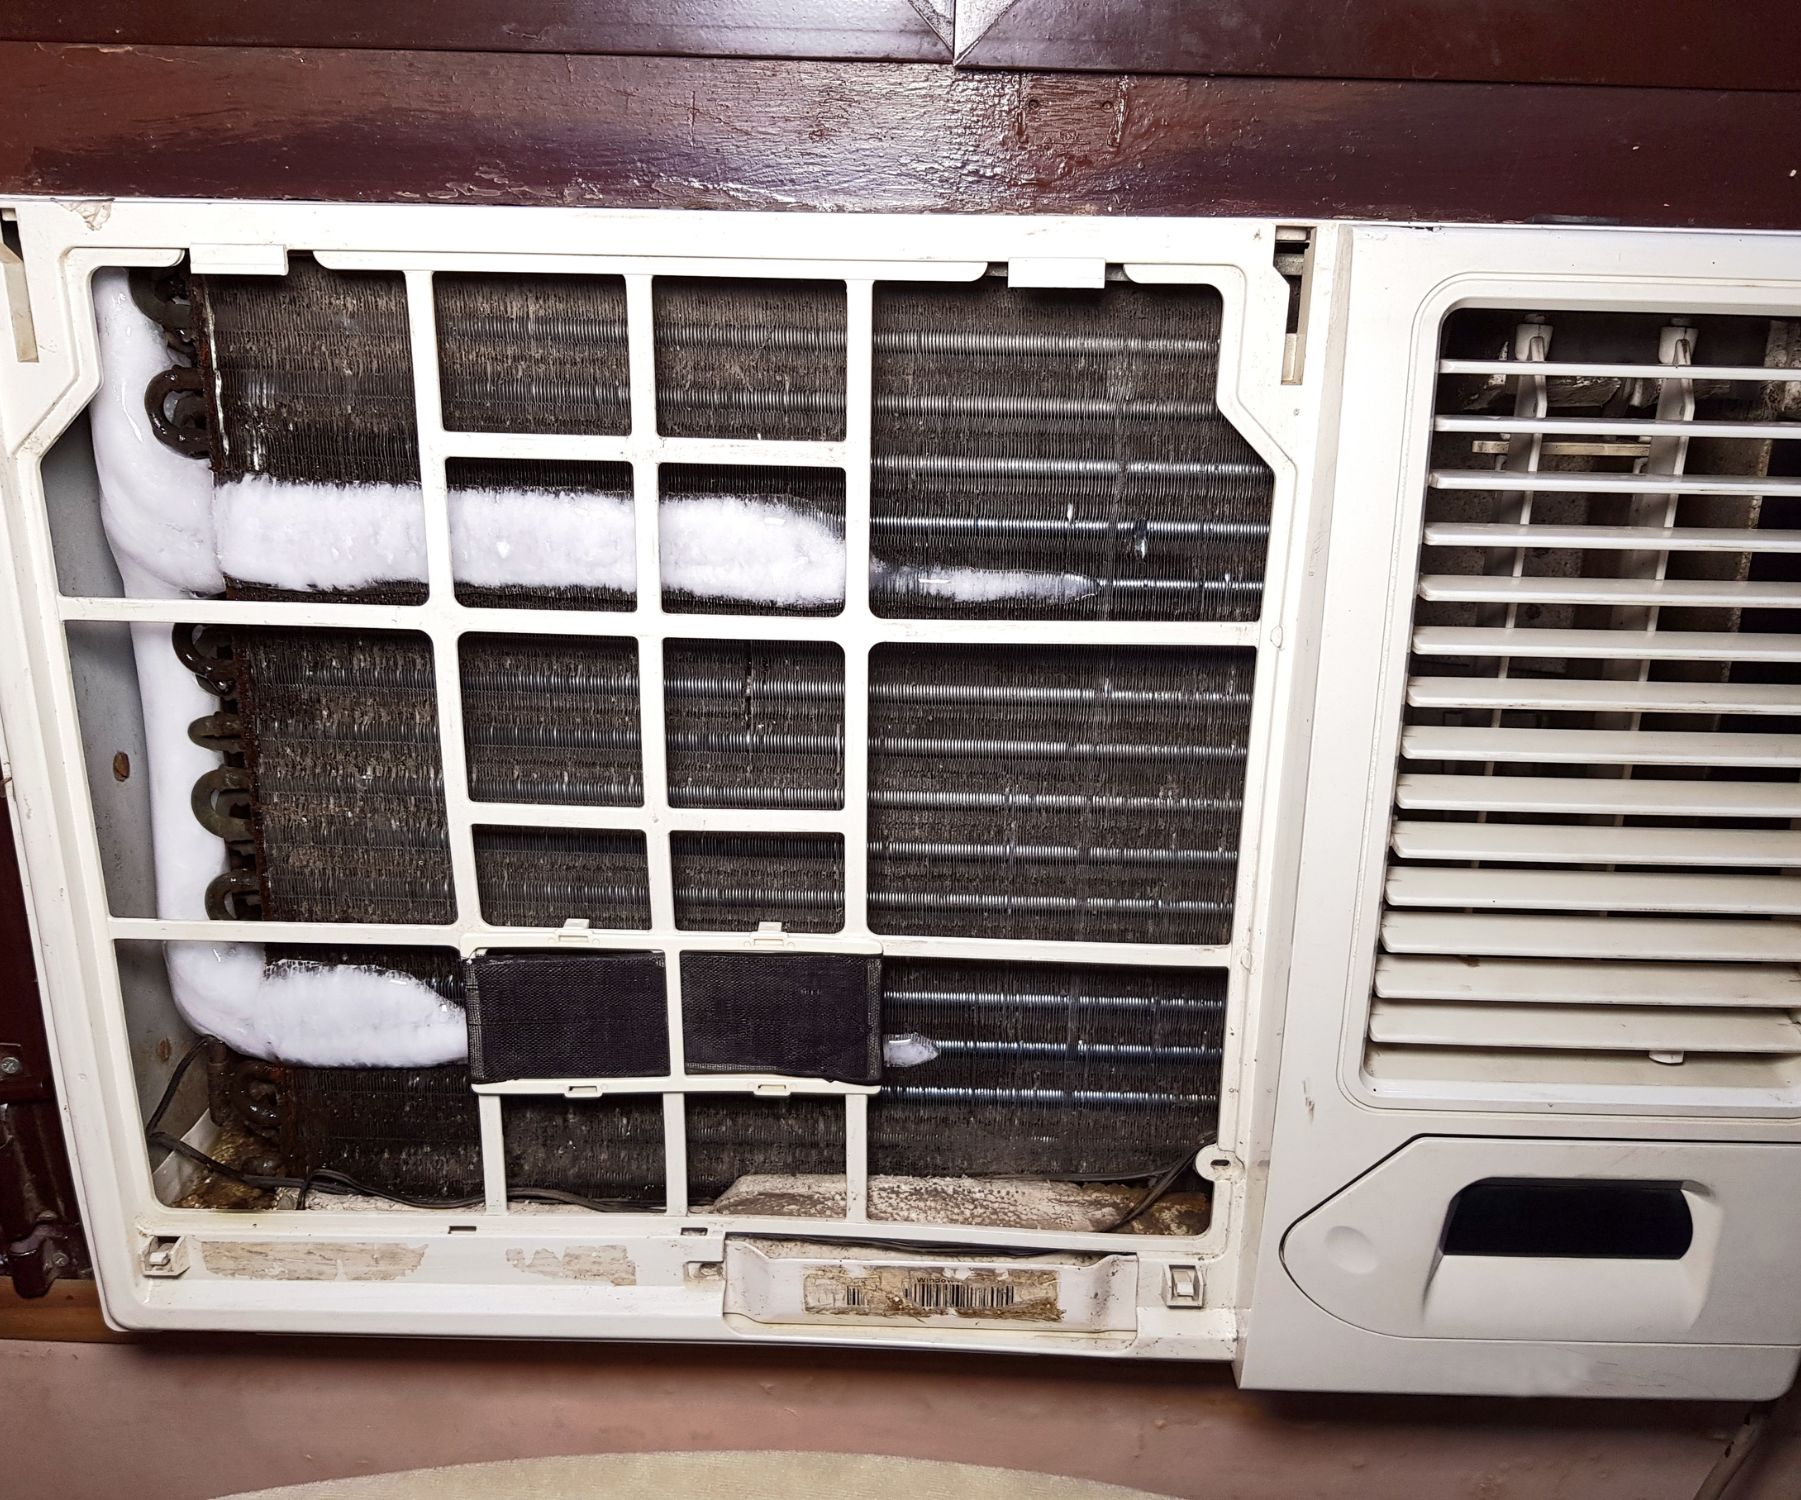
Step 4: Checking for Ice Buildup – A Sign of Underlying Issues
If your AC unit is blowing warm air, there's a chance the evaporator coil is frozen over. Ice buildup restricts airflow and prevents the unit from cooling properly.
4.1: Identifying Ice Buildup
Visually inspect the evaporator coil (the one inside the room) for ice. You may need to remove the front panel to gain a clear view. If you see a thick layer of ice, proceed to the next step.
4.2: Thawing the Ice
Turn off the AC unit and unplug it. Allow the ice to melt completely. This may take several hours. You can speed up the process by using a hairdryer on a low setting, but be careful not to overheat the coils.
4.3: Addressing the Underlying Cause
Once the ice has melted, you need to determine what caused it to form in the first place. Common causes include:
- Dirty Air Filter: As mentioned earlier, a clogged air filter restricts airflow, leading to ice buildup. Replace or clean the filter.
- Low Refrigerant: If the ice buildup is recurring and not due to a dirty filter, it could indicate a refrigerant leak. This requires professional attention.
- Blocked Airflow: Ensure nothing is blocking the airflow around the AC unit.
After thawing the ice and addressing the potential cause, turn the AC unit back on and monitor its performance. If the ice buildup recurs, it's time to call a professional.
Step 5: Ensuring Proper Installation – Secure and Sealed
A poorly installed window AC unit can leak air and reduce cooling efficiency. Make sure the unit is properly supported and sealed to prevent air from escaping.
5.1: Checking the Support Brackets
Ensure the support brackets are securely attached to the window frame and that they are adequately supporting the weight of the AC unit. If the brackets are loose or damaged, tighten or replace them.
5.2: Sealing Gaps and Cracks
Use weather stripping or foam insulation to seal any gaps or cracks around the AC unit. This will prevent warm air from entering the room and cold air from escaping. Pay particular attention to the sides and top of the unit.
5.3: Angling for Condensate Drainage
Your window AC unit should be slightly angled downwards towards the outside to allow condensate to drain properly. If the unit is level or angled inwards, water can accumulate and cause damage.
When to Call a Professional – Knowing Your Limits
While many window AC issues can be resolved with DIY troubleshooting, some problems require the expertise of a qualified HVAC technician. Here are some situations where you should call a professional:
- Refrigerant Leaks: Refrigerant is a hazardous substance, and handling it requires specialized equipment and training. If you suspect a refrigerant leak, do not attempt to fix it yourself.
- Electrical Problems: If you're experiencing frequent circuit breaker trips or suspect a wiring issue, call an electrician immediately. Electrical problems can be dangerous and should only be handled by qualified professionals.
- Compressor Issues: The compressor is the heart of the AC unit. If it's failing, the unit will not cool properly. Compressor repairs are complex and expensive and often require replacing the entire unit.
- Recurring Problems: If you've tried the troubleshooting steps outlined above and your AC unit is still not cooling properly, or if the same problem keeps recurring, it's time to seek professional help.
- Unit is Old: If your AC unit is over 10 years old, it might be nearing the end of its lifespan. Repairing an old unit can be costly and may not be worth the investment. Consider replacing it with a newer, more energy-efficient model.
Remember: When in doubt, it's always best to err on the side of caution and call a professional. Attempting to repair a complex issue yourself could damage the unit further or even pose a safety risk.
By following these troubleshooting steps, you can often diagnose and resolve common window AC problems yourself, saving time and money. But remember, safety is paramount. If you're uncomfortable with any of these steps, or if you suspect a more serious issue, don't hesitate to call a qualified HVAC technician.