Natural Gas Orifice Vs Propane Gas Orifice Size
Many homeowners experience issues with their gas appliances, from flickering flames in their gas fireplace to inconsistent burner output on their gas stove or grill. One of the most common culprits behind these problems lies in the correct orifice size, particularly when switching between natural gas and propane. Using the wrong orifice can lead to inefficient operation, dangerous carbon monoxide buildup, and even appliance failure. This article will guide you through diagnosing and addressing orifice issues, helping you understand when a simple fix is possible and when it's time to call a professional.
Understanding Orifices and Gas Types
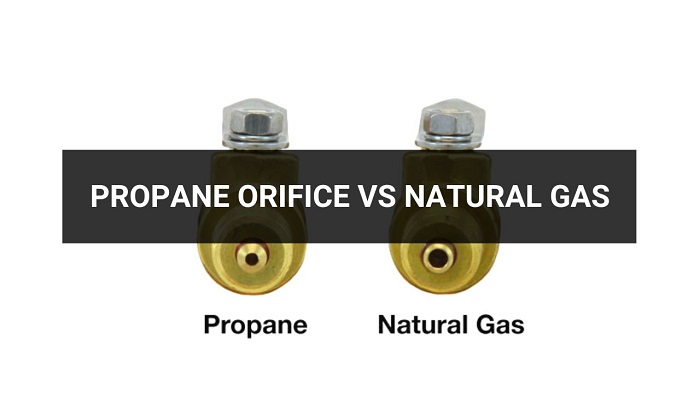
An orifice is a small, precisely sized opening that meters the amount of gas flowing to a burner. Different gases require different orifice sizes because they have different energy densities and pressures. Natural gas (NG) typically operates at a lower pressure and requires a larger orifice than propane (LP), which is stored as a liquid and vaporizes under higher pressure. This means that a propane orifice allows less gas to flow for the same burner output as a natural gas orifice.
Using the wrong orifice can be dangerous. If you're using a propane orifice with natural gas, the appliance will likely produce a weak, yellow flame and insufficient heat. Conversely, using a natural gas orifice with propane will result in an excessively large flame, potentially leading to soot buildup, incomplete combustion, and carbon monoxide poisoning.
Common Symptoms of Incorrect Orifice Size
Before you start tinkering, it's essential to identify the symptoms that suggest an orifice issue. Here are some common signs:
- Yellow or orange flames: Healthy gas flames should be primarily blue with maybe a slight yellow tip. Predominantly yellow or orange flames indicate incomplete combustion, often due to an incorrect orifice or inadequate air supply.
- Soot buildup: Soot is a black, powdery substance that forms when fuel doesn't burn completely. It's a sign that your appliance is producing too much carbon monoxide.
- Weak or small flames: This suggests that the orifice is too small for the gas type being used, restricting the gas flow.
- Excessively large flames: This suggests that the orifice is too large, allowing too much gas to flow, potentially causing damage.
- Popping or sputtering flames: This can indicate inconsistent gas flow, often linked to an incorrect orifice or regulator issue.
- Strong gas odor: While a faint gas odor is normal during initial ignition, a persistent strong odor suggests a leak or incomplete combustion, requiring immediate attention.
Step-by-Step Diagnosis
Now, let's walk through the diagnostic process. Always prioritize safety. Before working on any gas appliance, shut off the gas supply to the appliance. If you smell gas, evacuate the area and call your gas company or fire department immediately.
1. Identify the Appliance and Fuel Type
The first step is to identify the type of gas the appliance is designed to use. This information is usually found on a rating plate or label attached to the appliance. The label will typically specify whether the appliance is configured for natural gas, propane, or both (with instructions for conversion). Look for terms like "NG," "Natural Gas," "LP," or "Propane."
2. Locate the Orifices
The location of the orifices varies depending on the appliance. Here are some common locations:
- Gas Stoves: The orifices are usually located beneath the burners. You'll need to remove the burner grates and burner caps to access them.
- Gas Grills: The orifices are typically located at the end of the burner tubes, where the gas line connects.
- Gas Fireplaces: The orifice is usually located near the gas valve assembly, often hidden behind a decorative log set or access panel.
- Gas Furnaces and Water Heaters: These appliances usually require professional servicing for orifice inspection. Do not attempt to access or modify orifices in furnaces or water heaters unless you are a qualified technician.
3. Inspect the Orifices
Once you've located the orifices, carefully inspect them. Look for any markings that indicate the orifice size. Orifice sizes are typically stamped directly onto the orifice with a number (e.g., "50," "55," "60"). These numbers refer to the drill size used to create the opening. A smaller number indicates a smaller orifice. Comparing this number to the recommended size for your fuel type is crucial.
If you can't find a number, you may need to remove the orifice and visually compare it to a known natural gas and propane orifice. A propane orifice will have a noticeably smaller opening. Or, you can use a set of numbered drill bits to gauge the orifice size. However, be very careful not to enlarge or damage the orifice during this process.
4. Verify the Manifold Pressure
Manifold pressure is the pressure of the gas delivered to the burners. If the pressure is incorrect, even the correct orifice size won't solve the problem. You'll need a manometer to measure the manifold pressure. The correct pressure is usually specified on the appliance rating plate. Measuring gas pressure requires specialized knowledge and equipment. This is often a job best left to a qualified technician.
DIY Fixes: When and How
If you've determined that the orifice size is incorrect for your fuel type, and you're comfortable proceeding, here are some simple DIY fixes you can attempt:
1. Orifice Replacement
The most common solution is to replace the existing orifices with the correct size for your fuel type. You can purchase orifice kits specifically designed for converting appliances from natural gas to propane or vice versa. Ensure the kit is compatible with your specific appliance model.
To replace an orifice:
- Turn off the gas supply.
- Carefully remove the old orifice using a wrench or socket. Be careful not to strip the threads.
- Apply a small amount of pipe sealant (specifically designed for gas lines) to the threads of the new orifice.
- Install the new orifice, tightening it securely but not excessively.
- Turn the gas supply back on and test for leaks using a soap and water solution. Apply the solution to the connections and look for bubbles. If you see bubbles, turn off the gas and tighten the connections further.
2. Air Shutter Adjustment
The air shutter controls the amount of air that mixes with the gas before it's burned. Adjusting the air shutter can sometimes improve the flame quality, especially after converting an appliance. The air shutter is usually a rotating collar located near the burner. Loosening the screw and rotating the collar allows more or less air to enter.
To adjust the air shutter:
- Light the burner.
- Gradually adjust the air shutter while observing the flame.
- The goal is to achieve a blue flame with minimal yellow tipping.
- Tighten the screw to secure the air shutter in the optimal position.
When to Call a Professional
While some orifice issues can be resolved with simple DIY fixes, there are situations where professional intervention is necessary. Never hesitate to call a qualified gas appliance technician if you're unsure or uncomfortable with any aspect of the process.
Here are some scenarios that warrant professional help:
- You're not comfortable working with gas appliances. Safety should always be your top priority.
- You can't identify the correct orifice size. Using the wrong orifice can be dangerous.
- You suspect a gas leak. Gas leaks are a serious hazard and require immediate attention.
- You've adjusted the air shutter, but the flame is still yellow or orange. This could indicate a more complex issue with the gas valve or regulator.
- The appliance is a furnace or water heater. These appliances require specialized knowledge and equipment for servicing.
- The appliance is not operating correctly after replacing the orifices. There may be other underlying problems that need to be addressed.
- You don't have the right tools. Attempting to modify gas appliances with the wrong tools can damage them and create safety hazards.
- You are experiencing Carbon Monoxide symptoms. Nausea, headaches, dizziness, and confusion can be signs of CO poisoning. Evacuate the premises immediately and call 911.
Safety Precautions
Safety is paramount when working with gas appliances. Always follow these precautions:
- Turn off the gas supply to the appliance before starting any work.
- Never smoke or use open flames near gas appliances.
- Use a gas leak detector or soap and water solution to check for leaks after making any connections.
- Ensure adequate ventilation when working on gas appliances.
- Consult the appliance manufacturer's instructions for specific safety guidelines.
- Consider installing a carbon monoxide detector to alert you to dangerous levels of CO.
By understanding the role of orifices, recognizing the symptoms of incorrect sizing, and following these diagnostic and repair steps, you can confidently address many common gas appliance issues. Remember to prioritize safety and seek professional help when needed. With a little knowledge and caution, you can keep your gas appliances operating efficiently and safely.