Oil Burner Nozzles How Do They Work
Understanding Your Oil Burner Nozzle: The Heart of Your Heating System
If you have an oil-fired heating system, understanding the oil burner nozzle is crucial for efficient and reliable heating. This small, often overlooked component plays a vital role in atomizing the oil into a fine mist, allowing it to combust properly and heat your home. This article will delve into how oil burner nozzles work, common issues, troubleshooting tips, and when it's time to call a professional.
How Oil Burner Nozzles Work: A Detailed Look
The oil burner nozzle's primary function is to break down the fuel oil into tiny droplets, creating a spray pattern that mixes effectively with air. This atomization process is essential for efficient combustion. Here's a breakdown of the process:
- Oil Delivery: Fuel oil is pumped from your oil tank through a filter and then to the nozzle under high pressure (typically around 100 PSI).
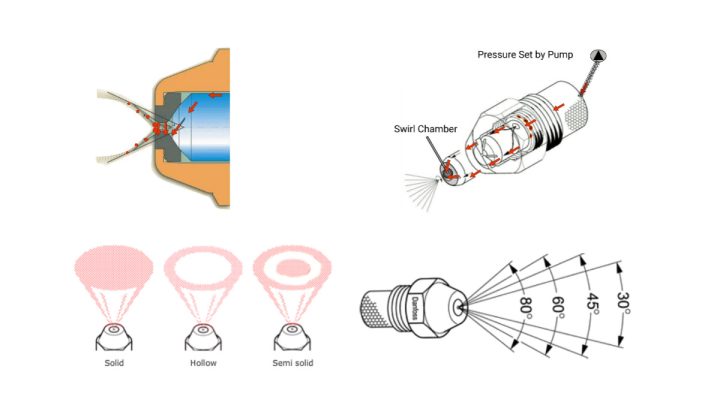
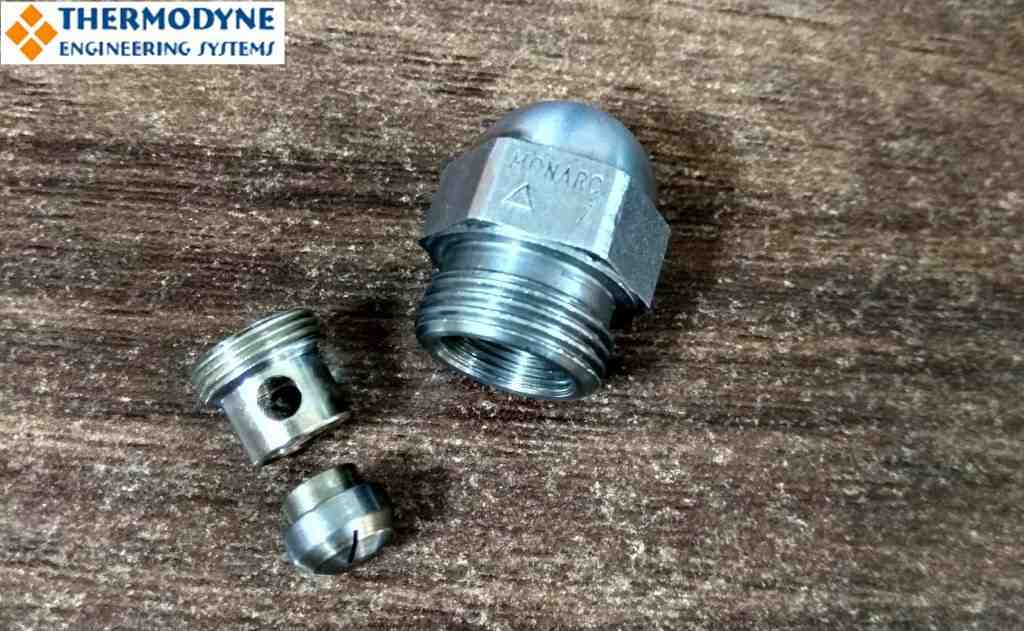
- Swirl Chamber: Inside the nozzle, the oil enters a swirl chamber, designed to impart a swirling motion to the oil. This swirling action is critical for atomization.
- Orifice: The oil then passes through a precisely sized and shaped orifice (a small hole). The combination of pressure and swirling action forces the oil out of the orifice in a fine spray.
- Spray Pattern: The shape of the nozzle tip and the internal design determine the spray pattern. Common spray patterns include hollow, solid, and semi-solid cones, each suited for different burner designs and combustion chamber configurations.
The result is a fine mist of oil that ignites easily and burns cleanly (when the system is functioning correctly). The efficiency of this process directly impacts your heating costs and the overall performance of your furnace or boiler.
Decoding Nozzle Specifications: Size, Angle, and Type
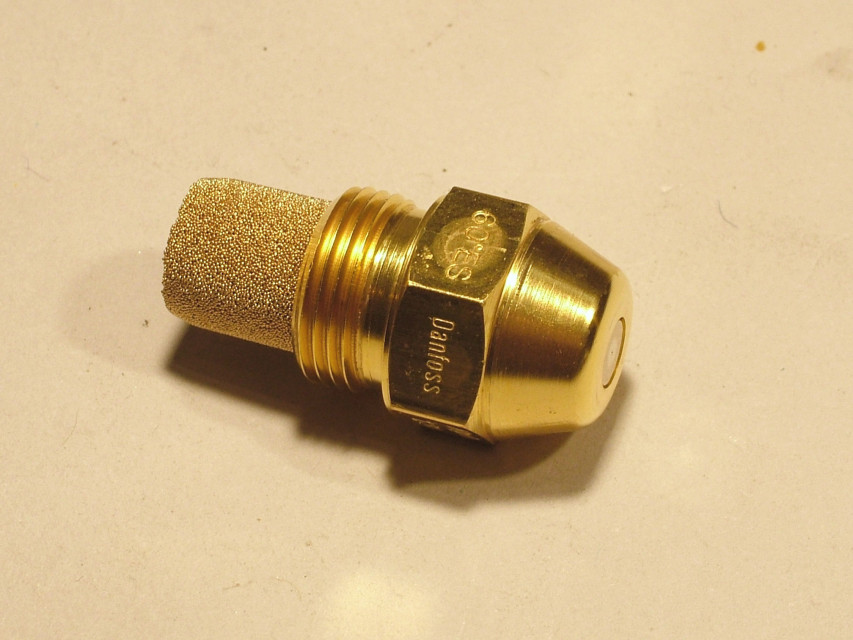
Oil burner nozzles aren't one-size-fits-all. They come with specific ratings that you need to understand. These ratings are usually stamped on the nozzle itself.
- GPH (Gallons Per Hour): This indicates the flow rate of the nozzle. A 1.00 GPH nozzle will deliver 1 gallon of oil per hour at the specified pressure (usually 100 PSI). Selecting the correct GPH rating is critical for proper burner operation and efficiency.
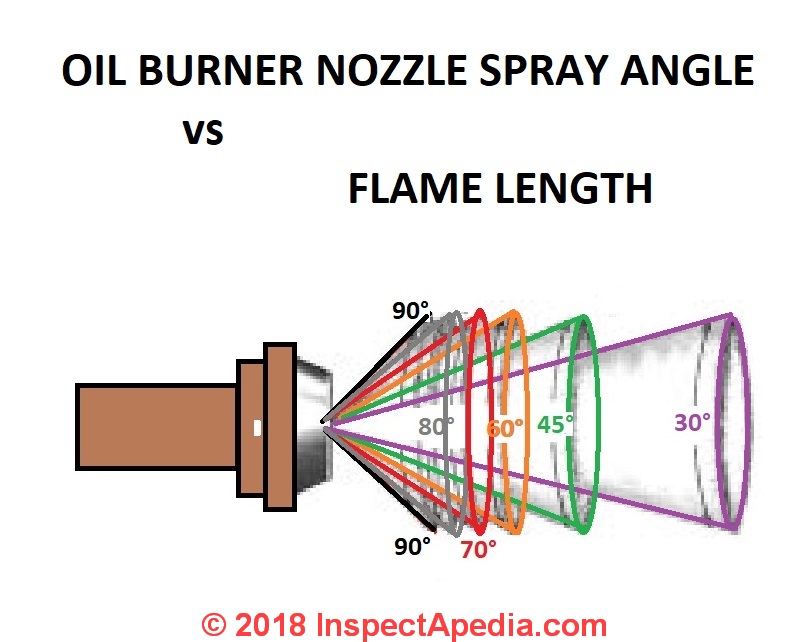
- Spray Angle: The spray angle, measured in degrees (e.g., 60°, 80°), determines the width of the oil spray cone. The correct spray angle is determined by your burner's design and combustion chamber size. Using the wrong angle can lead to incomplete combustion, soot buildup, and reduced efficiency.
- Spray Pattern (Hollow, Solid, Semi-Solid): As mentioned earlier, the spray pattern describes the distribution of oil within the spray cone. Hollow cone nozzles are common in smaller burners, while solid cone nozzles are often used in larger systems. Semi-solid nozzles offer a balance between the two.
Always consult your burner's manual or a qualified HVAC technician to determine the correct nozzle specifications for your system. Using the wrong nozzle can damage your equipment and create safety hazards.
Common Oil Burner Nozzle Problems: Symptoms and Troubleshooting
A malfunctioning oil burner nozzle can lead to a variety of problems, affecting your heating system's performance and efficiency. Here are some common issues and potential solutions:
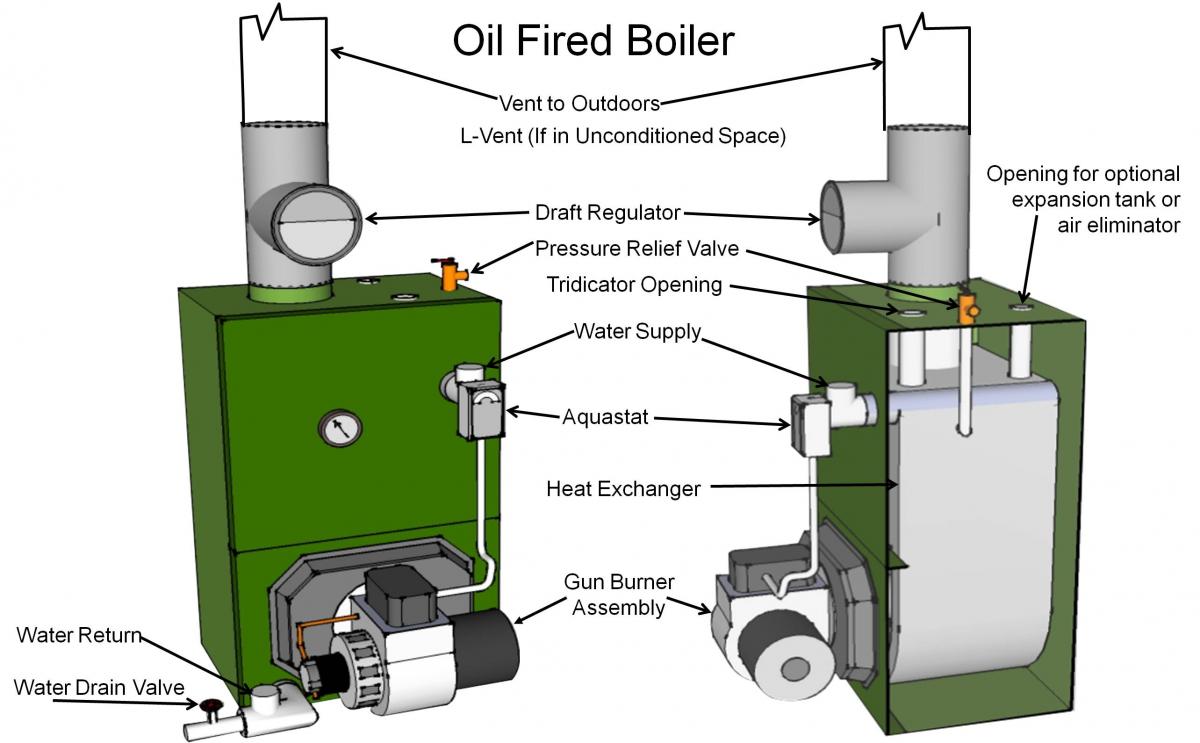
- Soot Buildup: Incomplete combustion due to a clogged or worn nozzle can produce excessive soot. This soot can coat the heat exchanger, reducing its efficiency and potentially leading to a dangerous carbon monoxide buildup.
- Puff Backs: A puff back occurs when unburned oil accumulates in the combustion chamber and then ignites with a sudden, forceful explosion. This is often caused by a delayed ignition due to a faulty nozzle or other burner components.
- Reduced Efficiency: A worn or damaged nozzle can disrupt the spray pattern, leading to inefficient combustion and increased fuel consumption. You might notice higher heating bills without a corresponding increase in warmth.
- No Heat: A completely clogged nozzle will prevent oil from reaching the combustion chamber, resulting in no heat.
- Smoking Burner: Excessive smoke from the chimney can indicate incomplete combustion, often caused by a faulty nozzle.
DIY Troubleshooting Steps (With Caution!)
Safety First! Before attempting any troubleshooting, always turn off the power to your heating system at the breaker panel and shut off the oil supply valve. Allow the burner to cool completely before proceeding.
- Visual Inspection: Carefully inspect the nozzle for signs of damage, wear, or clogs. Use a magnifying glass for a closer look.
- Nozzle Cleaning (Limited): In some cases, a very minor clog can be cleared by gently wiping the nozzle tip with a clean, lint-free cloth. Never use sharp objects or wires to clean the nozzle, as this can damage the delicate orifice.
- Nozzle Replacement (If Necessary and You're Comfortable): If the nozzle is clearly damaged or heavily clogged, replacement is often the best option. Make sure you have the correct replacement nozzle on hand (same GPH, spray angle, and pattern). Follow these steps:
- Disconnect the oil line from the nozzle adapter.
- Carefully unscrew the old nozzle using a nozzle wrench.
- Apply a small amount of pipe dope (specifically designed for oil lines) to the threads of the new nozzle.
- Screw the new nozzle into the adapter, tightening it securely with the nozzle wrench.
- Reconnect the oil line.
- Restart the Burner (and Monitor): After replacing the nozzle, turn the power back on and restart the burner. Closely monitor the burner's operation for any signs of trouble, such as excessive smoke, unusual noises, or a puff back. If you notice any of these issues, immediately shut down the burner and call a qualified HVAC technician.
Tools and Parts You Might Need:
- Nozzle wrench
- New oil burner nozzle (correct GPH, spray angle, and pattern)
- Clean, lint-free cloth
- Magnifying glass
- Pipe dope (for oil lines)
- Screwdrivers
- Wrenches
- Safety glasses
- Gloves
When to Call a Professional:
While some basic troubleshooting and nozzle replacement can be done by a DIY-savvy homeowner, certain situations require the expertise of a qualified HVAC technician. Never attempt repairs that you are not comfortable with or that involve complex electrical or mechanical components.
Call a professional if you experience any of the following:
- Persistent soot buildup
- Puff backs
- Strong odor of oil
- Unusual noises from the burner
- Difficulty starting the burner
- Any doubt about your ability to safely perform the repair
A professional HVAC technician has the tools, training, and experience to diagnose and repair oil burner problems safely and effectively. They can also perform a comprehensive tune-up to ensure your heating system is operating at peak efficiency.
Estimated Repair Costs:
The cost to repair or replace an oil burner nozzle can vary depending on the complexity of the job and your location. Here's a general estimate:
- Nozzle Replacement Only: $75 - $200 (including the cost of the nozzle and labor)
- Burner Tune-Up (including nozzle replacement): $150 - $400
- More Complex Repairs (e.g., replacing the oil pump, ignition transformer, or other components): $300 - $1000+
These are just estimates, and it's always best to get a quote from a qualified HVAC technician for your specific situation.
Preventive Maintenance: Extending the Life of Your Nozzle and System
Regular maintenance is key to preventing oil burner nozzle problems and ensuring the longevity of your heating system.
- Annual Tune-Up: Schedule an annual tune-up with a qualified HVAC technician. This typically includes cleaning and inspecting the burner, replacing the nozzle (as needed), adjusting the combustion settings, and checking for any potential problems.
- Oil Filter Replacement: Replace your oil filter regularly (usually once or twice a year) to prevent contaminants from reaching the nozzle and causing clogs.
- Keep Your Oil Tank Full: Maintaining a full oil tank helps prevent condensation and sludge buildup, which can contaminate the oil and clog the nozzle.
By understanding how oil burner nozzles work, recognizing common problems, and performing regular maintenance, you can keep your oil-fired heating system running efficiently and reliably for years to come.