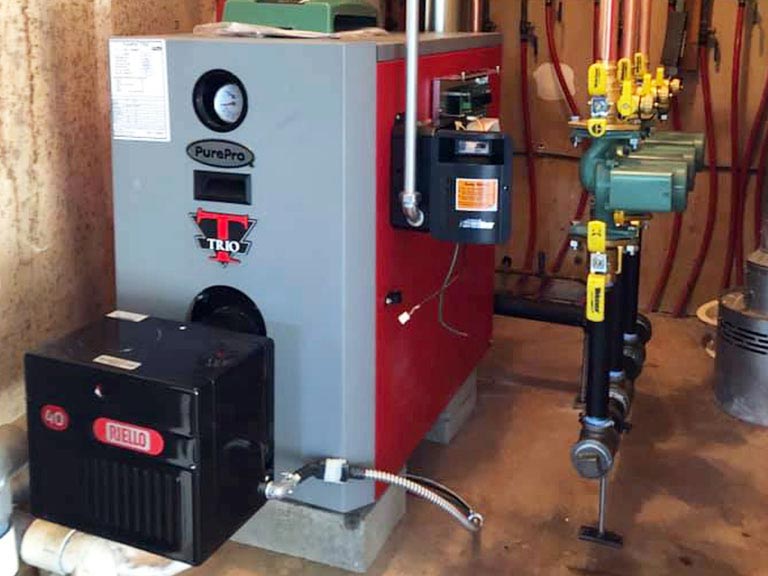
Oil Burner Service White Island Shores
Dealing with a cold house during a White Island Shores winter can be frustrating, especially when you rely on your oil burner. One of the most common problems homeowners face is a sudden loss of heat. Before you panic and call for emergency service, let's walk through some troubleshooting steps you can take to diagnose and potentially resolve the issue yourself. We'll focus on what you can check safely and when it's time to call in the pros.
Step 1: The Obvious Checks (No Tools Required!)
Before delving into anything complicated, let's start with the basics. These checks require no tools and can often pinpoint simple oversights.
Check Your Thermostat:
This might seem obvious, but it's often the culprit. Ensure your thermostat is set to "Heat" and the temperature is higher than the current room temperature. Also, verify that the thermostat is not in "Auto" mode and mistakenly set to cool instead of heat. Make sure the batteries are fresh. A low battery can cause erratic behavior.
Check Your Oil Tank Gauge:
This is crucial! Is there oil in your tank? Many homeowners run out of oil without realizing it. If the gauge reads near empty or completely empty, that's your problem. Order a delivery immediately. Even if the gauge indicates a small amount, it might not be enough to prime the burner, especially on uneven terrain.
Check the Emergency Shut-Off Switch:
Most oil burners have an emergency shut-off switch, usually located near the burner or at the top of the basement stairs. Make sure this switch is in the "ON" position. Someone might have accidentally switched it off.
Check the Circuit Breaker:
Locate the circuit breaker panel for your home. Find the breaker labeled "Oil Burner" or something similar. Is the breaker tripped (in the "OFF" or middle position)? If so, flip it fully to the "OFF" position and then back to the "ON" position. If it trips again immediately, *do not keep resetting it*. This indicates a more serious electrical issue and requires a professional.
Step 2: Basic Troubleshooting (Requires Minimal Equipment)
If the initial checks didn't solve the problem, we can move on to some basic troubleshooting steps that require minimal equipment – mostly your senses and perhaps a flashlight.
Listen to the Burner:
When the thermostat calls for heat, you should hear the oil burner motor start. If you hear *nothing* at all, it could indicate a problem with the motor, the ignition system, or the wiring. If you hear a *humming* sound but the burner doesn't ignite, this could indicate a problem with the igniter or the oil pump. Pay close attention to any unusual noises – banging, sputtering, or screeching – as these can provide clues.
Check for Oil Leaks:
Carefully inspect around the oil burner and the oil lines for any signs of oil leaks. Look for wet spots, oil puddles, or a strong oil odor. If you detect a leak, *do not attempt to fix it yourself*. Oil leaks can be dangerous and require professional attention.
Check the Burner Nozzle (WARNING: Requires caution and proper knowledge!):
This step is for homeowners with some mechanical aptitude and comfort working with equipment. If you're unsure, skip this step and call a professional.
The burner nozzle sprays oil into the combustion chamber. A clogged nozzle is a common cause of burner failure.
- Turn off the power to the oil burner at the circuit breaker.
- Locate the burner nozzle assembly. This is usually found near the front of the burner unit. Consult your burner's manual for the specific location.
- Carefully remove the nozzle assembly. This usually involves unscrewing a fitting. Be prepared for a small amount of oil to drip out. Have a rag ready to catch it.
- Inspect the nozzle. Is it clogged with debris? If so, you *might* be able to gently clean it with a small wire or needle. *Do not use anything abrasive*.
- Consider replacing the nozzle. Nozzles are relatively inexpensive and should be replaced annually as part of routine maintenance. Make sure you get the correct nozzle for your burner. The nozzle size and spray angle are usually stamped on the nozzle itself. Take the old nozzle with you when you purchase a replacement.
- Reassemble the nozzle assembly and turn the power back on to the burner.
- Monitor the burner. If it still doesn't ignite or runs erratically, there's likely a more serious problem.
Important Safety Note: When working with oil, wear gloves and eye protection. Properly dispose of any oil-soaked rags. Do not smoke or use open flames near the oil burner.
Check the Chimney Draft:
A properly functioning chimney draft is essential for safe and efficient burner operation. The draft pulls exhaust gases out of the house. A blocked or weak draft can cause the burner to malfunction and even create a dangerous situation.
Carefully hold a lit match or lighter near the draft diverter (usually a small opening near the base of the chimney flue pipe connected to your burner). The flame should be drawn *into* the opening. If the flame flickers or is pushed *away* from the opening, you likely have a draft problem.
Possible Causes of Draft Problems:
- Chimney Obstruction: Bird nests, leaves, or other debris can block the chimney flue.
- Damper Issues: If your chimney has a damper, make sure it's fully open.
- Cold Chimney: A cold chimney can sometimes have a weak draft, especially in very cold weather. Running a small space heater near the draft diverter for a short time can sometimes help establish a draft.
Addressing Draft Problems: Cleaning a chimney is a dirty and sometimes dangerous job. Unless you're experienced and have the proper equipment, it's best to hire a professional chimney sweep to inspect and clean your chimney.
Step 3: When to Call a Professional (Absolutely Necessary!)
There are certain situations where attempting DIY repairs on your oil burner is not only unwise but potentially dangerous. Call a qualified HVAC technician immediately if you encounter any of the following:
- Strong Oil Odor: A persistent or strong oil odor could indicate a leak or a malfunction in the burner.
- Smoke: Any visible smoke coming from the burner or the chimney is a serious warning sign.
- Repeated Tripping of the Circuit Breaker: As mentioned earlier, repeatedly resetting a tripped breaker can damage the electrical system and potentially cause a fire.
- Any Doubt or Uncertainty: If you're uncomfortable working with the oil burner or you're unsure about any of the troubleshooting steps, it's always best to err on the side of caution and call a professional.
- Suspected Carbon Monoxide Leak: Carbon monoxide is a deadly, odorless gas. If you suspect a carbon monoxide leak, evacuate the house immediately and call the fire department or a qualified HVAC technician. Install and maintain working carbon monoxide detectors on every level of your home.
- You've checked the basics and the burner still won't start: Complex issues within the burner like a faulty ignition transformer, cad cell relay, or oil pump require specialized tools and expertise.
Preventative Maintenance: The Best Medicine
The best way to avoid heating problems in the middle of winter is to perform regular preventative maintenance on your oil burner. Schedule an annual tune-up with a qualified HVAC technician. A tune-up typically includes:
- Cleaning and inspecting the burner
- Replacing the oil filter and nozzle
- Adjusting the burner for optimal efficiency
- Inspecting the chimney and flue pipe
- Testing the safety controls
Regular maintenance can help extend the life of your oil burner, improve its efficiency, and prevent costly breakdowns.
White Island Shores Specific Considerations
Living in White Island Shores has its own unique factors that can influence your oil burner's performance. Proximity to the coast means increased exposure to salt air, which can corrode components over time. Be sure to have your technician pay close attention to any signs of corrosion during your annual maintenance.
Also, consider the age and condition of your oil tank. Older tanks are more prone to leaks and corrosion. If your tank is nearing the end of its lifespan, consider replacing it before it becomes a problem.
By following these troubleshooting steps and scheduling regular maintenance, you can help ensure that your oil burner provides reliable heat throughout the winter and stay comfortable in your White Island Shores home. Remember, when in doubt, always call a qualified professional!