Oil Level Gauge For Oil Tank

Frequently Asked Questions: Oil Level Gauges for Oil Tanks
This article addresses common questions about oil level gauges used in residential and commercial oil tanks. Whether you're a homeowner or a facility manager, understanding your oil level gauge is crucial for efficient fuel management and preventing costly run-outs.
Question 1: What is an oil level gauge, and why do I need one?
An oil level gauge is a device that indicates the amount of oil remaining in your oil tank. It’s your primary tool for knowing when to order more oil and avoiding the inconvenience and potential damage caused by running empty. Imagine running out of heating oil in the middle of winter! The gauge prevents this.
Without a working gauge, you’d be relying on guesswork or potentially messy dipstick methods to check your oil levels. A properly functioning gauge provides a clear, convenient, and reliable reading.
Question 2: What are the different types of oil level gauges?
Several types of oil level gauges are available, each with its own advantages. Here are the most common:
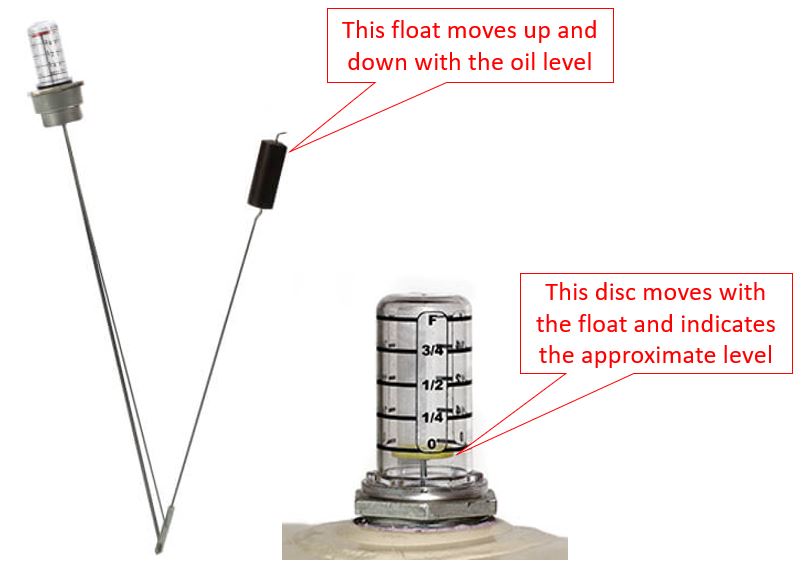
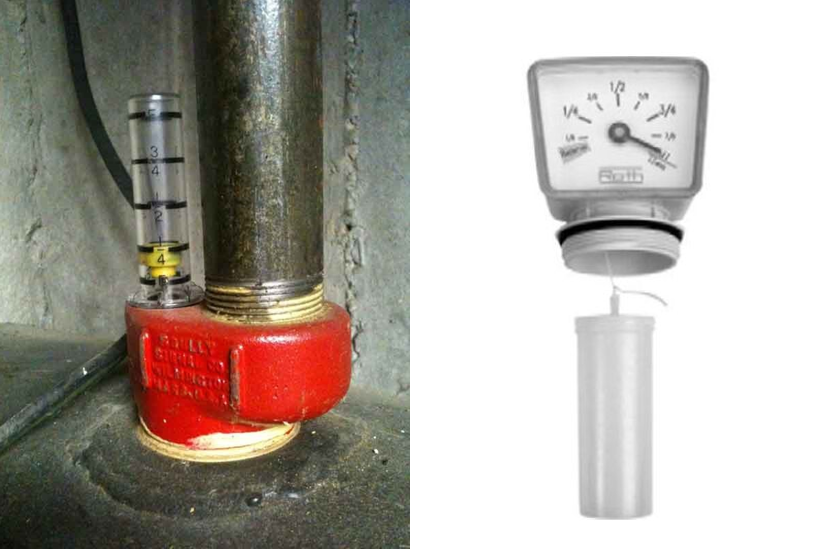
- Mechanical Float Gauges: These are the most common type, especially in residential settings. They use a float connected to an indicator on the top of the tank. As the oil level changes, the float moves, and the indicator shows the current level. They are usually reliable and relatively inexpensive.
- Hydrostatic Gauges: These gauges measure the pressure exerted by the oil at the bottom of the tank. This pressure is directly related to the oil level. These are often used in larger tanks and commercial applications.
- Digital/Electronic Gauges: These gauges use sensors to measure the oil level and display it digitally. They can offer more accurate readings and sometimes even transmit data remotely for remote monitoring. These are becoming increasingly popular due to their accuracy and convenience. Some models will even provide alerts via email or SMS when levels are low.
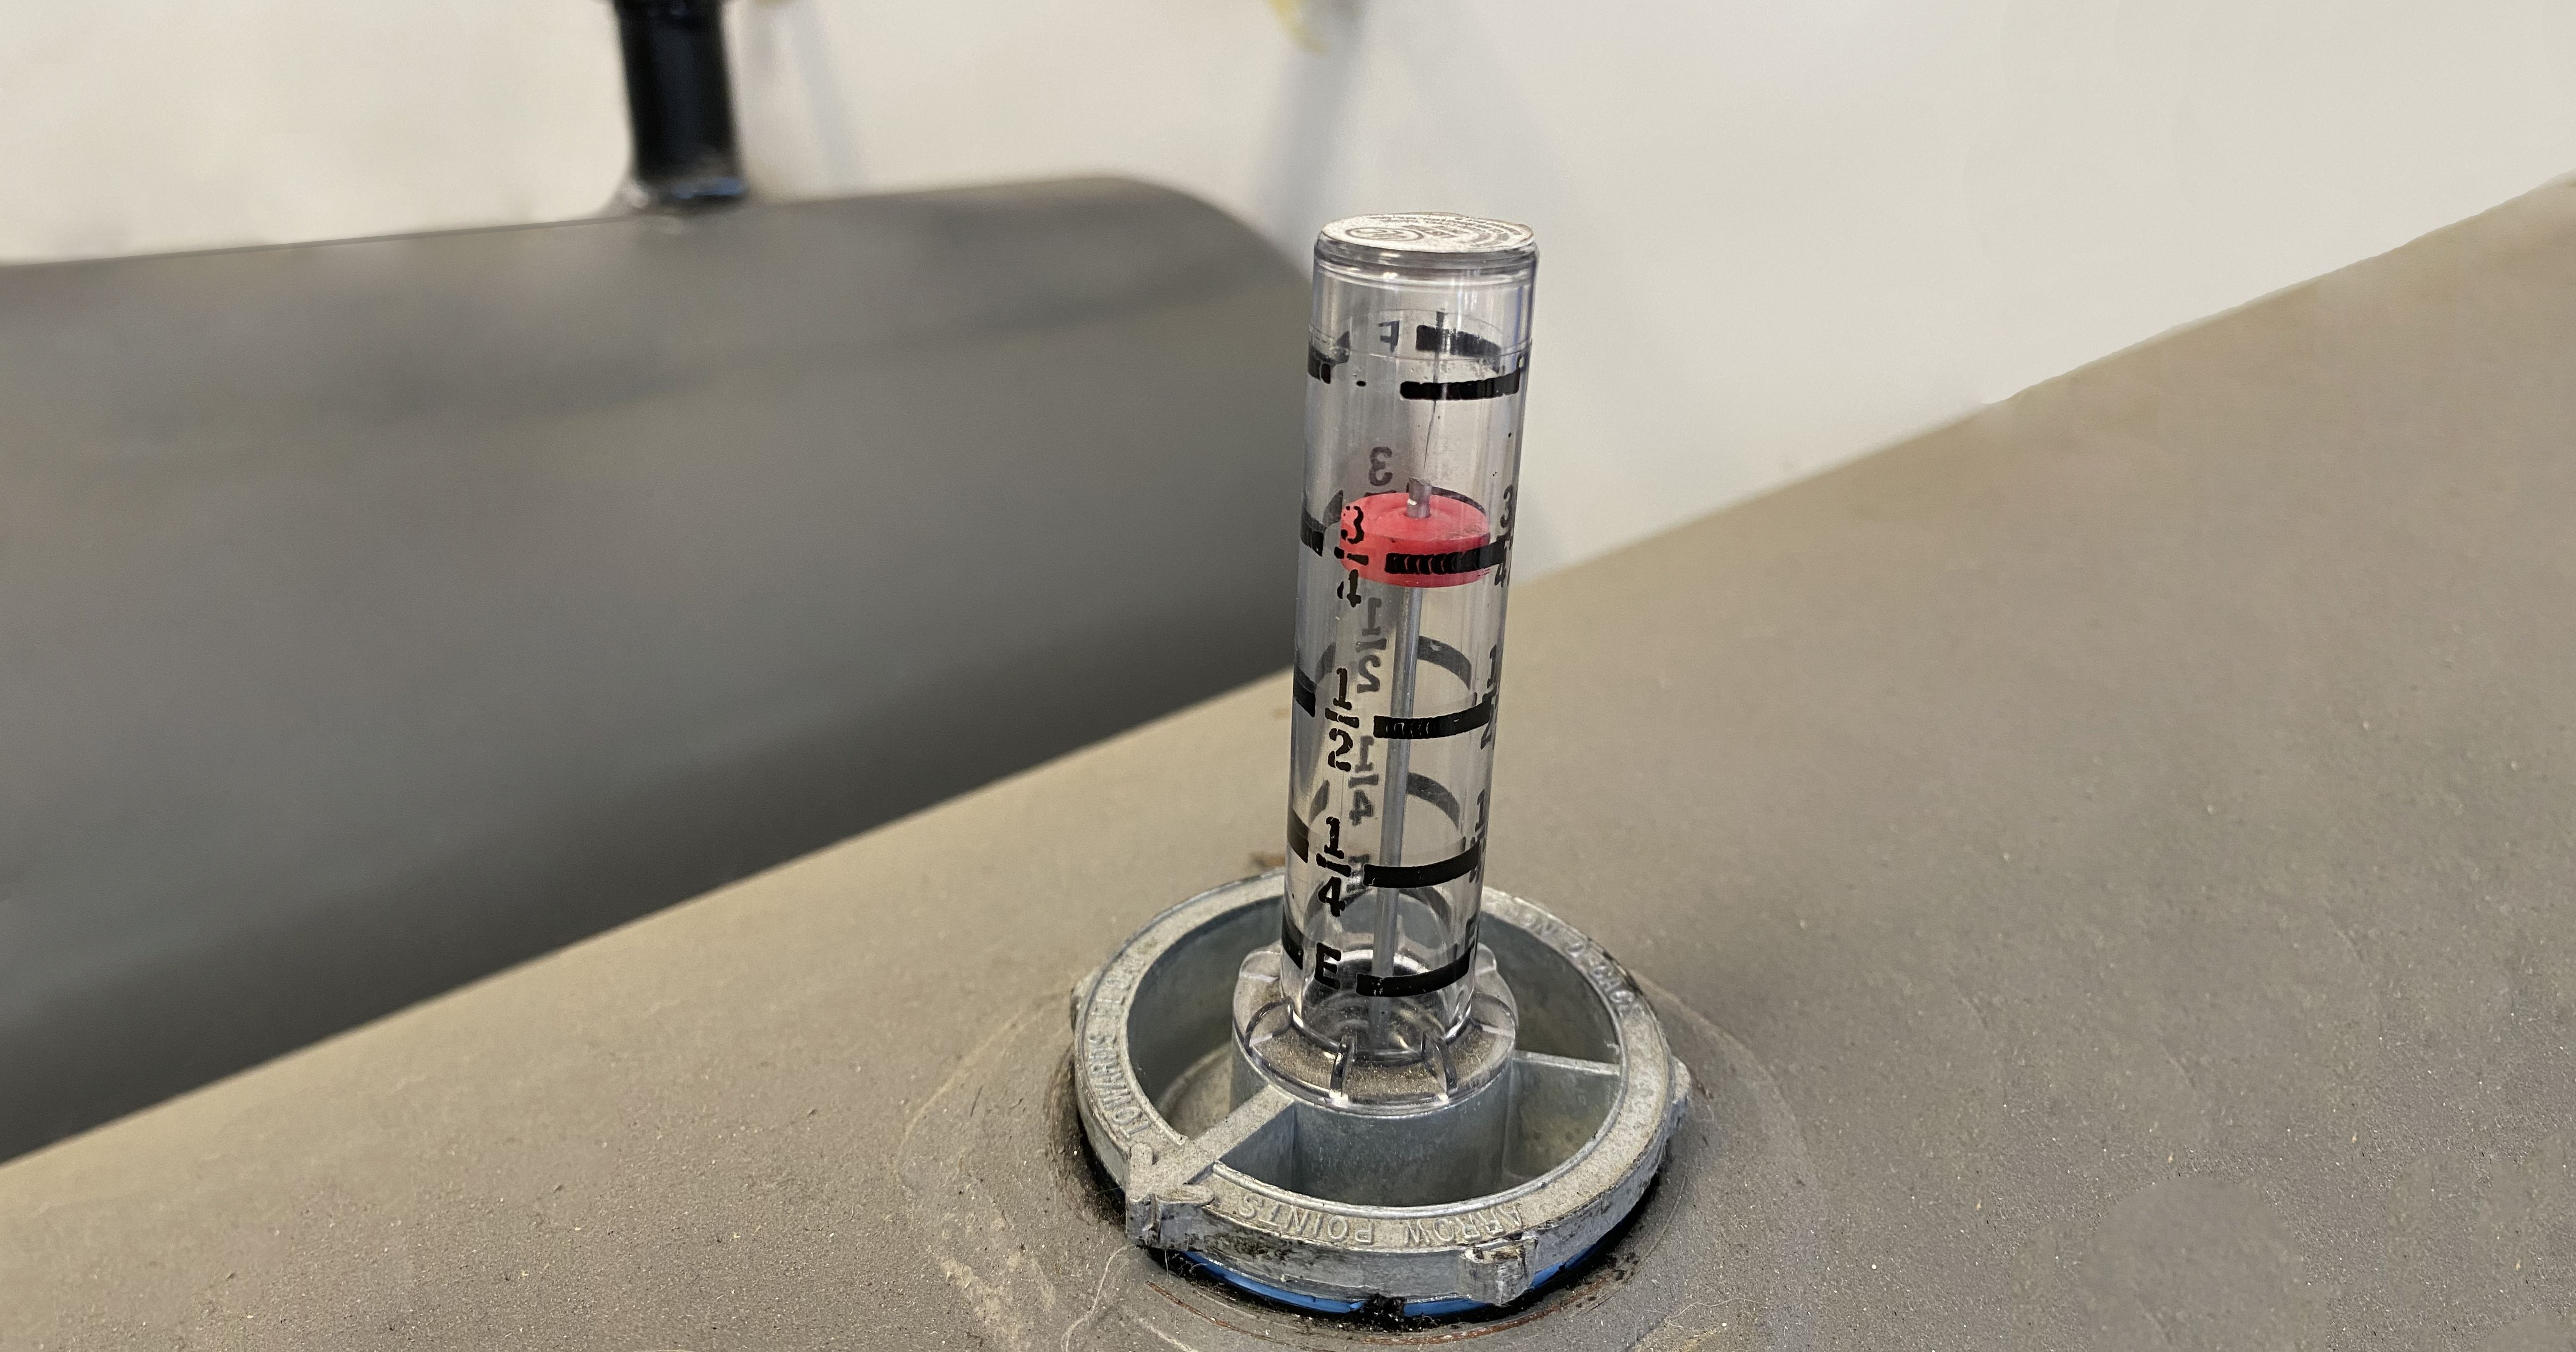
- Sight Gauges (also known as Tubular Gauges): These are simple transparent tubes installed on the side of the tank allowing you to visually see the oil level. They are less common but still used in some applications, particularly where visual inspection is preferred.
The best type for you will depend on the size and type of your tank, your budget, and your specific needs. Consult with a qualified technician for personalized recommendations.
Question 3: How do I read my oil level gauge (specifically a mechanical float gauge)?
Reading a mechanical float gauge is usually straightforward. Most gauges have a clear window or dial with markings indicating the oil level. The markings typically represent fractions of a tank, such as:
- F or Full: Tank is full.
- ¾: Tank is three-quarters full.
- ½: Tank is half full.
- ¼: Tank is one-quarter full.
- E or Empty: Tank is empty (or very nearly empty).
Simply look at the position of the indicator needle or float relative to these markings. If the needle is pointing at the "½" mark, your tank is approximately half full. Note that some gauges might have slightly different markings or scales, so familiarize yourself with your specific gauge.
It's crucial to check the gauge regularly, especially during periods of high heating demand. A general rule of thumb is to check it at least once a week.
Question 4: My oil level gauge seems stuck or is giving an inaccurate reading. What should I do?
A stuck or inaccurate oil level gauge can be a major problem, potentially leading to a run-out or overfilling. Here are some troubleshooting steps:
- Check for Obstructions: Inspect the area around the gauge for any debris or obstructions that might be preventing the float or indicator from moving freely. Clear away anything that is hindering its movement.
- Gently Tap the Gauge: Sometimes, a gentle tap on the gauge housing can dislodge a stuck float. Do this carefully and avoid applying excessive force.
- Inspect the Float Mechanism (If Accessible): If possible, carefully inspect the float mechanism inside the tank. Look for signs of corrosion, damage, or oil buildup that could be causing it to stick. Never attempt to repair the gauge yourself if you're not comfortable working with oil tanks.
- Check the Vent Pipe: A blocked vent pipe can create pressure imbalances in the tank, leading to inaccurate gauge readings. Ensure the vent pipe is clear of obstructions such as snow, ice, or debris.
- Temperature Fluctuations: Extreme temperature changes can sometimes affect the accuracy of mechanical gauges. If the reading seems off after a significant temperature swing, wait a few hours for the temperature to stabilize and recheck the gauge.
If these steps don't resolve the issue, call a qualified heating oil technician. A professional can properly diagnose the problem and repair or replace the gauge as needed. Ignoring a faulty gauge can be a costly mistake.
Question 5: How often should I replace my oil level gauge?
There's no hard and fast rule for how often to replace an oil level gauge. However, consider replacement if:
- The gauge is consistently inaccurate or unreliable. If you've tried troubleshooting and the gauge still isn't providing accurate readings, it's time to replace it.
- The gauge is physically damaged. Cracks, leaks, or other physical damage can compromise the gauge's functionality.
- The gauge is very old. Like any mechanical device, oil level gauges can wear out over time. A gauge that's been in service for many years may be nearing the end of its lifespan. A good rule of thumb is to consider replacing it every 10-15 years, even if it seems to be working fine. This helps prevent unexpected failures.
- During a tank replacement. When you replace your oil tank, it's a good idea to replace the oil level gauge at the same time to ensure that all components are new and compatible.
Regular maintenance and inspections can help prolong the life of your oil level gauge. However, it's important to be proactive and replace the gauge when necessary to avoid potential problems. A failing gauge can result in run-outs or overfills, both of which can be expensive and inconvenient. Don't delay in contacting a professional for replacement if you suspect an issue with your current gauge.
Question 6: Can I install an oil level gauge myself?
While some homeowners with plumbing or HVAC experience may be tempted to install an oil level gauge themselves, it's generally recommended to hire a qualified professional. Working with oil tanks and fuel lines can be dangerous, and improper installation can lead to leaks, spills, or other hazardous situations.
A professional technician will have the necessary training, tools, and experience to install the gauge safely and correctly, ensuring that it functions properly and meets all applicable codes and regulations. They can also inspect the tank and fuel lines for any potential problems and make recommendations for repairs or upgrades as needed.
Incorrect installations can have serious consequences, including environmental contamination and property damage. Furthermore, many oil tank warranties require professional installation of all components, including the oil level gauge. Attempting a DIY installation could void your warranty.
While it may seem like a cost-saving measure to install the gauge yourself, the risks and potential consequences far outweigh the benefits. Hiring a professional is the safest and most reliable way to ensure proper installation and prevent future problems.
Question 7: What are some signs that my oil tank might be leaking, even if the gauge seems fine?
While an oil level gauge is a primary indicator of fuel levels, it's important to be aware of other signs that your oil tank might be leaking, even if the gauge isn't showing an obvious drop. Leaks can be slow and subtle, and may not be immediately apparent on the gauge.
Here are some red flags to watch out for:
- Smell of Oil: A distinct odor of oil, especially near the tank or fill pipe, is a strong indication of a potential leak. Even a small leak can release a noticeable smell.
- Oil Stains: Check the area around the tank, fill pipe, and vent pipe for any signs of oil stains or spills. Look for discoloration on the ground, foundation, or nearby structures.
- Sudden Increase in Oil Consumption: If you notice that you're using more oil than usual, even with similar heating demands, it could be a sign of a leak. Compare your current oil consumption to previous years, taking into account weather patterns.
- Dampness or Wet Spots: Check for any dampness or wet spots around the base of the tank or on the surrounding floor. This could indicate a slow leak that's seeping out over time.
- Rust or Corrosion: Inspect the tank for any signs of rust or corrosion. These can weaken the tank's structure and eventually lead to leaks. Pay particular attention to the bottom of the tank, where moisture tends to accumulate.
- Discolored Soil or Vegetation: If you have an above-ground tank, check the soil and vegetation around it for any signs of discoloration or dying plants. Oil spills can contaminate the soil and harm plant life.
- Water in the Tank: While not directly indicative of a leak, the presence of water in the tank can accelerate corrosion and increase the risk of future leaks. If you suspect water in your tank, have it tested by a professional.
If you notice any of these signs, it's crucial to contact a qualified heating oil technician immediately. A professional can perform a thorough inspection of your tank and fuel lines to identify the source of the problem and recommend appropriate repairs or replacement. Ignoring a potential leak can lead to significant environmental damage and costly remediation efforts. Prevention is key, so regular tank inspections and prompt attention to any suspicious signs can help protect your property and the environment.