Open Cell Foam Insulation R Value
Have you noticed your energy bills creeping up, despite the installation of open cell foam insulation? Are some rooms noticeably colder in winter or hotter in summer than others? You might be facing a common issue: a perceived or actual drop in your open cell foam insulation's R-value. While open cell foam boasts excellent insulation properties, several factors can compromise its performance over time. This article provides a systematic approach to diagnose potential problems and explore simple DIY fixes before calling in a professional.
Understanding Open Cell Foam R-Value
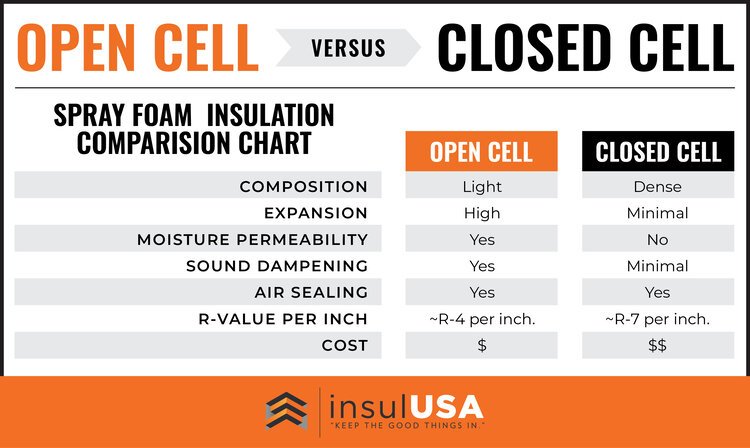
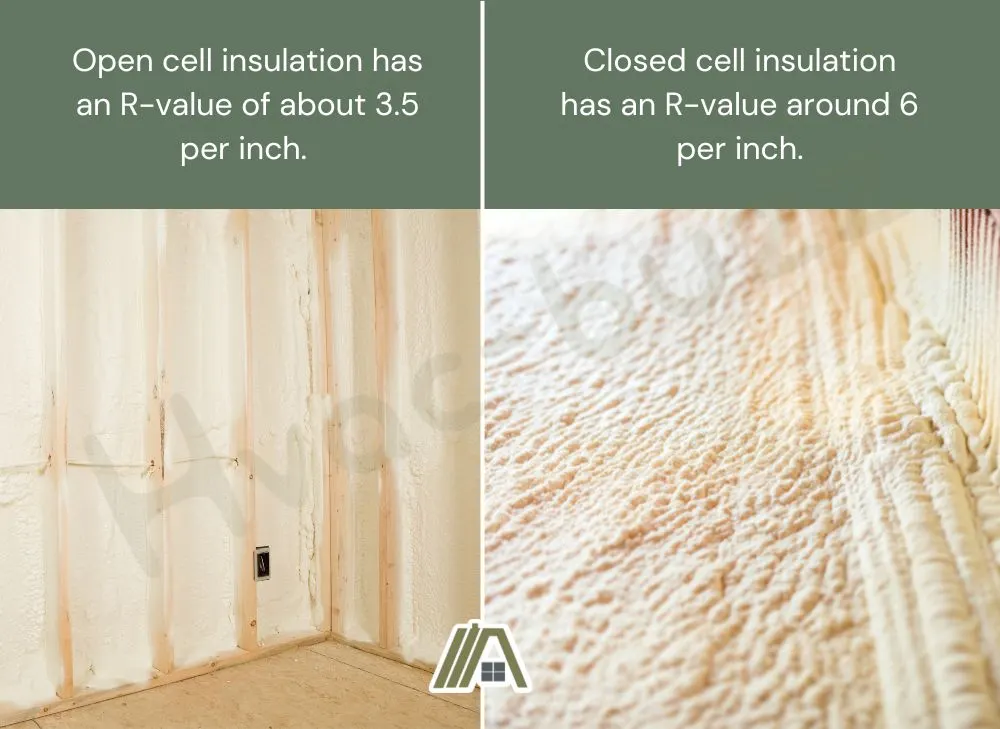
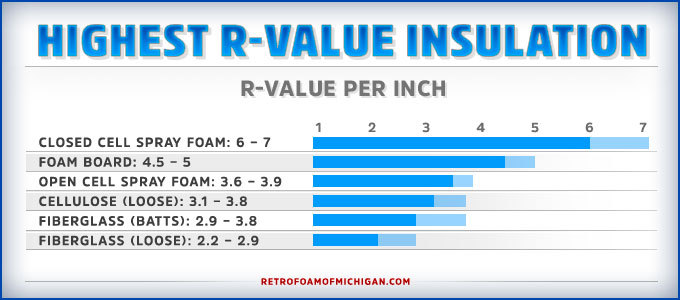
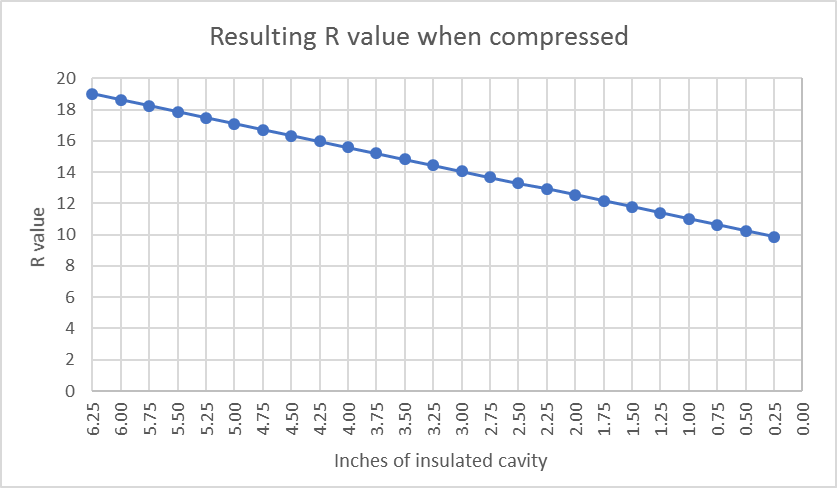
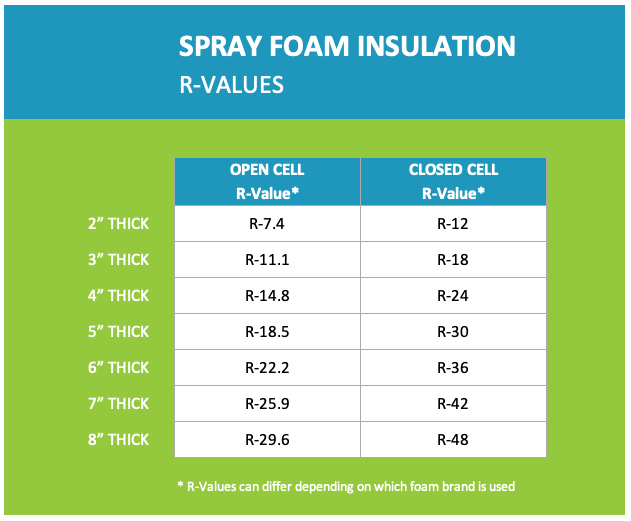
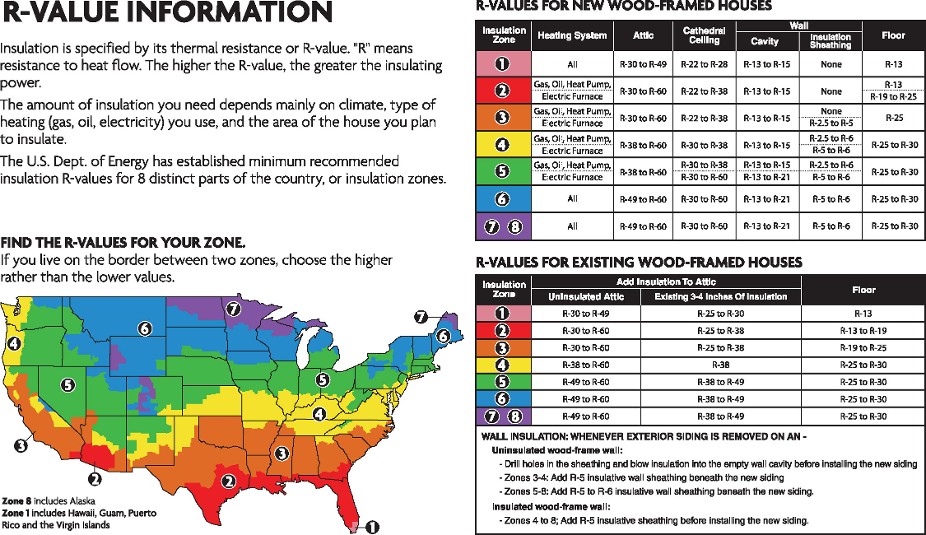
Before diving into troubleshooting, it's crucial to understand what R-value represents. The R-value measures thermal resistance – the ability of a material to resist heat flow. Higher R-values indicate better insulation. Open cell foam typically has an R-value of around R-3.5 to R-3.7 per inch. However, this is a nominal value achieved under ideal conditions. Various factors, as we'll discuss, can affect the real-world performance.
The Common Problem: Reduced Energy Efficiency
The most frequent complaint is a decrease in energy efficiency. This manifests as:
- Higher heating and cooling bills.
- Drafts or uneven temperatures in the house.
- Ice dams forming on the roof (in colder climates).
- Condensation problems or even mold growth in insulated areas.
If you're experiencing these issues, it's time to investigate your open cell foam insulation.
Step-by-Step Troubleshooting Guide
Step 1: Visual Inspection – The First Line of Defense
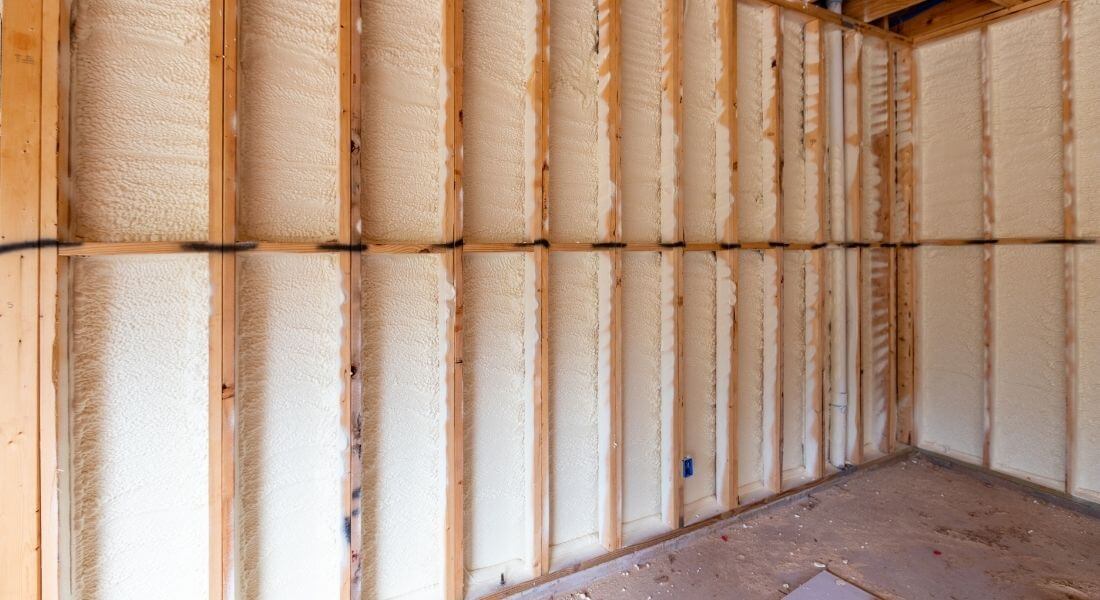
The first step is a thorough visual inspection. Safety first! Wear appropriate protective gear, including safety glasses, a dust mask or respirator, and gloves. Look for the following:
- Gaps or voids: Open cell foam should completely fill the cavity it's installed in. Look for any gaps around framing members, pipes, or wiring. Even small gaps can significantly reduce insulation effectiveness.
- Settling or shrinkage: While less common than with other types of insulation, open cell foam can occasionally shrink or settle over time, creating voids.
- Damage from pests: Rodents and insects can sometimes nest in or damage open cell foam. Look for signs of infestation, such as droppings, gnaw marks, or torn foam.
- Water damage: Open cell foam is relatively permeable to moisture, meaning it can absorb water. Look for signs of water stains, discoloration, or mold growth. Waterlogged foam loses much of its R-value.
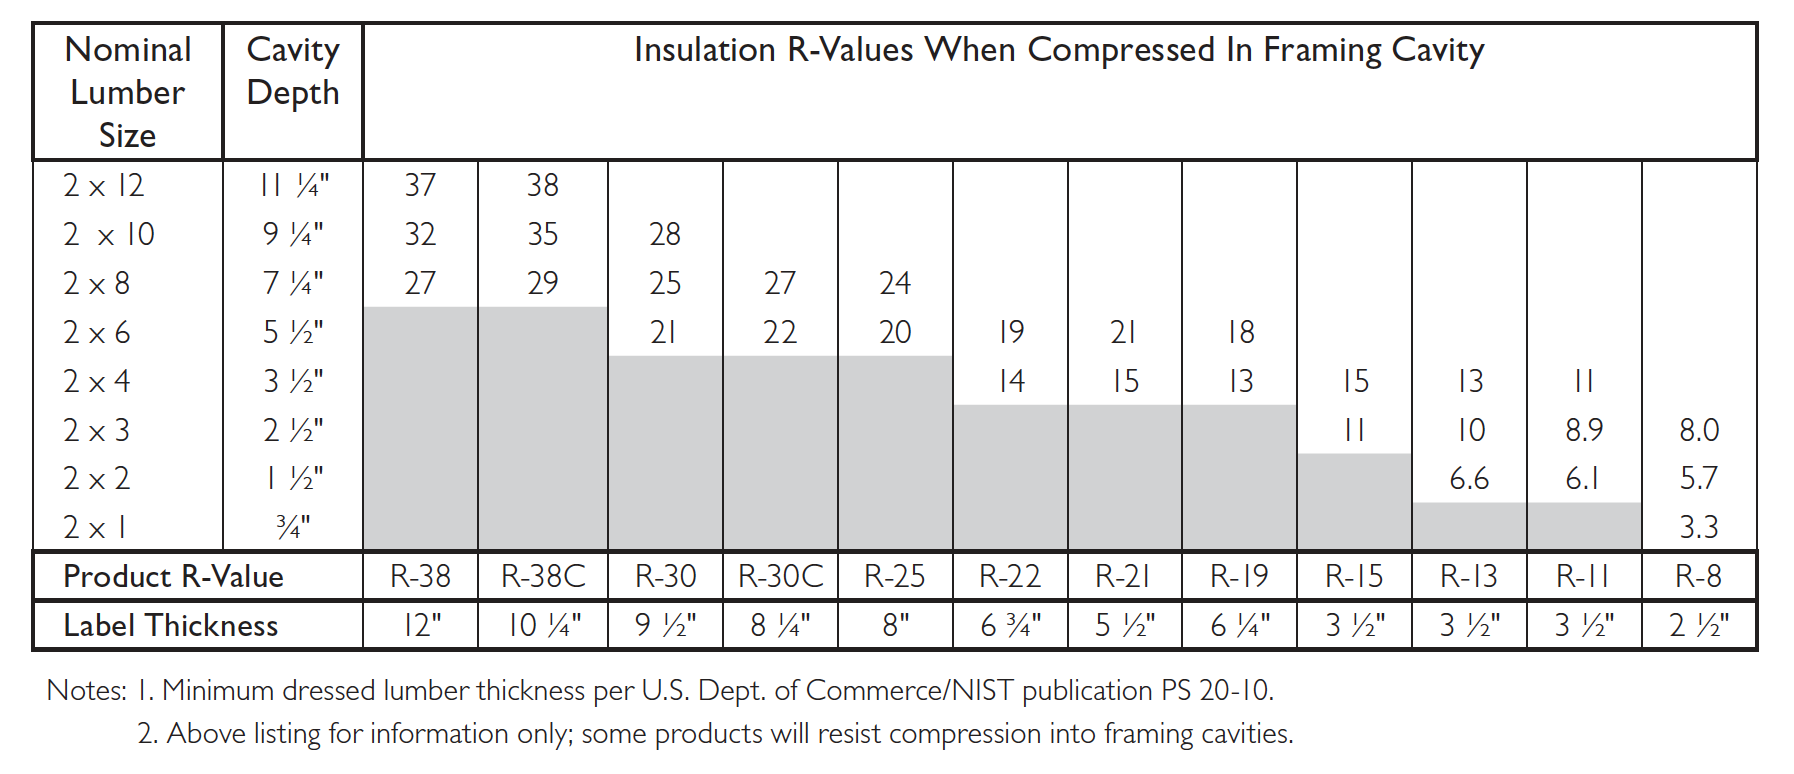
- Improper installation: Check if the foam was applied to the correct thickness. Measure the depth of the foam in several locations to ensure it meets the recommended R-value for your climate zone.
DIY Fix: If you find small gaps or voids, you can often fill them with spray foam insulation designed for sealing gaps and cracks. Be sure to follow the manufacturer's instructions carefully. Wear gloves and eye protection. For small pest damage, you can remove the affected area and fill it with spray foam, after addressing the pest issue. For minor shrinkage, careful application of compatible spray foam sealant can help fill the voids.
Step 2: Air Leakage Detection – The Blower Door Test (DIY Version)
Even if the foam appears intact, air leakage can significantly reduce its effectiveness. You can perform a simplified version of a blower door test to identify major air leaks.
- Choose a windy day: This will help amplify any drafts.
- Close all windows and doors: Ensure they are properly sealed.
- Turn off all combustion appliances: Furnaces, water heaters, and stoves should be off for safety.
- Turn on all exhaust fans: Bathroom fans, kitchen fans, and clothes dryers should be running to create negative pressure inside the house.
- Slowly walk around the house: Pay attention to areas where air leaks are common, such as around windows and doors, electrical outlets, plumbing penetrations, and attic access points.
- Use a lit incense stick or a piece of toilet paper: Hold it near potential leak locations and observe if the smoke or paper is drawn towards the area. This indicates an air leak.
DIY Fix: Seal identified air leaks with caulk, weatherstripping, or expanding foam. Pay particular attention to gaps around windows, doors, and where pipes or wires enter the house. Outlet and switch plate insulators can also help reduce drafts from electrical boxes. For larger gaps, consider using backer rod before applying caulk or sealant.
Step 3: Moisture Assessment – The Dampness Detective
Moisture is a major enemy of insulation. If you suspect moisture problems, investigate further. Consider these points:
- Check for leaks: Inspect your roof, gutters, and plumbing for any signs of leaks. Address any leaks immediately to prevent further damage.
- Assess ventilation: Ensure your attic and crawl space have adequate ventilation to prevent moisture buildup. Stagnant air can lead to condensation and mold growth.
- Monitor humidity levels: Use a hygrometer to monitor the humidity levels in your home. High humidity can contribute to moisture problems within the insulation.
DIY Fix: Improve ventilation by installing or upgrading attic vents. Repair any leaks promptly. Consider using a dehumidifier in damp areas of the house, especially crawl spaces. Ensure proper grading around the foundation to direct water away from the house.
Step 4: Evaluating Installation Quality – The Thickness Test
Improper installation is a common cause of reduced R-value. While you can't easily rectify a poorly installed foam job yourself, you can assess if the correct thickness was applied.
- Locate exposed foam: Find areas where you can see the thickness of the foam, such as in the attic, crawl space, or around rim joists.
- Measure the thickness: Use a ruler or measuring tape to measure the thickness of the foam in several locations.
- Compare to recommendations: Check the recommended R-value for your climate zone and the corresponding thickness of open cell foam required to achieve that R-value.
If the foam is significantly thinner than recommended, it could be a major contributor to your energy efficiency problems. Document your findings carefully, as this will be important when consulting with a professional.
When to Call a Professional
While many minor issues can be addressed with DIY fixes, some problems require professional intervention. Call a qualified insulation contractor or energy auditor in the following situations:
- Extensive water damage or mold growth: Addressing mold requires specialized equipment and techniques to prevent further spread and ensure proper remediation. Attempting to clean up large areas of mold yourself can be hazardous to your health.
- Significant pest infestation: A professional pest control company is needed to eliminate the infestation before any insulation repairs are made.
- Large areas of missing or damaged foam: Replacing large sections of open cell foam requires specialized equipment and expertise to ensure proper application and avoid creating new problems.
- Suspect installation problems: If you suspect the foam was not installed correctly in the first place (e.g., uneven application, insufficient density), a professional can assess the situation and recommend corrective measures.
- Persistent energy efficiency problems despite DIY efforts: If you've tried the DIY fixes outlined above and are still experiencing significant energy efficiency problems, a professional energy audit can help identify underlying issues and recommend more comprehensive solutions.
- You are uncomfortable working in confined spaces or with insulation materials: Safety is paramount. If you are not comfortable performing any of the DIY tasks outlined above, it's always best to err on the side of caution and call a professional.
Don't hesitate to seek professional advice. An experienced contractor can properly assess the situation, identify the root cause of the problem, and recommend the most effective and cost-efficient solution. A blower door test performed by a professional will pinpoint air leakage issues much more accurately than a DIY test.
Preventative Measures
The best way to maintain the R-value of your open cell foam insulation is to prevent problems from occurring in the first place. Consider these preventative measures:
- Ensure proper installation: Hire a qualified and experienced insulation contractor to install your open cell foam insulation. Make sure they follow the manufacturer's recommendations and local building codes.
- Maintain your roof and gutters: Regularly inspect your roof and gutters for leaks and damage. Repair any problems promptly to prevent water from entering your home and damaging the insulation.
- Control moisture: Ensure your attic and crawl space are properly ventilated to prevent moisture buildup. Use a dehumidifier in damp areas of the house.
- Prevent pest infestations: Take steps to prevent rodents and insects from entering your home. Seal any cracks or openings in your foundation and around pipes and wires. Keep your yard clean and free of debris.
- Regularly inspect your insulation: Periodically inspect your open cell foam insulation for any signs of damage or deterioration. Address any problems promptly to prevent them from escalating.
By following these troubleshooting steps and preventative measures, you can help maintain the R-value of your open cell foam insulation and ensure that your home remains comfortable and energy-efficient for years to come. Remember, early detection and proactive maintenance are key to preserving the performance of your insulation.