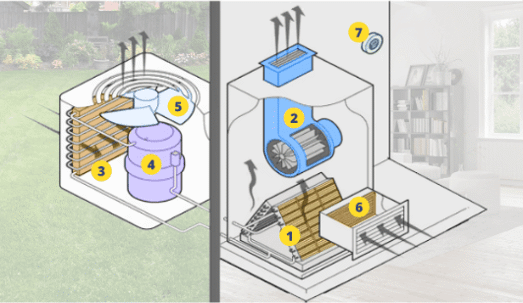
Parts Of A Central Air Unit
One of the most frustrating issues a homeowner can face is a central air conditioning unit that's blowing warm air, or worse, not blowing air at all. Before you resign yourself to a sweaty summer and a hefty repair bill, let's walk through some common culprits and simple troubleshooting steps you can take. This guide is designed to help you diagnose the problem and potentially fix it yourself, while also recognizing when it's time to call in the pros. Remember, safety is paramount; always turn off the power to your AC unit at the breaker before performing any inspections or maintenance.
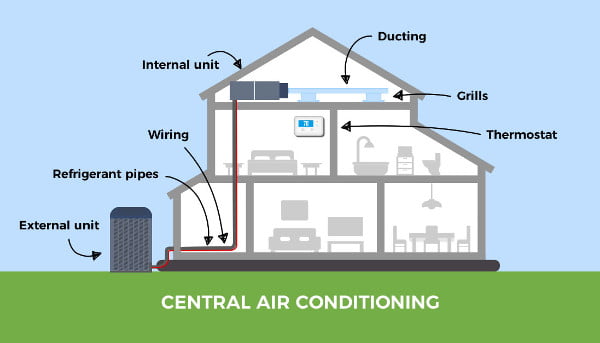
Understanding Your Central Air Unit's Anatomy
Before diving into troubleshooting, it’s helpful to understand the basic components of your central air conditioning system. Knowing what each part does will make the diagnostic process much smoother.
1. The Thermostat
The thermostat is the brain of your system. It senses the temperature and signals the AC unit to turn on or off to maintain your desired setting. A faulty thermostat can cause a variety of problems, including the unit not turning on at all, or running constantly.
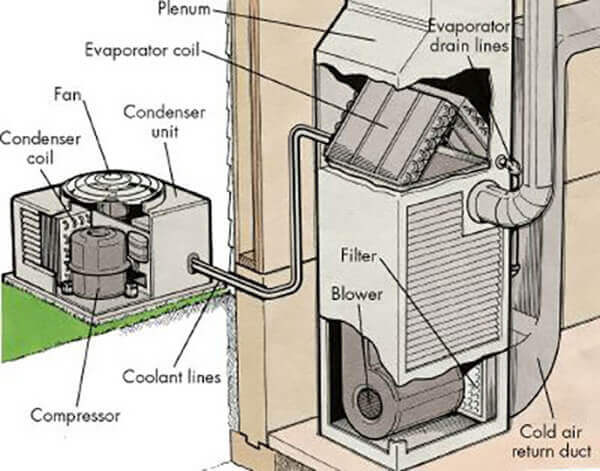
2. The Outdoor Unit (Condenser)
The outdoor unit, also known as the condenser, is typically a large, metal box located outside your house. It contains several key components:
- Compressor: This is the heart of the system, pumping refrigerant throughout the AC unit.
- Condenser Coil: This coil releases heat from the refrigerant into the outside air.
- Fan: The fan helps to dissipate heat from the condenser coil.
- Capacitor: A capacitor provides the electrical surge needed to start the fan motor and compressor.
3. The Indoor Unit (Evaporator)
The indoor unit, usually located inside your furnace or air handler, also contains important parts:
- Evaporator Coil: This coil absorbs heat from the air inside your home, cooling it down.
- Blower Fan: This fan circulates the cooled air throughout your ductwork and into your home.
- Expansion Valve: This valve regulates the flow of refrigerant into the evaporator coil.
4. Refrigerant Lines
These copper pipes carry the refrigerant between the indoor and outdoor units. Refrigerant is the substance that absorbs and releases heat, enabling the cooling process.
5. Air Filter
The air filter is usually located near the indoor unit. Its primary function is to trap dust, pollen, and other particles, preventing them from circulating throughout your home and protecting the AC system components.
Troubleshooting Steps: Warm Air Woes
Now, let's get to the heart of the matter: your AC is blowing warm air. Follow these steps to systematically diagnose the issue.
Step 1: Check the Thermostat
This might seem obvious, but it’s the most common cause of the problem. Make sure your thermostat is:
- Set to COOL mode.
- Set to a temperature lower than the current room temperature.
- Powered on and displaying correctly.
DIY Fix: If the thermostat is battery-powered, try replacing the batteries. If it’s hardwired, ensure the breaker is on. If the thermostat still isn't working, consult the user manual or consider replacing it. A basic thermostat is an inexpensive DIY project.
When to Call a Pro: If you suspect the thermostat itself is faulty and you are uncomfortable replacing it, or if replacing it doesn't solve the problem, it's time to call an HVAC technician.
Step 2: Inspect the Air Filter
A dirty air filter is a major culprit for reduced airflow and warm air. A clogged filter restricts airflow over the evaporator coil, causing it to freeze up and preventing proper cooling.
DIY Fix: Remove the air filter and hold it up to the light. If you can barely see through it, it’s time to replace it. Replace it with a new filter of the correct size and type. Aim to change your air filter every 1-3 months, or more often if you have pets or allergies.
When to Call a Pro: If replacing the filter doesn't improve airflow or if you notice ice buildup on the indoor unit's evaporator coil, there may be a more significant issue requiring professional attention.
Step 3: Examine the Outdoor Unit (Condenser)
Head outside and inspect the condenser unit for any obvious problems.
- Debris: Check for leaves, grass clippings, or other debris blocking the unit's fins.
- Ice: Look for ice buildup on the refrigerant lines or the unit itself.
- Fan Operation: Ensure the fan is running when the AC is turned on.
DIY Fix:
- Carefully remove any debris from the condenser fins. You can use a garden hose (on a gentle setting) to spray the fins from the inside out.
- If you see ice buildup, turn off the AC unit and allow the ice to melt completely. This could take several hours. Once melted, try running the AC again and see if the problem recurs. The filter being blocked may be the culprit here.
When to Call a Pro: If the fan is not running, or running erratically, or if ice buildup persists after cleaning the unit and changing the filter, it's a sign of a more serious problem, such as a faulty capacitor, compressor, or refrigerant leak. Do not attempt to repair these components yourself. Refrigerant handling requires specialized equipment and training.
Step 4: Check the Circuit Breaker
A tripped circuit breaker can cut power to the AC unit, preventing it from running. Locate your home's electrical panel and check the breaker for the AC unit. It's usually a double breaker (two switches connected together).
DIY Fix: If the breaker is tripped (in the "off" or middle position), flip it completely to the "off" position, then back to the "on" position. If the breaker trips again immediately, there's likely a short circuit or another electrical problem.
When to Call a Pro: If the breaker trips repeatedly, do not continue resetting it. This indicates a serious electrical issue that could damage your AC unit or even pose a fire hazard. Call a qualified electrician or HVAC technician to diagnose and repair the problem.
Step 5: Inspect Refrigerant Lines (Visually)
Visually inspect the refrigerant lines running between the indoor and outdoor units. Look for any signs of damage, such as dents, kinks, or oil leaks.
DIY Fix: Unfortunately, there's not much you can do yourself if you suspect a refrigerant leak. Handling refrigerant is a job for certified professionals only.
When to Call a Pro: If you see any signs of damage or suspect a refrigerant leak (e.g., hissing sound, oily residue), call an HVAC technician immediately. Refrigerant leaks are harmful to the environment and can reduce the efficiency of your AC unit.
Step 6: Check the Condensate Drain Line
The condensate drain line removes water that condenses on the evaporator coil. A clogged drain line can cause water to back up, potentially damaging your system and leading to mold growth.
DIY Fix: Locate the condensate drain line, usually a PVC pipe near the indoor unit. You may see water dripping from it. If it's dry or you suspect a clog, try the following:
- Wet/Dry Vacuum: Attach a wet/dry vacuum to the end of the drain line and try to suck out any clogs.
- Pouring Water: Carefully pour a cup of water down the drain line to see if it drains freely.
- Vinegar Solution: Periodically (every few months) pour a cup of white vinegar down the drain line to prevent clogs.
When to Call a Pro: If you are unable to clear the clog using the above methods, or if you notice water damage around the indoor unit, call an HVAC technician.
Preventive Maintenance: Keeping Your AC Running Smoothly
Regular preventive maintenance can help you avoid many of the problems discussed above and extend the life of your AC unit. Here are a few simple things you can do:
- Change your air filter regularly (every 1-3 months).
- Keep the outdoor unit clear of debris.
- Periodically clean the condenser fins with a garden hose.
- Consider a professional tune-up at least once a year. An HVAC technician can inspect the system, clean the coils, check refrigerant levels, and identify potential problems before they become major issues.
Knowing When to Call a Professional
While many AC problems can be resolved with simple DIY troubleshooting, there are situations where professional help is essential. Call a qualified HVAC technician if:
- You suspect a refrigerant leak.
- The compressor is not working.
- The fan motor is not running.
- There is ice buildup on the coils that persists after cleaning the unit and changing the filter.
- The circuit breaker trips repeatedly.
- You are uncomfortable working with electrical components.
- You have exhausted all the DIY troubleshooting steps and the problem persists.
By following these steps, you can gain a better understanding of your central air conditioning system and potentially save yourself time and money. Remember to prioritize safety and don't hesitate to call a professional when needed. Staying cool this summer is within your reach!


:max_bytes(150000):strip_icc()/what-are-central-air-conditioners-1152645_V2-390c6f1f6ca14b4ebc59426f226a78a8.png)