Parts Of A Mini Split System

Understanding Your Mini Split System: A Homeowner's Guide
Mini-split systems, also known as ductless systems, are a popular choice for heating and cooling individual rooms or small spaces. They offer energy efficiency and flexible installation, but understanding their components is crucial for proper maintenance and troubleshooting. This guide will break down the key parts of a mini-split system, helping you identify issues and decide when to tackle a repair yourself or call a professional.
The Outdoor Unit: The Heart of the System
The outdoor unit is where the main components responsible for the heat exchange process reside. It's typically installed on a concrete pad or mounted to an exterior wall.
- Compressor: The compressor is the engine of the system. It pumps refrigerant throughout the system, changing its pressure and temperature. A failing compressor usually requires professional replacement.
- Condenser Coil: The condenser coil rejects heat from the refrigerant to the outside air during cooling mode and absorbs heat during heating mode. Keep it clean for optimal performance.
- Condenser Fan: The condenser fan blows air across the condenser coil to facilitate heat transfer. A faulty fan motor can lead to overheating and reduced efficiency.
- Reversing Valve: The reversing valve switches the flow of refrigerant, allowing the system to switch between heating and cooling modes. A malfunctioning valve can result in the unit only working in one mode.
- Electrical Components: The outdoor unit houses various electrical components, including capacitors, contactors, and circuit boards, controlling the operation of the unit. Only trained professionals should work on these.
Safety First: Before inspecting or cleaning the outdoor unit, always disconnect the power at the breaker. Be cautious of sharp fins on the condenser coil.
The Indoor Unit: Delivering Comfort
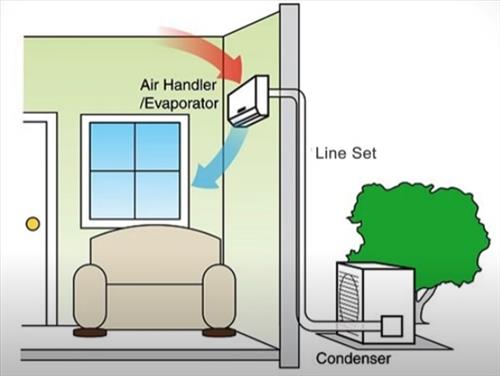
The indoor unit, also called the air handler, is mounted on a wall or ceiling inside the room you want to condition. It's responsible for circulating air and distributing heated or cooled air.
- Evaporator Coil: The evaporator coil absorbs heat from the room air during cooling mode and rejects heat during heating mode. Like the condenser coil, keeping it clean is vital.
- Blower Fan: The blower fan circulates air across the evaporator coil and distributes it into the room. A noisy or malfunctioning blower fan can impact airflow.
- Air Filters: Air filters remove dust, pollen, and other particles from the air. Regular cleaning or replacement is essential for air quality and system performance.
- Control Board: The control board manages the operation of the indoor unit, including fan speed, temperature settings, and communication with the outdoor unit.
- Remote Control Receiver: The remote control receiver receives signals from the remote control, allowing you to adjust the settings of the unit.
- Drain Pan and Drain Line: The drain pan collects condensation from the evaporator coil, and the drain line carries it away. A clogged drain line can lead to water leaks.
DIY Tip: Regularly clean or replace your air filters. A dirty filter restricts airflow, making the system work harder and reducing its efficiency. Check your drain line for clogs by pouring a cup of water into the drain pan and observing if it drains properly.
Connecting the Units: The Line Set
The line set connects the indoor and outdoor units, carrying refrigerant and electrical wiring between them.
- Refrigerant Lines: The refrigerant lines are copper pipes that carry refrigerant between the indoor and outdoor units. Proper insulation is crucial to prevent heat loss or gain.
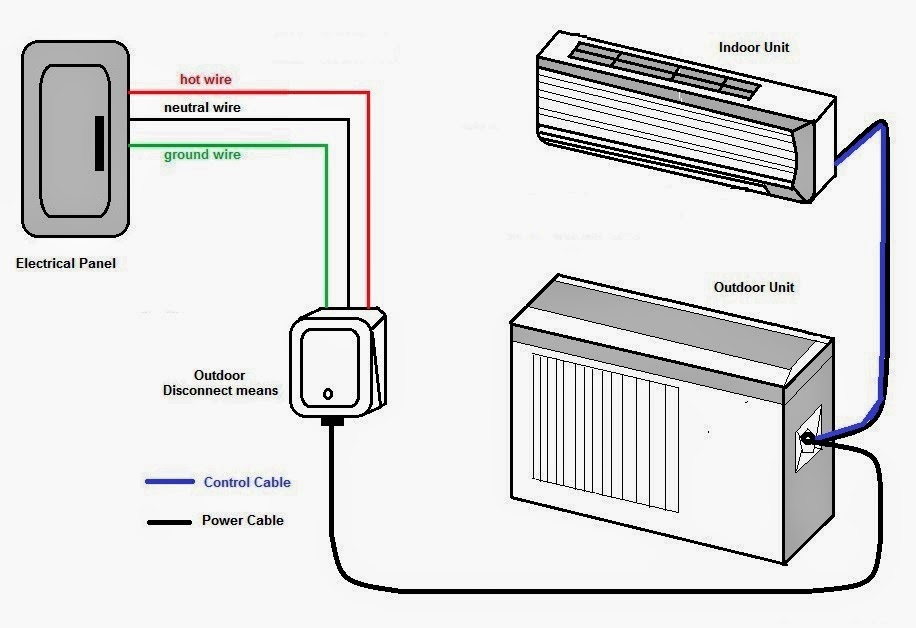
- Electrical Wiring: The electrical wiring provides power and communication between the indoor and outdoor units.
- Insulation: Insulation covers the refrigerant lines to minimize heat transfer and improve efficiency. Damaged or missing insulation should be replaced.
Warning: Working with refrigerant lines requires specialized tools and knowledge. Improper handling can be dangerous and can damage the environment. Always consult a qualified HVAC technician for repairs involving refrigerant.
Essential Accessories
Several accessories enhance the functionality and performance of your mini-split system.
- Remote Control: The remote control allows you to adjust the temperature, fan speed, and other settings from a distance.
- Mounting Bracket: The mounting bracket secures the indoor unit to the wall or ceiling.
- Condensate Pump (Optional): A condensate pump is used when the drain line cannot rely on gravity to drain properly.
- Line Set Cover: A line set cover conceals and protects the line set running between the indoor and outdoor units.
Troubleshooting Common Mini-Split Problems
Many mini-split issues can be resolved with simple troubleshooting. However, when in doubt, it's always best to call a qualified HVAC technician.
- Unit Not Turning On:
- Check the power supply and circuit breaker.
- Replace the remote control batteries.
- Ensure the unit is properly programmed and not in "sleep" mode.
- Weak Airflow:
- Clean or replace the air filter.
- Check for obstructions in the air vents.
- Ensure the blower fan is operating correctly.
- Unit Blowing Warm Air (Cooling Mode) or Cold Air (Heating Mode):
- Check the temperature settings and mode selection.
- Clean the condenser coil.
- Consider a refrigerant leak – call a professional.
- Water Leaking:
- Check the drain line for clogs.
- Ensure the drain pan is properly positioned.
- Inspect the condensate pump (if applicable).
- Unusual Noises:
- Check for loose components or debris in the blower fan.
- A buzzing sound from the outdoor unit could indicate a capacitor issue – call a professional.
DIY vs. Professional Repairs: Knowing Your Limits
While some maintenance tasks and minor repairs can be handled by homeowners, more complex issues require the expertise of a qualified HVAC technician. Consider these factors when deciding whether to DIY or call a pro:
- Complexity of the Repair: Simple tasks like cleaning filters or checking the drain line are usually safe for DIY. Repairs involving refrigerant, electrical components, or the compressor should be left to professionals.
- Your Skill Level: Be honest about your abilities. If you're not comfortable working with electrical wiring or handling tools, it's best to call a professional.
- Safety Concerns: Working with electricity and refrigerant can be dangerous. Always prioritize safety and take necessary precautions.
- Warranty: Attempting repairs yourself may void the manufacturer's warranty.
When to Call a Professional:
- Refrigerant leaks
- Compressor failures
- Electrical issues
- Reversing valve problems
- Any repair that requires specialized tools or knowledge
Estimated Repair Costs
Repair costs for mini-split systems can vary depending on the problem and the cost of parts and labor in your area. Here are some rough estimates:
- Air Filter Replacement: $10 - $30 (DIY)
- Drain Line Cleaning: $50 - $150 (DIY or professional)
- Capacitor Replacement: $100 - $300 (Professional)
- Blower Motor Replacement: $200 - $500 (Professional)
- Compressor Replacement: $800 - $2000+ (Professional)
- Refrigerant Leak Repair: $200 - $600+ (Professional)
Note: These are just estimates. Get quotes from multiple HVAC contractors to ensure you're getting a fair price. Always ask for a detailed breakdown of the costs involved.
Extending the Life of Your Mini-Split System
Proper maintenance can significantly extend the life of your mini-split system and prevent costly repairs. Here are some tips:
- Regularly clean or replace air filters.
- Clean the condenser and evaporator coils annually.
- Check the drain line for clogs regularly.
- Schedule professional maintenance checks at least once a year.
- Keep the area around the outdoor unit clear of debris.
By understanding the parts of your mini-split system and following these maintenance tips, you can keep it running efficiently and effectively for years to come.