Parts Of An Air Handling Unit

Is your home feeling more like a sauna in the summer or an icebox in the winter, despite your HVAC system running? A common culprit is a malfunctioning air handling unit (AHU). This vital component is the heart of your forced-air system, responsible for circulating conditioned air throughout your home. Don't fret! Before calling a costly HVAC technician, let's walk through some practical troubleshooting steps you can take to identify and potentially resolve the issue.
Understanding Your Air Handling Unit
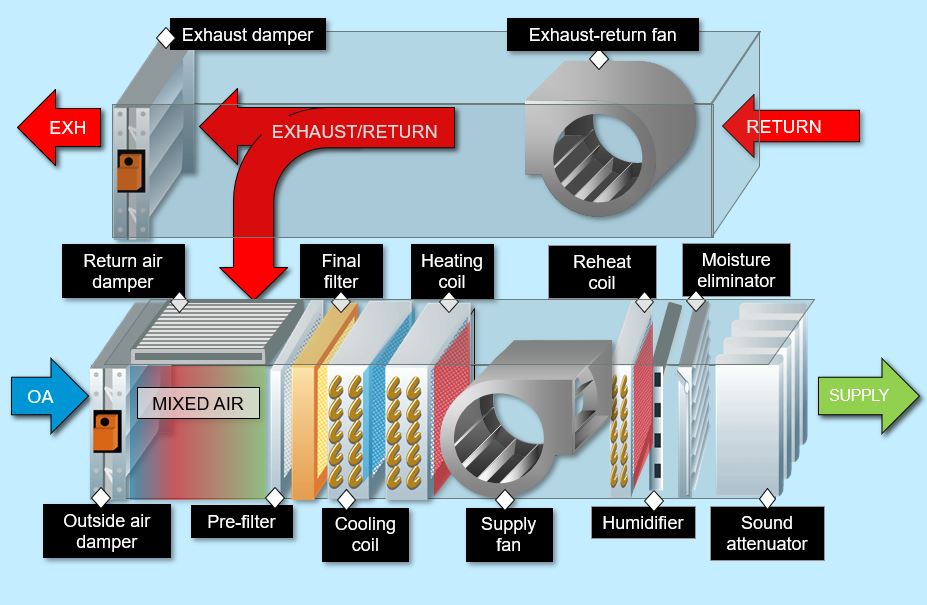
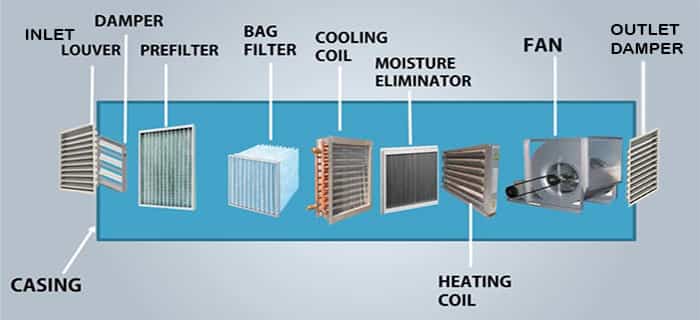
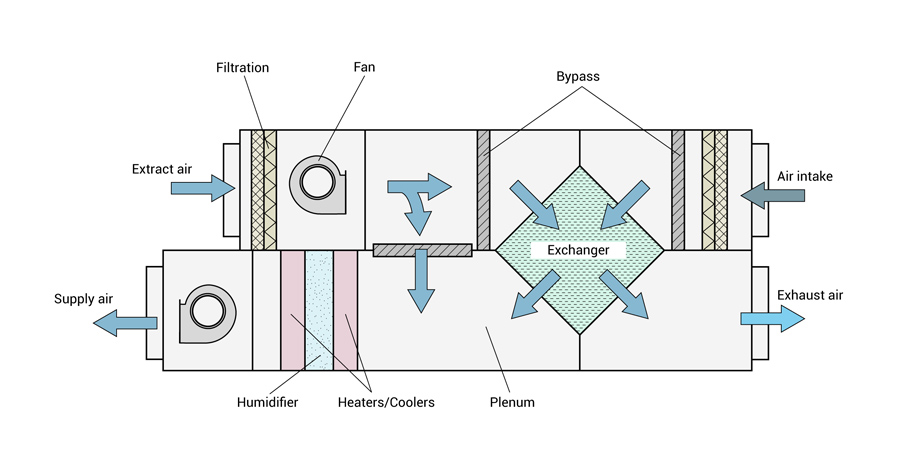
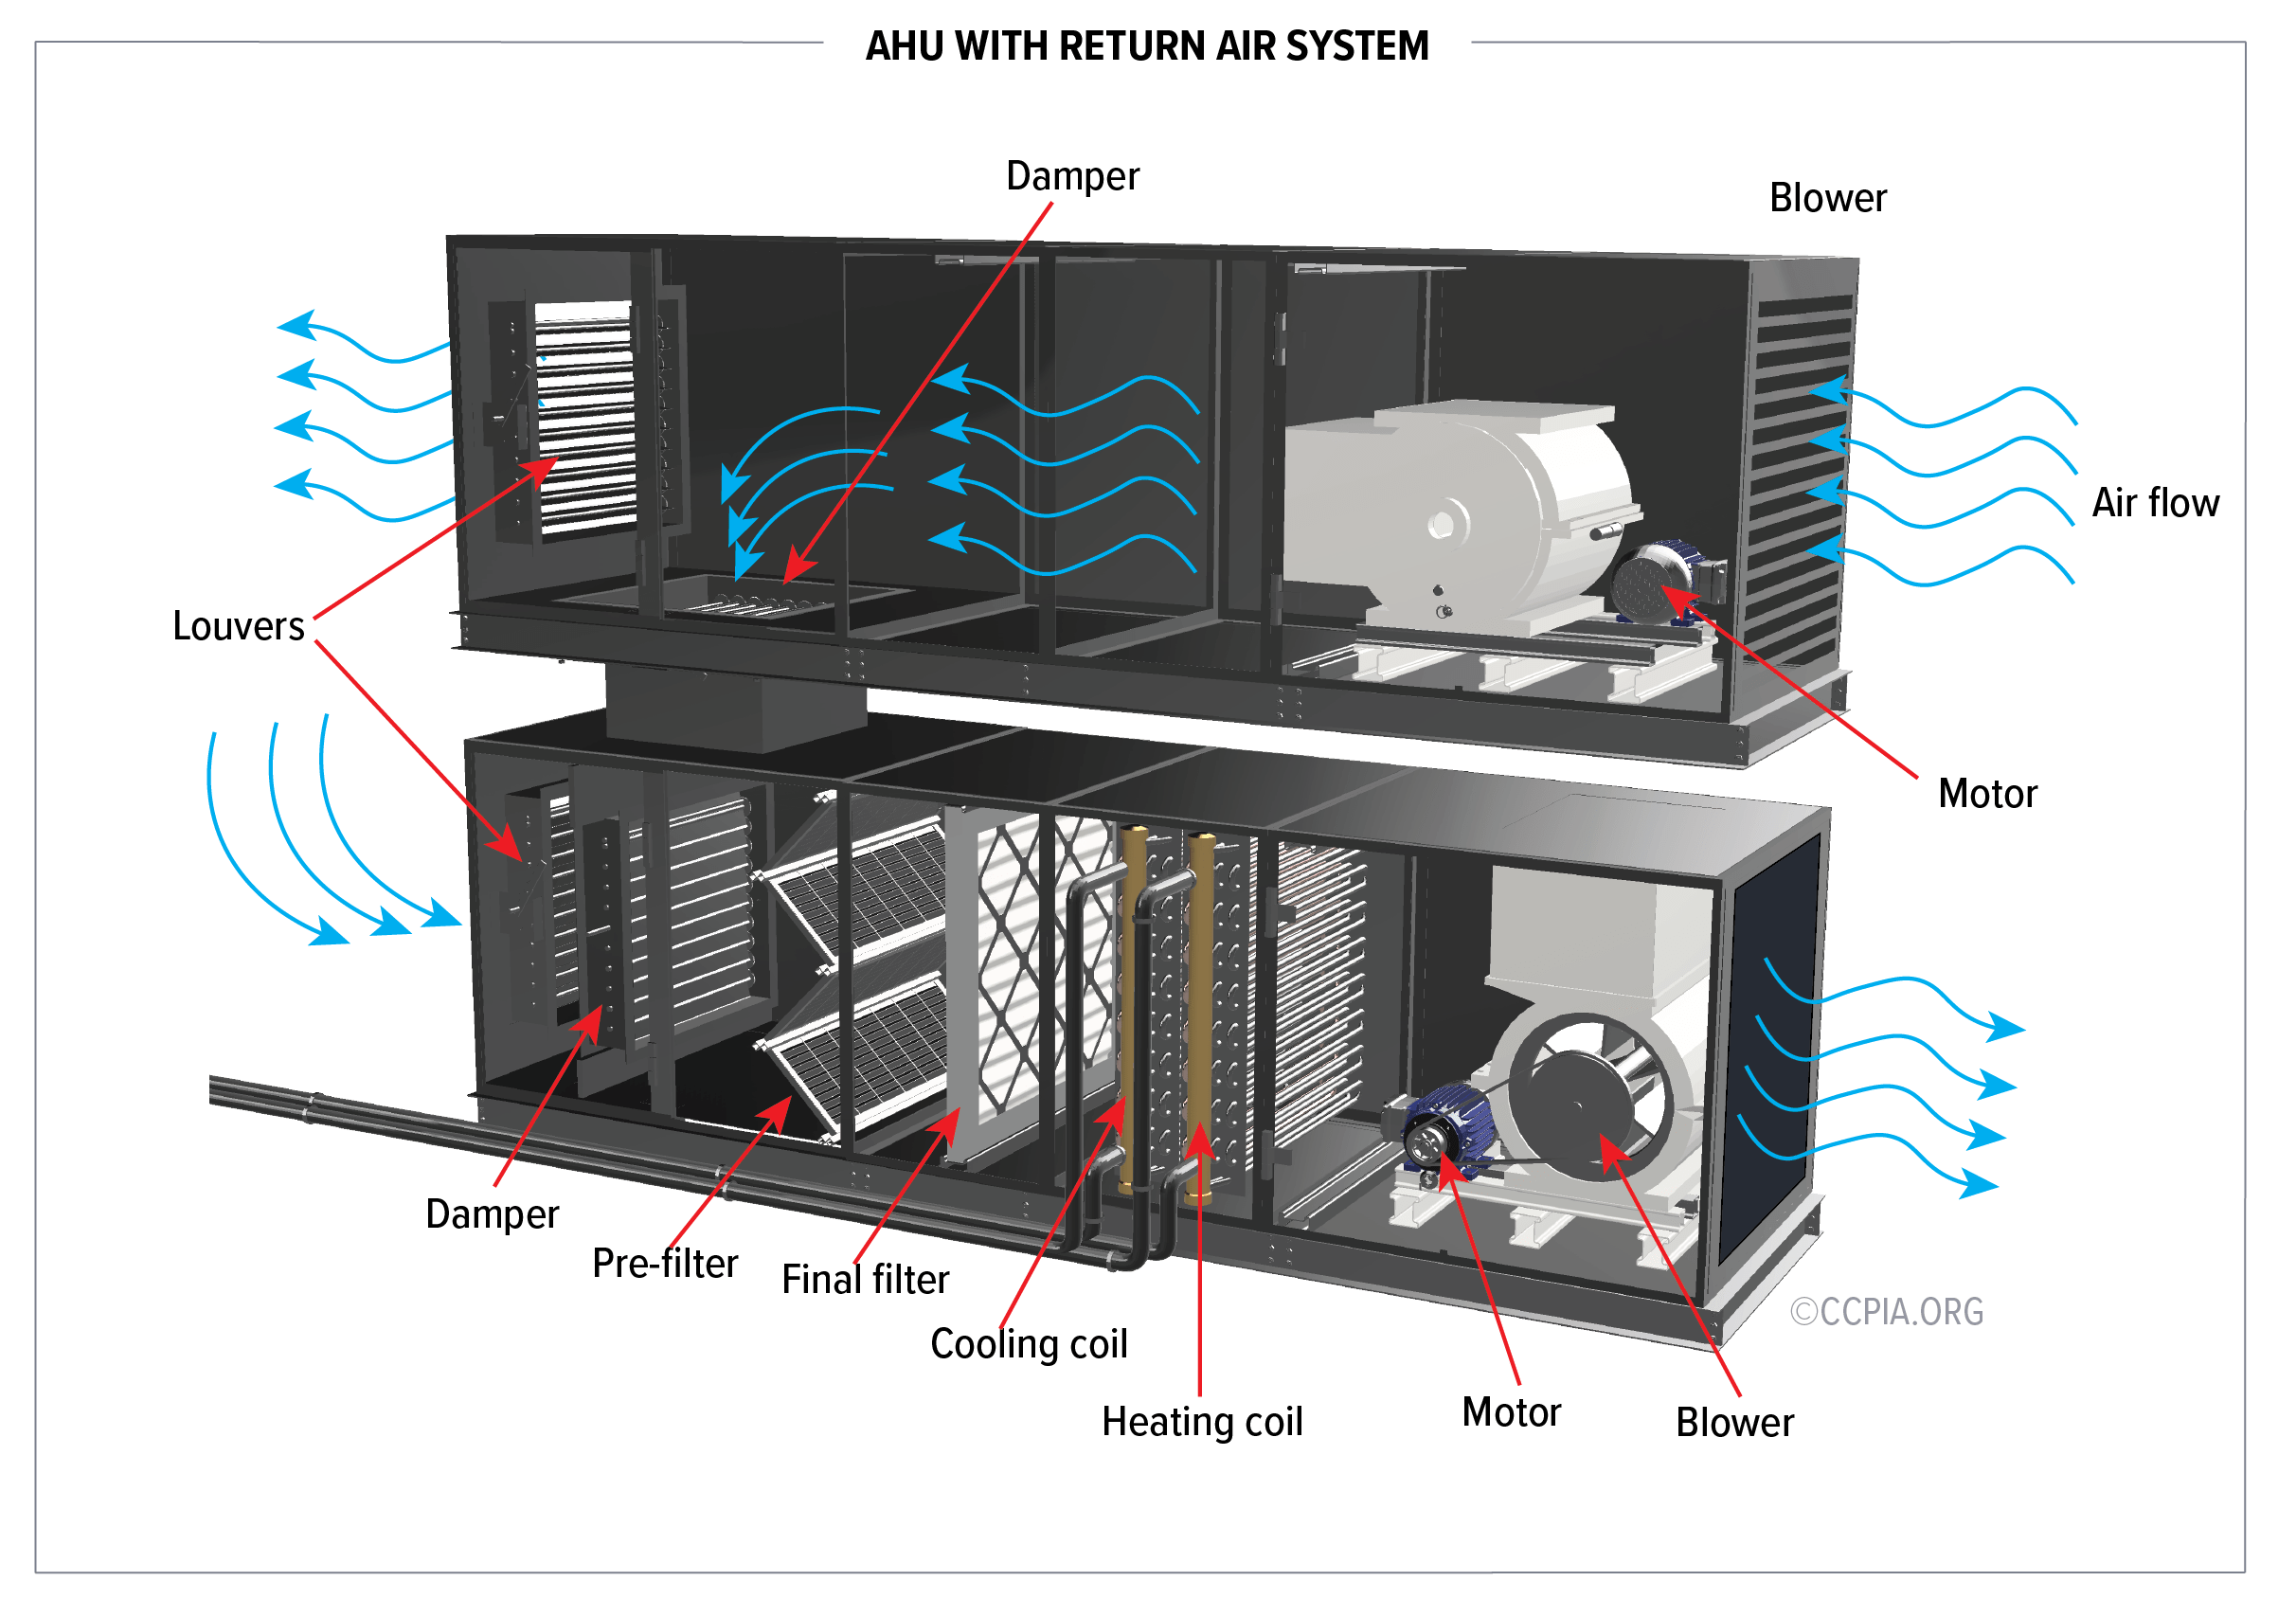
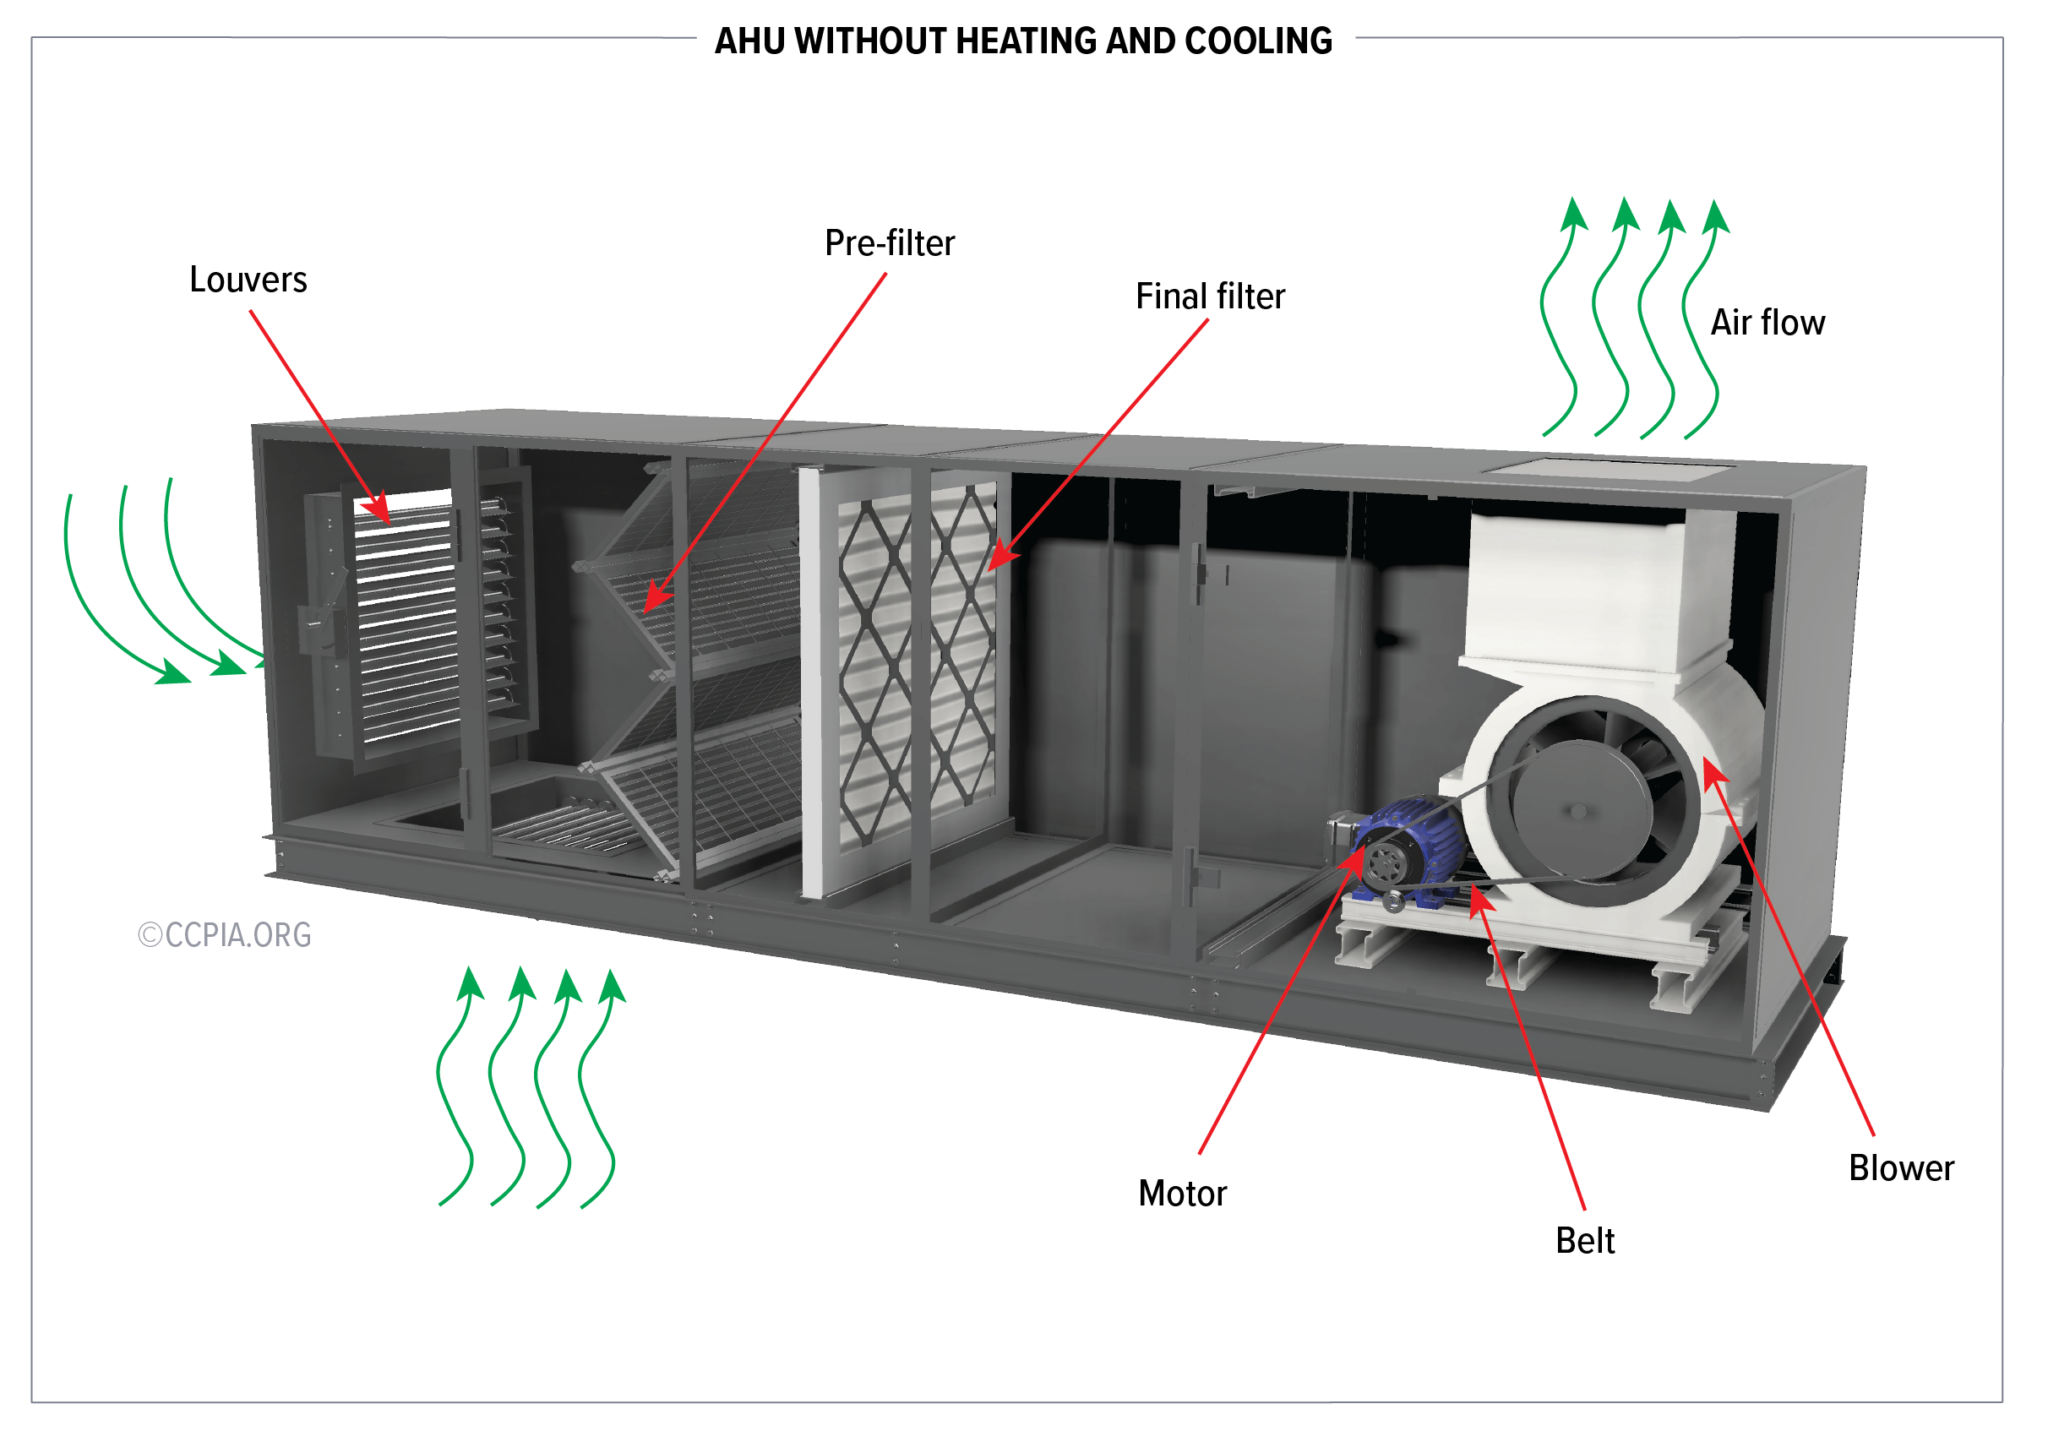
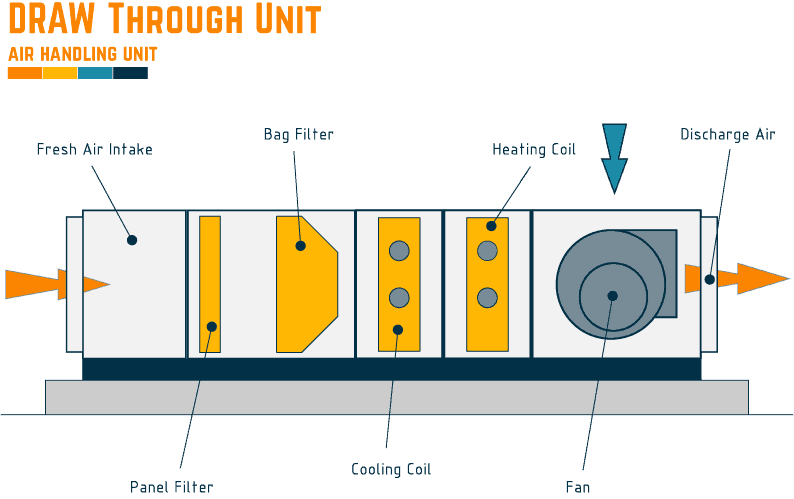
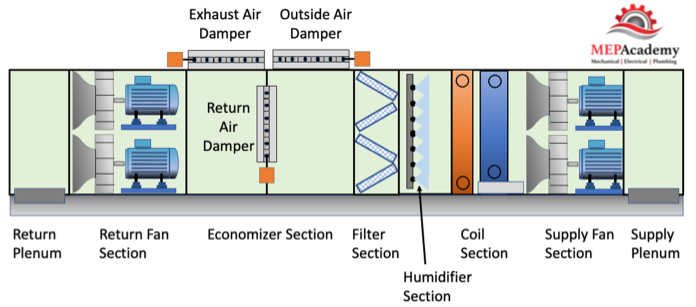
First, let's clarify what an AHU is and its key parts. The AHU isn't the outdoor condenser unit; instead, it's the indoor component, often located in your attic, basement, or a utility closet. It houses several critical components:
- Blower Fan: This is the powerhouse that pushes air through your ductwork.
- Heating/Cooling Coil: These coils contain refrigerant or hot water, depending on your system, to heat or cool the air.
- Air Filter: Captures dust, pollen, and other particles from the air.
- Ductwork Connections: Points where the AHU connects to your home's supply and return ducts.
- Control Panel: Contains electrical components like circuit breakers, relays, and the blower motor control board.
The Case of the Insufficient Airflow
One of the most frequent complaints is insufficient airflow. You might notice weak airflow from your vents, uneven temperatures throughout your home, or your system running constantly without achieving the desired temperature. Let's investigate!
Step 1: The Obvious – Check the Thermostat
This might seem elementary, but it's the first place to start.
- Verify settings: Ensure your thermostat is set to "Heat" or "Cool" and the desired temperature.
- Fan setting: Make sure the fan is set to "Auto," not "On." "On" will keep the fan running constantly, even when heating or cooling isn't needed, which can mask other issues.
- Battery check: If your thermostat is battery-powered, replace the batteries. Low batteries can cause erratic behavior.
Tool Needed: None
Step 2: The Low-Hanging Fruit – The Air Filter
A dirty air filter is the most common cause of reduced airflow. A clogged filter restricts airflow, forcing the blower motor to work harder and reducing the amount of conditioned air reaching your rooms.
- Locate the filter: Typically found near the AHU, often in a slot or behind a removable panel.
- Inspect the filter: Remove the filter and hold it up to the light. If you can barely see through it, it's dirty.
- Replace the filter: Use a filter with the correct size and MERV rating (check your AHU's manual). Higher MERV ratings filter out more particles, but can also restrict airflow if your system isn't designed for them.
Tool Needed: None
Step 3: Visual Inspection – Ductwork Check (Without Tools)
Take a walk around your visible ductwork (often in unfinished basements or attics). Look for:
- Disconnected ducts: Gaps in the ductwork allow conditioned air to escape, reducing airflow to your rooms.
- Crushed or damaged ducts: These restrict airflow and can lead to leaks.
- Obvious insulation damage: Damaged insulation increases energy loss, making your system work harder.
DIY Action: If you find disconnected ducts, you can try to reconnect them using duct tape (though metal foil tape is a better long-term solution). If you see minor damage to insulation, you can try patching it with insulation tape. Important: For significant ductwork damage, consult a professional. Faulty ductwork can lead to substantial energy loss and potentially impact indoor air quality.
Tool Needed: None
Step 4: Blower Fan Observation
Now, let's get a little closer to the AHU. Important Safety Note: Before proceeding, turn off the power to the AHU at the circuit breaker.
- Access the blower compartment: Remove the access panel to the blower fan. This panel is usually held in place by screws or clips.
- Visual check: With the power OFF, look for any obstructions blocking the blower fan, such as debris, insulation, or rodent nests. Remove any visible obstructions.
- Inspect the blower wheel: Check if the blower wheel (the fan itself) is clean. A heavily dust-laden wheel can reduce its efficiency. You can carefully clean it with a soft brush and a vacuum cleaner.
- Check the blower motor: Look for signs of damage to the motor itself, such as burnt wires, oil leaks, or a generally distressed appearance.
DIY Action: Clearing minor obstructions and cleaning the blower wheel are tasks you can potentially handle. However, if you see any signs of motor damage, do not attempt to repair it yourself. Call a qualified HVAC technician.
Tool Needed: Screwdriver (to remove access panel), Soft brush, Vacuum cleaner.
Step 5: Capacitor Check (Requires Multimeter)
The capacitor is a small, cylindrical component that helps start the blower motor. A failing capacitor is a common cause of blower motor issues.
Important Safety Note: Capacitors can hold an electrical charge even after the power is turned off. You must discharge the capacitor before handling it. This is a potentially dangerous procedure and should only be attempted if you are comfortable working with electrical components and have the proper knowledge and tools. If you are not comfortable, skip this step and call a professional.
- Discharge the capacitor: Use a screwdriver with an insulated handle to short the terminals of the capacitor. Be careful!
- Locate the capacitor: It's usually near the blower motor.
- Test with a multimeter: Set your multimeter to measure capacitance (µF or microfarads). Disconnect the wires from the capacitor and connect the multimeter probes to the capacitor terminals.
- Compare readings: Compare the reading on the multimeter to the rated capacitance printed on the capacitor. If the reading is significantly lower (more than 10% lower), the capacitor is likely failing and needs to be replaced.
DIY Action: Replacing a capacitor is a relatively straightforward repair, but requires caution and electrical knowledge. Ensure you purchase the correct replacement capacitor with the same voltage and capacitance ratings. Always disconnect the power before working on electrical components.
Tool Needed: Multimeter, Screwdriver (insulated handle), Wire strippers/crimpers (if needed)
Step 6: Control Board Inspection (Proceed with Caution)
The control board is the brain of your AHU, controlling various functions like blower motor speed and heating/cooling cycles. Important Safety Note: This step involves working with electrical components. If you are not comfortable, call a professional. Ensure the power is OFF before proceeding.
- Locate the control board: Usually housed in a metal enclosure within the AHU.
- Visual inspection: Look for any signs of damage, such as burnt components, bulging capacitors, or loose wires.
- Check the fuses/circuit breakers: If the AHU isn't receiving power, check the fuses on the control board or the circuit breaker in your electrical panel. Replace any blown fuses with the correct amperage rating.
DIY Action: Replacing a blown fuse is a simple task. However, if you see any other signs of damage to the control board, do not attempt to repair it yourself. Call a qualified HVAC technician. Replacing the entire control board is generally best left to professionals.
Tool Needed: Screwdriver, Multimeter (to check continuity of fuses)
When to Call a Professional
While these troubleshooting steps can help you identify and potentially resolve common AHU issues, certain problems require the expertise of a qualified HVAC technician.
- Refrigerant Leaks: Dealing with refrigerant requires specialized equipment and training.
- Compressor Issues: The compressor is a complex and expensive component. Repairs should be left to professionals.
- Major Ductwork Repairs: Significant damage to ductwork requires specialized knowledge and tools.
- Electrical Issues: If you are uncomfortable working with electrical components, call a professional.
- Uncertainty: If you've tried these steps and are still unsure what's causing the problem, it's best to consult a professional.
Remember: Your safety is paramount. If at any point you feel uncomfortable or unsure, stop and call a qualified HVAC technician. Ignoring a problem can lead to more significant damage and potentially costly repairs down the road. Don't hesitate to seek professional help when needed. Happy troubleshooting!