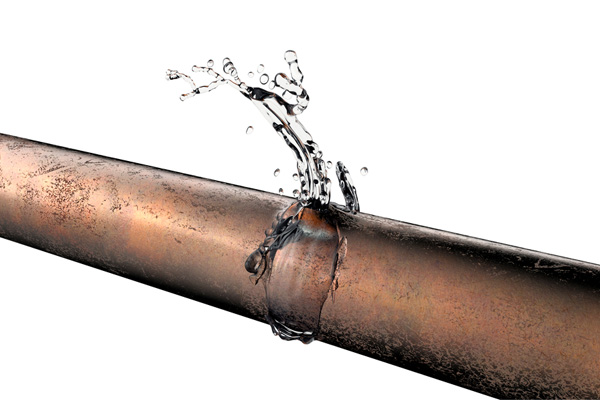
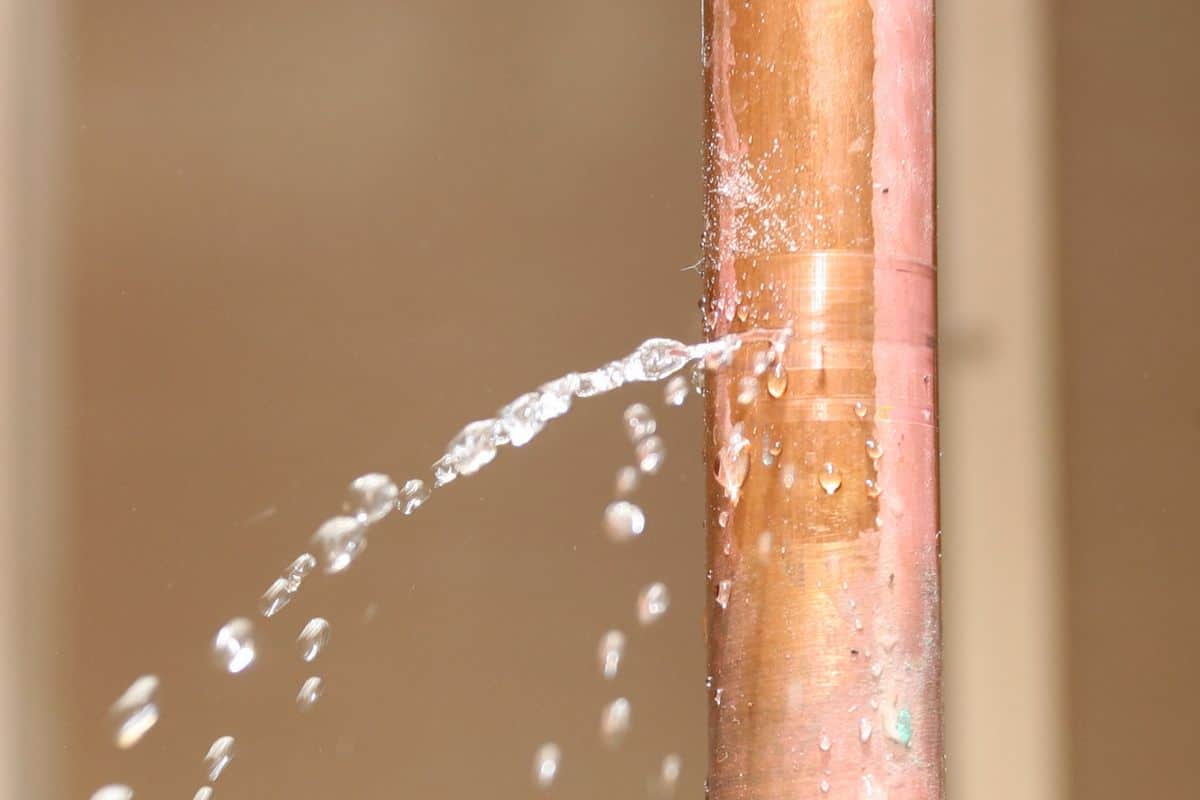
Pin Hole Leak In Copper Pipe
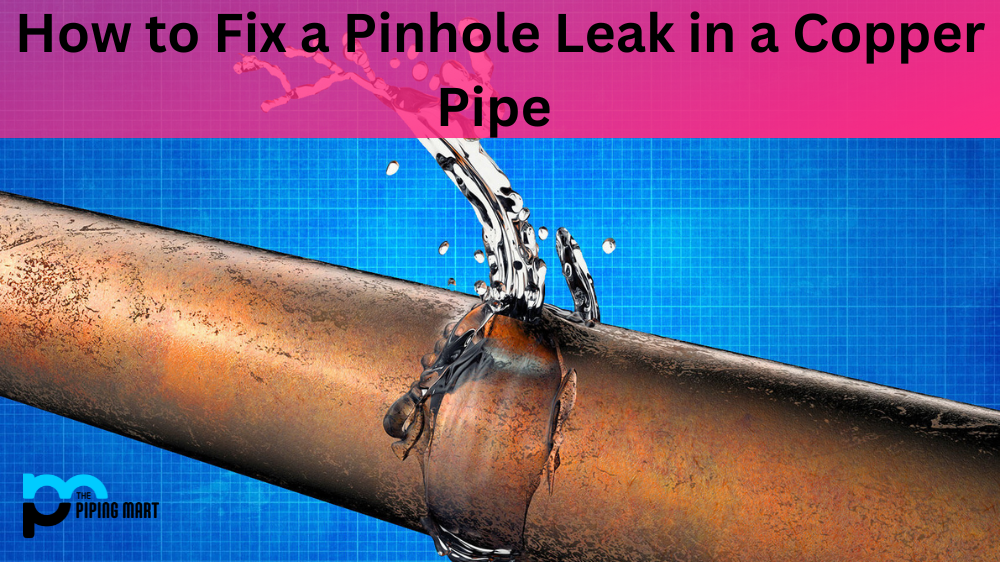
A pinhole leak in a copper pipe is a common problem faced by homeowners. These tiny leaks, often invisible to the naked eye at first, can cause significant water damage and lead to mold growth if left unattended. This guide walks you through identifying, understanding, and addressing pinhole leaks in your copper pipes, balancing DIY solutions with knowing when to call a professional.
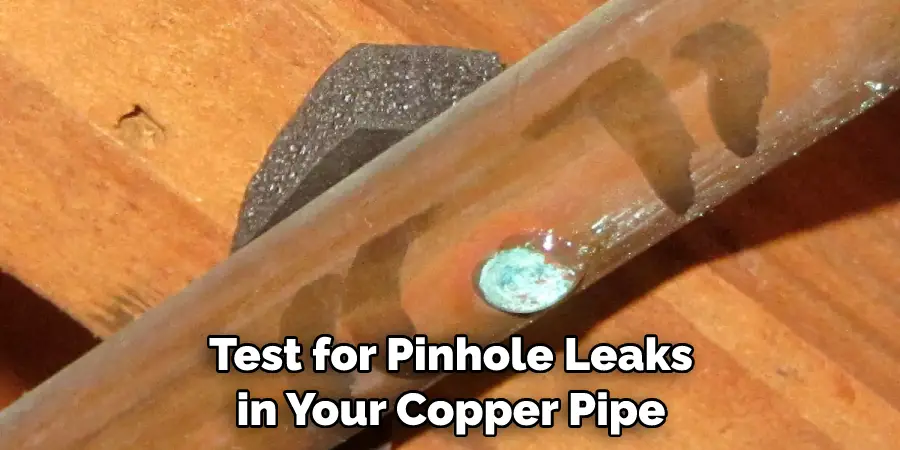
Identifying a Pinhole Leak
Finding a pinhole leak early can save you a lot of trouble. Here are some telltale signs:
- Water Stains: Look for stains on ceilings, walls, or floors, especially around pipe chases or where pipes are exposed.
- Dripping Sounds: Listen closely, especially in quiet areas. A faint dripping sound could indicate a leak behind walls or above ceilings.
- Increased Water Bill: A sudden, unexplained spike in your water bill is a strong indicator of a leak somewhere in your plumbing system.
- Mold or Mildew: Excessive moisture can lead to mold or mildew growth, particularly in damp areas like basements and bathrooms.
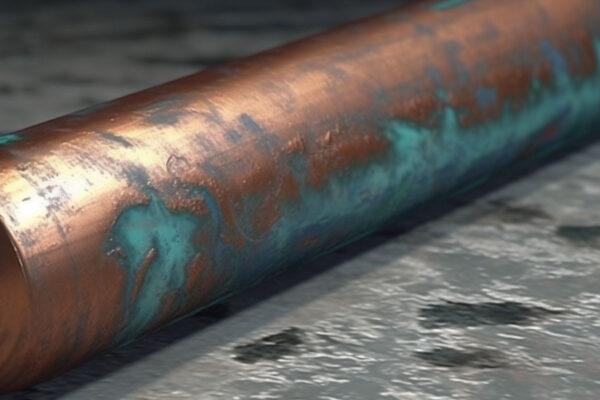
- Corrosion on Pipes: Examine exposed copper pipes for signs of corrosion, such as a greenish or bluish tint. This can be a precursor to pinhole leaks.
- Low Water Pressure: A significant drop in water pressure throughout your home could be due to a leak.
Even if you suspect a leak but can't find it, don't ignore your instincts. A professional leak detection service can pinpoint the source using specialized equipment.
Understanding the Causes
Several factors contribute to the formation of pinhole leaks in copper pipes:
- Corrosion: This is the most common cause. The type of corrosion can vary, but often involves chemical reactions between the water and the copper.
- Water Chemistry: Water that is too acidic (low pH) or contains high levels of chlorine or other minerals can corrode copper pipes over time.
- Electrolysis: Stray electrical currents in your plumbing system can accelerate corrosion.
- Manufacturing Defects: Although rare, imperfections in the copper pipe itself can create weak spots that are susceptible to leaks.
- Age: Older copper pipes are simply more prone to leaks due to wear and tear and accumulated corrosion.
- Improper Installation: Poor soldering techniques or using incompatible materials can weaken the pipe joint and make it more susceptible to leaks.
Understanding the potential causes helps you take preventative measures, such as testing your water and installing a whole-house water filter.
DIY Temporary Repair Options
If you find a pinhole leak, you need to act quickly to minimize water damage. These are temporary fixes to stop the leak until you can make a permanent repair:
Materials Needed:
- Safety Glasses
- Gloves
- Clean Rags
- Sandpaper or Wire Brush
- Epoxy Putty (Specifically for plumbing repairs) OR Pipe Repair Clamp
- Optional: Heat Gun
Epoxy Putty Method:
- Turn off the Water: Locate the shut-off valve for the affected pipe and turn it off. Then, open a faucet downstream from the leak to relieve any pressure in the pipe.
- Clean the Pipe: Thoroughly clean the area around the leak with sandpaper or a wire brush to remove any corrosion or debris. This will help the epoxy putty adhere properly.
- Dry the Area: Ensure the area is completely dry. A heat gun on a low setting can help speed up the drying process.
- Apply the Epoxy Putty: Knead the epoxy putty according to the manufacturer's instructions until it's a uniform color.
- Mold the Putty: Firmly press the putty over the pinhole leak, ensuring it completely covers the damaged area. Mold it into a smooth, even shape.
- Cure the Putty: Allow the putty to cure for the recommended time, usually several hours, before turning the water back on.
- Inspect for Leaks: After the curing time, slowly turn the water back on and check for any leaks around the repaired area. If necessary, apply additional epoxy putty.
Pipe Repair Clamp Method:
- Turn off the Water: Locate the shut-off valve for the affected pipe and turn it off. Then, open a faucet downstream from the leak to relieve any pressure in the pipe.
- Clean the Pipe: Thoroughly clean the area around the leak with sandpaper or a wire brush to remove any corrosion or debris.
- Position the Clamp: Center the clamp over the pinhole leak.
- Tighten the Clamp: Tighten the screws on the clamp evenly until the leak stops. Be careful not to overtighten, as this could damage the pipe further.
- Inspect for Leaks: Slowly turn the water back on and check for any leaks around the clamp. Readjust the clamp if necessary.
Important Safety Tip: Always wear safety glasses and gloves when working with plumbing. Be cautious when using a heat gun to avoid burns.
Permanent Repair Options
These temporary fixes are just that – temporary. A permanent repair is necessary to ensure the leak doesn't return. Here are the most common permanent repair options:
Replacing the Damaged Section of Pipe
This is the most reliable long-term solution, but it requires more skill and tools. This method is best left to professionals if you are not comfortable working with soldering equipment.
Materials Needed:
- Safety Glasses
- Gloves
- Copper Pipe Cutter
- New Section of Copper Pipe (same diameter)
- Flux
- Solder
- Propane Torch
- Sandpaper or Wire Brush
- Measuring Tape
- Fittings (Couplings)
- Wet Rags
Steps:
- Turn off the Water: Locate the shut-off valve for the affected pipe and turn it off. Then, open a faucet downstream from the leak to relieve any pressure in the pipe.
- Cut Out the Damaged Section: Use a copper pipe cutter to cut out the section of pipe containing the pinhole leak. Make sure to cut back to healthy, uncorroded pipe on either side of the leak.
- Measure and Cut Replacement Pipe: Measure the length of the section you removed and cut a new piece of copper pipe to the same length.
- Clean the Pipe Ends: Use sandpaper or a wire brush to thoroughly clean the ends of the existing pipe and the inside of the couplings. This ensures a good solder joint.
- Apply Flux: Apply flux to the outside of the existing pipe ends and the inside of the couplings. Flux helps the solder flow properly and creates a strong bond.
- Assemble the Joint: Slide the couplings onto the existing pipe ends and then insert the replacement pipe section into the other end of the couplings.
- Solder the Joints: Heat the coupling with a propane torch until it's hot enough to melt the solder. Touch the solder to the joint, and it should flow smoothly around the entire circumference. Remove the heat and let the joint cool.
- Cool the Joint: Wipe the joint with a wet rag to cool it down quickly.
- Inspect the Joint: Examine the solder joint for any gaps or imperfections. If necessary, reheat the joint and apply more solder.
- Test for Leaks: Slowly turn the water back on and check for any leaks around the soldered joints. If you find a leak, turn off the water, let the joint cool completely, and re-solder it.
Warning: Soldering involves working with a propane torch and hot metal. Take appropriate safety precautions to prevent burns and fire. Always have a fire extinguisher nearby.
Using a Compression Fitting
This method provides a solder-free connection, simplifying the repair process. Compression fittings offer an alternative to soldering, making the repair more accessible to DIYers. However, they must be installed correctly and require monitoring to ensure no leaks develop over time.
Materials Needed:
- Safety Glasses
- Gloves
- Copper Pipe Cutter
- New Section of Copper Pipe (same diameter)
- Compression Couplings (2)
- Adjustable Wrenches (2)
- Measuring Tape
- Deburring Tool (optional)
Steps:
- Turn off the Water: Locate the shut-off valve for the affected pipe and turn it off. Then, open a faucet downstream from the leak to relieve any pressure in the pipe.
- Cut Out the Damaged Section: Use a copper pipe cutter to cut out the section of pipe containing the pinhole leak. Ensure clean, square cuts on the remaining pipe.
- Measure and Cut Replacement Pipe: Measure the gap and cut a new piece of copper pipe to fit.
- Prepare Pipe Ends: Deburr the cut ends of all pipes (existing and replacement) to ensure a smooth surface for the compression fitting.
- Attach Compression Fittings: Slide the nut, then the compression ring (also called a ferrule), onto each end of the existing pipe and the new pipe.
- Insert Pipe into Fitting: Push the pipe ends into the compression fitting body as far as they will go.
- Tighten the Nuts: Hand-tighten the nuts onto the fitting body. Then, using two adjustable wrenches (one to hold the fitting body and the other to tighten the nut), tighten the nuts another half to three-quarters of a turn.
- Test for Leaks: Slowly turn the water back on and check for leaks around the compression fittings. If a leak is present, slightly tighten the nut (no more than a quarter turn at a time) until the leak stops.
Note: Overtightening compression fittings can damage the pipe and fitting, leading to leaks. Tighten gradually and check frequently.
When to Call a Professional
While some pinhole leak repairs can be tackled by homeowners, certain situations require a qualified plumber:
- Extensive Damage: If the pinhole leak has caused significant water damage to walls, ceilings, or floors, it's best to call a professional to assess and repair the damage.
- Multiple Leaks: If you're finding multiple pinhole leaks in your plumbing system, it could indicate a more serious underlying problem, such as widespread corrosion.
- Difficult Access: If the leak is located in a hard-to-reach area, such as behind walls or under floors, it's safer to leave the repair to a professional.
- Soldering Concerns: If you're not comfortable working with a propane torch and soldering equipment, it's best to hire a plumber to avoid potential accidents.
- Main Water Line: Any leaks in your main water line should be addressed by a professional plumber.
- Suspect Galvanic Corrosion: If you suspect galvanic corrosion, a plumber can assess your plumbing system and implement solutions to prevent future leaks.
Cost Estimates
The cost of repairing a pinhole leak can vary depending on the severity of the leak, the location of the pipe, and the plumber's hourly rate. Here's a general estimate:
- DIY Repair (Temporary Fix): $10 - $30 (for epoxy putty or a pipe repair clamp)
- DIY Repair (Replacing a Section of Pipe with Soldering): $50 - $100 (including tools and materials)
- DIY Repair (Replacing a Section of Pipe with Compression Fittings): $60 - $120 (including tools and materials)
- Professional Repair: $150 - $500+ (depending on the complexity of the repair and the plumber's rates)
- Leak Detection Service: $100 - $300+ (if the leak is difficult to locate)
These are just estimates. Always get a quote from a qualified plumber before proceeding with any repairs.
Preventative Measures
Preventing pinhole leaks is crucial for maintaining a healthy plumbing system. Here are some preventative measures you can take:
- Water Quality Testing: Test your water regularly to check for acidity and high levels of chlorine or minerals.
- Water Softener: If your water is hard, consider installing a water softener to reduce mineral buildup.
- Whole-House Water Filter: Install a whole-house water filter to remove sediment and other contaminants that can contribute to corrosion.
- Annual Plumbing Inspection: Have your plumbing system inspected annually by a qualified plumber to identify and address potential problems early.
- Avoid Mixing Metals: When making plumbing repairs or upgrades, avoid mixing different types of metals, such as copper and galvanized steel, as this can cause galvanic corrosion.
- Flush Your Water Heater: Regularly flush your water heater to remove sediment buildup, which can contribute to corrosion.
By understanding the causes of pinhole leaks and taking preventative measures, you can protect your home from water damage and costly repairs. Remember, when in doubt, always consult a professional plumber.


:max_bytes(150000):strip_icc()/PinholeLeaksonCopperPipe-565c96af5f9b5835e476dc17.jpg)