Power Saver Pro Reviews Consumer Reports

Many homeowners experience uneven heating or cooling throughout their house. One room might feel like a sauna while another is freezing. This discomfort often leads homeowners to search for quick fixes, and "Power Saver Pro" type devices often pop up in online searches, promising energy savings and better temperature regulation. But before you jump on the bandwagon of unverified solutions, let's troubleshoot the root cause of the issue. This article will guide you through a systematic approach to diagnosing and potentially fixing uneven temperatures yourself, and explain why relying solely on products like "Power Saver Pro" without proper diagnosis can be a costly mistake.
Diagnosing the Problem: Uneven Heating and Cooling
Before considering any supposed "magic bullet" solutions, it's crucial to pinpoint why your home isn't being heated or cooled evenly. Here's a methodical approach:
Step 1: Preliminary Checks (No Tools Required)
Start with the basics. These checks require absolutely no tools and can eliminate some common culprits.
- Check Thermostat Settings: Is your thermostat set correctly? Is it set to "heat" in winter and "cool" in summer? Seems obvious, but it's easily overlooked. Make sure the fan setting is on "auto" unless you have a specific reason to leave it on "on."
- Air Vents and Registers: Ensure that all air vents and registers are open and unobstructed. Furniture, rugs, and curtains can block airflow. Even a small obstruction can drastically reduce airflow to a room. Visually inspect for dust buildup.
- Return Air Grilles: These are usually larger grilles located in hallways or common areas. Make sure they are also unobstructed. Their purpose is to pull air back to the furnace or air conditioner. Blocked return air can severely impair the system's efficiency.
- Sun Exposure: Note which rooms get direct sunlight and for how long. Rooms with southern exposure will naturally be warmer in winter and cooler in summer. This is a natural factor that can contribute to temperature differences.
- Drafts: Feel for drafts around windows, doors, and exterior walls. Drafty areas can significantly impact room temperature.
- Insulation (Visual Inspection): If accessible (e.g., attic access), visually inspect your insulation. Look for areas where insulation is missing, damaged, or compressed.
Actionable Tip: Keep a notepad and pen handy to document your findings for each room. Note temperature differences, obstructions, drafts, and sun exposure. This will provide valuable clues later.
Step 2: Investigating Common Culprits (Simple Tools Required)
This step involves some very basic tools to perform more in-depth checks. These items are usually found in most households.
- Thermometer: Use a thermometer to measure the temperature in each room. Record the readings at different times of the day. This provides a quantifiable measure of the temperature difference.
- Flashlight: A flashlight is crucial for inspecting ducts and vents for obstructions.
- Screwdriver (Phillips and Flathead): You may need a screwdriver to remove vent covers for inspection or to tighten loose screws on accessible ductwork.
Actionable Steps:
- Ductwork Inspection (Accessible Areas): Use your flashlight to visually inspect accessible ductwork (e.g., in the basement or attic). Look for disconnected sections, holes, or crushed areas. Even small leaks can cause significant air loss.
- Air Filter: This is a critical check. A dirty air filter restricts airflow to your furnace or air conditioner, reducing its efficiency and potentially causing damage. Replace your air filter regularly (usually every 1-3 months, depending on the type). Write the date of the filter change on the filter itself for easy tracking.
- Vent Damper Operation: If your vents have dampers (adjustable flaps), ensure they are operating correctly. Sometimes these dampers can become stuck in a closed or partially closed position.
Safety Note: When inspecting ductwork in the attic or crawl space, wear appropriate protective gear, including gloves, a dust mask, and eye protection.
Step 3: More Advanced Troubleshooting (Professional Attention May Be Required)
The following steps require more specialized knowledge and potentially involve working with electrical components. Proceed with extreme caution and only if you are comfortable and confident. When in doubt, call a qualified HVAC technician.
- Checking Blower Motor Operation: If the airflow is weak throughout your entire house, the blower motor in your furnace or air handler might be the problem. Do not attempt to diagnose or repair the blower motor unless you have experience working with electrical equipment. Consult a professional.
- Inspecting Duct Insulation: Examine the insulation around your ductwork. If the insulation is damaged or missing, heat or cooling can be lost before it reaches the intended rooms. Adding or replacing duct insulation can significantly improve efficiency. This requires some knowledge of insulation types and proper installation techniques.
- Balancing Dampers (If Accessible and Knowledgeable): Some ductwork systems have balancing dampers that can be adjusted to regulate airflow to different zones. Adjusting these dampers requires a good understanding of how the system is designed. Improper adjustment can make the problem worse. A professional HVAC technician can perform a duct balancing service.
- Checking Refrigerant Levels (Air Conditioner Only): Low refrigerant levels can cause your air conditioner to blow warm air. This is a task for a licensed HVAC technician. Handling refrigerant requires specialized equipment and knowledge of environmental regulations.
- Evaluating Ductwork Design: In some cases, the ductwork system itself may be poorly designed or inadequate for the size of your home. This is a complex issue that requires professional assessment and potential redesign of the ductwork.
DIY Actions You Can Take
Based on your findings, here are some simple DIY actions you can take:
- Unblock Vents and Registers: Clear any obstructions from vents and registers.
- Replace Air Filter: Regularly replace your air filter according to the manufacturer's recommendations.
- Seal Drafts: Use weather stripping or caulk to seal drafts around windows and doors.
- Insulate Exposed Pipes: Insulate exposed hot water pipes in unheated areas to prevent heat loss.
- Install Door Sweeps: Install door sweeps on exterior doors to prevent drafts.
- Add Insulation (If Appropriate): Add insulation to areas where it is missing or inadequate (e.g., attic). Be sure to follow safety precautions and building codes.
When to Call a Professional
It's crucial to know when the problem is beyond your DIY capabilities. Here are some situations where you should definitely call a qualified HVAC technician:
- If you are uncomfortable or unsure about working with electrical components.
- If you suspect a refrigerant leak in your air conditioner.
- If you suspect a problem with the blower motor or other major components of your furnace or air conditioner.
- If you have tried the DIY steps and the problem persists.
- If you suspect a problem with your ductwork design.
- If you notice unusual noises or smells coming from your furnace or air conditioner.
- If your gas furnace has a yellow flame (it should be blue). This indicates a potentially dangerous carbon monoxide issue. Evacuate the premises and call your gas company immediately.
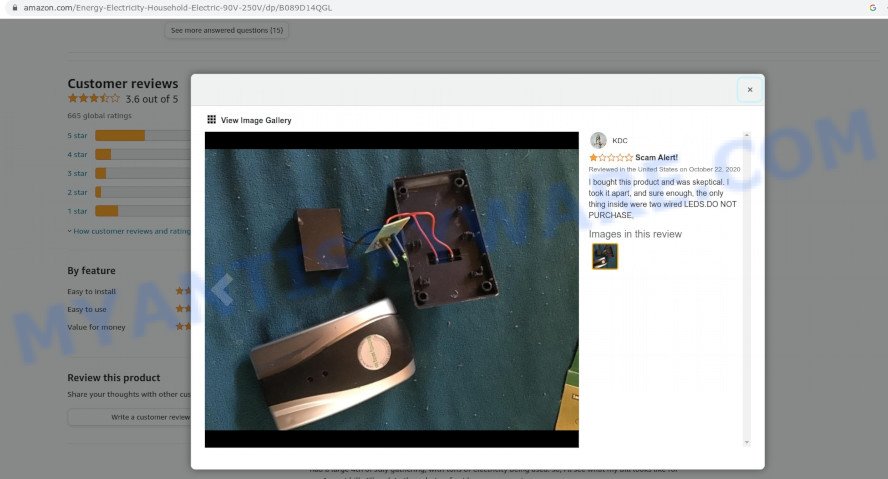
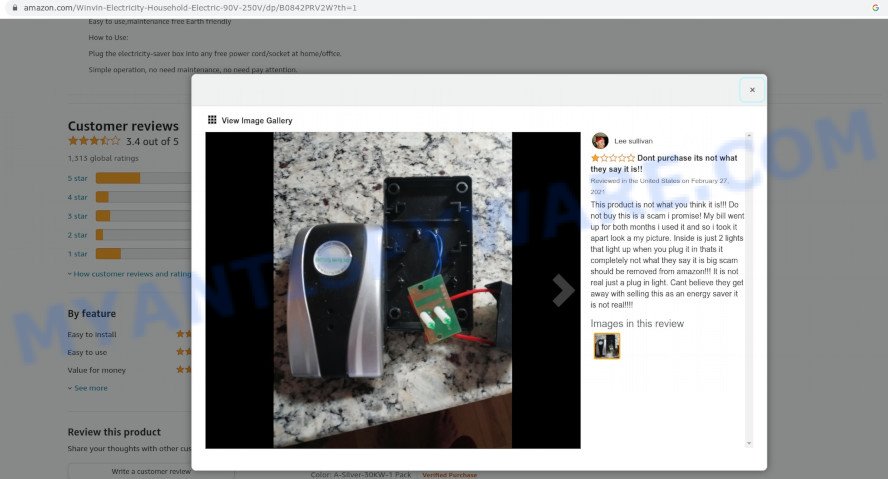
Regarding "Power Saver Pro" and Similar Devices
Many products like "Power Saver Pro" claim to save energy and improve heating/cooling efficiency. Consumer Reports and other reputable organizations often advise caution regarding such devices, particularly those that make unsubstantiated claims or lack independent testing.
Why be skeptical?
- Lack of Scientific Evidence: Many of these devices lack credible scientific evidence to support their claims.
- Misleading Marketing: They often rely on misleading marketing tactics and exaggerated promises.
- Potential for Damage: Some devices can potentially damage your HVAC system or electrical wiring.
- Focus on Symptoms, Not the Cause: They address the symptoms of a problem (uneven temperatures) without addressing the underlying cause (poor insulation, leaky ducts, etc.).
A Better Approach:
Instead of relying on unproven devices, focus on the following:
- Proper System Maintenance: Regular maintenance, including air filter replacement and professional servicing, is essential for optimal efficiency.
- Addressing Underlying Issues: Identify and address the root causes of uneven heating and cooling, such as poor insulation, leaky ducts, or a malfunctioning HVAC system.
- Energy-Efficient Upgrades: Consider upgrading to a more energy-efficient furnace, air conditioner, or heat pump.
- Professional Duct Sealing and Insulation: Have your ductwork professionally sealed and insulated to minimize air loss.
Conclusion
Uneven heating and cooling can be frustrating, but with a systematic approach, you can often diagnose and fix the problem yourself. Remember to start with the simple checks and gradually move on to more advanced troubleshooting. Be cautious when working with electrical components, and don't hesitate to call a professional when needed. And most importantly, be skeptical of unproven "miracle" devices. Addressing the root causes of the problem is the best way to achieve lasting comfort and energy savings.
By following these steps, you can avoid wasting money on ineffective products and ensure that your home is heated and cooled efficiently and evenly, providing a comfortable and healthy environment for you and your family.