Primary And Secondary Chilled Water System

Imagine waking up on a hot summer day only to find your refrigerator isn't cooling properly. Food is starting to spoil, and you're facing a potential grocery bill replacement. Before panicking, let's walk through some basic troubleshooting steps you can take to diagnose and potentially fix the issue yourself. Remember, if you're uncomfortable at any point or the problem involves electrical work beyond these basic steps, always call a qualified appliance repair technician.
Refrigerator Not Cooling: A Step-by-Step Troubleshooting Guide
This guide focuses on common issues that can cause a refrigerator to stop cooling effectively. We'll start with the simplest solutions and move to more involved (but still DIY-friendly) checks.
Step 1: Basic Checks - Power and Settings
Before diving into anything complex, ensure the obvious culprits aren't to blame.
- Check the Power Cord: Make sure the refrigerator is properly plugged into a working outlet. Try plugging another appliance into the same outlet to confirm it's delivering power. If the outlet is faulty, use a different one.
- Inspect the Circuit Breaker: Locate the circuit breaker box in your home. Identify the breaker labeled for the refrigerator (usually marked). Check if it's tripped (flipped to the "off" position). If so, flip it fully to the "off" position and then back to the "on" position. If it trips again immediately, there might be a short circuit, and you'll need to call an electrician. Do not repeatedly reset a tripped breaker.
- Verify the Temperature Settings: Ensure the thermostat is set to the appropriate temperature. Sometimes, accidentally bumping the dial can cause the refrigerator to warm up. Refer to your refrigerator's manual for recommended temperature settings. A common range is 35-38°F (2-3°C) for the refrigerator and 0-5°F (-18 to -15°C) for the freezer.
- Check the Door Seals: Inspect the rubber seals around the refrigerator and freezer doors. Are they clean, intact, and making a tight seal? A compromised seal allows warm air to enter, making the refrigerator work harder and potentially failing to maintain the correct temperature. To test the seal, close the door on a piece of paper. If you can easily pull the paper out with the door closed, the seal needs attention.
Step 2: Cleaning the Condenser Coils
The condenser coils release heat as part of the cooling process. If they're covered in dust and debris, the refrigerator can't efficiently dissipate heat, leading to cooling problems.
- Locate the Condenser Coils: These are usually located on the back of the refrigerator or underneath it. Consult your refrigerator's manual if you're unsure.
- Unplug the Refrigerator: Safety first! Always unplug the refrigerator from the power outlet before cleaning any components.
- Clean the Coils: Use a vacuum cleaner with a brush attachment to remove dust and debris from the coils. You can also use a soft brush or cloth. Be gentle to avoid damaging the coils.
- Plug the Refrigerator Back In: Once the coils are clean, plug the refrigerator back into the power outlet.
- Wait and Monitor: Give the refrigerator several hours to cool down and see if the cleaning improves its performance.
Step 3: Checking the Evaporator Fan Motor (Freezer Section)
The evaporator fan circulates cold air from the freezer compartment to the refrigerator section. If the fan isn't working, the refrigerator won't cool properly.
- Locate the Evaporator Fan: This is typically located inside the freezer compartment, behind a panel.
- Unplug the Refrigerator: Again, unplug the refrigerator before proceeding.
- Remove the Panel: Carefully remove the panel covering the evaporator fan. You might need a screwdriver.
- Inspect the Fan: Check the fan blades for any obstructions, such as ice buildup. Manually spin the fan blades to see if they rotate freely. If they're stiff or don't move, the fan motor may be faulty.
- Melt Any Ice Buildup: If there's ice buildup, you can use a hair dryer on a low setting to carefully melt it. Avoid using sharp objects to chip away the ice, as this could damage the fan blades or other components.
- Test the Fan Motor (Advanced - Use Caution): This step is a little more advanced and requires a multimeter. If you're comfortable using a multimeter, you can test the fan motor for continuity. If there's no continuity, the motor is likely dead and needs to be replaced. If you're not comfortable using a multimeter, skip this step and call a professional.
- Reassemble and Test: Once you've cleared any obstructions or tested the motor (or decided to call a professional), reassemble the panel and plug the refrigerator back in. Monitor the refrigerator's temperature to see if the fan is working correctly.
Step 4: Defrosting the Evaporator Coils
Even if the evaporator fan is working, excessive frost buildup on the evaporator coils can prevent proper cooling.
- Unplug the Refrigerator: Unplug the refrigerator.
- Empty the Freezer: Remove all food from the freezer compartment.
- Leave the Door Open: Leave the freezer door open to allow the ice to melt. Place towels around the refrigerator to absorb any water that drips.
- Speed Up the Defrosting Process (Optional): You can place bowls of hot water inside the freezer to speed up the defrosting process. Change the water regularly as it cools. You can also use a hair dryer on a low setting, but be very careful not to melt any plastic parts.
- Do Not Use Sharp Objects: Never use knives, screwdrivers, or other sharp objects to chip away ice, as this can damage the evaporator coils.
- Clean Up: Once all the ice has melted, clean up any water and wipe down the interior of the freezer.
- Plug the Refrigerator Back In: Plug the refrigerator back into the power outlet and allow it to cool down.
Step 5: Checking the Start Relay and Overload Protector (Advanced - Call a Professional if Unsure)
The start relay and overload protector are components that help the compressor (the heart of the refrigerator) start and run. If these components are faulty, the compressor won't run, and the refrigerator won't cool.
- Locate the Start Relay and Overload Protector: These components are usually located on the side of the compressor, at the back of the refrigerator.
- Unplug the Refrigerator: Unplug the refrigerator before proceeding.
- Access the Components: You may need to remove a cover to access the start relay and overload protector.
- Visually Inspect the Components: Look for any signs of damage, such as burns, cracks, or swelling.
- Test the Components (Advanced - Requires a Multimeter): Testing these components requires a multimeter and knowledge of electrical circuits. If you're not comfortable with this, call a professional.
- Replacing the Components (Advanced): Replacing these components also requires electrical knowledge. If you're not comfortable with this, call a professional. Incorrect wiring can damage the compressor and other components.
When to Call a Professional
While this guide provides several DIY troubleshooting steps, there are situations where calling a qualified appliance repair technician is the best course of action.
- Electrical Problems: If you suspect a serious electrical problem, such as a short circuit, do not attempt to fix it yourself. Call a qualified electrician.
- Refrigerant Leaks: If you suspect a refrigerant leak (you might smell a sweet, chemical odor), do not attempt to fix it yourself. Refrigerant is harmful and requires specialized equipment to handle. Call a qualified appliance repair technician.
- Compressor Problems: If you suspect a problem with the compressor (the refrigerator is making unusual noises or not running at all), call a professional. Compressor repairs are complex and require specialized tools and knowledge.
- Uncomfortable or Uncertain: If you're uncomfortable with any of the troubleshooting steps outlined in this guide, or if you're unsure about what to do next, call a professional. It's always better to be safe than sorry.
- Warranty Coverage: If your refrigerator is still under warranty, check the terms of the warranty before attempting any repairs yourself. Repairing the refrigerator yourself might void the warranty.
Primary And Secondary Chilled Water System - Explanation
The above examples relate to household refrigerators. Let's consider a larger, more complex system: a primary and secondary chilled water system, often used in commercial buildings for air conditioning. While you wouldn't typically repair this yourself as a homeowner, understanding the basics can help you communicate with HVAC professionals and understand building maintenance practices. A primary/secondary chilled water system is designed to provide efficient and reliable cooling to a building. It separates the chilled water production from the building's cooling demand, allowing for better control and energy savings.
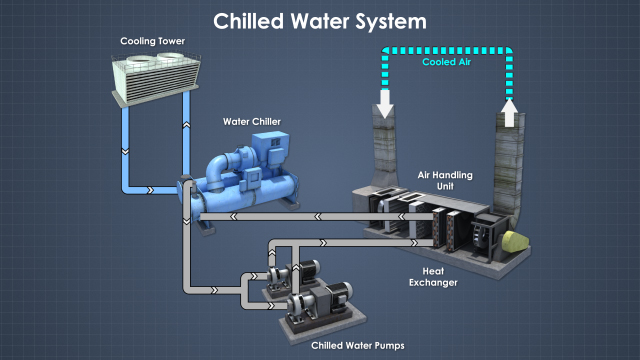
Primary System: The Chiller Plant
The primary system is the heart of the chilled water system. It's responsible for producing the chilled water. This typically includes:
- Chillers: These are the machines that actually cool the water. They use a refrigerant cycle to remove heat from the water.
- Pumps: Primary pumps circulate the chilled water through the chillers and to the secondary system.
- Cooling Towers (or Air-Cooled Condensers): These reject the heat removed from the water by the chillers.
- Piping: The network of pipes that carries the chilled water.
- Control System: A sophisticated control system monitors and controls the operation of the entire primary system, optimizing performance and efficiency.
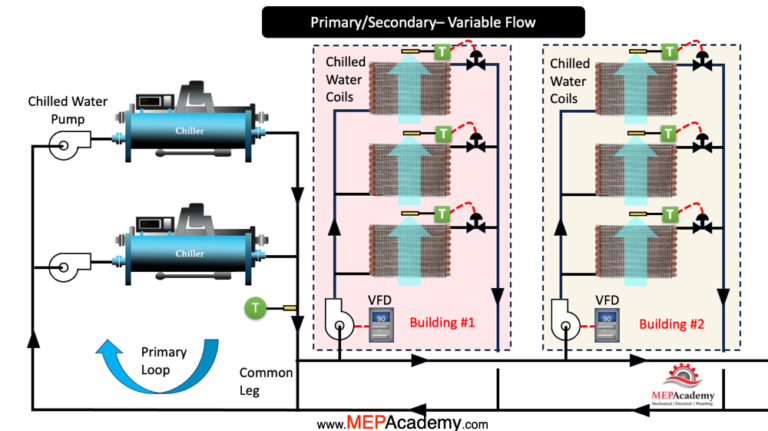
Secondary System: Distribution to the Building
The secondary system distributes the chilled water throughout the building to the air handling units (AHUs) and other cooling equipment.
- Pumps: Secondary pumps circulate the chilled water through the building's cooling coils.
- Piping: The network of pipes that carries the chilled water to the AHUs and other cooling equipment.
- Air Handling Units (AHUs): These units contain cooling coils that use the chilled water to cool the air that is circulated throughout the building.
- Control Valves: Control valves regulate the flow of chilled water to each AHU, based on the cooling demand of the zone it serves.
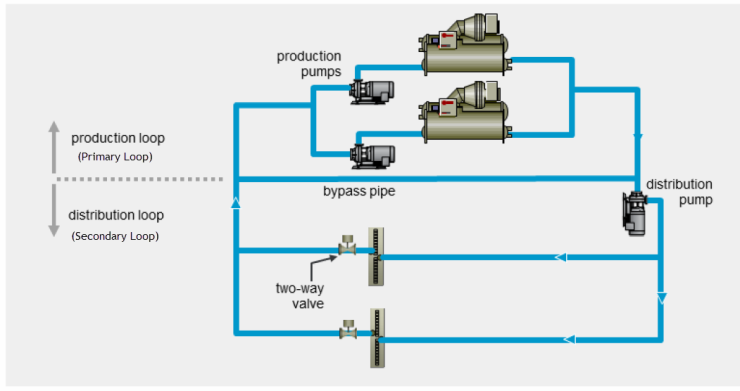
Decoupler: The Key to Separation
A decoupler (often a common pipe) is used to hydraulically separate the primary and secondary loops. This allows the primary chillers to operate at a constant flow rate, optimizing their efficiency, while the secondary pumps can adjust their flow rate to meet the fluctuating cooling demands of the building. Without the decoupler, changes in the secondary flow would directly affect the primary loop, potentially causing instability and inefficiencies.
Troubleshooting (Professional Only!)
Troubleshooting a chilled water system requires specialized training and equipment. Here are some common issues and what a professional would typically look for:
- Insufficient Cooling:
- Low Chiller Output: Check refrigerant levels, compressor performance, condenser water temperature, and chiller control settings.
- Low Flow Rates: Verify pump performance, check for blocked pipes or valves, and ensure proper pump speeds.
- Air in the System: Bleed air from the system at high points.
- Dirty Cooling Coils: Clean the cooling coils in the AHUs.
- High Energy Consumption:
- Inefficient Chiller Operation: Optimize chiller settings, check for fouling on heat transfer surfaces, and consider chiller replacement if it's old and inefficient.
- Excessive Pump Speeds: Optimize pump speeds based on cooling demand.
- Poor Insulation: Inspect and repair insulation on pipes and equipment.
- Water Leaks:
- Inspect Pipes and Fittings: Locate and repair any leaks.
- Check for Corrosion: Implement a water treatment program to prevent corrosion.
- Control System Issues:
- Sensor Calibration: Calibrate temperature and pressure sensors.
- Control Valve Malfunctions: Inspect and repair control valves.
- Software Errors: Troubleshoot and correct any software errors in the control system.
Understanding these basic concepts can empower you to better understand your building's climate control system, and ask the right questions to the HVAC technicians maintaining it.