R 410a Refrigerant Pressure Temperature Chart
Is your air conditioner blowing warm air, or your heat pump struggling to keep you warm? One common culprit behind these issues is a problem with your refrigerant, specifically the pressure and temperature relationship of R-410a, the most common refrigerant in modern residential systems. This article will guide you through basic troubleshooting using an R-410a pressure temperature chart, helping you understand what might be wrong and what steps you can safely take.
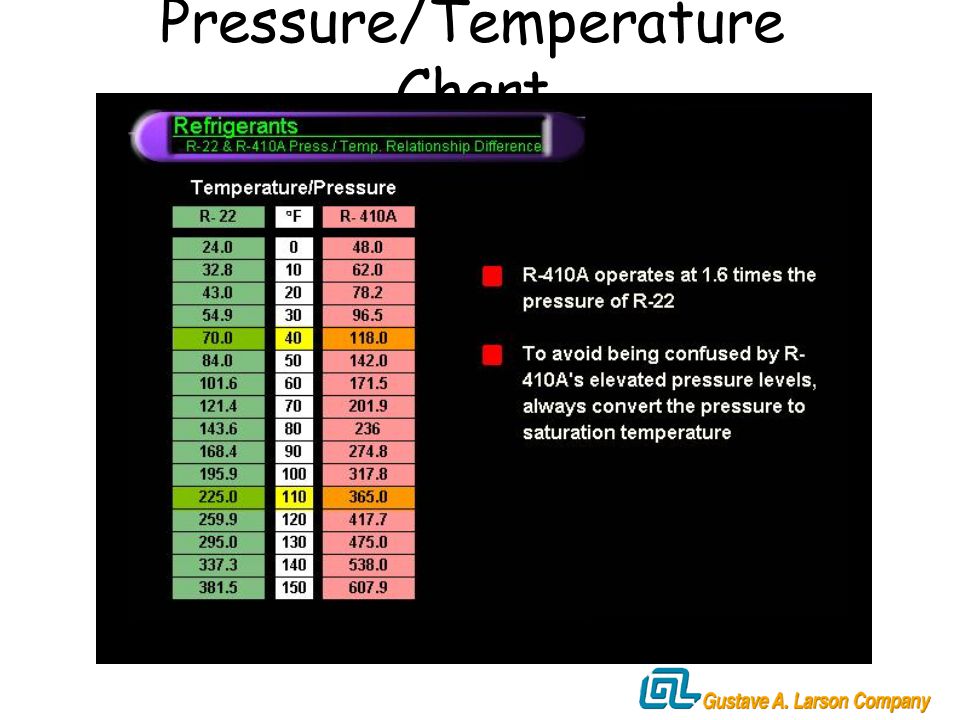
Understanding the R-410a Pressure Temperature Chart
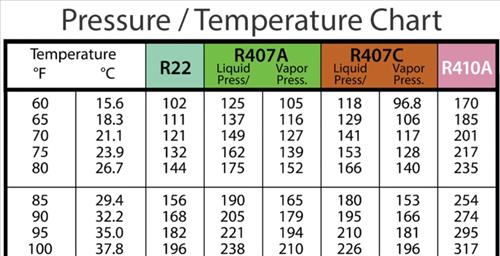
Before we dive into troubleshooting, let's understand the tool we'll be using: the R-410a pressure temperature chart. This chart shows the relationship between the refrigerant's temperature and pressure when it's in a saturated state (meaning it's both liquid and gas). The pressure is always related to the temperature. If you know either pressure or temperature you can determine the other. It's crucial to have the correct chart for R-410a, as using the wrong chart will lead to inaccurate readings and misdiagnosis.
You can easily find R-410a pressure temperature charts online. Look for a chart specifically labeled for R-410a. Many manufacturers also provide this information on the unit's service panel.
The Homeowner's Dilemma: Warm Air or Insufficient Heat
Imagine it's a scorching summer day, and your AC is blowing air that's more lukewarm than cool. Or perhaps it's a chilly winter evening, and your heat pump is running constantly but can't seem to bring the house up to a comfortable temperature. These are classic symptoms of a refrigerant issue.
Before you even think about the pressure temperature chart, do these initial checks. These are simple and don't require any tools.
Step 1: Initial Checks – No Tools Required!
- Check the Thermostat: Make sure it's set to the correct mode (Cool or Heat) and that the temperature setting is lower than the current room temperature (for cooling) or higher (for heating). Sounds obvious, but it's the most common oversight!
- Check the Air Filter: A dirty air filter restricts airflow, which can impact refrigerant pressures. Replace the filter if it's dirty. A clean filter is essential for proper system operation.
- Check the Outdoor Unit: Ensure the outdoor unit (condenser) isn't blocked by debris, plants, or snow. Clear any obstructions that could be hindering airflow. This is especially important for heat pumps in winter.
- Check the Indoor Vents: Make sure that vents throughout the house are open and unblocked by furniture.
If these basic checks don't solve the problem, it's time to investigate further, and that’s when we’ll need some basic tools and understanding of refrigerant pressures.
Diagnosing with the R-410a Pressure Temperature Chart
Safety First! Working with refrigerant involves potential hazards. If you are not comfortable working with electrical components and refrigerant, stop here and call a qualified HVAC technician. R-410a is under high pressure, and improper handling can lead to injury or equipment damage. Never vent refrigerant into the atmosphere; it's harmful to the environment and illegal.
The following steps require basic tools: a manifold gauge set with R-410a compatible hoses, a thermometer, and safety glasses.
Step 2: Accessing the Service Ports
The outdoor unit (condenser) has service ports – typically two – covered with caps. These ports are used to connect your manifold gauge set. Remove the caps carefully. You might hear a slight hiss, which is normal.
Step 3: Connecting the Manifold Gauge Set
Connect the blue hose (low-pressure) to the service port on the larger copper line (suction line). Connect the red hose (high-pressure) to the service port on the smaller copper line (liquid line). The yellow hose is typically used for charging or evacuation and won't be needed for this diagnostic step.
Important: Purge the hoses of air before connecting them fully. Briefly crack open the hose connection at the service port to allow any air in the hose to escape before tightening completely. This prevents contaminating the refrigerant system.
Step 4: Taking Pressure Readings
With the manifold gauge set connected, start the air conditioner (or heat pump in cooling mode) and let it run for at least 15 minutes to stabilize the system.
Now, take note of the pressure readings on both the low-pressure (suction) gauge and the high-pressure (liquid) gauge. Also, measure the outdoor ambient air temperature using your thermometer.
Step 5: Interpreting the Readings with the R-410a Pressure Temperature Chart
This is where the R-410a pressure temperature chart comes into play. We'll focus on the low-pressure (suction) side reading for this basic troubleshooting guide. The high-pressure reading can be more complex to interpret and is best left to professionals.
- Find the Outdoor Ambient Temperature: Locate the outdoor temperature you measured on the pressure temperature chart.
- Read the Corresponding Saturated Refrigerant Temperature: Find where that outdoor temperature intersects with the refrigerant pressure on your low-pressure gauge. Note what the corresponding saturated refrigerant temperature is.
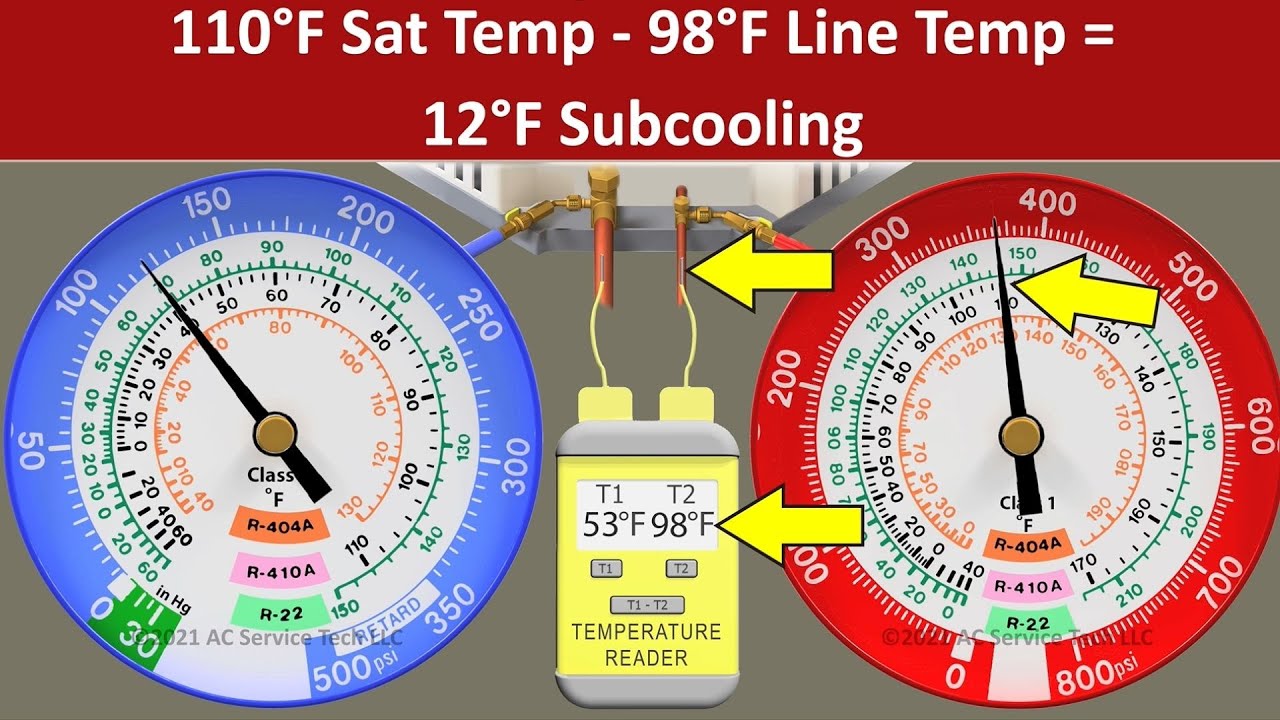
- Determine Superheat: Using a pipe thermometer, measure the temperature of the suction line (the larger copper pipe). This is your suction line temperature. Then, subtract the saturated refrigerant temperature (from the pressure temperature chart) from the suction line temperature (measured on the pipe) to determine the superheat.
What is Superheat? Superheat is the amount of heat added to the refrigerant *after* it has completely vaporized in the evaporator coil. This is very important for proper system operation. A normal superheat range is typically between 8-12 degrees Fahrenheit. Superheat can vary by manufacturer so consult the units specifications for the correct range. Superheat that is too low or too high is an indication of a problem.
Step 6: Analyzing the Results – What Do the Readings Mean?
Here are some common scenarios and what they might indicate:
- Low Suction Pressure and High Superheat: This is often a sign of low refrigerant charge. The system doesn't have enough refrigerant to properly cool the evaporator coil.
- High Suction Pressure and Low Superheat: This *could* be caused by an overcharge of refrigerant. There's too much refrigerant in the system, flooding the evaporator coil. Or a restricted metering device.
- Pressures are Extremely Low (Near Zero): This could indicate a significant refrigerant leak. A system with virtually no refrigerant won't cool at all.
- Pressures are Erratic or Fluctuating Wildly: This can indicate a variety of problems, including a restricted metering device (like a TXV valve), a compressor issue, or non-condensables in the system.
DIY Actions You Can *Potentially* Take (With Caution!)
Again, proceed with extreme caution and only if you are comfortable working with refrigeration equipment. Incorrect actions can damage your system or cause injury.
Adding Refrigerant (If Low Charge is Suspected)
If your readings indicate a low refrigerant charge, you *might* be able to add a small amount of R-410a. However, this is not recommended for most homeowners, as overcharging can be just as detrimental as undercharging. It's also essential to find and repair the leak that caused the low charge in the first place; otherwise, you're just putting a band-aid on the problem.
If you *do* decide to add refrigerant:
- Use the Yellow Hose: Connect the yellow hose from your manifold gauge set to a can or cylinder of R-410a.
- Purge the Hose: Purge the yellow hose of air before connecting it to the system.
- Slowly Add Refrigerant: Add small amounts of refrigerant, monitoring the suction pressure and superheat readings carefully. Aim to bring the pressures and superheat within the acceptable range based on the pressure temperature chart and your system's specifications.
- Do Not Overcharge! This is crucial. Overcharging can damage the compressor.
Cleaning the Condenser Coils
Sometimes, even if refrigerant levels are correct, dirty condenser coils can impact performance. You can clean the condenser coils yourself with a garden hose. Turn off the power to the unit at the breaker. Gently spray the coils from the inside out to remove dirt and debris. Avoid using high-pressure sprayers, as they can damage the delicate fins. Allow the unit to dry completely before turning the power back on.
When to Call a Professional HVAC Technician
There are many situations where DIY troubleshooting and repairs are simply not advisable. Call a qualified HVAC technician immediately if:
- You suspect a significant refrigerant leak: A large leak requires professional leak detection and repair.
- The compressor is making unusual noises: Compressor problems are complex and require specialized knowledge.
- You are uncomfortable working with refrigerant or electrical components: Safety is paramount.
- You suspect a restricted metering device (TXV valve, etc.): These are delicate components that require professional replacement.
- Your system is still not performing correctly after trying basic troubleshooting steps: There may be underlying issues that require expert diagnosis.
- If your superheat is consistently low: Low superheat often indicates a restriction in the system that needs professional attention.
Preventative Maintenance
The best way to avoid refrigerant problems is to schedule regular preventative maintenance with a qualified HVAC technician. They can check refrigerant levels, inspect for leaks, clean the coils, and ensure all components are functioning properly. Regular maintenance will extend the life of your system and keep it running efficiently.
In conclusion, the R-410a pressure temperature chart is a valuable tool for understanding the health of your air conditioning or heat pump system. While some basic troubleshooting and maintenance can be performed by homeowners, it's crucial to prioritize safety and know when to call in a professional. By following these steps, you can gain a better understanding of your system and ensure it's running efficiently for years to come. Remember, when in doubt, contact a qualified HVAC technician.