R134a Pressure Temperature Chart For Automotive

Understanding the refrigerant pressure in your car's air conditioning system is crucial for keeping cool on the road. The R134a Pressure Temperature Chart is a vital tool for diagnosing and troubleshooting AC problems. This guide will walk you through understanding and using the chart, focusing on practical application and safety.
Understanding the R134a Pressure Temperature Chart
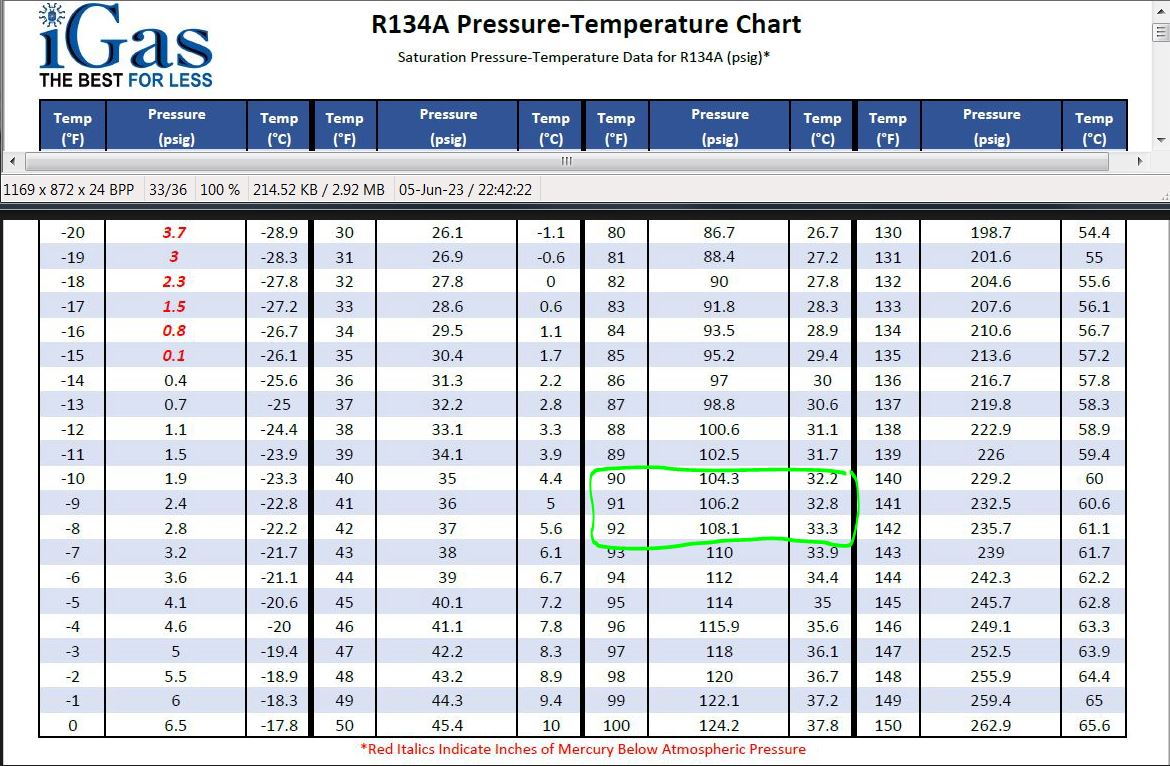
The R134a Pressure Temperature Chart, often called a P/T chart, correlates the pressure of R134a refrigerant to its corresponding temperature. This relationship allows you to determine if your system is functioning correctly by comparing measured pressures to expected temperatures. The chart typically shows temperature in both Fahrenheit and Celsius and pressure in PSI (pounds per square inch). The chart is based on the principle that at a specific temperature, R134a will exhibit a specific pressure when it is in a saturated state (a mix of liquid and vapor).
Think of it as a translator between pressure readings on your gauges and the actual cooling performance of your system. Abnormal pressures, when compared to the ambient temperature, can indicate a range of issues, from low refrigerant levels to compressor problems.
Accessing a Reliable Chart
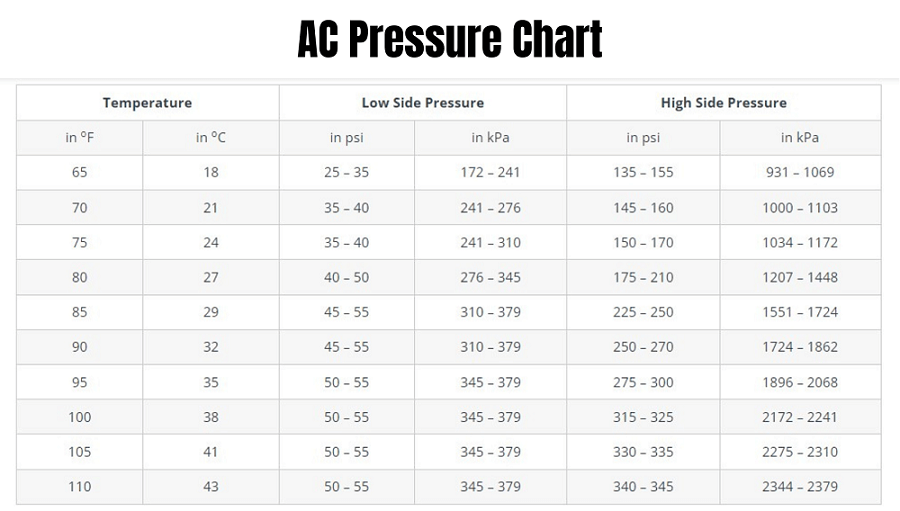
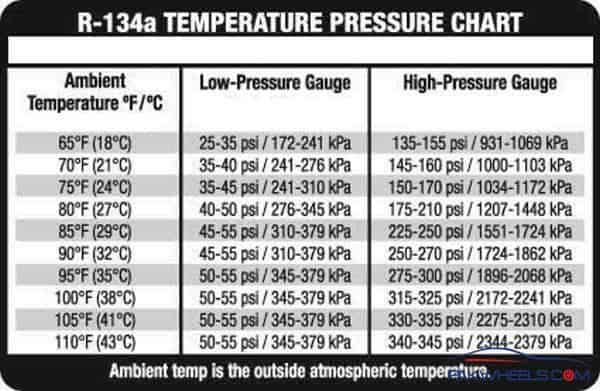
Many online resources offer R134a P/T charts. Look for charts from reputable sources like automotive supply companies or HVAC industry websites. Mobile apps for HVAC technicians often include these charts. Here is an example (note: this is for illustrative purposes only; always refer to a trusted source):
Example R134a P/T Chart (Illustrative):
- 30°F: ~29 PSI
- 40°F: ~39 PSI
- 50°F: ~50 PSI
- 60°F: ~62 PSI
- 70°F: ~75 PSI
- 80°F: ~90 PSI
- 90°F: ~106 PSI
Always double-check the chart against a known reliable source before using it for diagnosis.
Tools and Materials You'll Need
Before diving in, gather these essential tools:
- Manifold Gauge Set: This measures the high and low-side pressures of your AC system. Ensure it's compatible with R134a.
- Refrigerant: R134a if needed for topping off (proceed with caution – see warnings below).
- AC Leak Detector: Helps pinpoint refrigerant leaks.
- Thermometer: To measure ambient temperature and vent temperatures.
- Wrenches and Screwdrivers: For accessing service ports and components.
- Safety Glasses and Gloves: Protect your eyes and skin from refrigerant.
- R134a P/T Chart: Printed or accessible on a mobile device.
- Service Manual: Your vehicle’s specific manual will provide valuable information.
Step-by-Step Guide to Using the R134a P/T Chart
- Safety First: Wear safety glasses and gloves. Work in a well-ventilated area. Refrigerant can cause frostbite and is harmful if inhaled.
- Locate Service Ports: Identify the high-side and low-side service ports on your AC system. The high-side port is typically larger and located on the high-pressure line (usually near the compressor or condenser). The low-side port is smaller and found on the low-pressure line (usually near the evaporator).
- Connect Manifold Gauge Set: Attach the corresponding hoses from your manifold gauge set to the service ports. The blue hose connects to the low-side, and the red hose connects to the high-side. The yellow hose is for refrigerant charging (if needed) or vacuuming.
- Start the Vehicle and AC: Turn on the engine and set the AC to maximum cooling with the fan on high. Let the system run for a few minutes to stabilize.
- Record Pressure Readings: Observe the pressure readings on the manifold gauge set. Note both the low-side and high-side pressures.
- Measure Ambient Temperature: Use a thermometer to measure the ambient temperature near the vehicle. This is crucial for accurate interpretation of the P/T chart.
- Consult the R134a P/T Chart: Find the ambient temperature on the chart. Determine the corresponding ideal pressure range for both the low and high sides.
- Compare Readings: Compare your pressure readings to the ideal ranges on the chart. Note any discrepancies.
- Analyze Results: Use the table below to help troubleshoot potential problems.
Troubleshooting with the R134a P/T Chart: Common Issues
| Condition | Possible Cause | What to Check |
|---|---|---|
| Low-Side Pressure Low, High-Side Pressure Low | Low Refrigerant Charge | Check for leaks. Evacuate and recharge the system to the correct level. |
| Low-Side Pressure High, High-Side Pressure Low | Compressor Malfunction, Expansion Valve Issue | Check compressor clutch, compressor function, expansion valve operation. This often requires professional diagnosis. |
| Low-Side Pressure Normal, High-Side Pressure High | Restricted Condenser, Overcharge of Refrigerant | Check condenser for debris blockage, verify refrigerant charge level. |
| Low-Side Pressure Vacuum, High-Side Pressure Very High | Restriction in the System | Check for blocked hoses, a faulty dryer/accumulator, or a collapsed expansion valve. |
| Pressures Cycling Rapidly | Low Refrigerant or Compressor Clutch Issues | Leak test, recharge system if needed, check compressor clutch operation and air gap. |
Interpreting Vent Temperatures
While pressure readings are important, measuring the vent temperature provides a tangible indication of AC performance. After running the AC for several minutes, use a thermometer to measure the air temperature coming from the vents. Ideally, the vent temperature should be significantly lower than the ambient temperature (typically 40-60°F or lower, depending on ambient conditions).
High vent temperatures, even with seemingly normal pressures, can indicate other issues like a blend door malfunction or a partially clogged evaporator.
Safety Precautions and Warnings
Working with automotive AC systems involves potential hazards. Adhere to these safety precautions:
- Always wear safety glasses and gloves.
- Work in a well-ventilated area. Refrigerant displaces oxygen and can be harmful if inhaled.
- Never overcharge the system. This can damage the compressor and other components.
- Avoid direct contact with refrigerant. It can cause frostbite.
- Dispose of refrigerant properly. It's illegal and environmentally damaging to release refrigerant into the atmosphere. Take it to a certified recycling center.
- Be cautious around moving parts. Keep hands and tools clear of belts, pulleys, and fans.
- Disconnect the negative battery cable before working on any electrical components of the AC system.
When to Call a Professional
While some AC troubleshooting can be done by DIY enthusiasts, certain repairs require specialized knowledge and equipment. Contact a qualified HVAC technician if:
- You suspect a major leak that requires extensive repairs.
- The compressor is making unusual noises or appears to be malfunctioning.
- You are unsure about the correct refrigerant charge level.
- The expansion valve or other internal components need replacement.
- You lack the necessary tools or experience to perform the repairs safely.
- You are uncomfortable working with refrigerant.
Refrigerant recovery, evacuation, and charging require specialized equipment and training. It's often best left to professionals.
Cost Estimates for Common AC Repairs
These are rough estimates and can vary depending on location, vehicle type, and labor rates:
- Refrigerant Recharge: $50 - $150 (depending on refrigerant amount and leak test)
- Leak Repair (minor leak): $100 - $300 (includes leak detection and repair)
- Compressor Replacement: $400 - $1000+ (includes labor and parts)
- Condenser Replacement: $300 - $700+ (includes labor and parts)
- Expansion Valve Replacement: $200 - $500+ (includes labor and parts)
- Dryer/Accumulator Replacement: $150 - $400+ (includes labor and parts)
Always get a written estimate from a reputable shop before authorizing any repairs.
Preventative Maintenance Tips
Regular maintenance can help prevent AC problems and extend the life of your system:
- Run your AC periodically, even in the winter. This helps circulate refrigerant and lubricant, preventing seals from drying out.
- Inspect the condenser for debris. Clean it regularly to ensure proper airflow.
- Check the refrigerant level periodically. Have it checked by a professional if you suspect a leak.
- Replace the cabin air filter regularly. A clogged filter can restrict airflow and reduce cooling performance.
By understanding the R134a Pressure Temperature Chart and following these guidelines, you can effectively diagnose and troubleshoot common AC problems, potentially saving yourself time and money. Remember to prioritize safety and seek professional help when needed.