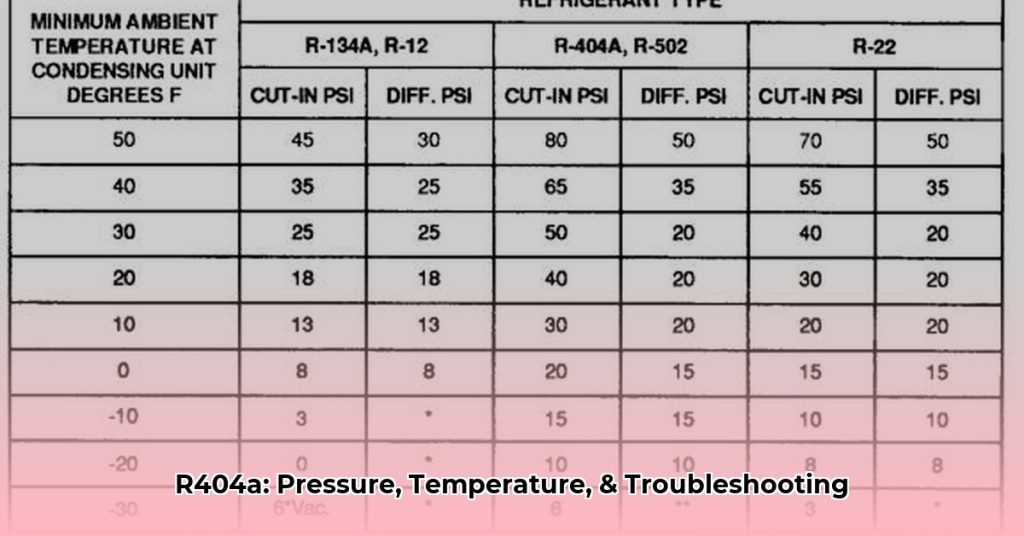
R404a Suction And Discharge Pressure Chart

Is your home uncomfortably warm in the summer or stubbornly cold in the winter, even with your HVAC system running? This is a common problem, and while many factors can contribute, one important diagnostic tool is understanding your system's refrigerant pressures. Specifically, we'll focus on R404a systems and how to interpret their suction and discharge pressures. Let's walk through a troubleshooting process, keeping safety in mind.
Understanding R404a Suction and Discharge Pressures
Before diving into troubleshooting, it's crucial to understand what suction and discharge pressures represent. In simple terms:
* Suction Pressure: This is the pressure of the refrigerant as it's being pulled back into the compressor. A low suction pressure often indicates a refrigerant leak, a restriction in the system, or a low refrigerant charge. * Discharge Pressure: This is the pressure of the refrigerant as it leaves the compressor, heading towards the condenser coil. A high discharge pressure can indicate a dirty condenser coil, a blockage in the refrigerant line, or a problem with the compressor itself.Keep in mind that ideal suction and discharge pressures vary depending on the outdoor temperature. We'll discuss how to use a pressure chart to account for this later.
Step-by-Step Troubleshooting: DIY and When to Call a Pro
Here's a methodical approach to diagnosing pressure-related issues, starting with simple checks you can do yourself:
Step 1: Initial Assessment (No Tools Needed)
Before grabbing any tools, take a good look at your system. This initial assessment can reveal valuable clues.
* Check the Air Filter: A clogged air filter is one of the most common causes of HVAC problems. A dirty filter restricts airflow, which can impact system pressures and performance. Replace it if it's dirty. This is a simple DIY task. * Inspect the Outdoor Unit (Condenser): Look for any obvious obstructions around the outdoor unit, such as bushes, leaves, or debris. Make sure the condenser fan is running smoothly when the unit is on. Clean away any visible debris. Don't stick your hands inside the unit while it's running! * Listen for Unusual Noises: Pay attention to any unusual noises coming from the indoor unit (air handler) or the outdoor unit. Clicking, hissing, or grinding sounds can indicate mechanical problems or refrigerant leaks. Note any sounds you hear. * Check for Ice Buildup: Look for ice buildup on the refrigerant lines or the evaporator coil (usually inside the air handler). Ice can indicate low refrigerant or airflow problems. If you see ice, turn off the system and let it thaw completely before proceeding. * Verify Thermostat Settings: Make sure your thermostat is set correctly and that the batteries are good. A simple setting error can cause the system to run incorrectly.Step 2: Gathering More Information (Basic Equipment Required)
If the initial assessment doesn't reveal the problem, you'll need some basic equipment to check the refrigerant pressures. This requires manifold gauges and ideally a thermometer. Caution: Working with refrigerant requires some knowledge and caution. If you're not comfortable working with these tools, it's best to call a professional.
* Connect Manifold Gauges: Carefully connect the manifold gauges to the service ports on the outdoor unit. The blue hose connects to the suction (low-pressure) side, and the red hose connects to the discharge (high-pressure) side. The yellow hose is typically used for charging or evacuating the system, but you won't be using it in this troubleshooting step. * Record Suction and Discharge Pressures: With the system running, record the suction and discharge pressures displayed on the gauges. Be sure to note the outdoor temperature at the time of measurement, as this is essential for interpreting the readings. Also, make sure the unit has been running for at least 15 minutes before taking readings to allow the system to stabilize.Step 3: Interpreting the Readings with an R404a Pressure Chart
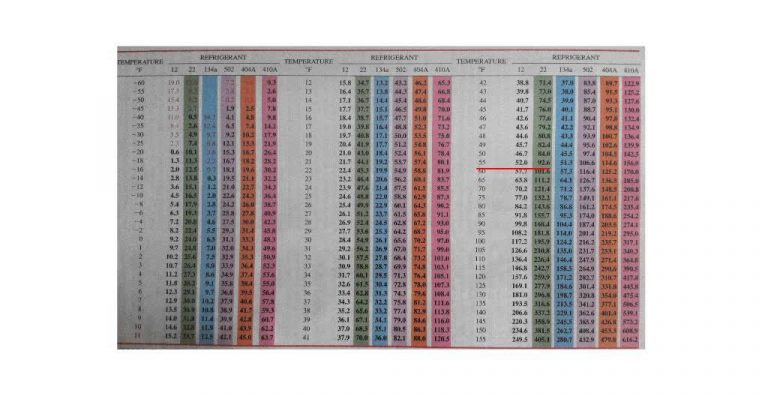
Now comes the crucial step: interpreting the pressure readings using an R404a pressure chart. These charts correlate the ideal suction and discharge pressures with the outdoor temperature.
* Find a Reliable R404a Pressure Chart: You can find R404a pressure charts online (search for "R404a pressure temperature chart") or in HVAC service manuals. Make sure the chart is specifically for R404a refrigerant. Different refrigerants have different pressure characteristics. * Locate Your Outdoor Temperature: Find the outdoor temperature you recorded earlier on the chart. * Identify Ideal Pressure Ranges: The chart will show the corresponding ideal suction and discharge pressure ranges for that temperature. These are usually expressed as a range (e.g., 60-70 PSI for suction, 200-250 PSI for discharge). * Compare Your Readings to the Chart: Compare the suction and discharge pressures you recorded with the ideal ranges on the chart. Are your pressures within the normal range? Are they too high, too low, or one high and one low?Step 4: Diagnosing the Problem Based on Pressure Readings
Here's a breakdown of common problems based on pressure readings:
* Low Suction Pressure and Low Discharge Pressure: This often indicates a refrigerant leak. The system is simply low on refrigerant. This typically requires a professional to locate and repair the leak and recharge the system. Attempting to add refrigerant without fixing the leak is only a temporary solution and is environmentally irresponsible. * High Suction Pressure and High Discharge Pressure: This could indicate several issues, including: * Overcharged Refrigerant: Too much refrigerant in the system. Requires a professional to safely remove excess refrigerant. * Non-Condensables in the System: Air or other non-condensable gases in the refrigerant lines. This is usually the result of improper installation or repair. Requires a professional to evacuate and recharge the system. * Restriction in the Liquid Line: A blockage in the line carrying liquid refrigerant to the evaporator. Requires a professional to diagnose and clear the restriction. * Low Suction Pressure and Normal to High Discharge Pressure: This might indicate: * Restricted Evaporator Coil: The evaporator coil (inside the air handler) might be dirty or blocked, restricting airflow. Double-check your air filter and inspect the coil if possible. (Consult a professional before attempting to clean the evaporator coil yourself, as it can be delicate.) * Expansion Valve Issue: The expansion valve regulates the flow of refrigerant into the evaporator. If it's malfunctioning, it can cause low suction pressure. Requires a professional to diagnose and repair. * Normal Suction Pressure and High Discharge Pressure: This is often caused by: * Dirty Condenser Coil: A dirty condenser coil restricts airflow, causing the discharge pressure to rise. Carefully clean the condenser coil with a fin comb or a gentle stream of water from a garden hose (be careful not to bend the fins). Turn off the power to the unit before cleaning. * Condenser Fan Malfunction: If the condenser fan isn't running properly, it won't effectively cool the refrigerant, leading to high discharge pressure. Check the fan motor and blades for any damage. Requires a professional if the fan motor is faulty.Step 5: DIY Actions (With Caution)
Based on your diagnosis, here are some DIY actions you can take if you're comfortable and confident. Remember, safety first! If you're unsure, always call a professional.
* Replace the Air Filter: As mentioned earlier, a clogged air filter is a common culprit. Replace it regularly. * Clean the Condenser Coil: Carefully clean the outdoor condenser coil with a fin comb or a gentle stream of water. * Clear Obstructions Around the Outdoor Unit: Remove any bushes, leaves, or debris that are blocking airflow to the outdoor unit. * Ensure Proper Airflow: Make sure vents and registers inside your home are open and unobstructed.When to Call a Professional
It's crucial to recognize when a problem is beyond your DIY capabilities. Always call a qualified HVAC technician in the following situations:
* Refrigerant Leaks: Dealing with refrigerant leaks requires specialized equipment and knowledge. Refrigerant is harmful to the environment, and improper handling can be dangerous. * Compressor Issues: Compressor problems are complex and require professional diagnosis and repair. * Electrical Issues: Never attempt to work on electrical components of your HVAC system unless you are a qualified electrician. * Expansion Valve Problems: Diagnosing and repairing expansion valve problems requires specialized tools and expertise. * Any Situation You're Uncomfortable With: If you're unsure about any step of the troubleshooting process, it's always best to err on the side of caution and call a professional. * Suspect a System Overcharge: This requires specialized equipment to remove the excess refrigerant. * Non-Condensibles in the System: System evacuation and recharge require specialized equipment and training.Safety First!
Working with HVAC systems involves potential hazards. Always take the following precautions:
* Turn off the power to the unit before performing any maintenance. * Wear safety glasses to protect your eyes. * Be careful when handling refrigerant. It can cause frostbite. * Never work on the system alone. * If you're unsure about anything, call a professional.Conclusion
Troubleshooting R404a suction and discharge pressures can seem daunting, but by following these steps and using a pressure chart, you can gain valuable insights into your system's performance. Remember to start with simple checks and only attempt DIY repairs if you're comfortable and confident. Knowing when to call a professional is crucial for ensuring the safety and longevity of your HVAC system. By being proactive and informed, you can help keep your home comfortable year-round and potentially save on costly repairs.