Radiator Btu Calculator From Radiator Size
Many homeowners face the frustrating issue of rooms that are persistently too cold or too hot, despite having radiators. Often, the culprit isn't a faulty radiator itself, but rather an incorrect estimation of the British Thermal Units (BTUs) needed to properly heat the space, leading to an undersized or oversized radiator.
This article will guide you through troubleshooting whether your radiator is adequately sized by using a 'Radiator BTU Calculator from Radiator Size' approach. We'll cover common problems, step-by-step diagnosis, and safe DIY fixes, while also clearly indicating when it's time to call in a professional.
Understanding the Problem: Are Your Radiators Really Undersized?
Before jumping to conclusions, it's crucial to rule out other potential issues. A seemingly undersized radiator might be perfectly adequate if there's another problem hindering its performance. Consider these factors:
- Air in the System: Trapped air can significantly reduce a radiator's efficiency.
- Sludge Build-up: Over time, sludge can accumulate inside the radiator, restricting water flow.
- Improperly Balanced System: An unbalanced system can result in some radiators receiving insufficient hot water.
- Poor Insulation: Heat loss through walls, windows, and roofs can make even a correctly sized radiator seem inadequate.
Only after addressing these potential issues should you consider whether the radiator is truly undersized.
Step 1: Gathering Information - Measure Your Radiator and Your Room
The first step in determining whether your radiator provides the correct BTU output is to accurately measure both the radiator itself and the room it’s heating. Precision is key here.
Measuring Your Radiator
You'll need the following dimensions of your radiator:
- Height: Measure from the top to the bottom of the radiator.
- Length: Measure the width of the radiator from one end to the other.
- Depth: Measure the distance from the front to the back of the radiator. For double-panel radiators, measure the depth of both panels and the gap between them.
Note: Be as precise as possible, measuring to the nearest centimeter or inch. Record all measurements carefully.
Measuring Your Room
You'll also need the dimensions of the room the radiator is heating:
- Length: Measure the length of the room.
- Width: Measure the width of the room.
- Height: Measure the height of the room from floor to ceiling.
Record these measurements accurately as well. You'll use these to calculate the room's volume.
Step 2: Estimating Current Radiator BTU Output
Unfortunately, there's no universal formula to perfectly calculate BTU output based solely on radiator dimensions. The BTU output depends on factors like radiator type (single panel, double panel, convector), the material it's made from (cast iron, steel), and the average water temperature flowing through it.
However, we can use some *estimates* to get a rough idea of the radiator’s output.
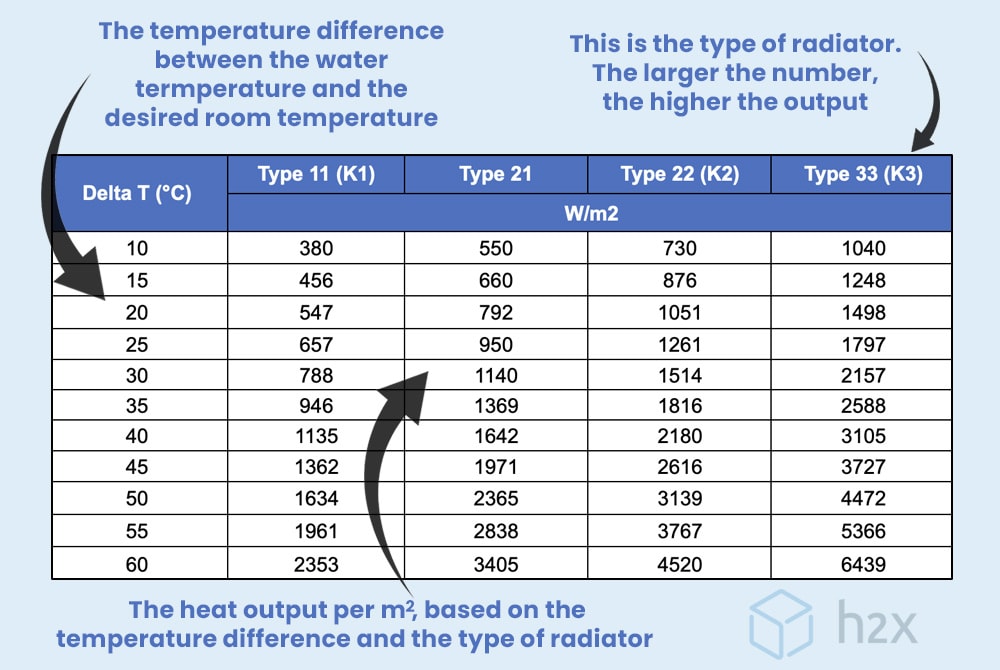
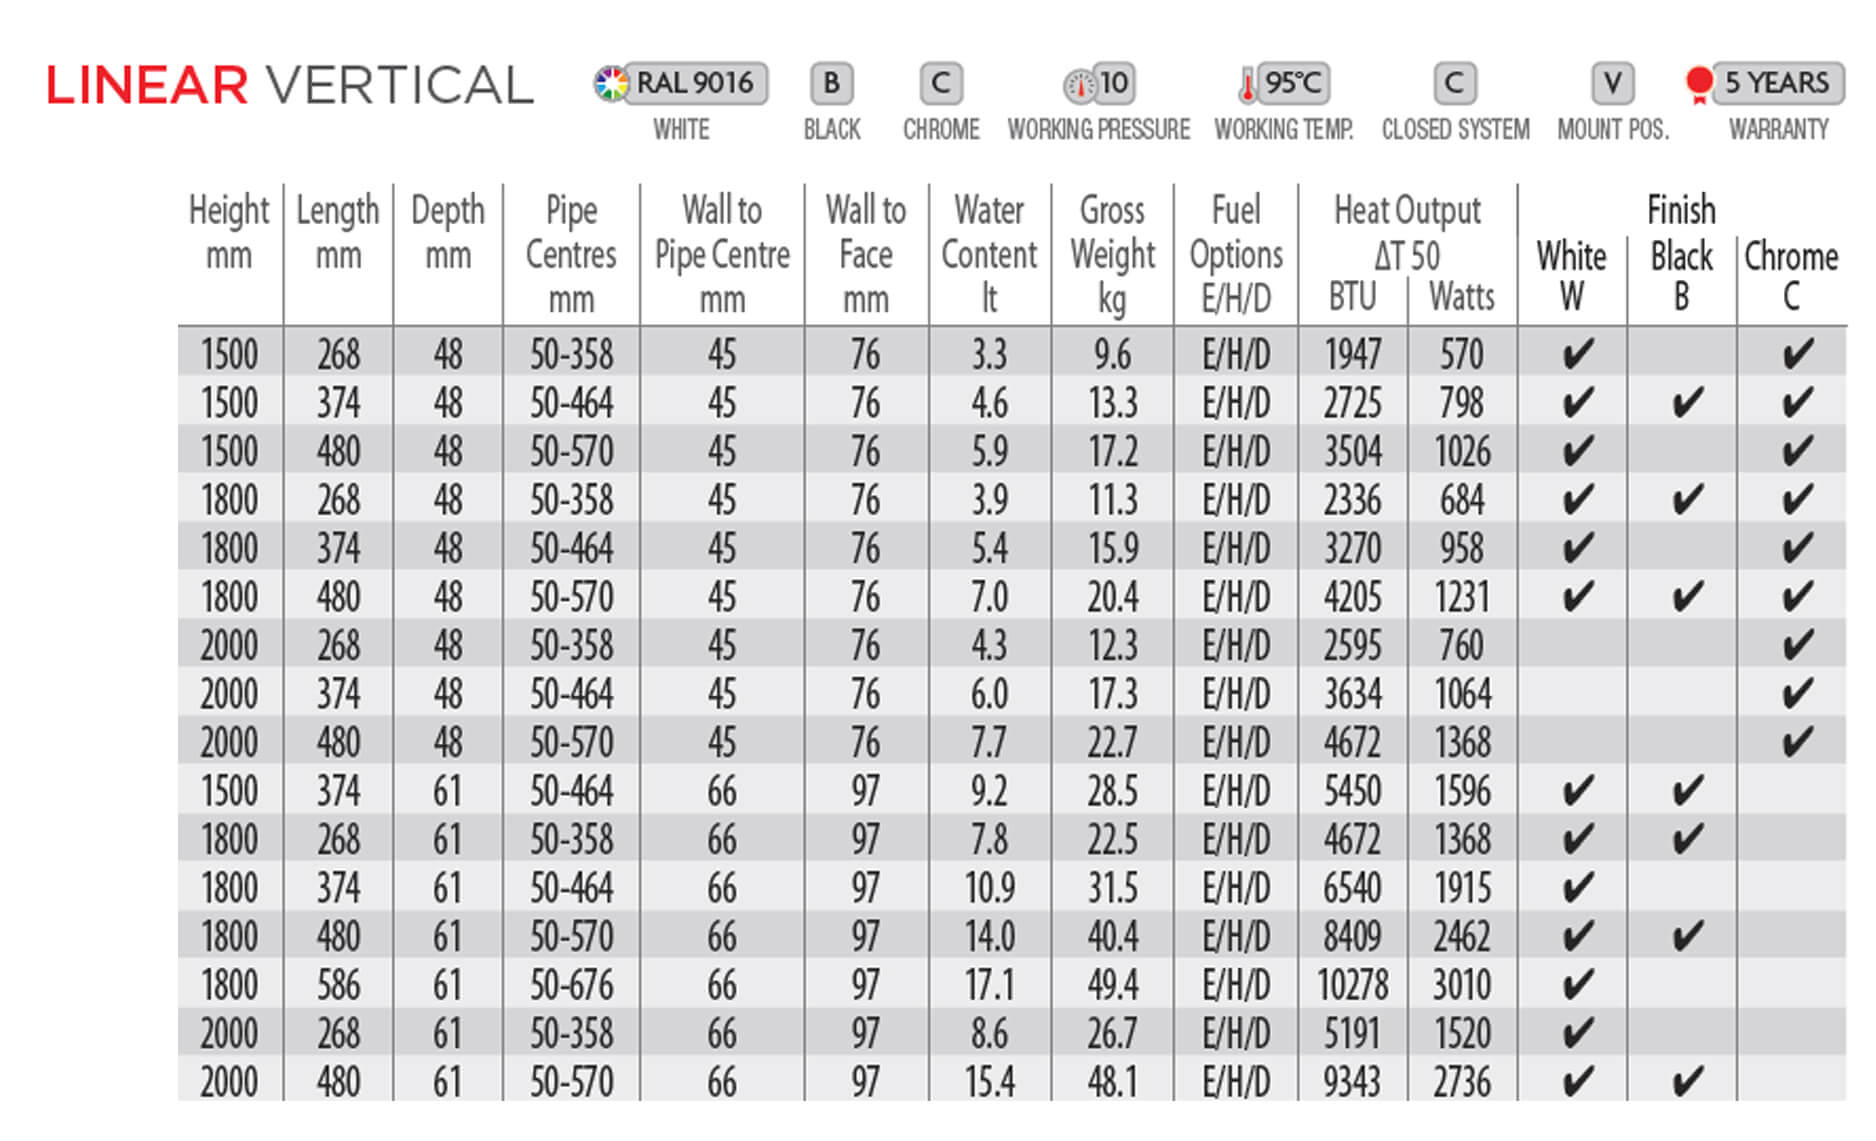
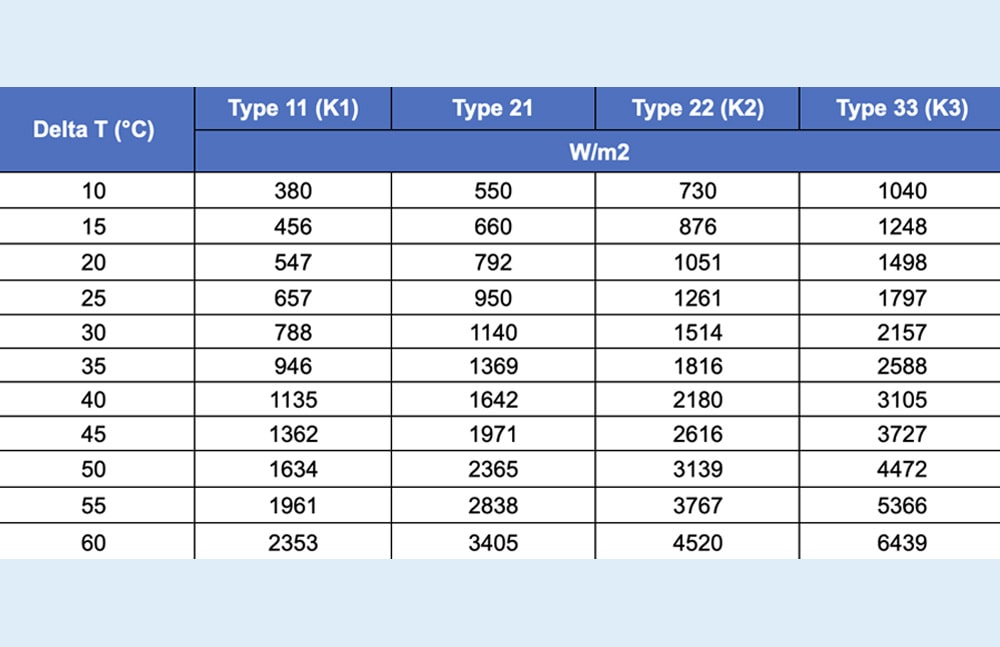
Look for a Label: The easiest way to find the BTU output is to look for a label on the radiator itself. This label, often located on the side or back, should provide the BTU rating at a specific temperature difference (e.g., Delta T50, which means a 50°C temperature difference between the radiator and the room). If you can find this label, you’ve already bypassed the estimation process.
Using Online BTU Calculators (with caution): Many websites offer online "radiator BTU calculators" that estimate the BTU output based on dimensions. *Use these with caution*. They often rely on averages and may not be entirely accurate for your specific radiator.
General Estimations (Least Accurate): If you cannot find a label or use a calculator with specific radiator data, you can use very general estimates. These are the *least accurate* but can give you a ballpark figure:
- Single Panel Radiators: As a very rough estimate, assume around 500 BTU per square foot of radiator surface area (height x length).
- Double Panel Radiators: As a very rough estimate, assume around 800 BTU per square foot of radiator surface area (height x length).
Important Note: These estimations are highly variable and should be treated as a starting point, not a definitive answer.
Step 3: Calculating Required BTU for the Room
Now that you have an estimate of your radiator's BTU output, you need to determine the BTU requirement for the room. Several online calculators can help you with this, but here’s a basic breakdown:
Factors Affecting BTU Requirement:
- Room Volume: The larger the room, the more BTUs are needed. (Length x Width x Height)
- Insulation Quality: Poorly insulated rooms require more BTUs.
- Window Quantity and Type: Windows are a major source of heat loss. Single-pane windows require more BTUs than double-pane.
- External Walls: Rooms with more external walls exposed to the outside require more BTUs.
- Location: Rooms in colder climates require more BTUs.
- Desired Temperature: The higher the desired temperature, the more BTUs are needed.
Using an Online BTU Calculator: The easiest and most accurate way is to use an online BTU calculator. Search for "room BTU calculator" and choose a reputable site. Input the room dimensions, insulation quality, window information, and other relevant factors. The calculator will provide an estimated BTU requirement for the room.
Manual Calculation (Less Accurate): While online calculators are recommended, you can perform a rough manual calculation. This method is less accurate but provides a general idea:
- Calculate Room Volume: Multiply the length, width, and height of the room in feet. (Length x Width x Height = Cubic Feet)
- Multiply by a BTU Factor: Multiply the room volume by a BTU factor based on your climate and insulation:
- Poorly Insulated Room in a Cold Climate: 6-8 BTU per cubic foot.
- Average Insulated Room in a Moderate Climate: 4-6 BTU per cubic foot.
- Well Insulated Room in a Mild Climate: 2-4 BTU per cubic foot.
Example: A poorly insulated room in a cold climate measuring 10ft x 12ft x 8ft would have a volume of 960 cubic feet. Multiplying by a BTU factor of 7 would give a required BTU of 6720.
Step 4: Comparing Estimated Radiator Output with Required BTU
Now you have two crucial numbers: an estimated BTU output for your radiator (from Step 2) and the required BTU for your room (from Step 3). *Compare these values*.
Radiator BTU is Significantly Lower than Required BTU: This indicates that your radiator is likely undersized. You may need to replace it with a larger one or add an additional radiator.
Radiator BTU is Roughly Equal to Required BTU: This suggests that your radiator is appropriately sized. If you're still experiencing cold spots, investigate other issues like air in the system, sludge build-up, or poor insulation.
Radiator BTU is Significantly Higher than Required BTU: This indicates that your radiator is oversized. While not as problematic as an undersized radiator, it can lead to overheating and energy waste. Consider turning down the thermostatic radiator valve (TRV) or, in extreme cases, replacing the radiator with a smaller one.
Step 5: DIY Fixes and When to Call a Professional
Before rushing to replace your radiator, try these DIY fixes:
Bleeding Your Radiator (Removing Air)
Problem: Radiator is cold at the top but warm at the bottom, indicating trapped air.
Solution:
- Turn off your heating system and let the radiators cool down completely.
- Locate the bleed valve on the top of the radiator (usually on one end).
- Insert a radiator bleed key into the valve.
- Slowly turn the key counterclockwise until you hear a hissing sound (air escaping).
- Hold a cloth beneath the valve to catch any water.
- Once water starts to trickle out instead of air, close the valve by turning the key clockwise.
- Repeat for all radiators in your home, starting with the ones furthest from the boiler.
- Turn your heating system back on and check if the radiators are heating evenly.
Balancing Your Radiators
Problem: Some radiators heat up quickly while others remain cold, indicating an unbalanced system.
Solution:
- Turn off your heating system and let the radiators cool down completely.
- Identify the lockshield valve on each radiator (usually located on the opposite side of the TRV).
- Fully open the lockshield valve on the radiator furthest from the boiler.
- Gradually close the lockshield valves on the radiators closer to the boiler, restricting the water flow. The closer to the boiler, the more you close the valve.
- Turn your heating system back on and monitor how quickly each radiator heats up.
- Adjust the lockshield valves until all radiators heat up at roughly the same rate. This may take several adjustments and checks.
Cleaning the Radiator Exterior
Problem: Dust and debris can insulate the radiator and reduce its efficiency.
Solution: Regularly dust and vacuum your radiators, paying attention to the fins and crevices.
When to Call a Professional
While DIY fixes can address some common issues, certain problems require professional intervention:
- Sludge Build-up: If your radiators are consistently cold at the bottom, even after bleeding, sludge build-up is likely. A professional power flush is needed to remove the sludge.
- Radiator Leaks: Any sign of a radiator leak requires immediate professional attention to prevent water damage.
- Boiler Issues: If you suspect a problem with your boiler, such as low water pressure or burner malfunctions, contact a qualified heating engineer.
- Complex Plumbing Adjustments: If you're uncomfortable making adjustments to your plumbing system, it's best to leave it to the professionals.
- Replacing a Radiator: Replacing a radiator involves draining the system and making plumbing connections, which should ideally be done by a qualified plumber to ensure proper installation and prevent leaks. *Especially if you are unfamiliar with plumbing, do not attempt this.*
Specifically, regarding BTU calculations: If, after performing the estimations outlined above, you are still unsure about the correct radiator size for your room, *consult with a heating professional*. They can perform a more accurate heat loss calculation and recommend the appropriate radiator size based on your specific needs and building characteristics.
Do not hesitate to contact a professional when unsure. Attempting complex repairs yourself can potentially damage your heating system and lead to costly repairs.
By following these steps, you can effectively troubleshoot whether your radiator is adequately sized and take appropriate action to ensure your home is warm and comfortable. Remember to prioritize safety and consult a professional when necessary. Good luck!