Refrigeration Parts And Functions

Understanding the inner workings of your air conditioning system can empower you to identify minor issues and potentially save on costly repair bills. This guide breaks down the essential refrigeration parts and functions within your HVAC system, offering insights for homeowners and DIY enthusiasts.
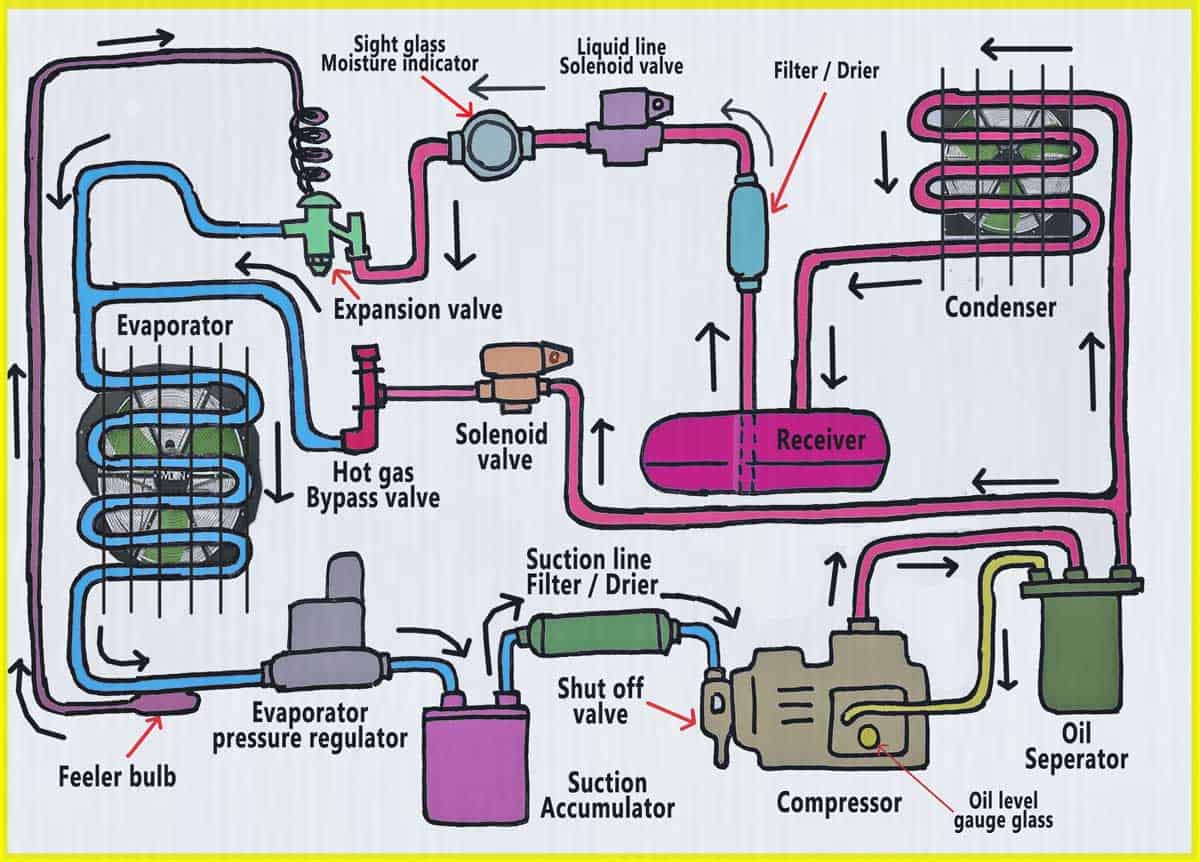
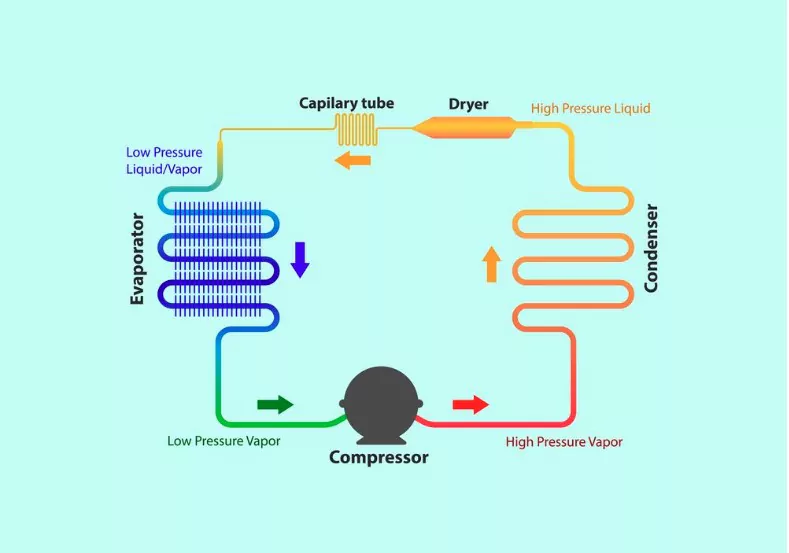
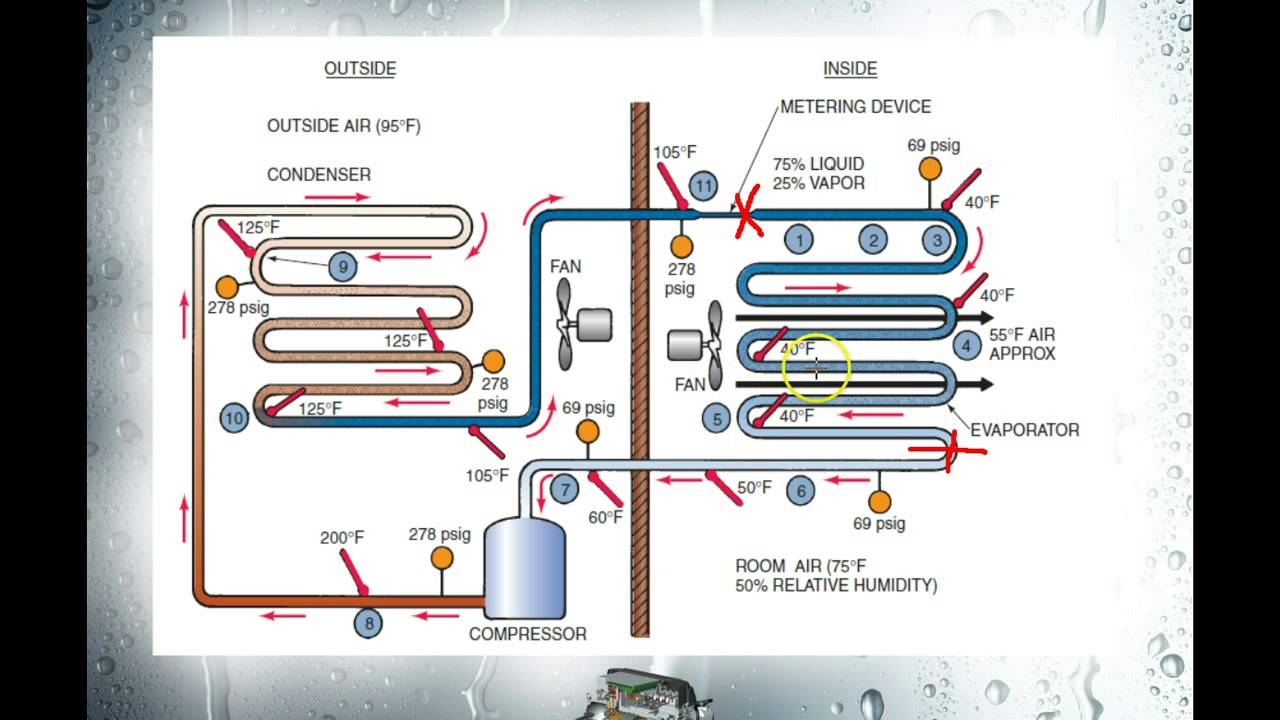
The Refrigeration Cycle: A Quick Overview
Before diving into individual components, it's crucial to grasp the fundamentals of the refrigeration cycle. This cycle, facilitated by refrigerant, is how your AC removes heat from your home. It involves four key processes:
- Evaporation: Refrigerant absorbs heat and changes from a liquid to a gas.
- Compression: The refrigerant gas is compressed, increasing its temperature and pressure.
- Condensation: The hot, high-pressure gas releases heat and changes back into a liquid.
- Expansion: The liquid refrigerant passes through an expansion valve, reducing its pressure and temperature, ready to repeat the cycle.
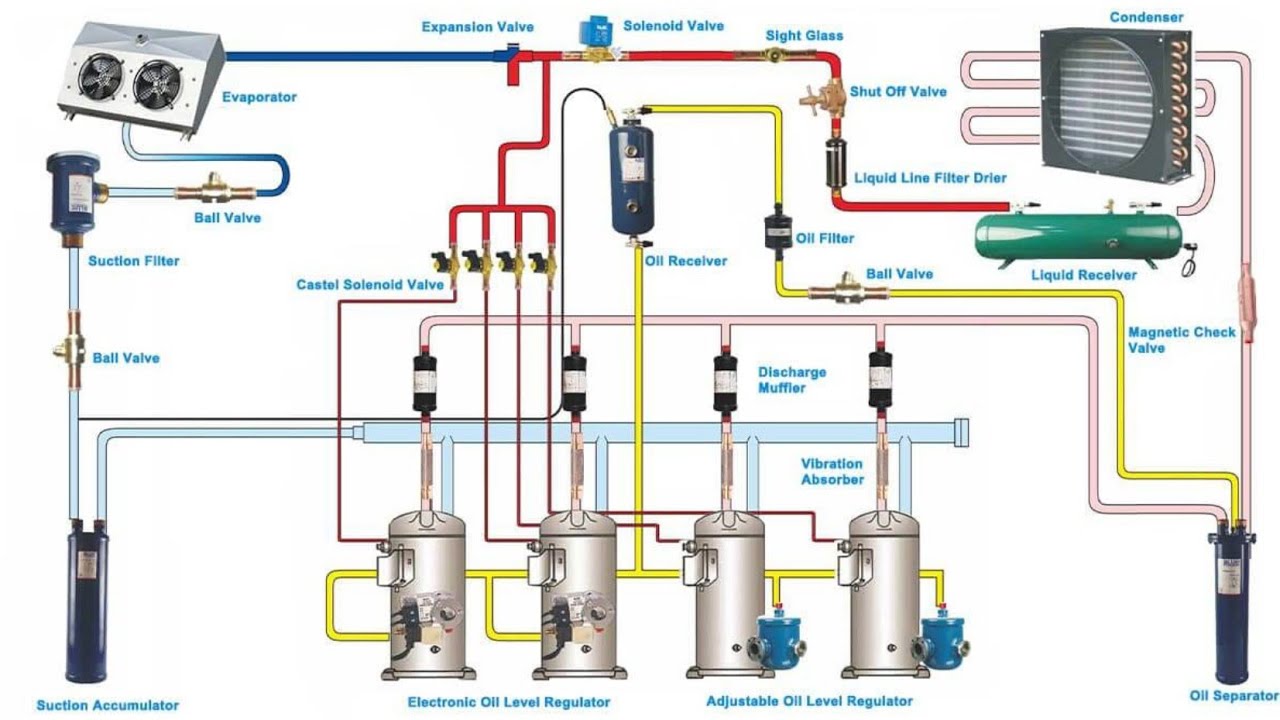
Key Refrigeration Parts and Their Functions
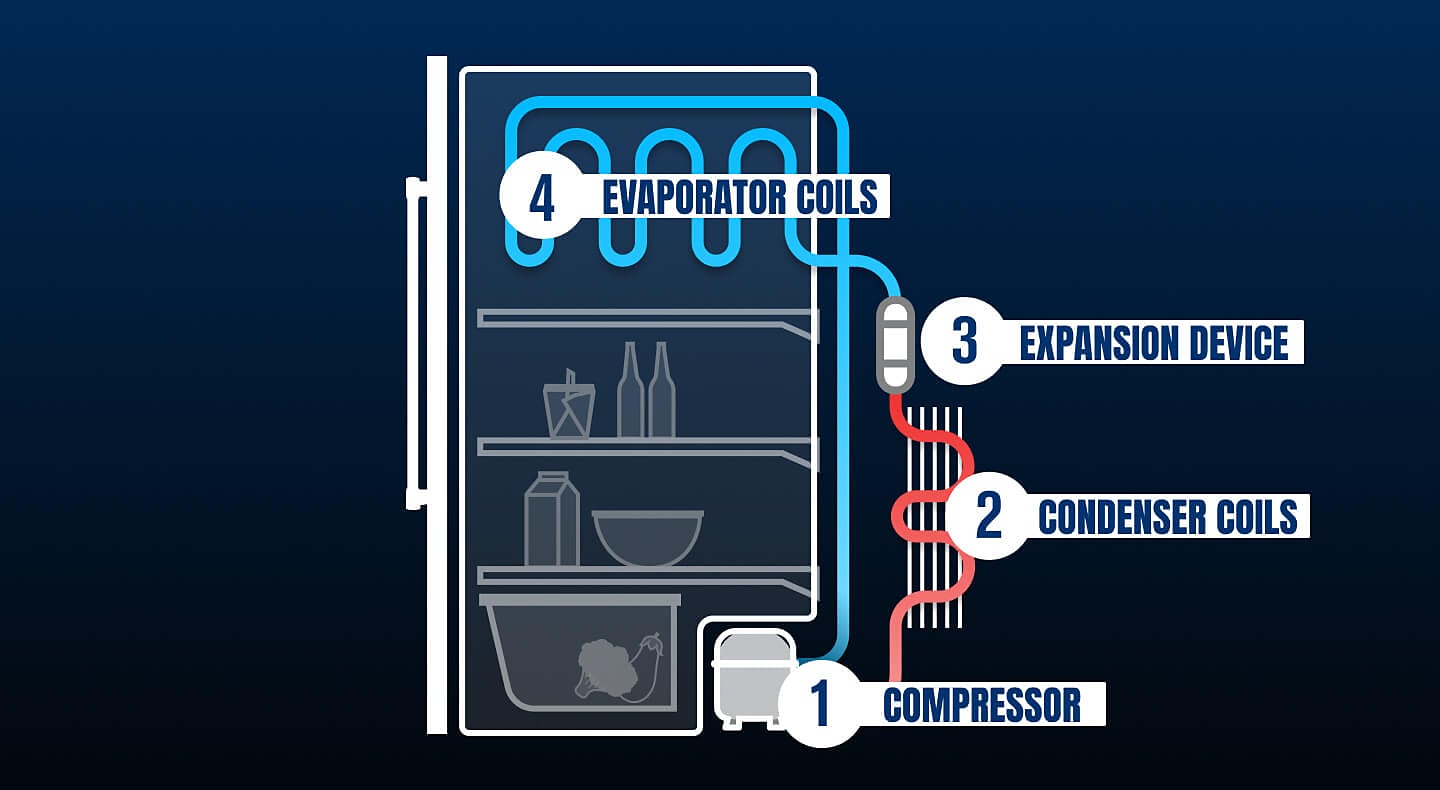
1. Compressor: The Heart of the System
The compressor is arguably the most vital and often the most expensive component in your AC unit. Its primary function is to compress the refrigerant gas, increasing its temperature and pressure. This process allows the refrigerant to effectively release heat in the condenser.
Common Issues:
- Hard starting: Difficulty initiating the compression cycle.
- Overheating: Excessive heat buildup due to lubrication issues or refrigerant leaks.
- Worn bearings: Resulting in unusual noises and reduced efficiency.
- Complete failure: No compression, leading to a non-functional AC.
DIY Considerations: Compressor repairs are generally best left to professionals due to the complexity of the task and the handling of refrigerant. Replacement often requires specialized tools and expertise.
Estimated Repair Cost: Replacing a compressor can range from $800 to $2,500, depending on the unit and labor costs.
2. Condenser Coil: Heat Rejection
The condenser coil is typically located in the outdoor unit. It's responsible for dissipating the heat absorbed by the refrigerant inside your home. As hot, high-pressure refrigerant gas flows through the coil, it releases heat to the outside air and condenses back into a liquid.
Common Issues:
- Dirty coils: Insufficient airflow due to dirt and debris buildup, reducing heat transfer.
- Damaged fins: Bent or damaged fins hindering airflow.
- Refrigerant leaks: Leaks in the coil reducing system pressure.
DIY Considerations: Cleaning condenser coils is a task you can handle yourself. Use a fin comb to straighten bent fins carefully. However, if you suspect a refrigerant leak, contact a qualified HVAC technician immediately.
Estimated Repair Cost: Coil cleaning can cost $75 - $200. Replacing a condenser coil can range from $700 to $1,800.
3. Evaporator Coil: Heat Absorption
The evaporator coil is located inside your indoor unit, usually within the air handler. Its function is to absorb heat from the air circulating through your home, cooling it down. Liquid refrigerant flows through the coil, absorbs heat, and evaporates into a gas.
Common Issues:
- Dirty coils: Reduced heat transfer due to dust and debris buildup.
- Frozen coils: Restricted airflow or low refrigerant levels leading to ice formation.
- Refrigerant leaks: Leaks in the coil, reducing system pressure.
DIY Considerations: Similar to the condenser coil, you can clean the evaporator coil. Ensure proper ventilation and use a suitable coil cleaner. If you notice ice buildup, try thawing it by turning off your AC and running the fan. If the problem persists, it could indicate a refrigerant leak or airflow issue requiring professional attention.
Estimated Repair Cost: Coil cleaning can cost $75 - $200. Replacing an evaporator coil can range from $800 to $2,000.
4. Expansion Valve (or Metering Device): Pressure Reduction
The expansion valve (also known as a metering device, TXV or orifice tube) controls the flow of refrigerant into the evaporator coil. It reduces the pressure of the liquid refrigerant, allowing it to evaporate and absorb heat efficiently.
Common Issues:
- Clogging: Debris or contaminants blocking the valve, restricting refrigerant flow.
- Malfunction: Failure to properly regulate refrigerant flow, leading to inefficient cooling or freezing.
- Improper calibration: Incorrect settings resulting in poor performance.
DIY Considerations: Diagnosing and repairing expansion valve issues are best left to professionals. Proper refrigerant charge and system balance are crucial for optimal performance. Incorrect repairs can damage the compressor.
Estimated Repair Cost: Replacing an expansion valve can range from $200 to $600.
5. Refrigerant Lines: The Delivery System
Refrigerant lines are copper pipes that connect the various components of the refrigeration system, carrying the refrigerant between the compressor, condenser, evaporator, and expansion valve.
Common Issues:
- Leaks: Refrigerant leaking at joints or from damaged pipes.
- Kinks or bends: Restricted refrigerant flow.
- Corrosion: Corrosion of the copper lines due to environmental factors.
DIY Considerations: Identifying refrigerant leaks requires specialized equipment. Sealing refrigerant lines and adding refrigerant should only be done by a certified technician. Small kinks can sometimes be carefully straightened, but severe damage requires professional repair.
Estimated Repair Cost: Repairing or replacing refrigerant lines can range from $150 to $800, depending on the extent of the damage and labor costs.
6. Refrigerant: The Lifeblood
Refrigerant is the substance that absorbs and releases heat, enabling the cooling process. Different types of refrigerants exist, each with specific properties and environmental considerations. Older systems often use R-22, which is being phased out due to its ozone-depleting potential. Newer systems typically use R-410A or other environmentally friendly refrigerants.
Common Issues:
- Leaks: Refrigerant leaks leading to reduced cooling capacity and potential environmental harm.
- Contamination: Moisture or air entering the system, reducing efficiency and potentially damaging components.
- Low charge: Insufficient refrigerant charge resulting in poor cooling performance.
DIY Considerations: Handling refrigerant requires EPA certification. Recharging a system with refrigerant should only be done by a licensed technician. Leaks must be located and repaired before adding refrigerant.
Estimated Repair Cost: Adding refrigerant can range from $150 to $500, depending on the type of refrigerant and the amount needed. Leak detection and repair will add to the cost.
Essential Tools for HVAC Maintenance (DIYers)
- Fin comb: For straightening bent condenser and evaporator coil fins.
- Coil cleaner: For removing dirt and debris from coils.
- Screwdrivers: Various sizes and types for accessing components.
- Wrenches: For tightening and loosening connections.
- Vacuum: Cleaning internal components safely
Safety First: Important Precautions
- Always disconnect power: Before working on any electrical components, disconnect the power supply.
- Wear safety glasses and gloves: Protect your eyes and hands from potential hazards.
- Avoid direct contact with refrigerant: Refrigerant can cause frostbite.
- Do not attempt complex repairs: If you're unsure about a repair, consult a qualified HVAC technician.
- Be aware of refrigerant regulations: Handling refrigerant requires EPA certification.
When to Call a Professional
While some HVAC maintenance tasks are suitable for DIYers, certain repairs require the expertise of a qualified technician. Call a professional if you encounter the following:
- Refrigerant leaks: Identifying and repairing refrigerant leaks requires specialized equipment.
- Compressor issues: Compressor repairs are complex and often involve handling refrigerant.
- Electrical problems: Diagnosing and repairing electrical faults can be dangerous.
- Complex system diagnostics: Identifying the root cause of a problem can be challenging without specialized tools and knowledge.
- Uncertainty: If you're unsure about a repair, it's always best to consult a professional to avoid further damage.
Troubleshooting Common AC Problems
- AC not cooling: Check the thermostat, air filter, and outdoor unit for obstructions.
- Weak airflow: Clean or replace the air filter, and check for blocked vents.
- Strange noises: Investigate the source of the noise and call a professional if necessary.
- Water leaks: Check the condensate drain line for clogs.
- Frozen coils: Thaw the coils and address the underlying cause (e.g., low refrigerant, airflow obstruction).
By understanding the function of each refrigeration part and following these guidelines, you can better maintain your AC system and potentially save on repair costs. Remember, safety is paramount, and some repairs are best left to the professionals.