Reliance Water Heater Parts Diagram

One of the most frustrating homeowner experiences is waking up to a cold shower. Your Reliance water heater, usually a reliable appliance, suddenly isn't delivering the hot water you expect. While it's tempting to panic, understanding the basics of your water heater and having access to a Reliance Water Heater Parts Diagram can empower you to diagnose and potentially fix the issue yourself. This guide will walk you through a systematic approach to troubleshooting, keeping safety a priority.
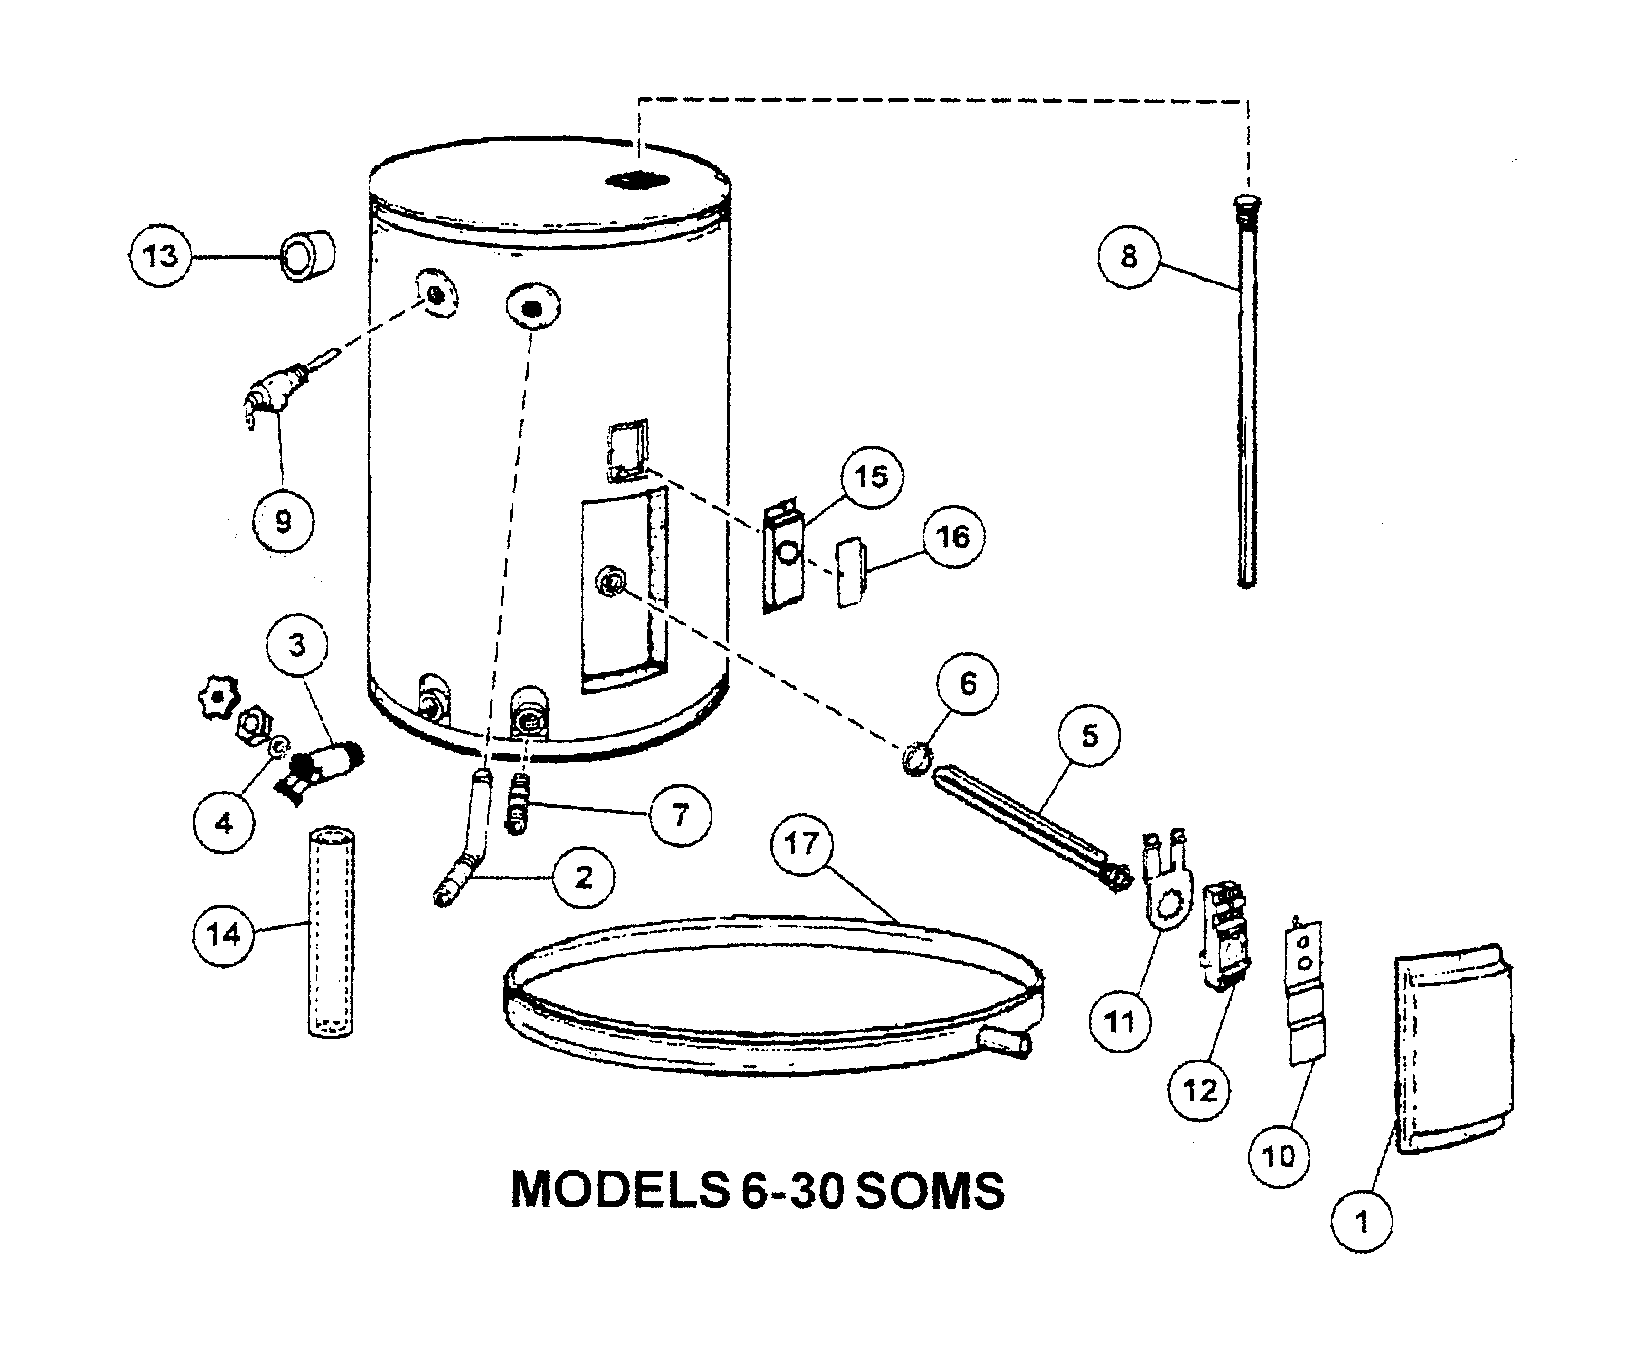
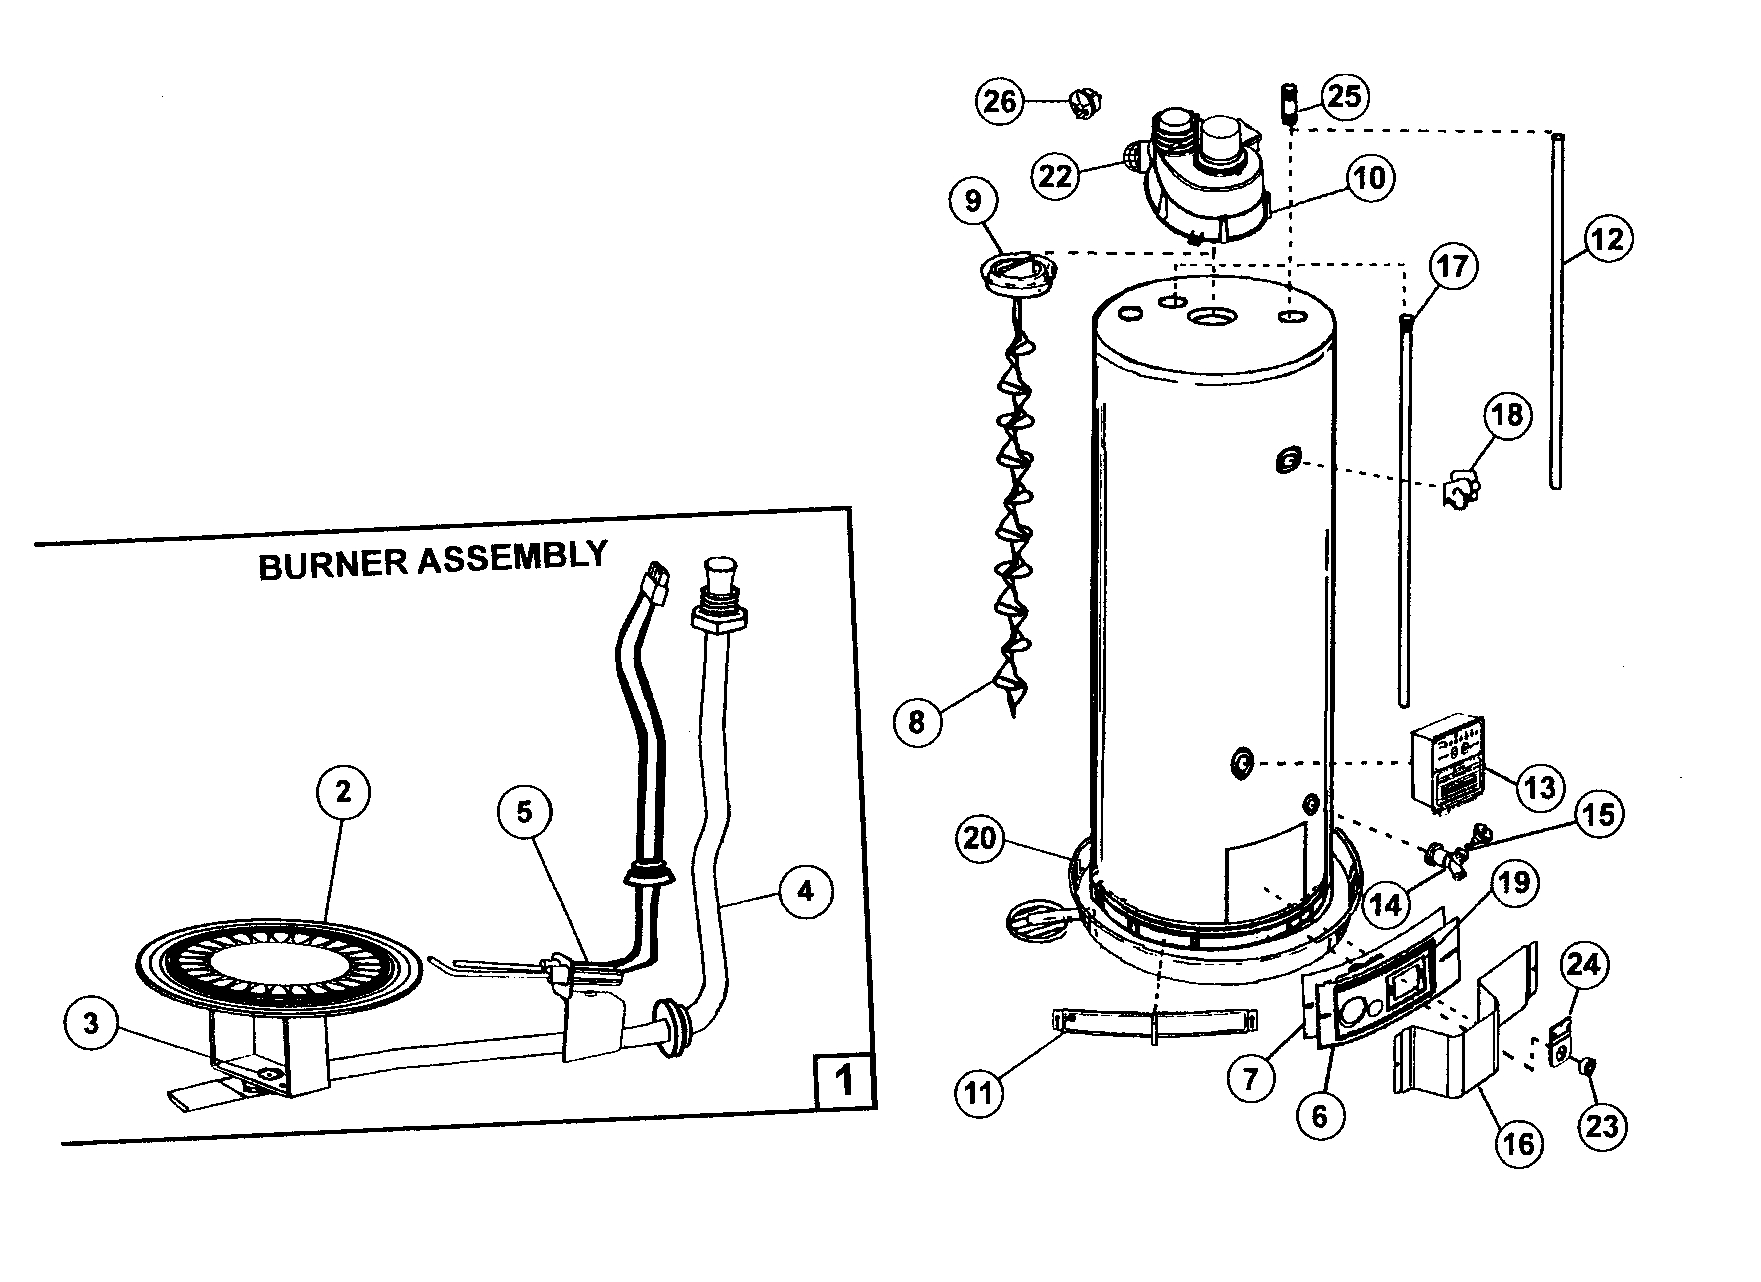
Understanding Your Reliance Water Heater: The Parts Diagram is Key
Before diving into the troubleshooting steps, let's emphasize the importance of the Reliance Water Heater Parts Diagram. You can usually find this diagram in your water heater's user manual or on the manufacturer's website. The diagram provides a visual representation of all the components, allowing you to identify them correctly. This is crucial for accurate diagnosis.
Key components to familiarize yourself with using the diagram include:
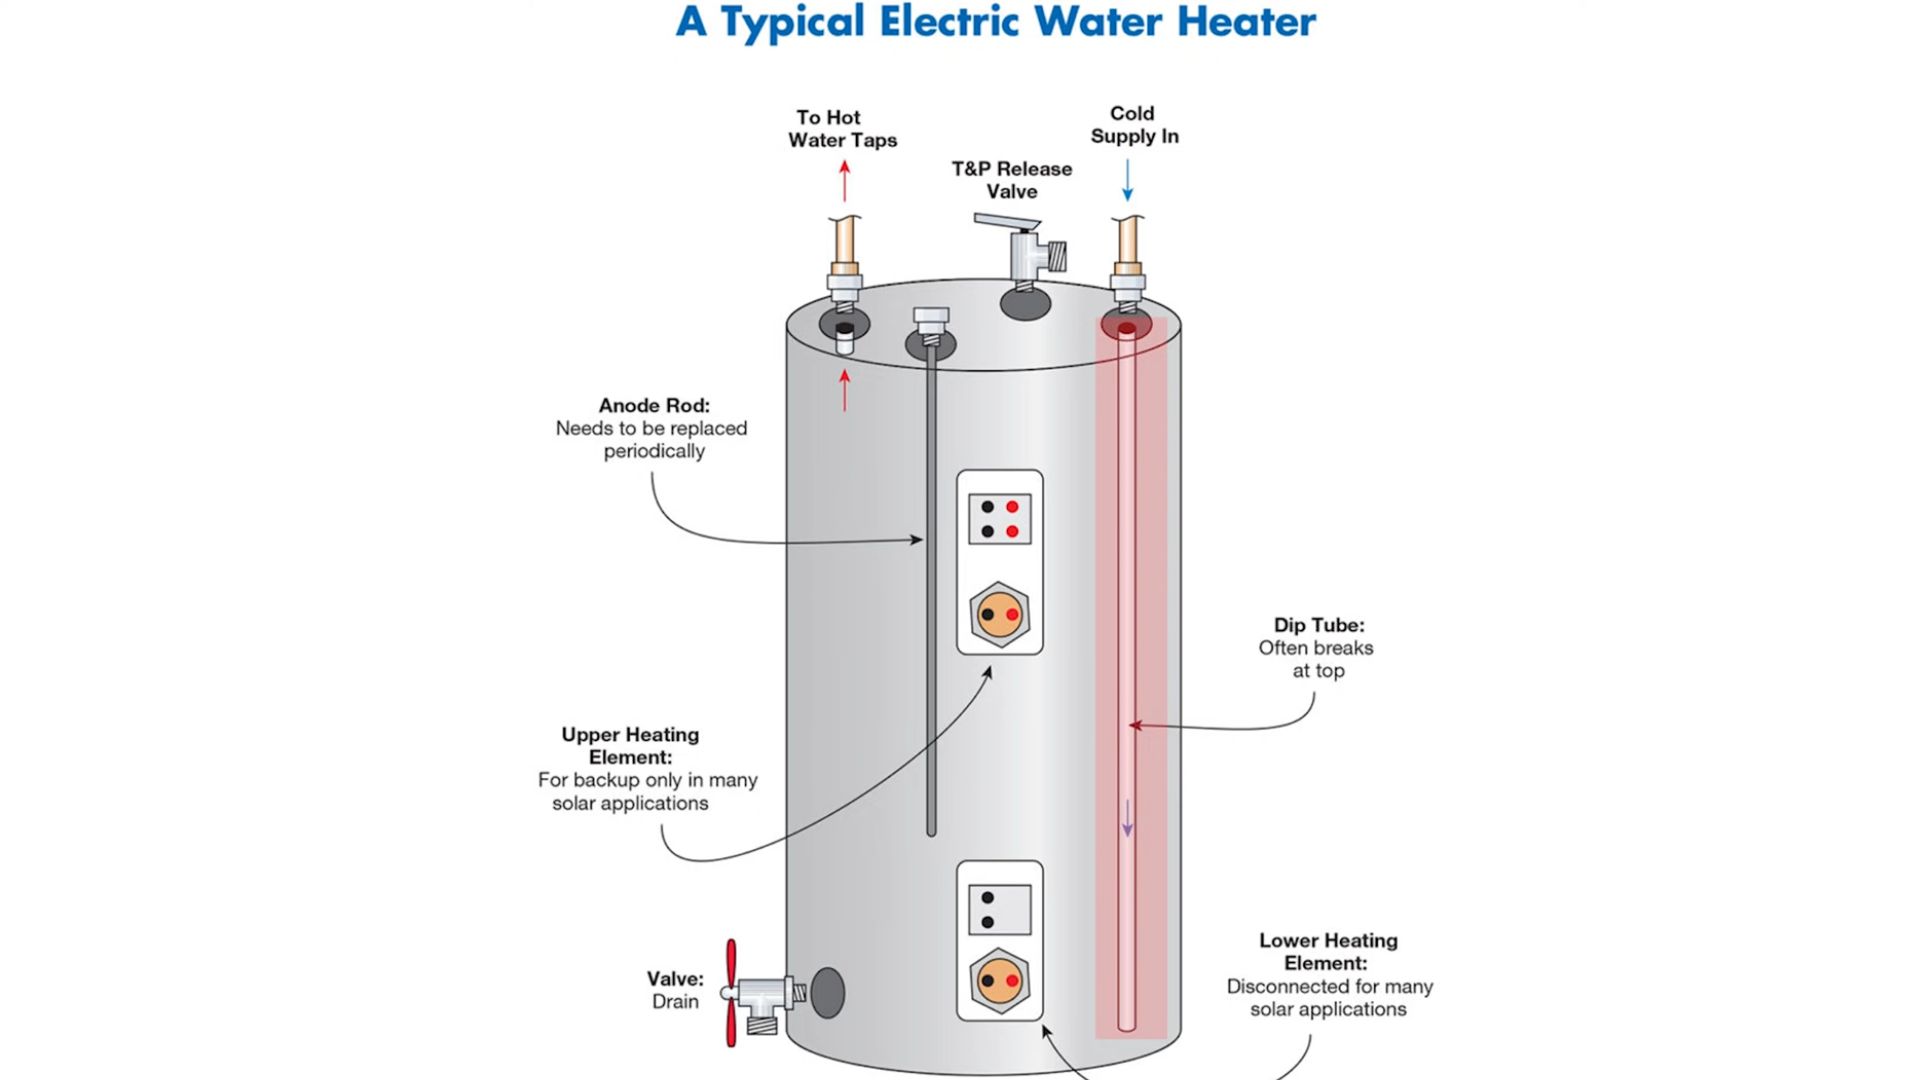
- Dip Tube: Brings cold water into the tank.
- Heating Elements (Electric Heaters): Heat the water.
- Thermocouple/Pilot Light Assembly (Gas Heaters): Ignites the gas and keeps it lit.
- Gas Valve (Gas Heaters): Controls the gas flow.
- Temperature and Pressure Relief (T&P) Valve: Releases excess pressure and temperature.
- Anode Rod: Protects the tank from corrosion.
- Thermostat: Regulates the water temperature.
- Drain Valve: Used to drain the tank for maintenance.
Having a clear understanding of these parts will make the troubleshooting process significantly easier.
Step-by-Step Troubleshooting: No Hot Water Woes
Let's tackle the common issue of no hot water. Follow these steps carefully:
Step 1: Check the Basics
This might sound obvious, but start with the simplest checks:
- Is the Water Heater Turned On? Verify that the power switch for electric heaters or the gas valve for gas heaters is in the "ON" position.
- Check the Circuit Breaker (Electric Heaters): Go to your electrical panel and check if the circuit breaker for the water heater has tripped. If it has, reset it. If it trips again immediately, do not continue resetting it – this indicates a short circuit, and you'll need a professional electrician.
- Check the Gas Supply (Gas Heaters): Ensure that your gas supply is turned on. Check other gas appliances to confirm that gas is flowing to your home.
If these simple checks resolve the issue, congratulations! If not, proceed to the next steps.
Step 2: Inspect the Pilot Light (Gas Heaters Only)
If you have a gas water heater, a common culprit is a pilot light that has gone out. Here's how to check and relight it:
- Locate the Pilot Light Assembly: Use your Reliance Water Heater Parts Diagram to identify the pilot light assembly. It's usually located near the bottom of the heater.
- Follow the Lighting Instructions: Most gas water heaters have lighting instructions printed directly on the unit. Carefully follow these instructions. Typically, you'll need to turn the gas valve to the "Pilot" setting, press and hold the reset button while lighting the pilot light, and continue holding the button for a minute or so after the pilot light ignites.
- Observe the Pilot Light: Once lit, the pilot light should remain lit. If it goes out immediately, the thermocouple (a safety device) might be faulty.
Safety Note: If you smell gas at any point, stop immediately and call your gas company or a qualified HVAC technician. Do not attempt to relight the pilot light yourself if you smell gas.
Step 3: Testing the Heating Elements (Electric Heaters Only)
If you have an electric water heater and the circuit breaker is not tripping, one or both of the heating elements might be faulty. Here's how to test them:
- Turn Off the Power: Absolutely crucial! Turn off the circuit breaker for the water heater at the electrical panel. Double-check that the power is off using a non-contact voltage tester.
- Locate the Heating Elements: Refer to your Reliance Water Heater Parts Diagram. Electric water heaters typically have two heating elements: an upper and a lower element. They are usually located behind access panels on the side of the tank.
- Remove the Access Panels: Carefully remove the access panels, exposing the heating elements and their wiring.
- Insulate Live Terminals: Cover the live terminals with electrical tape. The water heater can have residual voltage even after power is turned off.
- Test the Elements with a Multimeter: Use a multimeter set to the ohms (Ω) setting. Disconnect the wires from one of the heating element terminals. Place one probe of the multimeter on one terminal of the heating element and the other probe on the other terminal.
- Check the Resistance: A good heating element will typically show a resistance reading between 10 and 20 ohms. A reading of infinity (OL) indicates a burned-out element. A reading of zero indicates a short circuit.
- Repeat for the Second Element: Repeat the testing process for the other heating element.
If either heating element is faulty, it will need to be replaced. Consider professional help if you're uncomfortable working with electrical wiring.
Step 4: Check the Thermostat
The thermostat regulates the water temperature. A faulty thermostat can prevent the heating elements (electric) or gas valve (gas) from activating.
- Locate the Thermostat: Use your Reliance Water Heater Parts Diagram to find the thermostat. Electric water heaters usually have two thermostats (one for each element). Gas water heaters typically have one thermostat dial.
- Electric Water Heater Thermostat Test: Again, turn off power to the water heater via the circuit breaker. Use a multimeter to check for continuity. Remove the wires to the thermostats and using the multimeter, determine the continuity across the terminals. Replace thermostats if there is no continuity.
- Gas Water Heater Thermostat: For gas water heaters, the thermostat is often part of the gas valve assembly. Start by ensuring the thermostat dial is set to a reasonable temperature (e.g., 120°F). Sometimes, the thermostat can malfunction and prevent the gas valve from opening. Replacing the thermostat is typically part of replacing the entire gas valve assembly and requires professional assistance.
Step 5: Examine the Temperature and Pressure Relief (T&P) Valve
The T&P valve is a safety device that releases excess pressure and temperature. If it's constantly leaking, it could indicate a problem with the water heater's pressure or temperature. However, a single instance of it leaking is often normal and is simply doing its job when pressure or temperature rises beyond normal operating parameters.
- Locate the T&P Valve: Refer to your Reliance Water Heater Parts Diagram. It's usually located on the top or side of the water heater.
- Check for Leaks: Inspect the valve for any signs of leakage.
- Test the Valve: Carefully lift the lever on the T&P valve for a few seconds. Water should flow freely from the discharge pipe. When you release the lever, the valve should snap shut and stop leaking.
If the T&P valve continues to leak after testing, it may need to be replaced. Replacing a T&P valve is a relatively simple DIY task, but ensure you turn off the water supply and drain the tank partially before attempting it.
Step 6: Check the Anode Rod
The anode rod is a sacrificial metal rod that protects the steel tank from corrosion. Over time, it dissolves. A severely corroded anode rod can contribute to water heater problems.
- Locate the Anode Rod: Consult your Reliance Water Heater Parts Diagram. The anode rod is typically located under a hexagonal plug on the top of the water heater.
- Inspect the Anode Rod: This requires shutting off the water supply to the tank, draining some of the water, and unscrewing the anode rod. This can be difficult, as the rod often corrodes in place. A heavily corroded anode rod should be replaced.
Replacing the anode rod is a good preventative maintenance measure to extend the life of your water heater.
When to Call a Professional
While many water heater problems can be addressed with DIY troubleshooting, there are situations where professional intervention is crucial:
- Gas Leaks: If you smell gas at any point, evacuate immediately and call your gas company or a qualified HVAC technician.
- Electrical Problems: If the circuit breaker repeatedly trips, or if you are uncomfortable working with electrical wiring, call a qualified electrician.
- Tank Leaks: If you notice water leaking from the tank itself (not from connections), the tank is likely corroded and needs to be replaced. This is a job for a professional plumber.
- Complex Gas Valve Issues: If you suspect a problem with the gas valve assembly, do not attempt to repair it yourself. This requires specialized knowledge and tools.
- You're Unsure: If you've followed these troubleshooting steps and are still unsure of the problem, or if you're uncomfortable performing any of the repairs, it's always best to call a qualified plumber.
Remember, safety is paramount. Working with gas and electricity can be dangerous if you're not properly trained. When in doubt, call a professional.
Preventative Maintenance: Avoiding Future Headaches
Regular maintenance can help prevent many water heater problems and extend the life of your appliance:
- Flush the Tank Annually: Draining sediment from the tank prevents buildup that can reduce efficiency and damage the heating elements.
- Inspect the Anode Rod: Check the anode rod every few years and replace it as needed.
- Check the T&P Valve: Test the T&P valve annually to ensure it's functioning properly.
- Insulate the Water Heater: Insulating the water heater can reduce heat loss and lower energy bills.
By understanding the basics of your Reliance water heater, using the Reliance Water Heater Parts Diagram effectively, and following these troubleshooting steps, you can often diagnose and resolve common problems yourself. Remember to prioritize safety and when in doubt, call a qualified professional. With a little knowledge and effort, you can keep your hot water flowing smoothly for years to come.