Residential Central Air Conditioning System Diagram
One of the most frustrating issues a homeowner can face is a central air conditioning system that's blowing warm air instead of cool air. This can happen suddenly and leave you sweltering in the heat. Before calling for expensive professional help, there are several troubleshooting steps you can take to diagnose the problem using a basic understanding of your system's components. This guide will walk you through a methodical approach, separating DIY fixes from situations requiring a qualified HVAC technician.
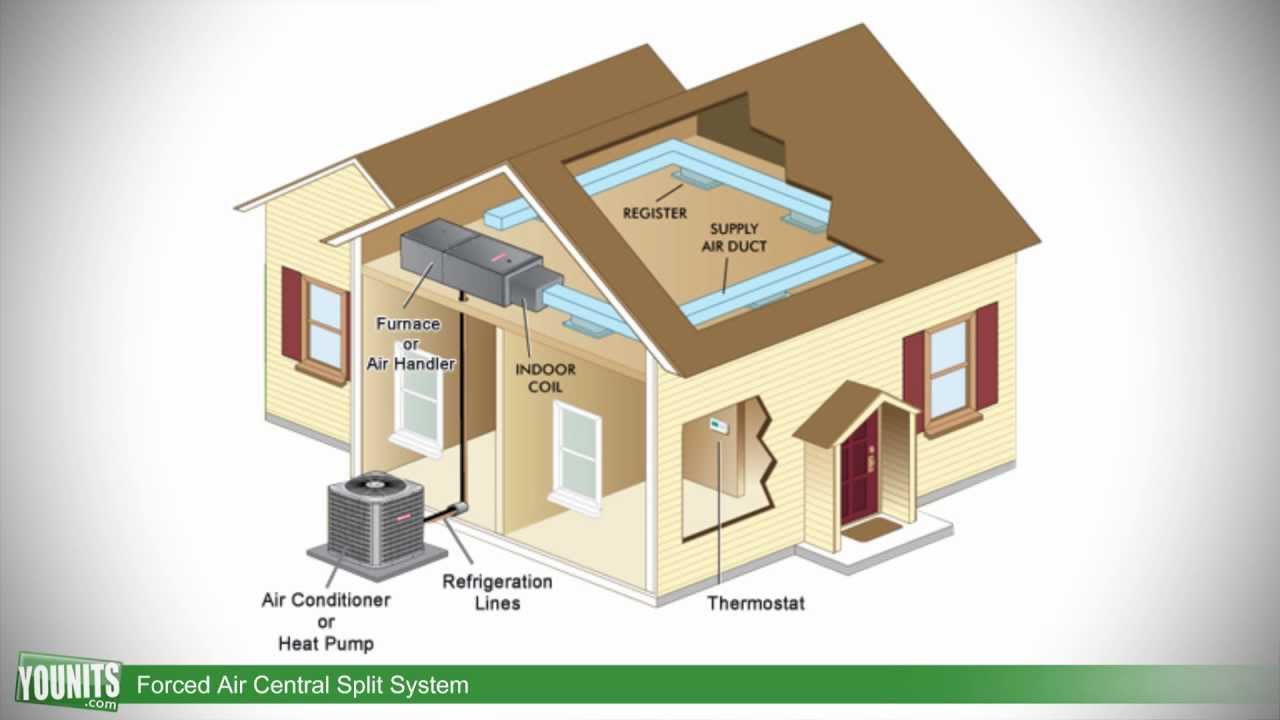
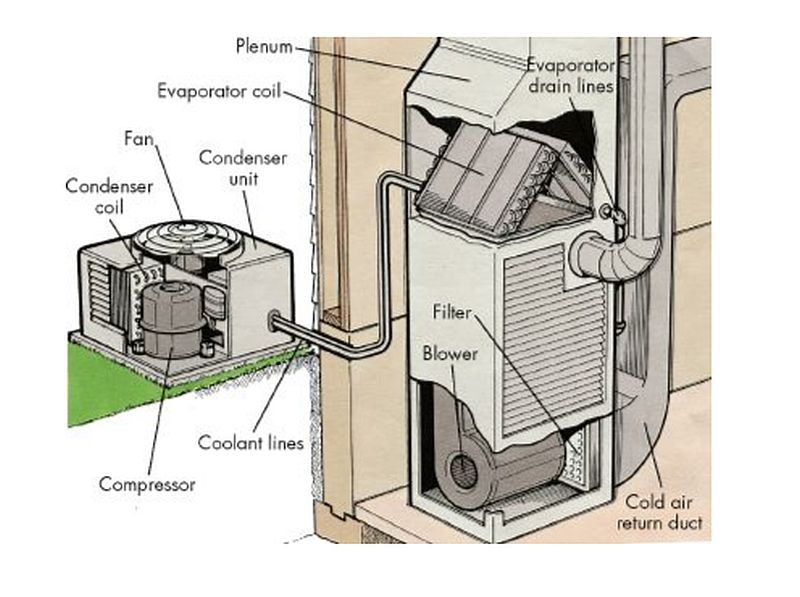
Understanding Your Central AC System: A Simplified Diagram
Think of your central AC system as having two main parts: the indoor unit and the outdoor unit. The indoor unit, usually containing the evaporator coil and blower fan, is often integrated with your furnace. The outdoor unit, called the condenser, contains the compressor and condenser fan. These two units are connected by refrigerant lines that carry refrigerant between them.
Here's a simplified breakdown of the key components:
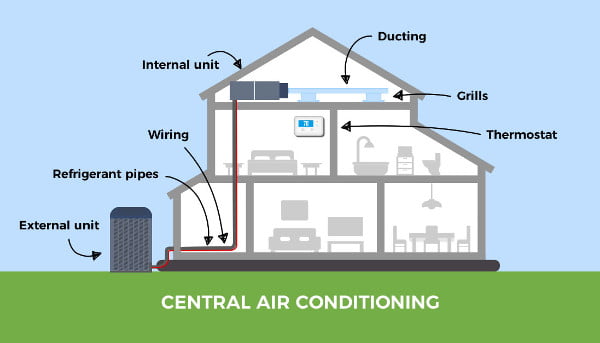
- Thermostat: Your control panel. Sends signals to the system to turn on or off, and sets the desired temperature.
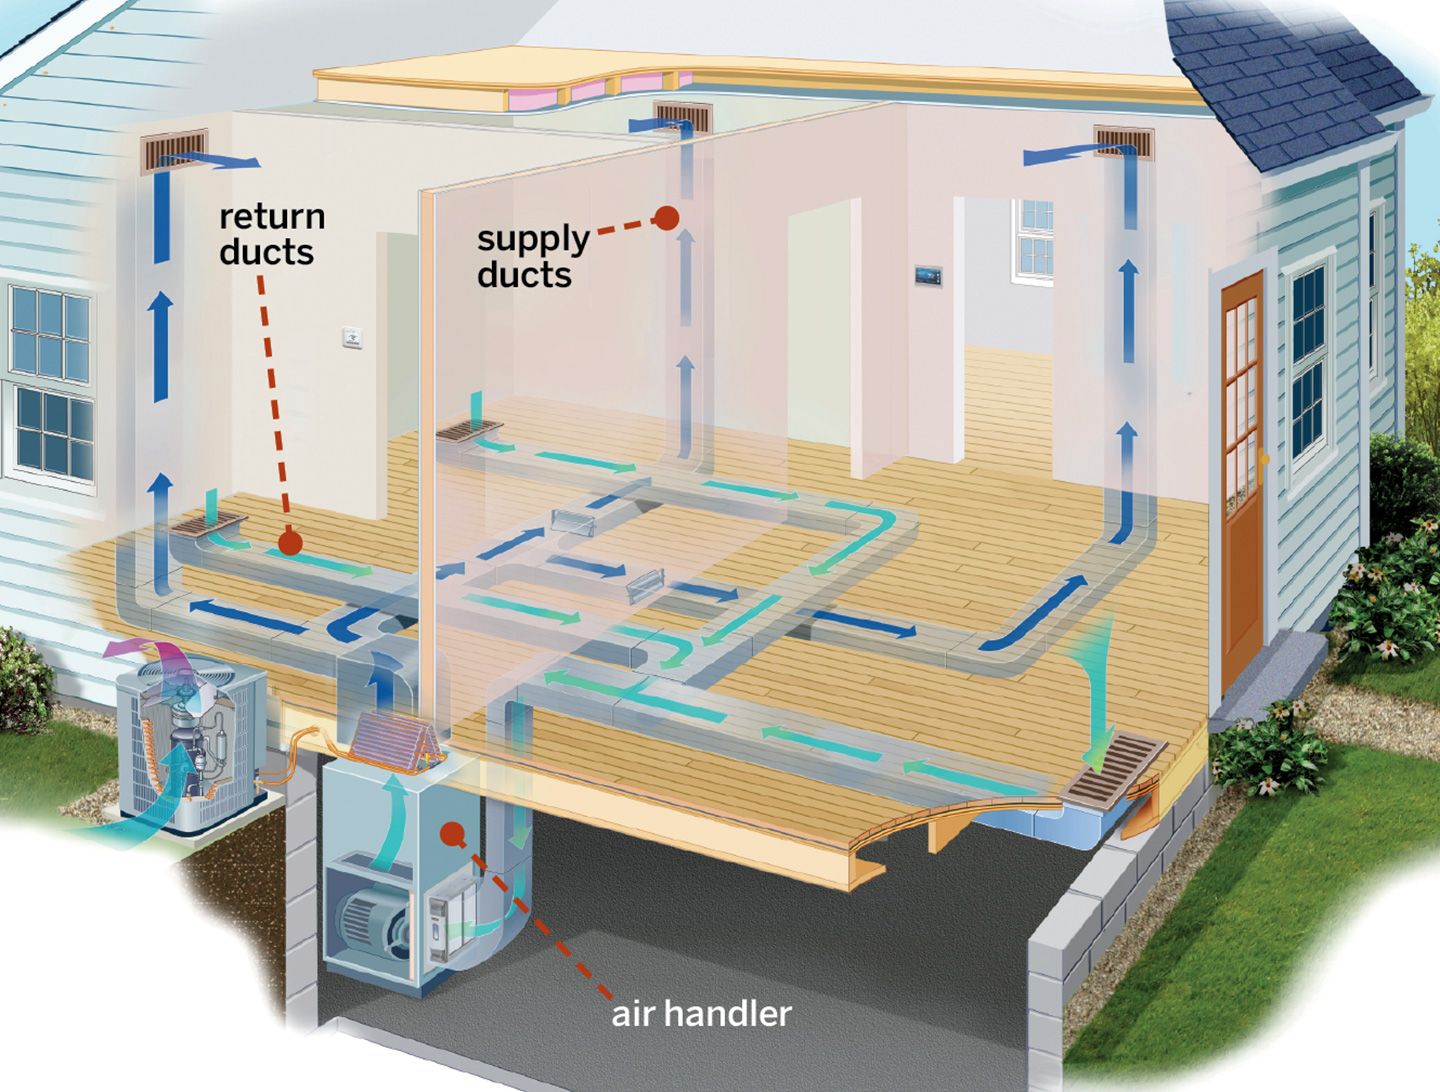
- Air Handler (Indoor Unit): Houses the blower fan that circulates air throughout your home and the evaporator coil that cools the air.
- Evaporator Coil: Located inside the air handler. Refrigerant absorbs heat from the air passing over it.
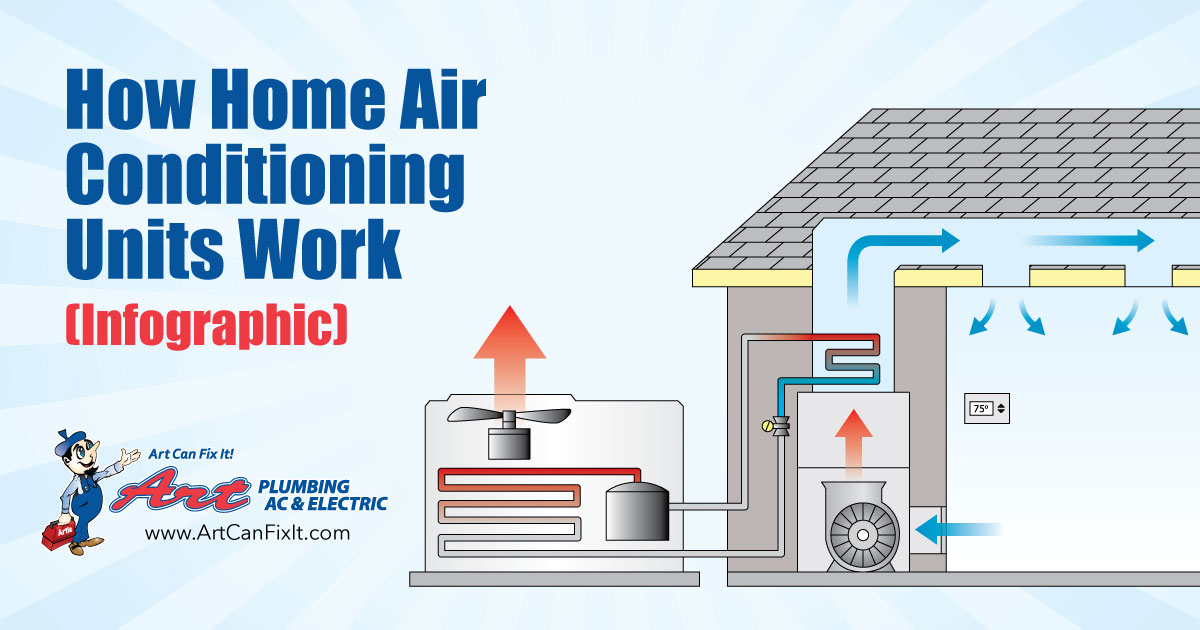
- Condenser (Outdoor Unit): Releases the heat absorbed by the refrigerant to the outside air. Contains the compressor and condenser fan.
- Compressor: The heart of the system. Pumps refrigerant through the system.
- Condenser Fan: Cools the condenser coil by blowing air over it.
- Refrigerant Lines: Copper pipes that carry refrigerant between the indoor and outdoor units.
- Air Filter: Located in the air handler. Removes dust and debris from the air.
- Ductwork: The network of channels that distributes cooled air throughout your home.
Step-by-Step Troubleshooting: Warm Air Blues
Follow these steps in order, checking the easiest things first. Always turn off the power to the system at the breaker box before attempting any repairs, except when checking the thermostat.
Step 1: Thermostat Check (No Tools Required)
The thermostat is the first place to start. It sounds obvious, but double-check these common issues:
- Mode: Is the thermostat set to "Cool" or "Auto"? Make sure it's not set to "Heat" or "Fan Only."
- Temperature Setting: Is the set temperature significantly lower than the current room temperature? Try lowering the set temperature a few degrees to ensure the AC is actually being *called* to turn on.
- Battery: If your thermostat is battery-powered, ensure the batteries are fresh. A low battery can cause erratic behavior.
- Programming: If you have a programmable thermostat, verify that the programming is correct. It might be set to a higher temperature during the day or not be set to cool at all during certain hours.
DIY Action: Correct any thermostat settings or replace the batteries. Wait a few minutes to see if the AC starts cooling.
Step 2: Air Filter Inspection (No Tools Required)
A clogged air filter is a very common cause of AC problems. A dirty filter restricts airflow, reducing the system's efficiency and potentially causing the evaporator coil to freeze.
- Location: The air filter is usually located inside the air handler or at a return air vent.
- Visual Check: Remove the filter and hold it up to the light. If you can't see light through it, it's definitely dirty.
DIY Action: Replace the dirty air filter with a new one of the correct size and type. Check your owner's manual or the filter itself for the correct size. *This simple step can often make a big difference.*
Step 3: Outdoor Unit Inspection (No Tools Required - but be careful!)
Carefully inspect the outdoor unit (condenser). Look for these common problems:
- Obstructions: Are there any obstructions blocking airflow around the unit, such as bushes, weeds, or debris? The unit needs plenty of clear space to exhaust heat.
- Bent Fins: Are the metal fins on the condenser coil bent or damaged? Bent fins restrict airflow.
- Ice: Is there ice forming on the refrigerant lines or the outdoor unit itself? This can indicate a refrigerant problem or airflow issue. If you see ice, turn the system off immediately!
DIY Action: Clear any obstructions around the unit, giving it at least two feet of clearance on all sides. Gently straighten bent fins with a fin comb (available at most hardware stores). *Do not use a sharp object that could puncture the coils.* If you see ice, DO NOT attempt to melt it with hot water. Turn the system off and let it thaw naturally.
Step 4: Circuit Breaker Check (No Tools Required, but be careful!)
A tripped circuit breaker can cut power to the entire AC system or just the outdoor unit. *Always exercise caution when working with electrical panels.*
- Location: Locate your electrical panel.
- Identification: Identify the breaker(s) labeled "AC," "Air Conditioner," or "Condenser."
- Check: Look for a breaker that is in the "tripped" (middle) position. If you find a tripped breaker, flip it all the way to the "off" position, then back to the "on" position.
Important Safety Note: If the breaker trips again immediately, do *not* continue to reset it. This indicates a serious electrical problem that requires professional attention.
DIY Action: Reset the tripped breaker. Wait a few minutes to see if the AC starts cooling.
Step 5: Condenser Fan Operation (Requires Observation)
With the system running (thermostat set to cool, breaker on), observe the outdoor unit. The condenser fan should be spinning. If it's not:
- Is it spinning at all? If not, the motor may be faulty, or there could be an electrical issue.
- Is it spinning slowly or erratically? This could indicate a failing motor.
Important Safety Note: Never stick your hand or any object into the condenser fan while it's running.
DIY Action: Very carefully try to spin the fan with a long stick when the unit is OFF. If it spins freely, the motor might be getting power but not starting. If it doesn't spin freely, the motor is likely seized. Replacing a condenser fan motor is generally a job for an HVAC technician.
Step 6: Check for Obvious Leaks (Requires Observation)
Carefully inspect the refrigerant lines (the copper pipes connecting the indoor and outdoor units) for any signs of leaks, such as:
- Oily Residue: A noticeable oily substance on the pipes or connections.
- Hissing Sound: A faint hissing sound coming from the pipes.
Important Safety Note: Refrigerant is harmful if inhaled or comes into contact with skin. Do not attempt to repair refrigerant leaks yourself.
DIY Action: There's no DIY action for refrigerant leaks. If you suspect a leak, call a qualified HVAC technician immediately.
Step 7: Evaporator Coil Icing (Requires Observation - Inside Air Handler)
If the evaporator coil (inside the air handler) freezes up, it will restrict airflow and prevent cooling. To check for this, you'll need to access the evaporator coil, which often requires removing an access panel on the air handler. Turn off the power to the system at the breaker box *before* removing any panels.
- Visual Inspection: Look for a thick layer of ice on the evaporator coil.
Important Safety Note: Be careful when removing access panels. There may be sharp edges inside the air handler.
DIY Action: If you find ice, turn off the AC and set the fan to "On" (not "Auto") to circulate air and help melt the ice. Once the ice has melted (this may take several hours), investigate the cause. The most common causes are:
- Dirty Air Filter: (Already addressed in Step 2)
- Restricted Airflow: Check for blocked return air vents or closed supply air registers.
- Refrigerant Leak: (Addressed in Step 6)
If the evaporator coil freezes up again after melting the ice and addressing potential airflow restrictions, you likely have a refrigerant leak, which requires professional attention.
Step 8: Ductwork Inspection (No Tools Required)
Check your ductwork for any obvious issues that could be causing a loss of cooled air:
- Disconnected Ducts: Look for any sections of ductwork that have become disconnected. These are most common in attics or crawl spaces.
- Damaged Ductwork: Look for any signs of damage to the ductwork, such as holes or tears.
DIY Action: Reconnect any disconnected ductwork using duct tape (though metal tape is preferred for a more permanent fix). Seal any small holes or tears in the ductwork with duct tape. For larger damage, it may be best to consult a professional.
When to Call a Professional HVAC Technician
If you've gone through these troubleshooting steps and your AC is still not cooling properly, it's time to call a qualified HVAC technician. Here are some situations where professional help is definitely needed:
- Refrigerant Leaks: As mentioned earlier, refrigerant leaks require specialized equipment and training to repair safely and effectively.
- Compressor Problems: The compressor is the most expensive component in the AC system. Diagnosing and repairing compressor issues requires specialized knowledge and equipment.
- Electrical Problems: If you suspect an electrical problem (e.g., the circuit breaker keeps tripping), it's best to leave it to a professional electrician or HVAC technician.
- Frozen Evaporator Coil (Recurring): If the evaporator coil keeps freezing up even after you've addressed potential airflow restrictions, it's likely due to a refrigerant leak or other underlying problem.
- Older Systems: If your AC system is older than 10-15 years and is experiencing frequent problems, it might be more cost-effective to replace it with a new, more efficient system.
- You're Uncomfortable or Unsure: If you're not comfortable performing any of these troubleshooting steps, or if you're unsure about what you're doing, it's always best to err on the side of caution and call a professional.
Prevention is Key
To help prevent AC problems, consider these preventative measures:
- Regular Air Filter Changes: Change your air filter every 1-3 months, depending on the type of filter and the air quality in your home.
- Annual Maintenance: Schedule an annual maintenance checkup with a qualified HVAC technician. They can clean the coils, check the refrigerant levels, and inspect the system for any potential problems.
- Keep the Outdoor Unit Clean: Regularly clear any debris or obstructions from around the outdoor unit.
- Use a Programmable Thermostat: A programmable thermostat can help you save energy and reduce wear and tear on your AC system.
By understanding the basics of your central AC system and following these troubleshooting steps, you can often diagnose and fix simple problems yourself, saving you time and money. However, always remember to prioritize safety and call a professional when necessary. A little knowledge and proactive maintenance can go a long way in keeping your home cool and comfortable.

:max_bytes(150000):strip_icc()/what-are-central-air-conditioners-1152645_V2-390c6f1f6ca14b4ebc59426f226a78a8.png)