Rheem Tonnage By Model Number
One of the most frustrating issues homeowners face is an air conditioner that doesn't seem to be cooling effectively. You might notice it running constantly, struggling to maintain a comfortable temperature, or simply not blowing cold air as expected. Often, this problem stems from an incorrectly sized air conditioner, and understanding your Rheem unit's tonnage is the first step towards diagnosing the issue.
Understanding Rheem Model Numbers and Tonnage
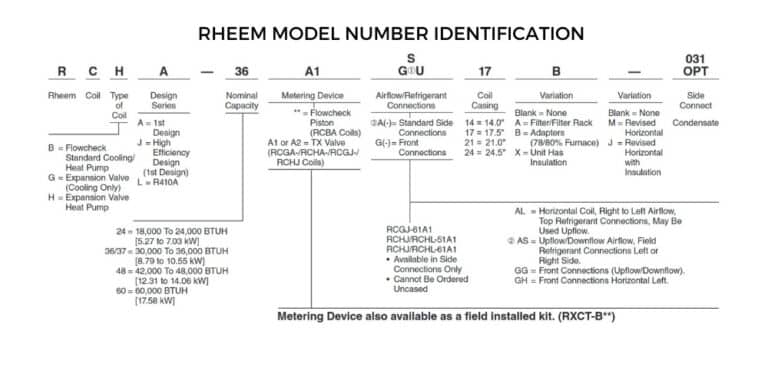
Rheem, like other HVAC manufacturers, embeds the tonnage information within the unit's model number. Knowing how to decipher this code is crucial for verifying if your unit is the right size for your home. A unit that's too small will struggle to cool adequately, leading to high energy bills and constant running. Conversely, a unit that's too large will cycle on and off frequently, potentially causing humidity issues and premature wear and tear.
Deciphering the Rheem Model Number
Rheem model numbers can seem complex, but the tonnage information is usually found within a specific section. Here's a general breakdown, although slight variations may exist depending on the specific model and year of manufacture. We'll use a hypothetical model number for demonstration: RA1336AJ1NA
- First Two Letters (RA): These typically indicate the type of unit (e.g., RA for Residential Air Conditioner).
- Next Two Digits (13): These often represent the SEER rating (Seasonal Energy Efficiency Ratio). This isn't directly related to tonnage but indicates energy efficiency.
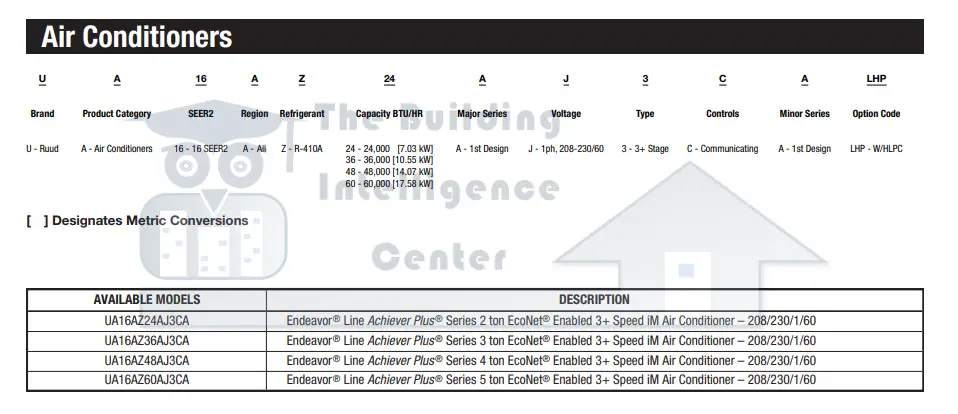
- Following Two Digits (36): This is where the tonnage information usually resides. This number, divided by 12, will give you the tonnage. In our example, 36 / 12 = 3 tons.
- Remaining Characters (AJ1NA): These characters usually represent other specifications such as the specific series, voltage, or manufacturing variations. These are not relevant for determining tonnage.
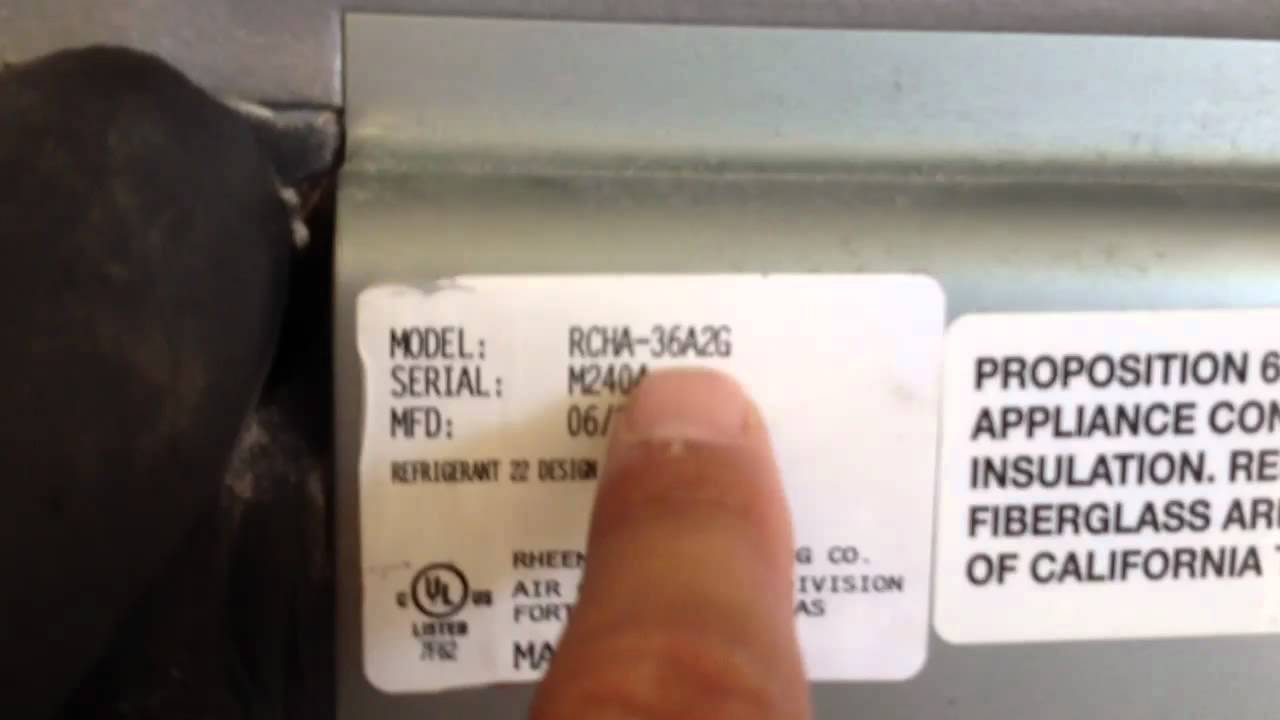
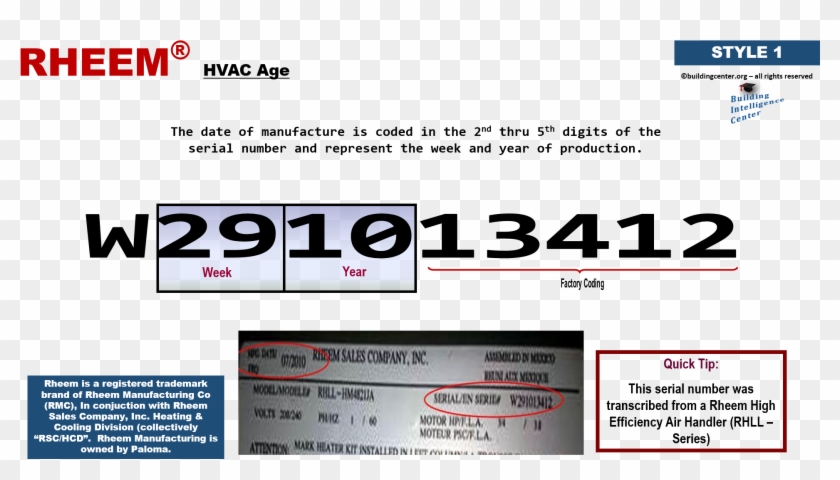
Important Note: Always refer to the unit's data plate for the most accurate information. The data plate is a metal or plastic tag attached to the unit, typically on the exterior of the condenser. It contains the official model number and other critical specifications.
Finding the Data Plate
Locating the data plate is usually straightforward:
- Outdoor Condenser Unit: Look on the side of the unit, often near the service valves or electrical connections.
- Indoor Air Handler/Furnace: The data plate is typically inside the unit, often on the blower compartment door or near the evaporator coil. You may need to remove an access panel to view it. Always disconnect power to the indoor unit at the breaker before removing any panels.
Troubleshooting Cooling Problems: A Step-by-Step Guide
Once you've identified your Rheem unit's tonnage, you can begin troubleshooting cooling problems. Here's a systematic approach:
Step 1: Verify Thermostat Settings
This might seem obvious, but it's the most common culprit. Ensure your thermostat is set to "Cool" mode and the temperature is set lower than the current room temperature. Also, check the batteries in your thermostat – a low battery can cause erratic behavior.
Step 2: Inspect the Air Filter
A dirty air filter is a major cause of reduced airflow and poor cooling performance. Replace the air filter with a clean one. Aim to change your air filter every 1-3 months, depending on usage and air quality. A clogged filter forces your system to work harder, reducing efficiency and potentially damaging components.
Step 3: Check the Outdoor Condenser Unit
Carefully inspect the outdoor condenser unit for obstructions. Ensure there are no bushes, vines, or debris blocking airflow around the unit. Clear away any leaves, grass clippings, or other obstructions. A minimum of 2-3 feet of clearance around the unit is recommended.
Also, examine the condenser fins (the thin metal fins surrounding the unit). These fins can become bent or damaged, restricting airflow. You can carefully straighten bent fins using a fin comb (available at most hardware stores). Be gentle to avoid further damage.
Step 4: Inspect the Indoor Unit (Evaporator Coil)
Caution: Disconnect power to the indoor unit at the breaker before proceeding. Access the evaporator coil (usually located inside the air handler or furnace). Check for ice buildup on the coil. If ice is present, this indicates a potential issue with airflow, refrigerant charge, or a malfunctioning component. Turn off the AC and run only the fan to melt the ice. Once melted, proceed with further troubleshooting.
Also, visually inspect the coil for dirt and debris. A dirty coil can significantly reduce cooling efficiency. Do not attempt to clean the coil yourself without proper training and equipment. You could damage the delicate fins. If the coil is visibly dirty, it's best to call a professional.
Step 5: Check the Ductwork
Inspect your ductwork for any visible leaks or damage. Look for disconnected sections, tears, or holes. Seal any minor leaks with duct tape (not regular tape). For more significant damage or leaks in hard-to-reach areas, it's best to consult a professional.
Step 6: Verify Breakers and Fuses
Check the circuit breakers for both the indoor and outdoor units. Ensure the breakers are in the "On" position and haven't tripped. Also, check any fuses associated with the HVAC system. If a breaker trips repeatedly, or a fuse blows frequently, this indicates a potential electrical problem requiring professional attention.
Determining if Your Unit is the Correct Size
After performing the above troubleshooting steps, if your AC still struggles to cool effectively, the unit might be improperly sized. Here's how to determine if the tonnage is appropriate for your home:
Rule of Thumb: Square Footage to Tonnage
A general rule of thumb is that 1 ton of cooling capacity is needed for every 400-600 square feet of living space. However, this is a *very* general guideline and doesn't account for factors such as climate, insulation, window size and orientation, ceiling height, and number of occupants.
Here's a simplified chart:
- 800 - 1200 sq ft: 2 ton
- 1200 - 1800 sq ft: 3 ton
- 1800 - 2400 sq ft: 4 ton
- 2400 - 3000 sq ft: 5 ton
Example: If you have a 1500 square foot home, a 3-ton unit would likely be appropriate, assuming average insulation and climate conditions. However, if you live in a hot climate with poor insulation, you might need a larger unit.
Factors Affecting Tonnage Requirements
The square footage guideline is just a starting point. Consider these factors:
- Climate: Hotter climates require more cooling capacity.
- Insulation: Good insulation reduces the cooling load.
- Window Size and Orientation: Large windows, especially those facing south or west, increase the cooling load.
- Ceiling Height: Higher ceilings increase the volume of air that needs to be cooled.
- Number of Occupants: More people generate more heat.
- Appliances: Heat-generating appliances like ovens and dryers increase the cooling load.
- Ductwork Design and Efficiency: Poorly designed or leaky ductwork reduces cooling efficiency.
Performing a Manual J Calculation
The most accurate way to determine the correct AC tonnage for your home is to perform a Manual J calculation. This is a detailed analysis that takes into account all the factors listed above. Manual J calculations are typically performed by HVAC professionals. While there are online tools that claim to provide Manual J calculations, these are often inaccurate and should not be relied upon for critical decisions.
When to Call a Professional
While many troubleshooting steps can be performed safely by homeowners, certain issues require professional intervention:
- Refrigerant Leaks: Refrigerant handling requires specialized equipment and certification. Do not attempt to add refrigerant yourself.
- Electrical Problems: Any electrical issues beyond checking breakers and fuses should be handled by a qualified electrician.
- Compressor Problems: The compressor is the heart of the AC unit. Diagnosing and repairing compressor issues requires specialized knowledge and tools.
- Dirty Evaporator Coil: Cleaning the evaporator coil requires specialized equipment and techniques to avoid damaging the delicate fins.
- Suspected Improper Tonnage: If you suspect your AC unit is the wrong size, consult with a qualified HVAC professional for a Manual J calculation and recommendations.
- Ice Buildup on Evaporator Coil: While melting the ice is a DIY step, the underlying cause needs to be diagnosed by a professional (e.g., refrigerant leak, airflow restriction, faulty metering device).
Signs that warrant a professional call immediately:
- Burning smell coming from the unit
- Loud, unusual noises
- Visible smoke
- Electrical sparking
Conclusion
Troubleshooting air conditioning problems can seem daunting, but understanding your Rheem unit's tonnage and following a systematic approach can help you identify and resolve many common issues. Remember to prioritize safety and never attempt repairs you're not comfortable with. When in doubt, always consult with a qualified HVAC professional. By understanding your system and knowing when to seek expert help, you can keep your home cool and comfortable all season long.